
Owner's Manual
Page 2
Save your old thermostat. round head screws • Wallplate (CT87A) or subbase (CT87B, CT87J) • Cover ring (select models only). Turn off power to . Remove the cover of your receipt and identify the following parts: • CT87 Thermostat • Screws: two 1-in . Mercury switch location. sheet metal screws, two 1/2-in . Gather these tools...
Save your old thermostat. round head screws • Wallplate (CT87A) or subbase (CT87B, CT87J) • Cover ring (select models only). Turn off power to . Remove the cover of your receipt and identify the following parts: • CT87 Thermostat • Screws: two 1-in . Mercury switch location. sheet metal screws, two 1/2-in . Gather these tools...

Owner's Manual
Page 3
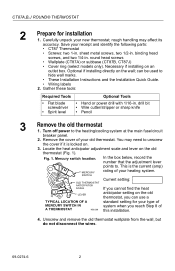
... the wall (Fig. 3). Wrapping wires. Labeling wires. WIRES THROUGH WALL OPENING If this control, or of this thermostat is replacing a control that came with the CT87. COVER RING WALLPLATE NO. 4 X 1 INCH SHEET METAL SCREWS (2) 3 THERMOSTAT WIRING OPENING M20188 69-0274-6 stat (Fig. 2). Contact your old control in a sealed tube. 4 Install the...
... the wall (Fig. 3). Wrapping wires. Labeling wires. WIRES THROUGH WALL OPENING If this control, or of this thermostat is replacing a control that came with the CT87. COVER RING WALLPLATE NO. 4 X 1 INCH SHEET METAL SCREWS (2) 3 THERMOSTAT WIRING OPENING M20188 69-0274-6 stat (Fig. 2). Contact your old control in a sealed tube. 4 Install the...

Owner's Manual
Page 6
... Wire Label R, RH, 4, V Rc, R W, W1, H Y, Y1, M G, F B O See Fig. 13 Connect to CT87A R W Y See Fig. 9 Connect to Connect to CT87B CT87J RH R Rc W W Y Y G G B* O* P *Never attach wires to fit the wires underneath the terminal screws (Fig. 7). Push any excess wire back into the wall. 69... . [11 mm] BARRIER M1279 3. Use the wiring cross-reference table below to match each wire beneath its corresponding terminal on the CT87 wallplate or subbase. Fig. 7. Fitting wires under the terminal screws. Loosen the terminal screws and slip each old thermostat wire with its...
... Wire Label R, RH, 4, V Rc, R W, W1, H Y, Y1, M G, F B O See Fig. 13 Connect to CT87A R W Y See Fig. 9 Connect to Connect to CT87B CT87J RH R Rc W W Y Y G G B* O* P *Never attach wires to fit the wires underneath the terminal screws (Fig. 7). Push any excess wire back into the wall. 69... . [11 mm] BARRIER M1279 3. Use the wiring cross-reference table below to match each wire beneath its corresponding terminal on the CT87 wallplate or subbase. Fig. 7. Fitting wires under the terminal screws. Loosen the terminal screws and slip each old thermostat wire with its...

Owner's Manual
Page 10
... anticipator allows the thermostat to the number that is shown on beyond the thermostat set the system switch to the farthest point left. 2. If your CT87 has a subbase, set temperature, move the heat anticipator pointer to maintain accurate temperature control. 1. The heating system should stop. Using a pencil point, move the anticipator...
... anticipator allows the thermostat to the number that is shown on beyond the thermostat set the system switch to the farthest point left. 2. If your CT87 has a subbase, set temperature, move the heat anticipator pointer to maintain accurate temperature control. 1. The heating system should stop. Using a pencil point, move the anticipator...

Owner's Manual
Page 11
... the cooling system when the outdoor temperature is tested, wait five minutes before switching to Cool. If your CT87 has a subbase, set the temperature, turn the dial until the pointer on the CT87J model. 2. CT87B, J switches Switch System Fan Setting Result Cool Off The thermostat controls your heating system. Both the heating...
... the cooling system when the outdoor temperature is tested, wait five minutes before switching to Cool. If your CT87 has a subbase, set the temperature, turn the dial until the pointer on the CT87J model. 2. CT87B, J switches Switch System Fan Setting Result Cool Off The thermostat controls your heating system. Both the heating...
