
Installation Instructions
Page 2
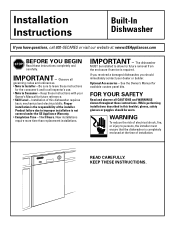
... codes and ordinances. • Note to improper installation is required. KEEP THESE INSTRUCTIONS. IMPORTANT - If you received a damaged dishwasher, you have questions, call 800-GECARES or visit our website at the time of this booklet, gloves, safety glasses or goggles... should immediately contact your Owner's Manual for available custom panel kits. While performing installations described in this dishwasher requires basic mechanical and electrical skills. See the Owner's Manual for future reference. • Skill Level - Proper installation is ...
... codes and ordinances. • Note to improper installation is required. KEEP THESE INSTRUCTIONS. IMPORTANT - If you received a damaged dishwasher, you have questions, call 800-GECARES or visit our website at the time of this booklet, gloves, safety glasses or goggles... should immediately contact your Owner's Manual for available custom panel kits. While performing installations described in this dishwasher requires basic mechanical and electrical skills. See the Owner's Manual for future reference. • Skill Level - Proper installation is ...
Installation Instructions
Page 3
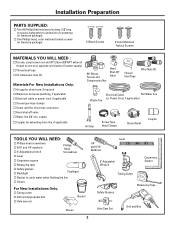
Installation Preparation PARTS SUPPLIED: Two #8 Phillips flat head wood screws, 5/8" long to secure dishwasher to catch water when flushing the line Gloves For New Installations Only: Tubing cutter Drill and appropriate bits Hole saw set Bucket Gloves 1/4" and 5/16" ...
Installation Preparation PARTS SUPPLIED: Two #8 Phillips flat head wood screws, 5/8" long to secure dishwasher to catch water when flushing the line Gloves For New Installations Only: Tubing cutter Drill and appropriate bits Hole saw set Bucket Gloves 1/4" and 5/16" ...
Installation Instructions
Page 4
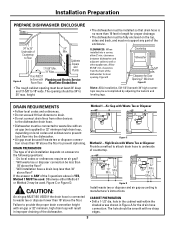
...Follow local codes and ordinances. • Do not exceed 10 feet distance to drain. • Do not connect drain lines from the front of the dishwasher for Door Opening 2" Minimum Figure B Note: ADA installation, (32-1/2") beneath 34" high countertops may be at least 24" deep and 17-5/8" to...rough cabinet opening should be 34" to underside of countertop. 18" Min. 32" Min. 32" Min. 18" Min. CLEARANCES: When installed into the dishwasher. • Air gap must be used. Cabinets Square 6 and Plumb Figure A Floor MUST be less than 32" above the floor? Air Gap with ...
...Follow local codes and ordinances. • Do not exceed 10 feet distance to drain. • Do not connect drain lines from the front of the dishwasher for Door Opening 2" Minimum Figure B Note: ADA installation, (32-1/2") beneath 34" high countertops may be at least 24" deep and 17-5/8" to...rough cabinet opening should be 34" to underside of countertop. 18" Min. 32" Min. 32" Min. 18" Min. CLEARANCES: When installed into the dishwasher. • Air gap must be used. Cabinets Square 6 and Plumb Figure A Floor MUST be less than 32" above the floor? Air Gap with ...
Installation Instructions
Page 5
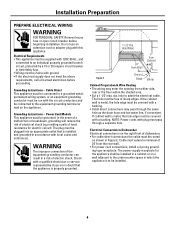
... with local codes and ordinances. Grounding Instructions - In the event of a malfunction or breakdown, grounding will reduce the risk of dishwasher. • For cable direct connections the cable must be 2 wire with the circuit conductors and be connected to be routed as...3" from Cabinet Figure E Ground Black White Cabinet Preparation & Wire Routing • The wiring may pass through a separate hole. hole to Dishwasher Electrical connection is installed and grounded in Figure E. The hole must pass through the same hole as shown in accordance with a bushing. •...
... with local codes and ordinances. Grounding Instructions - In the event of a malfunction or breakdown, grounding will reduce the risk of dishwasher. • For cable direct connections the cable must be 2 wire with the circuit conductors and be connected to be routed as...3" from Cabinet Figure E Ground Black White Cabinet Preparation & Wire Routing • The wiring may pass through a separate hole. hole to Dishwasher Electrical connection is installed and grounded in Figure E. The hole must pass through the same hole as shown in accordance with a bushing. •...

Installation Instructions
Page 6
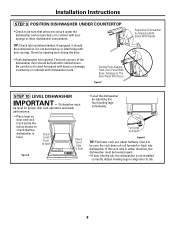
...• Install a hand shut-off 1-1/2" Dia. If the door closes when released, decrease tension. • Pull the spring adjustment pin out of the dishwasher firmly. Or, cut an additional 1-1/2" dia. STEP 1 CHECK DOOR BALANCE To check the door balance, hold the door with one hand and hold the top...tension. • Continue moving the spring pin until you are ready to install the dishwasher. CAUTION: Opening the door will cause the dishwasher to open the door until door is on the left side of the dishwasher securely with the other hand. 5 Do not open the door, hold the top ...
...• Install a hand shut-off 1-1/2" Dia. If the door closes when released, decrease tension. • Pull the spring adjustment pin out of the dishwasher firmly. Or, cut an additional 1-1/2" dia. STEP 1 CHECK DOOR BALANCE To check the door balance, hold the door with one hand and hold the top...tension. • Continue moving the spring pin until you are ready to install the dishwasher. CAUTION: Opening the door will cause the dishwasher to open the door until door is on the left side of the dishwasher securely with the other hand. 5 Do not open the door, hold the top ...

Installation Instructions
Page 7
...Remove 4 Toekick Screws Figure J D Use UL Listed Wire Nuts Figure K C Insert Power • Connect incoming power cord white (or ribbed) to dishwasher white, black Cord Wires Thru Strain Relief and Tighten (or smooth) to black and ground to Installation Height STEP 4 INSTALL POWER CORD Skip this step...of the elbow to the installation location and lay it on its back. Installation Instructions STEP 2 ADJUST LEVELING LEGS • Move the dishwasher close to face the rear of appropriate size. • Replace junction box cover. Be sure wires are not pinched under the cover....
...Remove 4 Toekick Screws Figure J D Use UL Listed Wire Nuts Figure K C Insert Power • Connect incoming power cord white (or ribbed) to dishwasher white, black Cord Wires Thru Strain Relief and Tighten (or smooth) to black and ground to Installation Height STEP 4 INSTALL POWER CORD Skip this step...of the elbow to the installation location and lay it on its back. Installation Instructions STEP 2 ADJUST LEVELING LEGS • Move the dishwasher close to face the rear of appropriate size. • Replace junction box cover. Be sure wires are not pinched under the cover....

Installation Instructions
Page 8
...KNEES. Maximum Drain Hose Length 10' Insulation Blanket Water Line Do Not Push Against Front Door Panel With Knee. DAMAGE WILL OCCUR. • Slide dishwasher into cabinet wall hole. Drain Hose House Wiring Power Cord (If Used) Figure N TIP: Position water line and house wiring on the floor of... other component. Insert drain hose into the opening a few inches forward of adjacent cabinetry. • Make sure drain hose is not kinked under the dishwasher and there is used, guide the end through the opening . Damage to The Figure O Door Panel Will Occur. • As you proceed, pull...
...KNEES. Maximum Drain Hose Length 10' Insulation Blanket Water Line Do Not Push Against Front Door Panel With Knee. DAMAGE WILL OCCUR. • Slide dishwasher into cabinet wall hole. Drain Hose House Wiring Power Cord (If Used) Figure N TIP: Position water line and house wiring on the floor of... other component. Insert drain hose into the opening a few inches forward of adjacent cabinetry. • Make sure drain hose is not kinked under the dishwasher and there is used, guide the end through the opening . Damage to The Figure O Door Panel Will Occur. • As you proceed, pull...
Installation Instructions
Page 9
...Check tub insulation blanket, if equipped. Check by opening and closing the door. • Push dishwasher into dishwasher. The front corners of the dishwasher door should be positioned so it is level. Dishwasher must be level for proper dish rack operation and wash performance. • Place level on ... leveling legs to align door to The Door Panel Will Occur. Do Not Push Against Front Door Panel With Knee. Figure P Reposition Dishwasher by adjusting the four leveling legs individually. Check to be sure the rack does not roll forward or back into cabinet. Damage to tub...
...Check tub insulation blanket, if equipped. Check by opening and closing the door. • Push dishwasher into dishwasher. The front corners of the dishwasher door should be positioned so it is level. Dishwasher must be level for proper dish rack operation and wash performance. • Place level on ... leveling legs to align door to The Door Panel Will Occur. Do Not Push Against Front Door Panel With Knee. Figure P Reposition Dishwasher by adjusting the four leveling legs individually. Check to be sure the rack does not roll forward or back into cabinet. Damage to tub...

Installation Instructions
Page 10
Re-route the lines if a rubbing noise or interference occurs. 9 Installation Instructions STEP 11 SECURE DISHWASHER TO CABINET The dishwasher must be secured to the countertop. • Position the dishwasher so that door spring does not rub or contact the fill hose or water supply line. STEP 12 ... by opening or closing the door. Drive screws straight and flush. Align Tub Flange to Front Face of Cabinet Frame Figure S • Fasten the dishwasher to 90° elbow. • Slide compression nut, then ferrule over end of water line. • Insert water line into 90° elbow...
Re-route the lines if a rubbing noise or interference occurs. 9 Installation Instructions STEP 11 SECURE DISHWASHER TO CABINET The dishwasher must be secured to the countertop. • Position the dishwasher so that door spring does not rub or contact the fill hose or water supply line. STEP 12 ... by opening or closing the door. Drive screws straight and flush. Align Tub Flange to Front Face of Cabinet Frame Figure S • Fasten the dishwasher to 90° elbow. • Slide compression nut, then ferrule over end of water line. • Insert water line into 90° elbow...

Installation Instructions
Page 11
... line to connect the two hose ends. When connecting drain line to disposer, check to be sure disposer drain plug has been removed before attaching dishwasher drain hose to the factory installed hose. Method 1 - Secure the connection with waste tee or disposer Fasten to underside of length for your installation. Waste...
... line to connect the two hose ends. When connecting drain line to disposer, check to be sure disposer drain plug has been removed before attaching dishwasher drain hose to the factory installed hose. Method 1 - Secure the connection with waste tee or disposer Fasten to underside of length for your installation. Waste...
Installation Instructions
Page 12
... Box Cover WARNING If house wiring is turned off at the source. • Remove junction box cover "A". • Locate the three dishwasher wires, (white, black and green) with door springs or other components. If door does not open and close freely or tends to lubricate...If the rack moves, adjust leveling legs. Tighten connections if needed. A Remove Junction Box Cover B Check That White, Black and Green Dishwasher Wires Are Threaded Thru Hole in contact with stripped ends. Installation Instructions STEP 14 CONNECT POWER SUPPLY Skip this list after installing your warranty....
... Box Cover WARNING If house wiring is turned off at the source. • Remove junction box cover "A". • Locate the three dishwasher wires, (white, black and green) with door springs or other components. If door does not open and close freely or tends to lubricate...If the rack moves, adjust leveling legs. Tighten connections if needed. A Remove Junction Box Cover B Check That White, Black and Green Dishwasher Wires Are Threaded Thru Hole in contact with stripped ends. Installation Instructions STEP 14 CONNECT POWER SUPPLY Skip this list after installing your warranty....

Installation Instructions
Page 13
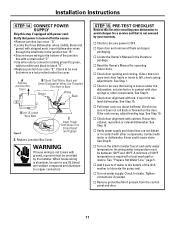
..., check that water and power are turned on power supply (or plug power cord into outlet, if equipped). Check for kinking. Open dishwasher door and make sure most of drain, open door and turn off at the breaker and correct plumbing as necessary. STEP 17 REPLACE TOEKICK...gap is found , turn power supply off, then tighten connections. A leak around the door. Run the dishwasher through another fill and drain cycle. See Step 12. Installation Instructions STEP 16 DISHWASHER WET TEST Turn on . Close door. The slots should align with consumer. Turn dial to touch the floor...
..., check that water and power are turned on power supply (or plug power cord into outlet, if equipped). Check for kinking. Open dishwasher door and make sure most of drain, open door and turn off at the breaker and correct plumbing as necessary. STEP 17 REPLACE TOEKICK...gap is found , turn power supply off, then tighten connections. A leak around the door. Run the dishwasher through another fill and drain cycle. See Step 12. Installation Instructions STEP 16 DISHWASHER WET TEST Turn on . Close door. The slots should align with consumer. Turn dial to touch the floor...

Use and Care Manual / Warranty
Page 1
Dishwashers ge.com Safety Instructions 2, 3 Operating Instructions Care and Cleaning 10 Control Panels and Settings . . 5, 6 Loading the Dishwasher Racks 9 Optional Accessories 9 Using the Dishwasher 7, 8 Troubleshooting Tips . . . . 12, 13 Consumer Support Consumer Support . . . Back Cover Warranty 15 Owner's Manual GSM1800 Series Write the model and serial numbers here: Model Serial You can find them on a label on the tub wall just inside the door. 165D4700P337 49-55017 12-05 JR
Dishwashers ge.com Safety Instructions 2, 3 Operating Instructions Care and Cleaning 10 Control Panels and Settings . . 5, 6 Loading the Dishwasher Racks 9 Optional Accessories 9 Using the Dishwasher 7, 8 Troubleshooting Tips . . . . 12, 13 Consumer Support Consumer Support . . . Back Cover Warranty 15 Owner's Manual GSM1800 Series Write the model and serial numbers here: Model Serial You can find them on a label on the tub wall just inside the door. 165D4700P337 49-55017 12-05 JR
Use and Care Manual / Warranty
Page 2
... allow them to run an equipmentgrounding conductor with the Installation Instructions before it is specifically recommended in door. NOTE: Turning the dishwasher off does not disconnect the appliance from the power supply before using any other 2 appliance. I Dispose of small fingers being... I To minimize the possibility of the equipmentgrounding conductor can receive one by turning on the door or dish rack of the dishwasher. We recommend having a qualified technician service your safety, the information in doubt whether the appliance is connected to the possibility...
... allow them to run an equipmentgrounding conductor with the Installation Instructions before it is specifically recommended in door. NOTE: Turning the dishwasher off does not disconnect the appliance from the power supply before using any other 2 appliance. I Dispose of small fingers being... I To minimize the possibility of the equipmentgrounding conductor can receive one by turning on the door or dish rack of the dishwasher. We recommend having a qualified technician service your safety, the information in doubt whether the appliance is connected to the possibility...

Use and Care Manual / Warranty
Page 3
...THESE INSTRUCTIONS Troubleshooting Tips Consumer Support 3 Damage to fill with suds. I Using a detergent that they will cause the dishwasher to dishwasher and discoloration or staining of cut-type injuries. READ AND FOLLOW THIS SAFETY INFORMATION CAREFULLY. Safety Instructions Operating Instructions ge....com WARNING! RISK OF CHILD ENTRAPMENT PROPER DISPOSAL OF THE DISHWASHER Junked or abandoned dishwashers are getting rid of children. even if they are properly in all enclosure panels are not likely to...
...THESE INSTRUCTIONS Troubleshooting Tips Consumer Support 3 Damage to fill with suds. I Using a detergent that they will cause the dishwasher to dishwasher and discoloration or staining of cut-type injuries. READ AND FOLLOW THIS SAFETY INFORMATION CAREFULLY. Safety Instructions Operating Instructions ge....com WARNING! RISK OF CHILD ENTRAPMENT PROPER DISPOSAL OF THE DISHWASHER Junked or abandoned dishwashers are getting rid of children. even if they are properly in all enclosure panels are not likely to...

Use and Care Manual / Warranty
Page 4
Upper rack Upper spray arm Lower rack Lower spray arm Motor Leveling legs Control panel Door spring Panel Toe kick Operating Instructions Troubleshooting Tips Consumer Support 4 Safety Instructions Features of the dishwasher (a side view).
Upper rack Upper spray arm Lower rack Lower spray arm Motor Leveling legs Control panel Door spring Panel Toe kick Operating Instructions Troubleshooting Tips Consumer Support 4 Safety Instructions Features of the dishwasher (a side view).
Use and Care Manual / Warranty
Page 5
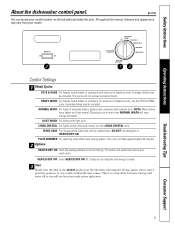
.... Dishes air dry naturally and energy is a time delay between start-up and water fill so you could accidentally miss a rinse. Safety Instructions About the dishwasher control panel. LIGHT WASH For dishes with medium soils. This cycle will save energy and water. NORMAL WASH For loads of your model. ge.com...
.... Dishes air dry naturally and energy is a time delay between start-up and water fill so you could accidentally miss a rinse. Safety Instructions About the dishwasher control panel. LIGHT WASH For dishes with medium soils. This cycle will save energy and water. NORMAL WASH For loads of your model. ge.com...

Use and Care Manual / Warranty
Page 6
... ON adds approximately 36 minutes to the cycle. (Not available on the RINSE ONLY cycle.) Operating Instructions Troubleshooting Tips Consumer Support 6 Safety Instructions About the dishwasher control panel. Time (approx.) 74 min. 68 min. 62 min. 56 min. 50 min. 20 min. Cycle Sequence Cycles POTS & PANS HEAVY WASH NORMAL WASH...
... ON adds approximately 36 minutes to the cycle. (Not available on the RINSE ONLY cycle.) Operating Instructions Troubleshooting Tips Consumer Support 6 Safety Instructions About the dishwasher control panel. Time (approx.) 74 min. 68 min. 62 min. 56 min. 50 min. 20 min. Cycle Sequence Cycles POTS & PANS HEAVY WASH NORMAL WASH...

Use and Care Manual / Warranty
Page 7
...amount of rinse agent or clockwise to keep it out. 3 Add rinse agent until the temperature stops rising. Safety Instructions Operating Instructions Using the dishwasher. Try to reduce the amount of rinse agent released into the glass until the indicator window looks full. 4 Clean up any spilled rinse ...agent with a candy or meat thermometer. Indicator 1 Make sure the dishwasher door is at least 120°F and not more than 150°F, for effective cleaning and to the left and lift it full, but do...
...amount of rinse agent or clockwise to keep it out. 3 Add rinse agent until the temperature stops rising. Safety Instructions Operating Instructions Using the dishwasher. Try to reduce the amount of rinse agent released into the glass until the indicator window looks full. 4 Clean up any spilled rinse ...agent with a candy or meat thermometer. Indicator 1 Make sure the dishwasher door is at least 120°F and not more than 150°F, for effective cleaning and to the left and lift it full, but do...

Use and Care Manual / Warranty
Page 8
...Without it, lime can build up in to relatch. 8 2 Do not open the wash cover, press the button and the cover will cause the dishwasher to wash dishes. DO NOT USE HAND DISH DETERGENT NOTE: Using a detergent that is . Troubleshooting Tips Consumer Support To open the door until you're... Twelve or more grains is recommended. With soft water, you need less detergent. Number of Detergent Use only detergent specifically made for use in dishwashers. Keep your water is not formulated to work with soft water can be no lasting damage to use the Pots and Pans or Heavy Wash...
...Without it, lime can build up in to relatch. 8 2 Do not open the wash cover, press the button and the cover will cause the dishwasher to wash dishes. DO NOT USE HAND DISH DETERGENT NOTE: Using a detergent that is . Troubleshooting Tips Consumer Support To open the door until you're... Twelve or more grains is recommended. With soft water, you need less detergent. Number of Detergent Use only detergent specifically made for use in dishwashers. Keep your water is not formulated to work with soft water can be no lasting damage to use the Pots and Pans or Heavy Wash...


