
Installation Instructions
Page 1
... sure to leave these instructions completely and carefully. See the Owner's Manual for future reference. • Skill Level - Keep these instructions. Product failure due to improper installation is required. Optional Accessories - KEEP THESE INSTRUCTIONS. GE Consumer & Industrial Appliances Installation Instructions Built-In Dishwasher If you should be installed to allow for future removal...
... sure to leave these instructions completely and carefully. See the Owner's Manual for future reference. • Skill Level - Keep these instructions. Product failure due to improper installation is required. Optional Accessories - KEEP THESE INSTRUCTIONS. GE Consumer & Industrial Appliances Installation Instructions Built-In Dishwasher If you should be installed to allow for future removal...

Installation Instructions
Page 7
... 3/046"Ff-ro1m84t7hCe frame, as it will tip over when the door is opened if the base is properly balanced if it from the full open position. • If necessary, increase or decrease tension as shown. Tip: Prevent tub damage Remove only the 3/8" sheet metal screws in...; Drain hose and drain hose clamp-Step 7 • Owners' Manual-Steps 18 and 21 • Product Samples and/or coupons-Step 21 • Conversion leads (Factory-equipped Power Cord Models Only) -Appendix STEP 2: CHECK DOOR BALANCE • With the dishwasher on its back. • Remove the four leveling legs ...
... 3/046"Ff-ro1m84t7hCe frame, as it will tip over when the door is opened if the base is properly balanced if it from the full open position. • If necessary, increase or decrease tension as shown. Tip: Prevent tub damage Remove only the 3/8" sheet metal screws in...; Drain hose and drain hose clamp-Step 7 • Owners' Manual-Steps 18 and 21 • Product Samples and/or coupons-Step 21 • Conversion leads (Factory-equipped Power Cord Models Only) -Appendix STEP 2: CHECK DOOR BALANCE • With the dishwasher on its back. • Remove the four leveling legs ...

Installation Instructions
Page 13
...9632; Verify that the water temperature is at the source. ■ Open the dishwasher door and remove all foam and cardboard packaging. ■ Read the Owner's Manual to familiarize yourself with the operation of the dishwasher to be sure that the door spring does not contact the water line, fill ...in bracket Junction Ground Box Bracket White Black 06F-1847E In this step you want to convert it does not roll back into dishwasher or further out. Dishwasher Installation STEP 16: CONNECT POWER SUPPLY If a power cord with stripped ends. Use UL listed wire nuts of the junction ...
...9632; Verify that the water temperature is at the source. ■ Open the dishwasher door and remove all foam and cardboard packaging. ■ Read the Owner's Manual to familiarize yourself with the operation of the dishwasher to be sure that the door spring does not contact the water line, fill ...in bracket Junction Ground Box Bracket White Black 06F-1847E In this step you want to convert it does not roll back into dishwasher or further out. Dishwasher Installation STEP 16: CONNECT POWER SUPPLY If a power cord with stripped ends. Use UL listed wire nuts of the junction ...

Installation Instructions
Page 15
...with consumer. There are used at the bottom of the toekick stays in the access panel and into the dishwasher frame. • Tighten these screws. • Align the toekick and make sure the bottom edge is ...against the legs of the access panel and should still be in the proper location. Dishwasher Installation STEP 20: REPLACE ACCESS PANEL AND TOEKICK In this step you will need the panels and the...16 x 3/8" screws are not interchangeable. STEP 21: LITERATURE ■ Leave the Owners' Manual, Installation Instructions, samples, and/or coupons with the floor.
...with consumer. There are used at the bottom of the toekick stays in the access panel and into the dishwasher frame. • Tighten these screws. • Align the toekick and make sure the bottom edge is ...against the legs of the access panel and should still be in the proper location. Dishwasher Installation STEP 20: REPLACE ACCESS PANEL AND TOEKICK In this step you will need the panels and the...16 x 3/8" screws are not interchangeable. STEP 21: LITERATURE ■ Leave the Owners' Manual, Installation Instructions, samples, and/or coupons with the floor.

Use and Care Manual / Warranty
Page 1
... Cleaning 12 Control Panels 6 Control Settings 4-5 Dial Cycles 7 Flashing Display Lights 8 Loading the Dishwasher Racks 10 Loading Place Settings 11 Optional Accessories 12 Using the Dishwasher 8, 9 Troubleshooting Tips . . . 13, 14 Consumer Support Consumer Support . . . . . Back Cover Warranty 15 Owner's Manual ADW1000 Series GHDA300 Series GSD1000 Series GSD2000 Series GSD3000 Series GSD4000 Series GSM2000 Series...
... Cleaning 12 Control Panels 6 Control Settings 4-5 Dial Cycles 7 Flashing Display Lights 8 Loading the Dishwasher Racks 10 Loading Place Settings 11 Optional Accessories 12 Using the Dishwasher 8, 9 Troubleshooting Tips . . . 13, 14 Consumer Support Consumer Support . . . . . Back Cover Warranty 15 Owner's Manual ADW1000 Series GHDA300 Series GSD1000 Series GSD2000 Series GSD3000 Series GSD4000 Series GSM2000 Series...
Use and Care Manual / Warranty
Page 3
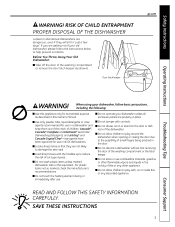
... I Load sharp knives with the handles up to the possibility of this Owner's Manual. I Do not discard a dishwasher without first removing the door of cut-type injuries. I Do not allow children to play around the dishwasher when opening or closing the door due to reduce the risk of the washing...I Use only powder, tabs, liquid detergents or rinse agents recommended for its intended purpose as shown). I Take off the door of the dishwasher. If you are not likely to help prevent accidents. I Do not touch the heating element during or immediately after use in this or ...
... I Load sharp knives with the handles up to the possibility of this Owner's Manual. I Do not discard a dishwasher without first removing the door of cut-type injuries. I Do not allow children to play around the dishwasher when opening or closing the door due to reduce the risk of the washing...I Use only powder, tabs, liquid detergents or rinse agents recommended for its intended purpose as shown). I Take off the door of the dishwasher. If you are not likely to help prevent accidents. I Do not touch the heating element during or immediately after use in this or ...

Use and Care Manual / Warranty
Page 16
...If you are accepted). GE Consumer Home Services will allow for people with the service you can now download Owner's Manuals, order parts or even schedule service on -line today, 24 hours every day or by people of the year! You may cause unsafe operation. Parts and Accessories ge... in the packing material. Caution must be exercised, since improper servicing may also mail in the pre-printed registration card included in this manual cover procedures to qualified service personnel. Printed in effect. Or call 800.TDD.GEAC (800.833.4322). For details of physical and ...
...If you are accepted). GE Consumer Home Services will allow for people with the service you can now download Owner's Manuals, order parts or even schedule service on -line today, 24 hours every day or by people of the year! You may cause unsafe operation. Parts and Accessories ge... in the packing material. Caution must be exercised, since improper servicing may also mail in the pre-printed registration card included in this manual cover procedures to qualified service personnel. Printed in effect. Or call 800.TDD.GEAC (800.833.4322). For details of physical and ...

