

User Manual
Page 1
...symbol are trademarks of Dolby Laboratories. Irdeto is a trademark of Philips Electronics N.V. Please read this user manual next to your receiver for purchasing a HUMAX Satellite receiver. CryptoWorks (TM) is a trademark of France Telecom. Keep this user manual carefully to be copied, used or translated ...in part or whole without notice. HUMAX does not have any responsibility for direct, indirect, accidental, necessary and other damage due to your offer or use and maintain the receiver at maximum performance. Conax is a trademark of Mindport BV....
...symbol are trademarks of Dolby Laboratories. Irdeto is a trademark of Philips Electronics N.V. Please read this user manual next to your receiver for purchasing a HUMAX Satellite receiver. CryptoWorks (TM) is a trademark of France Telecom. Keep this user manual carefully to be copied, used or translated ...in part or whole without notice. HUMAX does not have any responsibility for direct, indirect, accidental, necessary and other damage due to your offer or use and maintain the receiver at maximum performance. Conax is a trademark of Mindport BV....

User Manual
Page 3
... the product from the mains before connecting or disconnecting the cable from the satellite dish. The buried cable of the product. ** 6. Safety and Warning ** This receiver has been manufactured to the unit. MAINS SUPPLY ** 90 - 250V AC 50/60Hz Operate this may be buried in electric fire or shock. ** 3. Use a light...
... the product from the mains before connecting or disconnecting the cable from the satellite dish. The buried cable of the product. ** 6. Safety and Warning ** This receiver has been manufactured to the unit. MAINS SUPPLY ** 90 - 250V AC 50/60Hz Operate this may be buried in electric fire or shock. ** 3. Use a light...

User Manual
Page 5
... GB17 GB17 GB19 GB22 GB22 GB23 GB24 GB27 GB30 GB 5 Installation Wizard ** 3.1 Language 3.2 Area Setting 3.3 Antenna Setting 3.4 Automatic Search 3.5 Time Setting 4. Contents ** 1. Before Using the Receiver ** 1.1 Package Contents 1.2 Front Panel 1.3 Rear Panel 1.4 Remote Control 2.
... GB17 GB17 GB19 GB22 GB22 GB23 GB24 GB27 GB30 GB 5 Installation Wizard ** 3.1 Language 3.2 Area Setting 3.3 Antenna Setting 3.4 Automatic Search 3.5 Time Setting 4. Contents ** 1. Before Using the Receiver ** 1.1 Package Contents 1.2 Front Panel 1.3 Rear Panel 1.4 Remote Control 2.

User Manual
Page 8
1. Before Using the Receiver ** This chapter provides detailed instructions on the product and its accessories. 1.1 Package Contents Please check all package contents before using your product. ** ** Batteries (2) Remote Control Unit (1) User's Manual (1) ** Note: Since faults may occur if the remote controller is being left without a battery for a long time, always keep the battery inserted in the remote controller. GB 8
1. Before Using the Receiver ** This chapter provides detailed instructions on the product and its accessories. 1.1 Package Contents Please check all package contents before using your product. ** ** Batteries (2) Remote Control Unit (1) User's Manual (1) ** Note: Since faults may occur if the remote controller is being left without a battery for a long time, always keep the battery inserted in the remote controller. GB 8
User Manual
Page 10
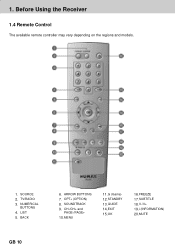
TV/RADIO 3. NUMERICAL BUTTONS 4. ARROW BUTTONS 7. CH-/CH+ and PAGE-/PAGE+ 10.MENU 11.G (Game) 12.STANDBY 13.GUIDE 14.EXIT 15.OK 16.FREEZE 17.SUBTITLE 18.V-/V+ 19.i (INFORMATION) 20.MUTE GB 10 SOUNDTRACK 9. LIST 5. OPT+ (OPTION) 8. 1. Before Using the Receiver ** 1.4 Remote Control The available remote controller may vary depending on the regions and models. ** ** 1. SOURCE 2. BACK 6.
TV/RADIO 3. NUMERICAL BUTTONS 4. ARROW BUTTONS 7. CH-/CH+ and PAGE-/PAGE+ 10.MENU 11.G (Game) 12.STANDBY 13.GUIDE 14.EXIT 15.OK 16.FREEZE 17.SUBTITLE 18.V-/V+ 19.i (INFORMATION) 20.MUTE GB 10 SOUNDTRACK 9. LIST 5. OPT+ (OPTION) 8. 1. Before Using the Receiver ** 1.4 Remote Control The available remote controller may vary depending on the regions and models. ** ** 1. SOURCE 2. BACK 6.
User Manual
Page 11
... the main menu. ** 11.G (Game) ** Displays the Game. ** 12.STANDBY ** Switches between TV and Radio modes. ** 3. 1. SOURCE ** Selects the input source between TV and satellite receiver. ** 2. OPT+ (OPTION) ** Displays the channel attributes during watching a programme. ** 16.FREEZE ** Freezes the TV screen you are watching. Before Using the...
... the main menu. ** 11.G (Game) ** Displays the Game. ** 12.STANDBY ** Switches between TV and Radio modes. ** 3. 1. SOURCE ** Selects the input source between TV and satellite receiver. ** 2. OPT+ (OPTION) ** Displays the channel attributes during watching a programme. ** 16.FREEZE ** Freezes the TV screen you are watching. Before Using the...

User Manual
Page 12
Note: If you encounter any problem when setting up mode. ** 2.2 Powering On ** 1. The Standby LED indicator is the most appropriate procedure depending on your local product distributor. 2.1 Connecting the Antenna 1. GB 12 2. Connect the power cord of the receiver to set -up the receiver, please contact your requirements. Connecting TV and VCR ** This is turned on by pressing the STANDBY button at Remote Controller. Power on Green. Select the most simple set up ** This chapter describes how to a wall outlet. 2. Set-up the receiver.
Note: If you encounter any problem when setting up mode. ** 2.2 Powering On ** 1. The Standby LED indicator is the most appropriate procedure depending on your local product distributor. 2.1 Connecting the Antenna 1. GB 12 2. Connect the power cord of the receiver to set -up the receiver, please contact your requirements. Connecting TV and VCR ** This is turned on by pressing the STANDBY button at Remote Controller. Power on Green. Select the most simple set up ** This chapter describes how to a wall outlet. 2. Set-up the receiver.

User Manual
Page 13
... can return to the next step Antenna Setting . 3.2 Area Setting You can easily set -up using the NUMERICAL (0-9) buttons. Installation Wizard ** When powering on your receiver for the first time after completing the set -up procedure. button GB 13 Select the appropriate area from the list using the and press the...
... can return to the next step Antenna Setting . 3.2 Area Setting You can easily set -up using the NUMERICAL (0-9) buttons. Installation Wizard ** When powering on your receiver for the first time after completing the set -up procedure. button GB 13 Select the appropriate area from the list using the and press the...

User Manual
Page 15
... and press the OK button to the next step. 3.5 Time Setting You can set the current time. Warning: Press the EXIT button to configure your receiver as you can use the Menu-Installation-Antenna Setting and Channel Search menu to save the previous input information and exit the Installation Wizard when...
... and press the OK button to the next step. 3.5 Time Setting You can set the current time. Warning: Press the EXIT button to configure your receiver as you can use the Menu-Installation-Antenna Setting and Channel Search menu to save the previous input information and exit the Installation Wizard when...

User Manual
Page 38
... the NUMERICAL (0~9) button, and select OK and press OK button. 3. Select Menu/Audio/Subtitle Language using the press the OK or button. Audio Priority This receiver doesn't provide this funtion. Selec Preferences using the press the OK or button. Select Language Setting using the OK or button. Menu/Audio/Subtitle Language...
... the NUMERICAL (0~9) button, and select OK and press OK button. 3. Select Menu/Audio/Subtitle Language using the press the OK or button. Audio Priority This receiver doesn't provide this funtion. Selec Preferences using the press the OK or button. Select Language Setting using the OK or button. Menu/Audio/Subtitle Language...

User Manual
Page 41
..., refer to watch programme at your desired reservation, and press the OK button. Select Preferences using the button, and press the OK 2.VCR-SCART The receiver doesn't provide this function. Select one option among CVBS/RGB using the the OK or button. GB 41 button, and press 3. Press the MENU button...
..., refer to watch programme at your desired reservation, and press the OK button. Select Preferences using the button, and press the OK 2.VCR-SCART The receiver doesn't provide this function. Select one option among CVBS/RGB using the the OK or button. GB 41 button, and press 3. Press the MENU button...

User Manual
Page 43
... button, and press the OK 25, 50, 75 As the number is bigger, the screen is set the transparency of On Screen Display. 1. ** ** 7.6 UHF This receiver doesn't provide this function. Select one option among Disable/25/50/75 using the button, and press the OK or button. 2. Option in Channel List...
... button, and press the OK 25, 50, 75 As the number is bigger, the screen is set the transparency of On Screen Display. 1. ** ** 7.6 UHF This receiver doesn't provide this function. Select one option among Disable/25/50/75 using the button, and press the OK or button. 2. Option in Channel List...

User Manual
Page 46
8. You can select DiSEqC switch. 1. GB 46 LNB Voltage This receiver doesn't provide this function. 8.2 Automatic Search ** If you select the satellite to search channel according to the Antenna Setting, you cannot watch any other information. ...
8. You can select DiSEqC switch. 1. GB 46 LNB Voltage This receiver doesn't provide this function. 8.2 Automatic Search ** If you select the satellite to search channel according to the Antenna Setting, you cannot watch any other information. ...

User Manual
Page 52
... one from Disable/Auto/Horizontal/Vertical and press the OK button. button, and press the OK or ** Frequency 1. button, and press 2. SMATV Search If your receiver uses the antenna for common use , operate SMATV Search. Select the symbol rate of Automatic Search. Select Symbol Rate using the the OK or button...
... one from Disable/Auto/Horizontal/Vertical and press the OK button. button, and press the OK or ** Frequency 1. button, and press 2. SMATV Search If your receiver uses the antenna for common use , operate SMATV Search. Select the symbol rate of Automatic Search. Select Symbol Rate using the the OK or button...

User Manual
Page 55
... return to 3. For detailed information about Installation Wizard, refer to the previous menu. button, and press the 3. button to 6. ** ** 8.5 Default Setting Default Setting restores the receiver to automatically run the Installation Wizard. When completing the default setting, press the OK button to the default settings. Confirm again to Factory Default. Select...
... return to 3. For detailed information about Installation Wizard, refer to the previous menu. button, and press the 3. button to 6. ** ** 8.5 Default Setting Default Setting restores the receiver to automatically run the Installation Wizard. When completing the default setting, press the OK button to the default settings. Confirm again to Factory Default. Select...

User Manual
Page 56
... the manufacturer uses. 4. The equipment should have the most up-to different antennas having different footprints(area where the signal can be received). Update may not work at the Humax website http://www.humaxdigital.com. The equipment must be interrupted and the product may be tuned properly to the same antenna that...
... the manufacturer uses. 4. The equipment should have the most up-to different antennas having different footprints(area where the signal can be received). Update may not work at the Humax website http://www.humaxdigital.com. The equipment must be interrupted and the product may be tuned properly to the same antenna that...

User Manual
Page 60
... operating. ** GB 60 Connect your PC to make this product with RS-232C serial cable. 4. Software Upgrade ** 9.2 Software Update from PC You can connect your receiver to this product model from our website into your computer(http://www.humaxdigital.com). 2. Download new software file (HDF files) equivalent for this product. ** 1. Download...
... operating. ** GB 60 Connect your PC to make this product with RS-232C serial cable. 4. Software Upgrade ** 9.2 Software Update from PC You can connect your receiver to this product model from our website into your computer(http://www.humaxdigital.com). 2. Download new software file (HDF files) equivalent for this product. ** 1. Download...

User Manual
Page 61
... OK 2. Display information about Hardware version, Software version, Loader version, System ID, Slot1, 2. 10.2 Signal Detection You can view the signal strength and signal quality receiving from satellite via your satellite dish. 1. System Information ** You can view System information 1. Select System Detection using the or button. GB 61 button, and 2. Press...
... OK 2. Display information about Hardware version, Software version, Loader version, System ID, Slot1, 2. 10.2 Signal Detection You can view the signal strength and signal quality receiving from satellite via your satellite dish. 1. System Information ** You can view System information 1. Select System Detection using the or button. GB 61 button, and 2. Press...

User Manual
Page 64
... brightness level of the TV and product. - Replace LNB with the remote controller, the remote controller's top end should directly point towards the receiving part of order. 4. Check the Mute status of TV. - Press the Audio button to the equipment. - Reservation is off. Check whether... in Operation Mode. - Check the channel is correctly connected to change the Sound Track type. 5. Poor picture and sound quality - The receiving level can be influenced by heavy rain, sound and picture may temporarily be not accepted as a malfunction of weather conditions cannot be poor. ...
... brightness level of the TV and product. - Replace LNB with the remote controller, the remote controller's top end should directly point towards the receiving part of order. 4. Check the Mute status of TV. - Press the Audio button to the equipment. - Reservation is off. Check whether... in Operation Mode. - Check the channel is correctly connected to change the Sound Track type. 5. Poor picture and sound quality - The receiving level can be influenced by heavy rain, sound and picture may temporarily be not accepted as a malfunction of weather conditions cannot be poor. ...

User Manual
Page 68
...fills the EPG differently or not, so differences in the EPG are not necessarily receiver errors. ** Frequency The number of cycles or events per one second, which is expressed in the unit of hertz. ** FTA (Free-To-Air) An unscrambled broadcast, which you can play back all the audio frequencies... of the human, which it is the range of audio devices that receives amplifies and retransmits a signal on the screen directly. OSD information includes ...
...fills the EPG differently or not, so differences in the EPG are not necessarily receiver errors. ** Frequency The number of cycles or events per one second, which is expressed in the unit of hertz. ** FTA (Free-To-Air) An unscrambled broadcast, which you can play back all the audio frequencies... of the human, which it is the range of audio devices that receives amplifies and retransmits a signal on the screen directly. OSD information includes ...


