
User Manual
Page 4
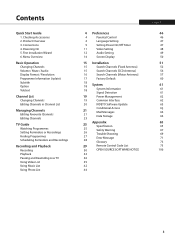
...List Changing Channels Editing Channels in Channel List Managing Channels Editing Favourite Channels Editing Channels TV Guide Watching Programmes Setting Reminders or Recordings Finding Programmes Scheduling Reminders and Recordings Recording and Playback Recording Playback Pausing and Rewinding Live TV... Using Video List Using Music List Using Photo List 4 Preferences 4 Parental Control 4 Language Setting 9 Setting Power On/Off Timer 11 Video Setting 12 Audio Setting 14 Screen Display 15 Installation 15 Search Channels [Fixed Antenna] 15 Search Channels [SCD Antenna] ...
...List Changing Channels Editing Channels in Channel List Managing Channels Editing Favourite Channels Editing Channels TV Guide Watching Programmes Setting Reminders or Recordings Finding Programmes Scheduling Reminders and Recordings Recording and Playback Recording Playback Pausing and Rewinding Live TV... Using Video List Using Music List Using Photo List 4 Preferences 4 Parental Control 4 Language Setting 9 Setting Power On/Off Timer 11 Video Setting 12 Audio Setting 14 Screen Display 15 Installation 15 Search Channels [Fixed Antenna] 15 Search Channels [SCD Antenna] ...
User Manual
Page 9
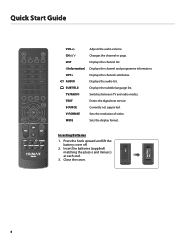
... display format. SUBTITLE Displays the subtitle language list. V-FORMAT Sets the resolution of video. CHш/щ Changes the channel or page. i (Information) Displays the channel and programme information. AUDIO Displays the audio list. Close ...
... display format. SUBTITLE Displays the subtitle language list. V-FORMAT Sets the resolution of video. CHш/щ Changes the channel or page. i (Information) Displays the channel and programme information. AUDIO Displays the audio list. Close ...
User Manual
Page 10
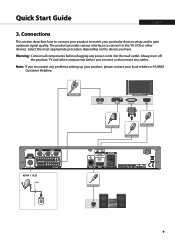
The product provides various interfaces to connect to the TV, VCR or other components before plugging any problems setting up your product, please contact your particular devices setup and to match your local retailer or HUMAX Customer Helpline. Quick Start Guide English 3. Warning: Connect all components before you connect or disconnect any cables...
The product provides various interfaces to connect to the TV, VCR or other components before plugging any problems setting up your product, please contact your particular devices setup and to match your local retailer or HUMAX Customer Helpline. Quick Start Guide English 3. Warning: Connect all components before you connect or disconnect any cables...

User Manual
Page 13
Language Select your product for more channels. 1. Quick Start Guide 5. In this case, you may not have all of the channels available. Note: If you exit the installation wizard without fully completing the channel searching procedure, you can use the Settings > Installation menu to your TV. 12 First Installation Wizard When powering on your language. 2. Display Set the video output to search for the first time after purchase or performing the factory default in menu, the installation wizard will operate automatically.
Language Select your product for more channels. 1. Quick Start Guide 5. In this case, you may not have all of the channels available. Note: If you exit the installation wizard without fully completing the channel searching procedure, you can use the Settings > Installation menu to your TV. 12 First Installation Wizard When powering on your language. 2. Display Set the video output to search for the first time after purchase or performing the factory default in menu, the installation wizard will operate automatically.

User Manual
Page 14
... for Slovakia: Search all Skylink and CSlink channels of the Installation Wizard is complete. 5. Automatic Search Channel search will begin automatically. Select Finish to MENU > Settings > Installation. 4.
... for Slovakia: Search all Skylink and CSlink channels of the Installation Wizard is complete. 5. Automatic Search Channel search will begin automatically. Select Finish to MENU > Settings > Installation. 4.

User Manual
Page 15
Menu Overview Channel List TV Guide Video Music Photo Settings Preferences • Parental Control • Language • Time • Video • Audio • Recording • Screen Display Edit Channels • Edit Favourite List • Edit ...
Menu Overview Channel List TV Guide Video Music Photo Settings Preferences • Parental Control • Language • Time • Video • Audio • Recording • Screen Display Edit Channels • Edit Favourite List • Edit ...
User Manual
Page 16
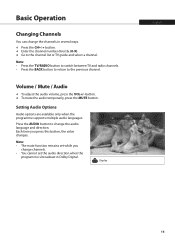
... button to switch between TV and radio channels. • Press the BACK button to return to change the audio language and direction. Setting Audio Options Audio options are available only when the programme supports multiple audio languages. Display English 15 Press the CH / button. Enter ...select a channel. Volume / Mute / Audio To adjust the audio volume, press the VOL+/- Each time you change channels. • You cannot set while you press this button, the value changes. Basic Operation Changing Channels You can change the channels in Dolby Digital. Note: • The mute...
... button to switch between TV and radio channels. • Press the BACK button to return to change the audio language and direction. Setting Audio Options Audio options are available only when the programme supports multiple audio languages. Display English 15 Press the CH / button. Enter ...select a channel. Volume / Mute / Audio To adjust the audio volume, press the VOL+/- Each time you change channels. • You cannot set while you press this button, the value changes. Basic Operation Changing Channels You can change the channels in Dolby Digital. Note: • The mute...

User Manual
Page 17
... display format according to the screen ratio. Basic Operation Display Format / Resolution Setting Display Format Press the WIDE button to set the resolution of the screen. Zoom Note: Refer to resolutions the TV supports. Original Note: When connected with an HDMI cable, you press this button, ...the value changes. 576i - 576p - 720p - 1080i - Pillar Box - Screen ratio 4:3: Auto - Letterbox - Display Display 16 Each time you can only change to Setting Display Format for details. Each time you press this button, the value changes.
... display format according to the screen ratio. Basic Operation Display Format / Resolution Setting Display Format Press the WIDE button to set the resolution of the screen. Zoom Note: Refer to resolutions the TV supports. Original Note: When connected with an HDMI cable, you press this button, ...the value changes. 576i - 576p - 720p - 1080i - Pillar Box - Screen ratio 4:3: Auto - Letterbox - Display Display 16 Each time you can only change to Setting Display Format for details. Each time you press this button, the value changes.
User Manual
Page 18
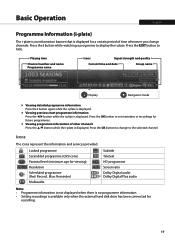
...the / button while the i-plate is displayed. Press the i button while watching a progamme to hide. Press the OK button to set reminders or recordings for recording. 17 Locked programme Scrambled programme (CAS icons) Parental level (minimum age for viewing) Resolution Scheduled programme (Red: ... audio Dolby Digital Plus audio Note: • Programme information is not displayed when there is no programme information. • Setting recordings is available only when the external hard disk drive has been connected for future programmes. Playing time Channel number and name...
...the / button while the i-plate is displayed. Press the i button while watching a progamme to hide. Press the OK button to set reminders or recordings for recording. 17 Locked programme Scrambled programme (CAS icons) Parental level (minimum age for viewing) Resolution Scheduled programme (Red: ... audio Dolby Digital Plus audio Note: • Programme information is not displayed when there is no programme information. • Setting recordings is available only when the external hard disk drive has been connected for future programmes. Playing time Channel number and name...

User Manual
Page 19
... available. Each time you want and press the OK button. Note: You can choose to save and exit. Lock: Select On or Off. You can set the options for the watching channel. 1. All teletext supporting channels have the teletext icon on news, weather and many other topics. Select the teletext function...
... available. Each time you want and press the OK button. Note: You can choose to save and exit. Lock: Select On or Off. You can set the options for the watching channel. 1. All teletext supporting channels have the teletext icon on news, weather and many other topics. Select the teletext function...

User Manual
Page 21
... OK button and enter the name in the favourite group. 1. Select OK to edit and press the YELLOW button. 2. Note: The default password is 0000. Setting Favourite Channels YELLOW Display Select Confirm You can edit each channel in the channel list, as well as in and press the OK button. Locking...
... OK button and enter the name in the favourite group. 1. Select OK to edit and press the YELLOW button. 2. Note: The default password is 0000. Setting Favourite Channels YELLOW Display Select Confirm You can edit each channel in the channel list, as well as in and press the OK button. Locking...

User Manual
Page 22
... Channels The Edit Favourite List menu will help you add or remove channels from the favourite list, select the channels you want to edit. 2. MENU Settings Edit Channels Edit Favourite List Group name Marked / Total channels Favourite group name Select Mark/Confirm Page up/down Function buttons : Coloured or OPT+ button...
... Channels The Edit Favourite List menu will help you add or remove channels from the favourite list, select the channels you want to edit. 2. MENU Settings Edit Channels Edit Favourite List Group name Marked / Total channels Favourite group name Select Mark/Confirm Page up/down Function buttons : Coloured or OPT+ button...

User Manual
Page 24
MENU Settings Edit Channels Edit Channel List Group name Marked / Total channels Select Mark/Confirm Page up/down Function buttons : Coloured or OPT+ button Note: • : Locked ...
MENU Settings Edit Channels Edit Channel List Group name Marked / Total channels Select Mark/Confirm Page up/down Function buttons : Coloured or OPT+ button Note: • : Locked ...

User Manual
Page 27
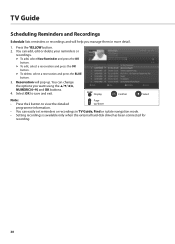
Press the OK button again to the previous/next day. Note: • Setting recordings is available only when the external hard disk drive has been connected for recording. • If the programme is conflicted with another programme, adjust ... hours. The default password is locked, you want. Press the / button to Finding Programmes.) 26 Select a future programme and press the OK button. 2. TV Guide Setting Reminders or Recordings 1. The reserved programmes will be added automatically in Schedule. Changing Group To list the channels of other groups, press the BLUE button...
Press the OK button again to the previous/next day. Note: • Setting recordings is available only when the external hard disk drive has been connected for recording. • If the programme is conflicted with another programme, adjust ... hours. The default password is locked, you want. Press the / button to Finding Programmes.) 26 Select a future programme and press the OK button. 2. TV Guide Setting Reminders or Recordings 1. The reserved programmes will be added automatically in Schedule. Changing Group To list the channels of other groups, press the BLUE button...

User Manual
Page 28
... i button to view the detailed up/down programme information. • Press the OK button to watch a found programme. • You can set reminders or recordings for future programmes. (Refer to Setting Reminders or Recordings.) 27 Select a keyword and press the OK button. Select Genre and press the button. 3. Note: To enter a new...
... i button to view the detailed up/down programme information. • Press the OK button to watch a found programme. • You can set reminders or recordings for future programmes. (Refer to Setting Reminders or Recordings.) 27 Select a keyword and press the OK button. Select Genre and press the button. 3. Note: To enter a new...
User Manual
Page 29
...view the detailed up . Press the YELLOW button. 2. You can change the options you manage them in TV Guide, Find or i-plate navigation mode. • Setting recordings is available only when the external hard disk drive has been connected for recording. 28 To edit, select a reservation and press the OK button... and exit. TV Guide Scheduling Reminders and Recordings Schedule lists reminders or recordings and will pop up /down programme information. • You can easily set reminders or recordings in more detail. 1. You can add, edit or delete your reminders or recordings.
...view the detailed up . Press the YELLOW button. 2. You can change the options you manage them in TV Guide, Find or i-plate navigation mode. • Setting recordings is available only when the external hard disk drive has been connected for recording. 28 To edit, select a reservation and press the OK button... and exit. TV Guide Scheduling Reminders and Recordings Schedule lists reminders or recordings and will pop up /down programme information. • You can easily set reminders or recordings in more detail. 1. You can add, edit or delete your reminders or recordings.

User Manual
Page 31
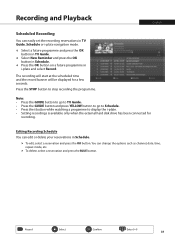
..., press the RECORD button. When no programme information is provided, the recording will continue till the end of the current prorgramme or the next programme. Set the duration manually or select till the end of the next programme. Recording and Playback Recording Instant Recording You can record the currently watching programme...
..., press the RECORD button. When no programme information is provided, the recording will continue till the end of the current prorgramme or the next programme. Set the duration manually or select till the end of the next programme. Recording and Playback Recording Instant Recording You can record the currently watching programme...
User Manual
Page 32
.... • Press the i button while watching a progamme to stop recording the programme. To delete, select a reservation and press the BLUE button. You can easily set the recording reservations in TV Guide, Schedule or i-plate navigation mode. Press the STOP button to display the i-plate. •...; Setting recordings is available only when the external hard disk drive has been connected for a few seconds. Editing Recording Schedule You can edit or delete ...
.... • Press the i button while watching a progamme to stop recording the programme. To delete, select a reservation and press the BLUE button. You can easily set the recording reservations in TV Guide, Schedule or i-plate navigation mode. Press the STOP button to display the i-plate. •...; Setting recordings is available only when the external hard disk drive has been connected for a few seconds. Editing Recording Schedule You can edit or delete ...

User Manual
Page 33
Recording and Playback Recording Conflict Recording Duration Conflict When an instant recording conflicts with the previously set recording (or reminder), you will be canceled. Record for the automatically modified duration. OK: The channel will change at the start automatically. Record 32 Select ...
Recording and Playback Recording Conflict Recording Duration Conflict When an instant recording conflicts with the previously set recording (or reminder), you will be canceled. Record for the automatically modified duration. OK: The channel will change at the start automatically. Record 32 Select ...

User Manual
Page 34
... jump time to replay or skip scenes during playback or time shifted recording. Setting Jump Time You can record the digital TV or radio programmes only. If the free space on the programme. • To view the recorded programme ... the playback control buttons such as pause, fast rewind, instant replay, slow, etc. • You can set the recording padding time in standby mode if the external hard disk drive is insufficient, recording will stop . Setting Time Shift Recording Time Shift Recording : Time shift recording starts when the channel is enough free...
... jump time to replay or skip scenes during playback or time shifted recording. Setting Jump Time You can record the digital TV or radio programmes only. If the free space on the programme. • To view the recorded programme ... the playback control buttons such as pause, fast rewind, instant replay, slow, etc. • You can set the recording padding time in standby mode if the external hard disk drive is insufficient, recording will stop . Setting Time Shift Recording Time Shift Recording : Time shift recording starts when the channel is enough free...


