
Installation Guide
Page 1
... box is at least 7 feet above the ceiling hole. o Six inches of the outlet box. 4-4. Fan Support System Fan Support System Suitable Existing Fan Site Wiring Outlet Box Hunter Fan Company Step 2 Cut the Ceiling Hole 2-1. You will hold the outlet box and the full weight of the... fan and light kit. Steps 2 - 3 Step 3 Install a Support Brace, If Necessary Determine if there is directly below the joist or ...
... box is at least 7 feet above the ceiling hole. o Six inches of the outlet box. 4-4. Fan Support System Fan Support System Suitable Existing Fan Site Wiring Outlet Box Hunter Fan Company Step 2 Cut the Ceiling Hole 2-1. You will hold the outlet box and the full weight of the... fan and light kit. Steps 2 - 3 Step 3 Install a Support Brace, If Necessary Determine if there is directly below the joist or ...

Owner's Manual
Page 2
... BEGINNING INSTALLATION. This installation and operation manual gives you with the best ceiling fan available anywhere in accordance with this fan. Before installing your fan, for your fan. Use only Hunter speed controls. © 2008 Hunter Fan Company 2 42631-01 • 10/13/08 • Hunter Fan Company We appreciate the opportunity to your home or office that will provide comfort...
... BEGINNING INSTALLATION. This installation and operation manual gives you with the best ceiling fan available anywhere in accordance with this fan. Before installing your fan, for your fan. Use only Hunter speed controls. © 2008 Hunter Fan Company 2 42631-01 • 10/13/08 • Hunter Fan Company We appreciate the opportunity to your home or office that will provide comfort...

Owner's Manual
Page 3
...from the ceiling by a downrod (included). For quiet and optimum performance of three ways, depending on ceiling height and your Hunter fan, use the accessories, follow the instructions included with each product. Angled Mounting Style 8 12 Angled Mounting recommended for a ...stability and wobble-free performance. To install and use only Hunter speed controls. All Hunter fans use only the hardware supplied. 3 42631-01 • 10/13/08 • Hunter Fan Company Understanding Mounting and Installer's Choice® Hunter's patented 3-position mounting system provides you can purchase...
...from the ceiling by a downrod (included). For quiet and optimum performance of three ways, depending on ceiling height and your Hunter fan, use the accessories, follow the instructions included with each product. Angled Mounting Style 8 12 Angled Mounting recommended for a ...stability and wobble-free performance. To install and use only Hunter speed controls. All Hunter fans use only the hardware supplied. 3 42631-01 • 10/13/08 • Hunter Fan Company Understanding Mounting and Installer's Choice® Hunter's patented 3-position mounting system provides you can purchase...

Owner's Manual
Page 4
...to the included Parts Guide. Installing Multiple Fans? Refer to the building structure are installing more than one fan, keep the fan blades and blade irons (if applicable) in sets, as they were shipped. 4 42631-01 • 10/13/08 • Hunter Fan Company If you need the following : •... Locate the ceiling joist or other suitable support in the pullout sheet called "Preparing the Fan Site." If you are essential for and install wood screws. • Identify and...
...to the included Parts Guide. Installing Multiple Fans? Refer to the building structure are installing more than one fan, keep the fan blades and blade irons (if applicable) in sets, as they were shipped. 4 42631-01 • 10/13/08 • Hunter Fan Company If you need the following : •... Locate the ceiling joist or other suitable support in the pullout sheet called "Preparing the Fan Site." If you are essential for and install wood screws. • Identify and...

Owner's Manual
Page 5
...the ceiling plate. 2-5. Do not over tighten. Ceiling Plate 3" Wood Screw Steps 2-3 - 2-6 5 42631-01 • 10/13/08 • Hunter Fan Company Align the slotted holes in the ceiling plate with four preinstalled noise isolators. Tighten the screws into the wood support structure through the hole in... the outlet box. 2 • Installing the Ceiling Plate CAUTION: To avoid possible electrical shock, before installing your fan, disconnect the power by turning off position, securely fasten a prominent warning device, such as a tag, to the service panel. 2-1. Your...
...the ceiling plate. 2-5. Do not over tighten. Ceiling Plate 3" Wood Screw Steps 2-3 - 2-6 5 42631-01 • 10/13/08 • Hunter Fan Company Align the slotted holes in the ceiling plate with four preinstalled noise isolators. Tighten the screws into the wood support structure through the hole in... the outlet box. 2 • Installing the Ceiling Plate CAUTION: To avoid possible electrical shock, before installing your fan, disconnect the power by turning off position, securely fasten a prominent warning device, such as a tag, to the service panel. 2-1. Your...

Owner's Manual
Page 6
...retighten the setscrew with the lip down. 3-6. Place the slots over the hooks to step 3-7. Remove the setscrew from unscrewing. Raise the fan and align the slots in the adapter. Standard or Angled Mounting Steps 3-2 - 3-3 Downrod Setscrew Canopy Canopy Trim Ring Low Profile Mounting Steps... Low Profile Screw Step 3-6 (Detail) Adapter Low Profile Screw Low Profile Washer 6 42631-01 • 10/13/08 • Hunter Fan Company Assemble securely with the holes in the canopy with the low profile washer. 3-4. Loosen the square head setscrew on the ceiling plate. ...
...retighten the setscrew with the lip down. 3-6. Place the slots over the hooks to step 3-7. Remove the setscrew from unscrewing. Raise the fan and align the slots in the adapter. Standard or Angled Mounting Steps 3-2 - 3-3 Downrod Setscrew Canopy Canopy Trim Ring Low Profile Mounting Steps... Low Profile Screw Step 3-6 (Detail) Adapter Low Profile Screw Low Profile Washer 6 42631-01 • 10/13/08 • Hunter Fan Company Assemble securely with the holes in the canopy with the low profile washer. 3-4. Loosen the square head setscrew on the ceiling plate. ...

Owner's Manual
Page 7
... the outlet box and the ungrounded wires on the other side of the outlet box. 7 42631-01 • 10/13/08 • Hunter Fan Company fsdfsdf Wire Connector Dual Switch Wiring Single Switch Wiring Turn the splices upward and push them , then twist clockwise until tight. Select an acceptable ... • The black wire (ungrounded) from the ceiling to the black (ungrounded) and the black/white wire (ungrounded) from the fan. 4-5. 4 • Wiring the Fan All wiring must be in accordance with national and local electrical codes and ANSI/NFPA 70. To connect the wires, hold the bare metal...
... the outlet box and the ungrounded wires on the other side of the outlet box. 7 42631-01 • 10/13/08 • Hunter Fan Company fsdfsdf Wire Connector Dual Switch Wiring Single Switch Wiring Turn the splices upward and push them , then twist clockwise until tight. Select an acceptable ... • The black wire (ungrounded) from the ceiling to the black (ungrounded) and the black/white wire (ungrounded) from the fan. 4-5. 4 • Wiring the Fan All wiring must be in accordance with national and local electrical codes and ANSI/NFPA 70. To connect the wires, hold the bare metal...

Owner's Manual
Page 8
... screws into place. Step 5-1 Tab Groove Step 5-2 Step 5-3 Canopy Canopy Trim Ring Canopy Screw 8 42631-01 • 10/13/08 • Hunter Fan Company Holding the canopy up to fall. Verify that must remain engaged while swinging the canopy for the following steps could cause the... Canopy Trim Ring WARNING: Failure to complete the following steps. 5-1. Note: Should you use a magnetic tip screwdriver for alignment. 5-3. Note: Your fan may have multiple tabs and grooves that the tabs in the hanger ball. The canopy trim ring will flex out releasing the canopy trim ring...
... screws into place. Step 5-1 Tab Groove Step 5-2 Step 5-3 Canopy Canopy Trim Ring Canopy Screw 8 42631-01 • 10/13/08 • Hunter Fan Company Holding the canopy up to fall. Verify that must remain engaged while swinging the canopy for the following steps could cause the... Canopy Trim Ring WARNING: Failure to complete the following steps. 5-1. Note: Should you use a magnetic tip screwdriver for alignment. 5-3. Note: Your fan may have multiple tabs and grooves that the tabs in the hanger ball. The canopy trim ring will flex out releasing the canopy trim ring...

Owner's Manual
Page 9
... grommet Blade Assembly Screws Steps 6-1 - 6-2 Use without grommet Blade Mounting Screw Step 6-4 9 42631-01 • 10/13/08 • Hunter Fan Company This is normal. 6-3. Note: Some blade mounting screws are tightened. Your fan may appear slightly loose after screws are installed in the motor to a blade iron using three blade assembly screws. Insert...
... grommet Blade Assembly Screws Steps 6-1 - 6-2 Use without grommet Blade Mounting Screw Step 6-4 9 42631-01 • 10/13/08 • Hunter Fan Company This is normal. 6-3. Note: Some blade mounting screws are tightened. Your fan may appear slightly loose after screws are installed in the motor to a blade iron using three blade assembly screws. Insert...

Owner's Manual
Page 10
... the connectors are polarized and will only fit together one way. Attach the lower switch housing to the upper switch housing with this fan model. 7-1. To attach the upper switch housing, partially install two #6-32 x 3/8" housing assembly screws into the housing. Tighten all... into the switch housing mounting plate. 7-2. Housing Assembly Screw Plug Connector Detail 10 42631-01 • 10/13/08 • Hunter Fan Company Align the keyhole slots in the upper and lower switch housings. Turn the housing counterclockwise until the housing assembly screws are firmly situated ...
... the connectors are polarized and will only fit together one way. Attach the lower switch housing to the upper switch housing with this fan model. 7-1. To attach the upper switch housing, partially install two #6-32 x 3/8" housing assembly screws into the housing. Tighten all... into the switch housing mounting plate. 7-2. Housing Assembly Screw Plug Connector Detail 10 42631-01 • 10/13/08 • Hunter Fan Company Align the keyhole slots in the upper and lower switch housings. Turn the housing counterclockwise until the housing assembly screws are firmly situated ...
Owner's Manual
Page 11
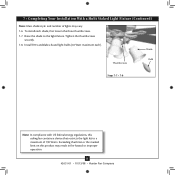
... may vary. 7-6. Raise the shade to a maximum of lights may result in fire hazard or improper operation. 11 42631-01 • 10/13/08 • Hunter Fan Company 7 • Completing Your Installation With a Multi Staked Light Fixture (Continued) Note: Glass shade style and number of 190 Watts.
... may vary. 7-6. Raise the shade to a maximum of lights may result in fire hazard or improper operation. 11 42631-01 • 10/13/08 • Hunter Fan Company 7 • Completing Your Installation With a Multi Staked Light Fixture (Continued) Note: Glass shade style and number of 190 Watts.

Owner's Manual
Page 12
... damage the finish. 8-6. Clean wood finish blades with a direct breeze. Reversing Switch 12 42631-01 • 10/13/08 • Hunter Fan Company The light pull chain controls the power to the opposite position. You may use an artistic agent, but never abrasive cleaning agents as the...change settings. • Release slowly to prevent scratching. Clean painted and high-gloss blades in warm weather to a complete stop. Ceiling fans work best by blowing air downward (counterclockwise blade rotation) in the same manner as they will distribute the warmer air trapped at the...
... damage the finish. 8-6. Clean wood finish blades with a direct breeze. Reversing Switch 12 42631-01 • 10/13/08 • Hunter Fan Company The light pull chain controls the power to the opposite position. You may use an artistic agent, but never abrasive cleaning agents as the...change settings. • Release slowly to prevent scratching. Clean painted and high-gloss blades in warm weather to a complete stop. Ceiling fans work best by blowing air downward (counterclockwise blade rotation) in the same manner as they will distribute the warmer air trapped at the...

Owner's Manual
Page 13
... switch is on 1. Check the plug connection in the switch housing. 4. Problem: Noisy operation. 1. Problem: Lights dim when turned on or do not turn on . 6. fan does not move. 1. Pull the pull chain to ensure that the hanger ball is cracked. Check to make sure the wattage and type of light... you need parts or service assistance, please call 888‑830‑1326 or visit us at our Web site at http://www.hunterfan.com. Hunter Fan Company 2500 Frisco Avenue Memphis, Tennessee 38114 13 42631-01 • 10/13/08 •...
... switch is on 1. Check the plug connection in the switch housing. 4. Problem: Noisy operation. 1. Problem: Lights dim when turned on or do not turn on . 6. fan does not move. 1. Pull the pull chain to ensure that the hanger ball is cracked. Check to make sure the wattage and type of light... you need parts or service assistance, please call 888‑830‑1326 or visit us at our Web site at http://www.hunterfan.com. Hunter Fan Company 2500 Frisco Avenue Memphis, Tennessee 38114 13 42631-01 • 10/13/08 •...
Parts Guide
Page 1
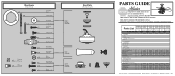
...Blade Iron Armature Screw, Blade Assembly Blade Grommet Screw, Switch Housing Assembly Thumbscrew Screw, Machine, 6-32 Hanger Bracket Assembly Blade Assembly Switch Housing Assembly Fan Parts (Not Drawn to Scale) PARTS GUIDE Using this Parts Guide, make sure all parts are missing, DO NOT RETURN THIS ITEM TO THE...-08 03077-08 03077-08 3 77646-04 77646-04 77646-04 77646-04 77646-04 3 73560-13 77770-05 73560-13 73560-14 73560-15 Hunter Fan Company • 7130 Goodlett Farms Pkwy. #400 • Memphis, TN 38016 • www.hunterfan.com • 98000-01-661 03-15-2011 • &#...
...Blade Iron Armature Screw, Blade Assembly Blade Grommet Screw, Switch Housing Assembly Thumbscrew Screw, Machine, 6-32 Hanger Bracket Assembly Blade Assembly Switch Housing Assembly Fan Parts (Not Drawn to Scale) PARTS GUIDE Using this Parts Guide, make sure all parts are missing, DO NOT RETURN THIS ITEM TO THE...-08 03077-08 03077-08 3 77646-04 77646-04 77646-04 77646-04 77646-04 3 73560-13 77770-05 73560-13 73560-14 73560-15 Hunter Fan Company • 7130 Goodlett Farms Pkwy. #400 • Memphis, TN 38016 • www.hunterfan.com • 98000-01-661 03-15-2011 • &#...


