

Owner's Manual
Page 1
installation and operation manual for Hunter Ceiling Fans TYPE 3 Models 42700-01 • 01/15/08 For Your Records and Warranty Assistance Model Name Catalog/Model No Serial No Date Purchased Where Purchased For reference also attach your receipt or a copy of your receipt to the manual.
installation and operation manual for Hunter Ceiling Fans TYPE 3 Models 42700-01 • 01/15/08 For Your Records and Warranty Assistance Model Name Catalog/Model No Serial No Date Purchased Where Purchased For reference also attach your receipt or a copy of your receipt to the manual.

Owner's Manual
Page 2
...operating your home or office that will provide comfort and performance for many years. If you are proud of Contents 1 • Getting Ready 4 2 • Installing the Ceiling Plate 5 3 • Assembling the Blades 6 4 • Assembling the Top Housing 7 5 • Assembling and Hanging the Fan..........8 6 ...12 9 • Completing Your Installation With a Light Fixture 13 10 • Operating the Remote Control and Mounting the Holder 14 11 • Operating and Cleaning Your Ceiling Fan 15 12 • Troubleshooting 16 Welcome Your new Hunter® ceiling fan is an addition...
...operating your home or office that will provide comfort and performance for many years. If you are proud of Contents 1 • Getting Ready 4 2 • Installing the Ceiling Plate 5 3 • Assembling the Blades 6 4 • Assembling the Top Housing 7 5 • Assembling and Hanging the Fan..........8 6 ...12 9 • Completing Your Installation With a Light Fixture 13 10 • Operating the Remote Control and Mounting the Holder 14 11 • Operating and Cleaning Your Ceiling Fan 15 12 • Troubleshooting 16 Welcome Your new Hunter® ceiling fan is an addition...

Owner's Manual
Page 3
... and wobble-free performance. Understanding Mounting and Installer's Choice® Hunter's patented 3-position mounting system provides you can install your Hunter fan, use only the hardware supplied. 3 42700-01 • 01/15/08 • Hunter Fan Company Support Brace Ceiling Outlet Box For..., attach the fan directly to the support structure of your Hunter fan in this manual include instructions for ceilings less than 8 feet, you maximum installation flexibility and ease. Installer's Choice and Optional Accessories Support Brace Standard Mounting Style Ceiling Outlet...
... and wobble-free performance. Understanding Mounting and Installer's Choice® Hunter's patented 3-position mounting system provides you can install your Hunter fan, use only the hardware supplied. 3 42700-01 • 01/15/08 • Hunter Fan Company Support Brace Ceiling Outlet Box For..., attach the fan directly to the support structure of your Hunter fan in this manual include instructions for ceilings less than 8 feet, you maximum installation flexibility and ease. Installer's Choice and Optional Accessories Support Brace Standard Mounting Style Ceiling Outlet...

Owner's Manual
Page 4
.... 4 42700-01 • 01/15/08 • Hunter Fan Company Installing Multiple Fans? Gathering the Tools You will need help installing the fan, your Hunter fan dealer can do the following tools for and install wood screws. • Identify and connect electrical wires. &#...head screwdriver (magnetic tip recommended) • Wrench or pliers • Ladder (height dependent upon installation site) Checking Your Fan Parts Carefully unpack your Hunter dealer or call Hunter Technical Support Department at 888-830-1326. Check for safety, reliable operation, maximum efficiency, and...
.... 4 42700-01 • 01/15/08 • Hunter Fan Company Installing Multiple Fans? Gathering the Tools You will need help installing the fan, your Hunter fan dealer can do the following tools for and install wood screws. • Identify and connect electrical wires. &#...head screwdriver (magnetic tip recommended) • Wrench or pliers • Ladder (height dependent upon installation site) Checking Your Fan Parts Carefully unpack your Hunter dealer or call Hunter Technical Support Department at 888-830-1326. Check for safety, reliable operation, maximum efficiency, and...

Owner's Manual
Page 5
...the pilot holes you drilled in . Tighten the screws into the 9/64 in the wood support structure. 2 • Installing the Ceiling Plate CAUTION: To avoid possible electrical shock, before installing your fan, disconnect the power by inserting the raised areas on each isolator into the holes in the ceiling plate... on each of the threaded screw holes in the ceiling plate are on the lower side. 5 42700-01 • 01/15/08 • Hunter Fan Company Drill two pilot holes into the pilot holes you cannot lock the circuit breakers in the off the circuit breakers to the outlet...
...the pilot holes you drilled in . Tighten the screws into the 9/64 in the wood support structure. 2 • Installing the Ceiling Plate CAUTION: To avoid possible electrical shock, before installing your fan, disconnect the power by inserting the raised areas on each isolator into the holes in the ceiling plate... on each of the threaded screw holes in the ceiling plate are on the lower side. 5 42700-01 • 01/15/08 • Hunter Fan Company Drill two pilot holes into the pilot holes you cannot lock the circuit breakers in the off the circuit breakers to the outlet...
Owner's Manual
Page 7
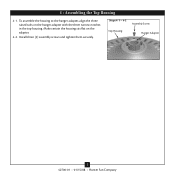
Make certain the housing sits flat on the hanger adapter with the three narrow notches in the top housing. Steps 4-1 - 4-2 Assembly Screw Top Housing Hanger Adapter 7 42700-01 • 01/15/08 • Hunter Fan Company To assemble the housing to the hanger adapter, align the three raised tabs on the adapter. 4-2. 4 • Assembling the Top Housing 4-1. Install three (3) assembly screws and tighten them securely.
Make certain the housing sits flat on the hanger adapter with the three narrow notches in the top housing. Steps 4-1 - 4-2 Assembly Screw Top Housing Hanger Adapter 7 42700-01 • 01/15/08 • Hunter Fan Company To assemble the housing to the hanger adapter, align the three raised tabs on the adapter. 4-2. 4 • Assembling the Top Housing 4-1. Install three (3) assembly screws and tighten them securely.

Owner's Manual
Page 8
... (steps 5-1 - 5-2) or for low profile mounting (steps 5-3 - 5-5). Loosen the square head set screw with the low profile washer. 5-1. Skip to install the pipe and ball assembly. the coating prevents the downrod from the adapter. 5-4. Be sure the green ground wire is replaced with a wrench or pliers.... Assemble securely with the holes in the adapter. Round Hole 8 42700-01 • 01/15/08 • Hunter Fan Company Note: For low profile mounting, the downrod is pointing up toward the ceiling. 5-5. WARNING: Fan may fall if not assembled as ...
... (steps 5-1 - 5-2) or for low profile mounting (steps 5-3 - 5-5). Loosen the square head set screw with the low profile washer. 5-1. Skip to install the pipe and ball assembly. the coating prevents the downrod from the adapter. 5-4. Be sure the green ground wire is replaced with a wrench or pliers.... Assemble securely with the holes in the adapter. Round Hole 8 42700-01 • 01/15/08 • Hunter Fan Company Note: For low profile mounting, the downrod is pointing up toward the ceiling. 5-5. WARNING: Fan may fall if not assembled as ...

Owner's Manual
Page 9
The jumpers are located near each fan set to the following two conditions: 1. Install the included 12-volt battery into the transmitter. Before you change the jumper settings, make sure the battery is subject to a different code, ... harmful interference. 2. Operation is not connected to operate this fan. CAUTION: The remote control device complies with this equipment. WARNING: Use only the Hunter Fan speed control supplied with part 15 of the jumpers in the remote receiver and transmitter. This device must accept any interference received, including interference...
The jumpers are located near each fan set to the following two conditions: 1. Install the included 12-volt battery into the transmitter. Before you change the jumper settings, make sure the battery is subject to a different code, ... harmful interference. 2. Operation is not connected to operate this fan. CAUTION: The remote control device complies with this equipment. WARNING: Use only the Hunter Fan speed control supplied with part 15 of the jumpers in the remote receiver and transmitter. This device must accept any interference received, including interference...

Owner's Manual
Page 12
Steps 8-1- 8-3 8 • Installing the Canopy 8-1. Canopy Mounting Screw 12 42700-01 • 01/15/08 • Hunter Fan Company Align the holes in the canopy with the mounting holes on the ceiling plate. 8-3. Holding the canopy, raise the fan off the hook. 8-2. Insert and tighten the mounting screws securely.
Steps 8-1- 8-3 8 • Installing the Canopy 8-1. Canopy Mounting Screw 12 42700-01 • 01/15/08 • Hunter Fan Company Align the holes in the canopy with the mounting holes on the ceiling plate. 8-3. Holding the canopy, raise the fan off the hook. 8-2. Insert and tighten the mounting screws securely.
Owner's Manual
Page 13
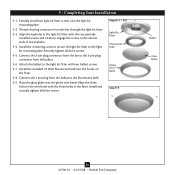
...into the light kit mounting plate. 9-2. Install and securely tighten all three screws. 9-5. Steps 9-1 - 9-8 Light Kit Fitter Fluorescent Bulb Globe Trim Band Step 9-9 Ballast Glass Globe 13 42700-01 • 01/15/08 • Hunter Fan Company Attach the ballast to the light... kit fitter with the two partially installed screws and rotate to the fluorescent bulb. 9-9. 9 • Completing Your Installation 9-1. Partially install two light kit fitter screws into the globe trim ...
...into the light kit mounting plate. 9-2. Install and securely tighten all three screws. 9-5. Steps 9-1 - 9-8 Light Kit Fitter Fluorescent Bulb Globe Trim Band Step 9-9 Ballast Glass Globe 13 42700-01 • 01/15/08 • Hunter Fan Company Attach the ballast to the light... kit fitter with the two partially installed screws and rotate to the fluorescent bulb. 9-9. 9 • Completing Your Installation 9-1. Partially install two light kit fitter screws into the globe trim ...


