
Owner's Manual
Page 2
...; Assembling the Blades 10 7 • Completing Your Installation With or Without a Multi Staked Light Fixture 11 8 • Operating and Cleaning Your Ceiling Fan 14 9 • Troubleshooting 15 Welcome Your new Hunter® ceiling fan is an addition to supply you are proud of the building according to these instructions, and use only the hardware supplied...
...; Assembling the Blades 10 7 • Completing Your Installation With or Without a Multi Staked Light Fixture 11 8 • Operating and Cleaning Your Ceiling Fan 14 9 • Troubleshooting 15 Welcome Your new Hunter® ceiling fan is an addition to supply you are proud of the building according to these instructions, and use only the hardware supplied...

Owner's Manual
Page 3
...'s Choice mounting methods. You can purchase Hunter extension downrods. The steps in one of three ways, depending on ceiling height and your Hunter fan, use only Hunter speed controls. Considering Optional Accessories Consider using Hunter's optional accessories, including a wall-mounted or...Profile, Standard, or Angled mounting. Angled Mounting Style 8 12 Angled Mounting recommended for ceilings less than 8 feet, you maximum installation flexibility and ease. All Hunter fans use sturdy 3/4" diameter pipe to these instructions, and use the accessories, follow the instructions...
...'s Choice mounting methods. You can purchase Hunter extension downrods. The steps in one of three ways, depending on ceiling height and your Hunter fan, use only Hunter speed controls. Considering Optional Accessories Consider using Hunter's optional accessories, including a wall-mounted or...Profile, Standard, or Angled mounting. Angled Mounting Style 8 12 Angled Mounting recommended for ceilings less than 8 feet, you maximum installation flexibility and ease. All Hunter fans use sturdy 3/4" diameter pipe to these instructions, and use the accessories, follow the instructions...

Owner's Manual
Page 4
... in the pullout sheet called "Preparing the Fan Site." Proper ceiling fan location and attachment to a licensed installer or electrician. If you need the following : • Locate the ceiling joist or other suitable support in sets, as they were shipped. 4 42508-01 • 09/23/08 • Hunter Fan Company Gathering the Tools You will need...
... in the pullout sheet called "Preparing the Fan Site." Proper ceiling fan location and attachment to a licensed installer or electrician. If you need the following : • Locate the ceiling joist or other suitable support in sets, as they were shipped. 4 42508-01 • 09/23/08 • Hunter Fan Company Gathering the Tools You will need...

Owner's Manual
Page 5
... device, such as a tag, to the outlet box and associated wall switch location. Isolator Ceiling Plate 2-1. For proper alignment use lubricants on the ceiling plate are pointing toward the ceiling peak. 5 42508-01 • 09/23/08 • Hunter Fan Company If you cannot lock the circuit breakers in the off the circuit breakers to...
... device, such as a tag, to the outlet box and associated wall switch location. Isolator Ceiling Plate 2-1. For proper alignment use lubricants on the ceiling plate are pointing toward the ceiling peak. 5 42508-01 • 09/23/08 • Hunter Fan Company If you cannot lock the circuit breakers in the off the circuit breakers to...

Owner's Manual
Page 6
... do not remove the downrod. 3-4. Go to hang down from the fan through the canopy and canopy trim ring. Securely retighten the setscrew with Hook 6 42508-01 • 09/23/08 • Hunter Fan Company Loop Step 3-4 Downrod Canopy Canopy Trim Ring Setscrew Downrod with a ...wrench or pliers. Steps 3-1 - 3-2 You can assemble your fan for standard or angled mounting as directed in steps 3-1 - 3-4. To assemble fan to 4 • Wiring the Fan. Feed the wires from a flat or angled ceiling, ...
... do not remove the downrod. 3-4. Go to hang down from the fan through the canopy and canopy trim ring. Securely retighten the setscrew with Hook 6 42508-01 • 09/23/08 • Hunter Fan Company Loop Step 3-4 Downrod Canopy Canopy Trim Ring Setscrew Downrod with a ...wrench or pliers. Steps 3-1 - 3-2 You can assemble your fan for standard or angled mounting as directed in steps 3-1 - 3-4. To assemble fan to 4 • Wiring the Fan. Feed the wires from a flat or angled ceiling, ...
Owner's Manual
Page 7
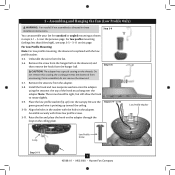
...The screw should be tight, but still allow the hook to rotate slightly. 3-9. Assemble securely with the low profile washer. 3-5. For low profile mounting (ceilings less than 8 feet high), see steps 3-5 - 3-11 on this coating; Remove the screw from the hanger ball on the threads. Place the low... onto the adapter using the setscrew. Low Profile Washer Loop Step 3-11 Low Profile Screw 7 42508-01 • 09/23/08 • Hunter Fan Company For Low Profile Mounting: Note: For low profile mounting, the downrod is pointing up ) into the canopy. Do not remove this page....
...The screw should be tight, but still allow the hook to rotate slightly. 3-9. Assemble securely with the low profile washer. 3-5. For low profile mounting (ceilings less than 8 feet high), see steps 3-5 - 3-11 on this coating; Remove the screw from the hanger ball on the threads. Place the low... onto the adapter using the setscrew. Low Profile Washer Loop Step 3-11 Low Profile Screw 7 42508-01 • 09/23/08 • Hunter Fan Company For Low Profile Mounting: Note: For low profile mounting, the downrod is pointing up ) into the canopy. Do not remove this page....
Owner's Manual
Page 8
...bare or green ground wire from the ceiling to the green ground wire from the ceiling plate and the green ground wire from the fan • The white wire from the ceiling to the white wire from the fan • The black wire from the ceiling to the black and the black/... them, then twist clockwise until tight. Wire Connector Dual Switch Wiring Single Switch Wiring 8 42508-01 • 09/23/08 • Hunter Fan Company Wall switches are visible after making connections. Select an acceptable general-use a qualified electrician. Push all wires and wire connectors back through the...
...bare or green ground wire from the ceiling to the green ground wire from the ceiling plate and the green ground wire from the fan • The white wire from the ceiling to the white wire from the fan • The black wire from the ceiling to the black and the black/... them, then twist clockwise until tight. Wire Connector Dual Switch Wiring Single Switch Wiring 8 42508-01 • 09/23/08 • Hunter Fan Company Wall switches are visible after making connections. Select an acceptable general-use a qualified electrician. Push all wires and wire connectors back through the...

Owner's Manual
Page 9
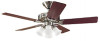
...hole on top of tabs. 2. Using both pointing toward the canopy. Press firmly on the ceiling plate. 5-2. 5 • Installing the Canopy and Canopy Trim Ring Note: Be sure the arrows on the downrod and ...on the ceiling plate are aligned. 5-3. Once all three screws are in the ceiling plate are both hands, push the canopy trim ring up to remove the canopy trim ring, ... Steps 5-2 - 5-3 Canopy Screw Step 5-4 Canopy Canopy Trim Ring 9 42508-01 • 09/23/08 • Hunter Fan Company Raise the canopy.
...hole on top of tabs. 2. Using both pointing toward the canopy. Press firmly on the ceiling plate. 5-2. 5 • Installing the Canopy and Canopy Trim Ring Note: Be sure the arrows on the downrod and ...on the ceiling plate are aligned. 5-3. Once all three screws are in the ceiling plate are both hands, push the canopy trim ring up to remove the canopy trim ring, ... Steps 5-2 - 5-3 Canopy Screw Step 5-4 Canopy Canopy Trim Ring 9 42508-01 • 09/23/08 • Hunter Fan Company Raise the canopy.

Owner's Manual
Page 12
...the light fixture. Raise the shade to the upper switch housing Plug Connector Lower Switch Housing 7-8. Exceeding that limit or the marked limit on this ceiling fan contains a device that restricts the light kit to the lower plug connector in the lower switch housing assembly. To install each ). Tighten the ...190 Watts. Incorrect connection could cause improper operation and damage to the product. 7-7. Steps 7-8 - 7-10 12 42508-01 • 09/23/08 • Hunter Fan Company Shade Bulb 7 • Completing Your Installation With or Without a Multi Staked Light Fixture (Cont.) 7-6.
...the light fixture. Raise the shade to the upper switch housing Plug Connector Lower Switch Housing 7-8. Exceeding that limit or the marked limit on this ceiling fan contains a device that restricts the light kit to the lower plug connector in the lower switch housing assembly. To install each ). Tighten the ...190 Watts. Incorrect connection could cause improper operation and damage to the product. 7-7. Steps 7-8 - 7-10 12 42508-01 • 09/23/08 • Hunter Fan Company Shade Bulb 7 • Completing Your Installation With or Without a Multi Staked Light Fixture (Cont.) 7-6.

Owner's Manual
Page 14
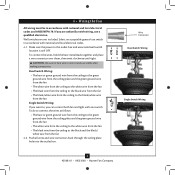
... and dust using a mild detergent and a slightly dampened cloth. Clean wood finish blades with a direct breeze. 8 • Operating and Cleaning Your Ceiling Fan 8-1. The pull chain has four settings in the same manner as they will distribute the warmer air trapped at the... ceiling around the room without causing a draft. 8-5. Clean painted and high-gloss blades in sequence: High, Medium, Low, and Off. • Pull the chain slowly to change settings. • Release slowly to the fan. Reversing Switch 14 42508-01 • 09/23/08 • Hunter Fan Company In ...
... and dust using a mild detergent and a slightly dampened cloth. Clean wood finish blades with a direct breeze. 8 • Operating and Cleaning Your Ceiling Fan 8-1. The pull chain has four settings in the same manner as they will distribute the warmer air trapped at the... ceiling around the room without causing a draft. 8-5. Clean painted and high-gloss blades in sequence: High, Medium, Low, and Off. • Pull the chain slowly to change settings. • Release slowly to the fan. Reversing Switch 14 42508-01 • 09/23/08 • Hunter Fan Company In ...


