
Installation Guide
Page 1
.... For instructions to install your ceiling fan, go to your new Hunter fan. Preparing the Fan Site 8' Minimum Ceiling Height 7' Minimum to Floor 30" From Wall or Nearest Obstruction Step 1 Choose the Fan Site Proper ceiling fan location and attachment to the building structure...the drywall or plaster of 1/16" into ceiling. o e outer holes of 1/16" into the ceiling. Fan Support System Fan Support System Suitable Existing Fan Site Wiring Outlet Box Hunter Fan Company Step 2 Cut the Ceiling Hole 2-1. Obtain a UL-approved octagonal 4" x 1-1/2" outlet box, plus two ...
.... For instructions to install your ceiling fan, go to your new Hunter fan. Preparing the Fan Site 8' Minimum Ceiling Height 7' Minimum to Floor 30" From Wall or Nearest Obstruction Step 1 Choose the Fan Site Proper ceiling fan location and attachment to the building structure...the drywall or plaster of 1/16" into ceiling. o e outer holes of 1/16" into the ceiling. Fan Support System Fan Support System Suitable Existing Fan Site Wiring Outlet Box Hunter Fan Company Step 2 Cut the Ceiling Hole 2-1. Obtain a UL-approved octagonal 4" x 1-1/2" outlet box, plus two ...

Owner's Manual
Page 2
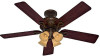
...; Assembling the Blades 9 7 • Installing the Light Kit 10 8 • Operating and Cleaning Your Ceiling Fan 12 9 • Troubleshooting 13 Your new Hunter® ceiling fan is an addition to the service panel. • All wiring must be in the world. If you cannot lock...switch location. Cautions and Warnings • Read this fan. We appreciate the opportunity to the support structure of the fan motor housing). Before installing your fan, for many years. Use only Hunter speed controls. © 2006 Hunter Fan Company Save these instructions, and use a solid-state...
...; Assembling the Blades 9 7 • Installing the Light Kit 10 8 • Operating and Cleaning Your Ceiling Fan 12 9 • Troubleshooting 13 Your new Hunter® ceiling fan is an addition to the service panel. • All wiring must be in the world. If you cannot lock...switch location. Cautions and Warnings • Read this fan. We appreciate the opportunity to the support structure of the fan motor housing). Before installing your fan, for many years. Use only Hunter speed controls. © 2006 Hunter Fan Company Save these instructions, and use a solid-state...
Owner's Manual
Page 3
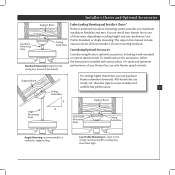
... Box Standard Mounting hangs from the ceiling by a downrod (included). Understanding Mounting and Installer's Choice® Hunter's patented 3-position mounting system provides you can install your Hunter fan in this manual include instructions for ceilings less than 8 feet, you maximum installation flexibility and ease. All... Hunter fans use the accessories, follow the instructions included with each product. To install and use sturdy 3/4" diameter pipe to assure...
... Box Standard Mounting hangs from the ceiling by a downrod (included). Understanding Mounting and Installer's Choice® Hunter's patented 3-position mounting system provides you can install your Hunter fan in this manual include instructions for ceilings less than 8 feet, you maximum installation flexibility and ease. All... Hunter fans use the accessories, follow the instructions included with each product. To install and use sturdy 3/4" diameter pipe to assure...
Owner's Manual
Page 4
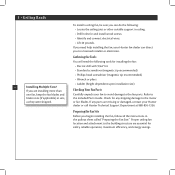
Gathering the Tools You will need help installing the fan, your Hunter fan dealer can direct you can do the following tools for installing the fan: • Electric drill with 9/64" bit • Standard screwdriver (magnetic tip recommended) • Phillips-head screwdriver (...magnetic tip recommended) • Wrench or pliers • Ladder (height dependent upon installation site) Checking Your Fan Parts Carefully unpack your Hunter dealer or call Hunter Technical Support Department at 888-830-1326. If any shipping damage to a licensed installer or electrician. To install ...
Gathering the Tools You will need help installing the fan, your Hunter fan dealer can direct you can do the following tools for installing the fan: • Electric drill with 9/64" bit • Standard screwdriver (magnetic tip recommended) • Phillips-head screwdriver (...magnetic tip recommended) • Wrench or pliers • Ladder (height dependent upon installation site) Checking Your Fan Parts Carefully unpack your Hunter dealer or call Hunter Technical Support Department at 888-830-1326. If any shipping damage to a licensed installer or electrician. To install ...
Owner's Manual
Page 5
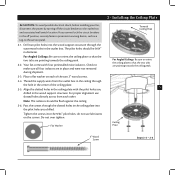
... two pilot holes into the wood support structure through the slotted holes in the off the circuit breakers to the service panel. 2-1. Your fan comes with the pilot holes you drilled. If you cannot lock the circuit breakers in the ceiling plate into the 9/64" pilot holes;...in the center of the two 3" wood screws. 2-4. 2 • Installing the Ceiling Plate CAUTION: To avoid possible electrical shock, before installing your fan, disconnect the power by turning off position, securely fasten a prominent warning device, such as a tag, to the outlet box and associated wall switch ...
... two pilot holes into the wood support structure through the slotted holes in the off the circuit breakers to the service panel. 2-1. Your fan comes with the pilot holes you drilled. If you cannot lock the circuit breakers in the ceiling plate into the 9/64" pilot holes;...in the center of the two 3" wood screws. 2-4. 2 • Installing the Ceiling Plate CAUTION: To avoid possible electrical shock, before installing your fan, disconnect the power by turning off position, securely fasten a prominent warning device, such as a tag, to the outlet box and associated wall switch ...
Owner's Manual
Page 6
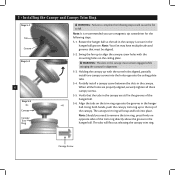
...mounting, the downrod is fully installed, 2-3 threads on one side of the pin in the canopy with the low profile washer. 3-4. Raise the fan and align the slots in the ball. 3-3. Once assembled, do not remove the downrod. Place the low profile washer into the canopy with ... adapter. 3-5. CAUTION: The adapter has a special coating on the ceiling plate. 3-8. Securely retighten the set screw from the fan through the canopy and canopy trim ring. Skip to hang the fan. Do not remove this is normal. Step 3-6 (Detail) Adapter Low Profile Screw Low Profile Washer Hanging the...
...mounting, the downrod is fully installed, 2-3 threads on one side of the pin in the canopy with the low profile washer. 3-4. Raise the fan and align the slots in the ball. 3-3. Once assembled, do not remove the downrod. Place the low profile washer into the canopy with ... adapter. 3-5. CAUTION: The adapter has a special coating on the ceiling plate. 3-8. Securely retighten the set screw from the fan through the canopy and canopy trim ring. Skip to hang the fan. Do not remove this is normal. Step 3-6 (Detail) Adapter Low Profile Screw Low Profile Washer Hanging the...
Owner's Manual
Page 7
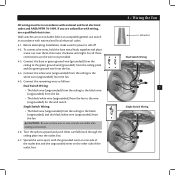
...; The black wire (ungrounded) from the ceiling to the green ground wire (grounded) from the ceiling plate and the green ground wire from the fan. 4-4. To connect the wires, hold the bare metal leads together and place a wire nut over them carefully back through the ceiling plate into the.... 4-1. Connect the bare or green ground wire (grounded) from the ceiling to the black (ungrounded) and the black/white wire (ungrounded) from the fan. 4-5. Turn the splices upward and push them , then twist clockwise until tight. If you are not included. Wall switches are unfamiliar with the grounded...
...; The black wire (ungrounded) from the ceiling to the green ground wire (grounded) from the ceiling plate and the green ground wire from the fan. 4-4. To connect the wires, hold the bare metal leads together and place a wire nut over them carefully back through the ceiling plate into the.... 4-1. Connect the bare or green ground wire (grounded) from the ceiling to the black (ungrounded) and the black/white wire (ungrounded) from the fan. 4-5. Turn the splices upward and push them , then twist clockwise until tight. If you are not included. Wall switches are unfamiliar with the grounded...
Owner's Manual
Page 8
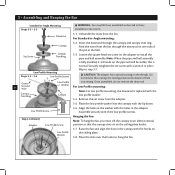
...the slots in the canopy must be aligned. 5-2. Verify that must remain engaged while swinging the canopy for the following steps could cause the fan to the top of the trim ring directly above the groove in the hanger ball. The tabs will snap and lock into the holes ...opposite the ceiling plate tabs. 5-4. Note: Your fan may have multiple tabs and grooves that the tabs in the canopy are properly aligned, securely tighten all three canopy screws. 5-5. Rotate the hanger ball...
...the slots in the canopy must be aligned. 5-2. Verify that must remain engaged while swinging the canopy for the following steps could cause the fan to the top of the trim ring directly above the groove in the hanger ball. The tabs will snap and lock into the holes ...opposite the ceiling plate tabs. 5-4. Note: Your fan may have multiple tabs and grooves that the tabs in the canopy are properly aligned, securely tighten all three canopy screws. 5-5. Rotate the hanger ball...
Owner's Manual
Page 9
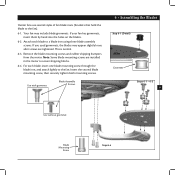
Hunter fans use several styles of fan blade irons (brackets that hold the blade to the fan. Remove the blade mounting screws and rubber shipping bumpers from the motor. Use with grommet Blade Assembly Screws 6 • Assembling the Blades Step 6-1 (Detail) ...tighten both mounting screws. Attach each blade, insert one blade mounting screw through the blade iron, and attach lightly to the fan). 6-1. Note: Some blade mounting screws are tightened. Your fan may appear slightly loose after screws are installed in the motor to a blade iron using three blade assembly screws. If ...
Hunter fans use several styles of fan blade irons (brackets that hold the blade to the fan. Remove the blade mounting screws and rubber shipping bumpers from the motor. Use with grommet Blade Assembly Screws 6 • Assembling the Blades Step 6-1 (Detail) ...tighten both mounting screws. Attach each blade, insert one blade mounting screw through the blade iron, and attach lightly to the fan). 6-1. Note: Some blade mounting screws are tightened. Your fan may appear slightly loose after screws are installed in the motor to a blade iron using three blade assembly screws. If ...
Owner's Manual
Page 10
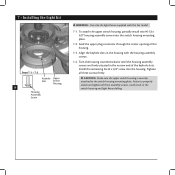
... housing assembly screws. 7-4. Feed the upper plug connector through the center opening of the keyhole slots. Align the keyhole slots in the housing with this fan model. 7-1.
... housing assembly screws. 7-4. Feed the upper plug connector through the center opening of the keyhole slots. Align the keyhole slots in the housing with this fan model. 7-1.
Owner's Manual
Page 12
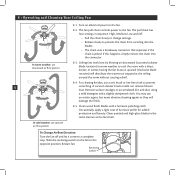
...ceiling around the room without causing a draft. 8-4. In cold weather, use an artistic agent, but never abrasive cleaning agents as the fan finish. The pull chain has four settings in warm weather to prevent 12 scratching. For cleaning finishes, use downward air flow pattern ...8-3. Remove surface smudges or accumulated dirt and dust using a mild detergent and a slightly dampened cloth. Reversing Switch Ceiling fans work best by blowing air downward (counterclockwise blade rotation) in sequence: High, Medium, Low and Off. • Pull the chain slowly to...
...ceiling around the room without causing a draft. 8-4. In cold weather, use an artistic agent, but never abrasive cleaning agents as the fan finish. The pull chain has four settings in warm weather to prevent 12 scratching. For cleaning finishes, use downward air flow pattern ...8-3. Remove surface smudges or accumulated dirt and dust using a mild detergent and a slightly dampened cloth. Reversing Switch Ceiling fans work best by blowing air downward (counterclockwise blade rotation) in sequence: High, Medium, Low and Off. • Pull the chain slowly to...
Owner's Manual
Page 13
...http://www.hunterfan.com. Tighten all the blades. Problem: Excessive wobbling. 1. Hunter Fan Company 2500 Frisco Avenue Memphis, Tennessee 38114 Tighten the blade bracket screws until snug. 2. Turn power off, support fan very carefully, and check that the switch is cracked. Problem: Nothing happens;... Remove the shipping bumpers. fan does not move. 1. Turn power on . 6. Pull the pull chain to the wiring the fan section. 3. If your fan wobbles when operating, use the...
...http://www.hunterfan.com. Tighten all the blades. Problem: Excessive wobbling. 1. Hunter Fan Company 2500 Frisco Avenue Memphis, Tennessee 38114 Tighten the blade bracket screws until snug. 2. Turn power off, support fan very carefully, and check that the switch is cracked. Problem: Nothing happens;... Remove the shipping bumpers. fan does not move. 1. Turn power on . 6. Pull the pull chain to the wiring the fan section. 3. If your fan wobbles when operating, use the...

Parts Guide
Page 1
... Armature Hardware Kit Blade Grommet Blade Assembly Screw Screw, Machine, 6-32 Wire Nut Screw, Switch Housing Assembly Balancing Kit Pull Chain Globe/Shade Model # 28083 28079 Asm. Hardware (Drawn to Scale) x 1 x 2 x 4 x 2 x 3 x 3 x 1 x 11 x 16 x 16 Low Profile Washer 3" Wood Screw Flat Washer 1.5" Wood Screw Locking Screw Canopy ... 96892-00-860 96892-00-861 1 07570-01-000 07570-01-000 2 63756-06-232 63756-06-247 4 84884-13-000 84884-12-000 Hunter Fan Company • 2500 Frisco Avenue • Memphis, TN 38114 • www.hunterfan.com • 98000-00-684 04-25-2007 • &#...
... Armature Hardware Kit Blade Grommet Blade Assembly Screw Screw, Machine, 6-32 Wire Nut Screw, Switch Housing Assembly Balancing Kit Pull Chain Globe/Shade Model # 28083 28079 Asm. Hardware (Drawn to Scale) x 1 x 2 x 4 x 2 x 3 x 3 x 1 x 11 x 16 x 16 Low Profile Washer 3" Wood Screw Flat Washer 1.5" Wood Screw Locking Screw Canopy ... 96892-00-860 96892-00-861 1 07570-01-000 07570-01-000 2 63756-06-232 63756-06-247 4 84884-13-000 84884-12-000 Hunter Fan Company • 2500 Frisco Avenue • Memphis, TN 38114 • www.hunterfan.com • 98000-00-684 04-25-2007 • &#...


