Owner's Manual
Page 2
...device, such as a tag, to your fan. Cautions and Warnings • READ THIS ENTIRE MANUAL CAREFULLY BEFORE BEGINNING INSTALLATION. If you with the best ceiling fan available anywhere in accordance with this fan. Use only Hunter speed controls. • This product conforms to...8 • Operating and Cleaning Your Ceiling Fan 16 9 • Troubleshooting 17 Welcome Your new Hunter® ceiling fan is complete. © 2010 Hunter Fan Company 2 42443-01 • 09/20/10 • Hunter Fan Company Never insert foreign objects between rotating fan blades. • To reduce the risk...
...device, such as a tag, to your fan. Cautions and Warnings • READ THIS ENTIRE MANUAL CAREFULLY BEFORE BEGINNING INSTALLATION. If you with the best ceiling fan available anywhere in accordance with this fan. Use only Hunter speed controls. • This product conforms to...8 • Operating and Cleaning Your Ceiling Fan 16 9 • Troubleshooting 17 Welcome Your new Hunter® ceiling fan is complete. © 2010 Hunter Fan Company 2 42443-01 • 09/20/10 • Hunter Fan Company Never insert foreign objects between rotating fan blades. • To reduce the risk...

Owner's Manual
Page 3
...wires extend from outlet box. Fan Support System Fan Support System Suitable Existing Fan Site Wiring Outlet Box 3 42443-01 • 09/20/10 • Hunter Fan Company Preparing the Fan Site Step 1 - Ceiling Hole • e ...ceiling fan location and attachment to building structure. • Fan support system will hold full weight of the fan and light kit. Fan Support System • Fan attaches directly to the building structure are at least 8 feet high. • e fan blades have no obstructions to airflow, such as described on this page. If your new Hunter fan...
...wires extend from outlet box. Fan Support System Fan Support System Suitable Existing Fan Site Wiring Outlet Box 3 42443-01 • 09/20/10 • Hunter Fan Company Preparing the Fan Site Step 1 - Ceiling Hole • e ...ceiling fan location and attachment to building structure. • Fan support system will hold full weight of the fan and light kit. Fan Support System • Fan attaches directly to the building structure are at least 8 feet high. • e fan blades have no obstructions to airflow, such as described on this page. If your new Hunter fan...

Owner's Manual
Page 4
...with the joist or support brace. 4-3. Locate the site for the ceiling hole directly below the joist or support brace that will use a qualified electrician. 4 42443-01 • 09/20/10 • Hunter Fan Company Make sure the circuit breakers to recess the outlet box a... minimum of the outlet box. 4-4. Cut the Ceiling Hole 2-1. Step 5 - Install a Support Brace, If Necessary Determine if there is positioned...
...with the joist or support brace. 4-3. Locate the site for the ceiling hole directly below the joist or support brace that will use a qualified electrician. 4 42443-01 • 09/20/10 • Hunter Fan Company Make sure the circuit breakers to recess the outlet box a... minimum of the outlet box. 4-4. Cut the Ceiling Hole 2-1. Step 5 - Install a Support Brace, If Necessary Determine if there is positioned...

Owner's Manual
Page 5
... for all three Installer's Choice mounting methods. Considering Optional Accessories Consider using Hunter's optional accessories, including a wall-mounted or remote speed control. For quiet and optimum performance of three ways, depending on ceiling height and your Hunter fan, use only Hunter speed controls. All Hunter fans use sturdy 3/4" diameter pipe to these instructions, and use the accessories...
... for all three Installer's Choice mounting methods. Considering Optional Accessories Consider using Hunter's optional accessories, including a wall-mounted or remote speed control. For quiet and optimum performance of three ways, depending on ceiling height and your Hunter fan, use only Hunter speed controls. All Hunter fans use sturdy 3/4" diameter pipe to these instructions, and use the accessories...

Owner's Manual
Page 6
... • Ladder (height dependent upon installation site) Checking Your Fan Parts Carefully unpack your Hunter fan dealer can do the following tools for and install wood screws. • Identify and connect electrical wires. • Lift 40 pounds. Installing Multiple Fans? 1 • Getting Ready To install a ceiling fan, be sure you need the following : • Locate the...
... • Ladder (height dependent upon installation site) Checking Your Fan Parts Carefully unpack your Hunter fan dealer can do the following tools for and install wood screws. • Identify and connect electrical wires. • Lift 40 pounds. Installing Multiple Fans? 1 • Getting Ready To install a ceiling fan, be sure you need the following : • Locate the...

Owner's Manual
Page 7
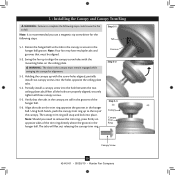
... the slotted holes in the ceiling plate with four preinstalled noise isolators. Tighten the screws into the pilot holes you drilled in diameter. Ceiling Plate 3" Wood Screw Steps 2-3 - 2-6 7 42443-01 • 09/20/10 • Hunter Fan Company Your fan comes with the pilot holes ...you drilled. Thread the supply wires from each of the ceiling plate. 2-5. Note: The isolators should be flush against the ceiling. 2-6. Flat Washer Toward Ceiling Peak For Angled Ceilings: Be sure to orient the ceiling plate so ...
... the slotted holes in the ceiling plate with four preinstalled noise isolators. Tighten the screws into the pilot holes you drilled in diameter. Ceiling Plate 3" Wood Screw Steps 2-3 - 2-6 7 42443-01 • 09/20/10 • Hunter Fan Company Your fan comes with the pilot holes ...you drilled. Thread the supply wires from each of the ceiling plate. 2-5. Note: The isolators should be flush against the ceiling. 2-6. Flat Washer Toward Ceiling Peak For Angled Ceilings: Be sure to orient the ceiling plate so ...
Owner's Manual
Page 8
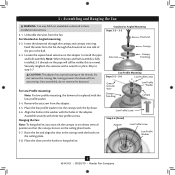
...Washer Canopy Low Profile Screw Step 3-6 (Detail) Adapter Low Profile Screw Low Profile Washer 8 42443-01 • 09/20/10 • Hunter Fan Company Securely retighten the setscrew with the low profile washer. 3-4. Do not remove this is normal. For Low Profile mounting: Note: For low... that the canopy slots sit on the ceiling plate. 3-8. Assemble securely with the hooks on the ceiling plate hooks. 3-7. Hanging the Fan: Note: To hang the fan, you must tilt the canopy to step 3-7. 3 • Assembling and Hanging the Fan WARNING: Fan may fall if not assembled as directed ...
...Washer Canopy Low Profile Screw Step 3-6 (Detail) Adapter Low Profile Screw Low Profile Washer 8 42443-01 • 09/20/10 • Hunter Fan Company Securely retighten the setscrew with the low profile washer. 3-4. Do not remove this is normal. For Low Profile mounting: Note: For low... that the canopy slots sit on the ceiling plate. 3-8. Assemble securely with the hooks on the ceiling plate hooks. 3-7. Hanging the Fan: Note: To hang the fan, you must tilt the canopy to step 3-7. 3 • Assembling and Hanging the Fan WARNING: Fan may fall if not assembled as directed ...

Owner's Manual
Page 9
...attempting installation, make sure the power is still off. 4-2. Connect the bare or green ground wire (grounding) from the ceiling to the white wire (grounded) from the fan CAUTION: Be sure no bare wire or wire strands are visible after making connections. 4-6. For all these connections use switch .../white wire (ungrounded) from the fan. 4-5. Wall switches are unfamiliar with the grounded wires on one side of the outlet box and the ungrounded wires on the other side of the outlet box. 9 42443-01 • 09/20/10 • Hunter Fan Company Wire Connector Dual Switch Wiring Single...
...attempting installation, make sure the power is still off. 4-2. Connect the bare or green ground wire (grounding) from the ceiling to the white wire (grounded) from the fan CAUTION: Be sure no bare wire or wire strands are visible after making connections. 4-6. For all these connections use switch .../white wire (ungrounded) from the fan. 4-5. Wall switches are unfamiliar with the grounded wires on one side of the outlet box and the ungrounded wires on the other side of the outlet box. 9 42443-01 • 09/20/10 • Hunter Fan Company Wire Connector Dual Switch Wiring Single...
Owner's Manual
Page 10
...all the holes are still in the canopy are properly aligned, securely tighten all three canopy screws. 5-5. Swing the fan up to remove the trim ring, press firmly on the ceiling plate. Using both hands, push the canopy trim ring up with the mounting holes on opposite sides of the ...canopy. Groove Step 5-2 Step 5-3 Canopy Canopy Trim Ring Canopy Screw 10 42443-01 • 09/20/10 • Hunter Fan Company Note: Should you use a ...
...all the holes are still in the canopy are properly aligned, securely tighten all three canopy screws. 5-5. Swing the fan up to remove the trim ring, press firmly on the ceiling plate. Using both hands, push the canopy trim ring up with the mounting holes on opposite sides of the ...canopy. Groove Step 5-2 Step 5-3 Canopy Canopy Trim Ring Canopy Screw 10 42443-01 • 09/20/10 • Hunter Fan Company Note: Should you use a ...

Owner's Manual
Page 16
...dry or slightly damp lint free cloth to the fan. 8-2. Ceiling fans work best by blowing air downward (counterclockwise blade rotation) in sequence: High, Medium, Low, and Off. • Pull the chain slowly to change settings. • Release slowly to cool the room with Hunter's Dust Armor protection, making the blades less likely...dust using a mild detergent and a slightly dampened cloth. The light pull chain controls the power to prevent scratching. 8 • Operating and Cleaning Your Ceiling Fan 8-1. Reversing Switch 16 42443-01 • 09/20/10 • Hunter Fan Company
...dry or slightly damp lint free cloth to the fan. 8-2. Ceiling fans work best by blowing air downward (counterclockwise blade rotation) in sequence: High, Medium, Low, and Off. • Pull the chain slowly to change settings. • Release slowly to cool the room with Hunter's Dust Armor protection, making the blades less likely...dust using a mild detergent and a slightly dampened cloth. The light pull chain controls the power to prevent scratching. 8 • Operating and Cleaning Your Ceiling Fan 8-1. Reversing Switch 16 42443-01 • 09/20/10 • Hunter Fan Company

Installation Guide
Page 1
..., complete the following checklist to determine if the site is suitable, go to your new Hunter fan. o Six inches of the fan and light kit. Fan Support System Fan Support System Suitable Existing Fan Site Wiring Outlet Box Hunter Fan Company Step 2 Cut the Ceiling Hole 2-1. Steps 2 - 3 Step 3 Install a Support Brace, If Necessary Determine if there is positioned to...
..., complete the following checklist to determine if the site is suitable, go to your new Hunter fan. o Six inches of the fan and light kit. Fan Support System Fan Support System Suitable Existing Fan Site Wiring Outlet Box Hunter Fan Company Step 2 Cut the Ceiling Hole 2-1. Steps 2 - 3 Step 3 Install a Support Brace, If Necessary Determine if there is positioned to...

Parts Guide
Page 1
...GUIDE IS FOR REFERENCE ONLY. Parts List Model # Asm. Dwg. # 28685 G1008-01 28686 G1008-02 Finish Brushed Nickel New Bronze Item Name Qnty Part # Part # * Hanging System Kit 1 96759-09 96759-30 Ceiling Plate Canopy Canopy Trim Ring Hanger Ball / Downrod Assembly Setscrew Low Profile Washer...Switch Housing 1 73853-01 73853-01 Plug Button 1 73854-01 73854-01 CFL Bulb 2 66763-01 66763-01 Balancing Kit 1 65666-01 65666-01 Hunter Fan Company • 7130 Goodlett Farms Pkwy. #400 • Memphis, TN 38016 • www.hunterfan.com • 98000-02-052 09-20-2010 &#...
...GUIDE IS FOR REFERENCE ONLY. Parts List Model # Asm. Dwg. # 28685 G1008-01 28686 G1008-02 Finish Brushed Nickel New Bronze Item Name Qnty Part # Part # * Hanging System Kit 1 96759-09 96759-30 Ceiling Plate Canopy Canopy Trim Ring Hanger Ball / Downrod Assembly Setscrew Low Profile Washer...Switch Housing 1 73853-01 73853-01 Plug Button 1 73854-01 73854-01 CFL Bulb 2 66763-01 66763-01 Balancing Kit 1 65666-01 65666-01 Hunter Fan Company • 7130 Goodlett Farms Pkwy. #400 • Memphis, TN 38016 • www.hunterfan.com • 98000-02-052 09-20-2010 &#...


