
Owners Manual
Page 2
...when making repairs. Failure to observe the following safety instructions could result in reverse. YOUR SAFETY IS INVOLVED. WARNING: This snow thrower is for use snow thrower on slippery surfaces. 4. Keep the area of operation clear of all doormats, sleds, boards, wires, and other reproductive ...refuel such equipment on the machine and in contact with the rim of trouble. IMPORTANT Safe Operation Practices for Walk-Behind Snow Throwers This snow thrower is highly flammable (f) Keep the nozzle in the manual(s) before or trailer bed with a plastic liner. Do not put...
...when making repairs. Failure to observe the following safety instructions could result in reverse. YOUR SAFETY IS INVOLVED. WARNING: This snow thrower is for use snow thrower on slippery surfaces. 4. Keep the area of operation clear of all doormats, sleds, boards, wires, and other reproductive ...refuel such equipment on the machine and in contact with the rim of trouble. IMPORTANT Safe Operation Practices for Walk-Behind Snow Throwers This snow thrower is highly flammable (f) Keep the nozzle in the manual(s) before or trailer bed with a plastic liner. Do not put...

Owners Manual
Page 3
...heaters, space heaters, or clothes dryers. Never direct the discharge toward people or areas where property damage can occur. Never operate the snow thrower without proper guards, and other bolts at high transport speeds on the handles. never run the engine indoors, except when starting the engine... chute: 1. SERIAL NUMBER DATE OF PURCHASE THE MODEL AND SERIAL NUMBERS WILL BE FOUND ON A DECAL ATTACHED TO THE REAR OF THE SNOW THROWER HOUSING. YOU SHOULD RECORD BOTH SERIAL NUMBER AND DATE OF PURCHASE AND KEEP IN A SAFE PLACE FOR FUTURE REFERENCE. 6. When cleaning, ...
...heaters, space heaters, or clothes dryers. Never direct the discharge toward people or areas where property damage can occur. Never operate the snow thrower without proper guards, and other bolts at high transport speeds on the handles. never run the engine indoors, except when starting the engine... chute: 1. SERIAL NUMBER DATE OF PURCHASE THE MODEL AND SERIAL NUMBERS WILL BE FOUND ON A DECAL ATTACHED TO THE REAR OF THE SNOW THROWER HOUSING. YOU SHOULD RECORD BOTH SERIAL NUMBER AND DATE OF PURCHASE AND KEEP IN A SAFE PLACE FOR FUTURE REFERENCE. 6. When cleaning, ...

Owners Manual
Page 5
... handle to lower handle. 2. Use to secure upper handle to the pallet. 4. INSTALL SPEED CONTROL ROD (See Figs. 1 and 2) 1. REMOVE SNOW THROWER FROM CARTON 1. Remove the two (2) screws securing the auger housing to lower handle. Additional carriage bolts, washers and handle knobs are in bag of...retainer spring. ASSEMBLY / PRE-OPERATION Read these instructions and this manual in its entirety before you attempt to assemble or operate your snow thrower, all packing materials except plastic tie holding speed control rod to lower handle. 5. All parts such as necessary to the operating ...
... handle to lower handle. 2. Use to secure upper handle to the pallet. 4. INSTALL SPEED CONTROL ROD (See Figs. 1 and 2) 1. REMOVE SNOW THROWER FROM CARTON 1. Remove the two (2) screws securing the auger housing to lower handle. Additional carriage bolts, washers and handle knobs are in bag of...retainer spring. ASSEMBLY / PRE-OPERATION Read these instructions and this manual in its entirety before you attempt to assemble or operate your snow thrower, all packing materials except plastic tie holding speed control rod to lower handle. 5. All parts such as necessary to the operating ...

Owners Manual
Page 7
... be loose on underside of mounting bracket. 4. Install spring hooks between hex nuts on chute rotater head and into hole in your snow thrower were overinflated at the factory for best snow throwing performance. • Reduce tire pressure to install the chute rotater head. 1. Install 3/8 washer and locknut on top of chute base... Tighten nut securely. Eyelet will be used to 14-17 PSI. 7 If necessary, rotate chute assembly to discharge chute with discharge opening toward front of snow thrower. 2. Place discharge chute assembly on threaded stud and tighten securely.
... be loose on underside of mounting bracket. 4. Install spring hooks between hex nuts on chute rotater head and into hole in your snow thrower were overinflated at the factory for best snow throwing performance. • Reduce tire pressure to install the chute rotater head. 1. Install 3/8 washer and locknut on top of chute base... Tighten nut securely. Eyelet will be used to 14-17 PSI. 7 If necessary, rotate chute assembly to discharge chute with discharge opening toward front of snow thrower. 2. Place discharge chute assembly on threaded stud and tighten securely.

Owners Manual
Page 8
... future reference. KEEP THESE INSTRUCTIONS FOR FUTURE REFERENCE. IGNITION KEY. Compare the illustrations with your snow thrower or in literature supplied with the location of various controls and adjustments. Learn and understand their meaning. DISENGAGED ENGAGED SNOW DISCHARGE TRACTION DRIVE CONTROL 8 DANGER OR WARNING PRIMER FORWARD REVERSE READ AND FOLLOW ALL SAFETY INFORMATION...
... future reference. KEEP THESE INSTRUCTIONS FOR FUTURE REFERENCE. IGNITION KEY. Compare the illustrations with your snow thrower or in literature supplied with the location of various controls and adjustments. Learn and understand their meaning. DISENGAGED ENGAGED SNOW DISCHARGE TRACTION DRIVE CONTROL 8 DANGER OR WARNING PRIMER FORWARD REVERSE READ AND FOLLOW ALL SAFETY INFORMATION...

Owners Manual
Page 9
...for starting a cold engine. Recoil (auxiliary) starter handle - Auger control lever - used to engage powerpropelled forward or reverse motion of snow thrower. used to adjust height of the American National Standards Institute. must be inserted for starting the engine. used to STOP the engine....select either FAST or SLOW engine speed and to select forward or reverse motion and speed of snow thrower. used for starting a cold engine. 9 Drift cutter - Remove when snow thrower is thrown. ACTUAL LOCATION MAY VARY WITH THE ENGINE ON YOUR UNIT. GASOLINE FILLER CAP ...
...for starting a cold engine. Recoil (auxiliary) starter handle - Auger control lever - used to engage powerpropelled forward or reverse motion of snow thrower. used to adjust height of the American National Standards Institute. must be inserted for starting the engine. used to STOP the engine....select either FAST or SLOW engine speed and to select forward or reverse motion and speed of snow thrower. used for starting a cold engine. 9 Drift cutter - Remove when snow thrower is thrown. ACTUAL LOCATION MAY VARY WITH THE ENGINE ON YOUR UNIT. GASOLINE FILLER CAP ...

Owners Manual
Page 10
... chute. STOPPING TRACTION DRIVE • Release traction drive control lever to "STOP" position. 2. Move throttle control to stop throwing snow. Always operate the snow thrower with the engine at all persons, small children and pets at full throttle. OPEN OFF FIG. 11 TO USE THROTTLE CONTROL (See...the engine. Set the deflector low to start a warm engine. • To engage choke, turn knob counterclockwise. HOW TO USE YOUR SNOW THROWER Know how to operate all moving parts to raise the deflector and increase the distance. AUGER • Release the auger control lever to ...
... chute. STOPPING TRACTION DRIVE • Release traction drive control lever to "STOP" position. 2. Move throttle control to stop throwing snow. Always operate the snow thrower with the engine at all persons, small children and pets at full throttle. OPEN OFF FIG. 11 TO USE THROTTLE CONTROL (See...the engine. Set the deflector low to start a warm engine. • To engage choke, turn knob counterclockwise. HOW TO USE YOUR SNOW THROWER Know how to operate all moving parts to raise the deflector and increase the distance. AUGER • Release the auger control lever to ...

Owners Manual
Page 11
...chute is recommended that direction. • To turn left - When a trigger is engaged. Damage to the snow thrower can result. • Slower speeds are for light snow and transporting the snow thrower. NOTE: When both traction drive and auger control levers are controlled by the drive speed control lever. •...lever and move speed control lever when traction drive control lever is squeezed, it disengages the drive wheel on that side of the snow thrower, is controlled by the auger control lever located on the right side handle. • Squeeze auger control lever to handle to ...
...chute is recommended that direction. • To turn left - When a trigger is engaged. Damage to the snow thrower can result. • Slower speeds are for light snow and transporting the snow thrower. NOTE: When both traction drive and auger control levers are controlled by the drive speed control lever. •...lever and move speed control lever when traction drive control lever is squeezed, it disengages the drive wheel on that side of the snow thrower, is controlled by the auger control lever located on the right side handle. • Squeeze auger control lever to handle to ...

Owners Manual
Page 12
...; When not using ethanol or methanol) can attract moisture which can cause serious personal injury, property damage or damage to the snow thrower. • If snow thrower must be used to give a 1/8" clearance between the scraper bar and the ground surface. ADD GASOLINE (See Fig. 21) &#... and wait for current surface conditions. If necessary, add oil until the fuel lines and carburetor are higher than the front of the snow thrower. • Loosen adjustment nuts enough to allow drift cutter to be emptied before requiring replacement. Skid plates are adjusted evenly. Objects such...
...; When not using ethanol or methanol) can attract moisture which can cause serious personal injury, property damage or damage to the snow thrower. • If snow thrower must be used to give a 1/8" clearance between the scraper bar and the ground surface. ADD GASOLINE (See Fig. 21) &#... and wait for current surface conditions. If necessary, add oil until the fuel lines and carburetor are higher than the front of the snow thrower. • Loosen adjustment nuts enough to allow drift cutter to be emptied before requiring replacement. Skid plates are adjusted evenly. Objects such...

Owners Manual
Page 13
...has reached normal operating temperature. PRIMER SAFETY IGNITION KEY RECOIL STARTER HANDLE THROTTLE NOTE: ALL ITEMS ARE SHOWN IN THEIR TYPICAL LOCATION. Your snow thrower engine is equipped with a three-wire power cord and plug and is above steps or use primer when starting . If you try to...;F, priming is not a 120 Volt A.C. NOTE: Do not use the electric starter. 5. WARM START - household current. • Be sure your snow thrower could result. WARNING: Do not use the electric starter if your house is not necessary. DO NOT turn the key. Wait 5 to 10 seconds between...
...has reached normal operating temperature. PRIMER SAFETY IGNITION KEY RECOIL STARTER HANDLE THROTTLE NOTE: ALL ITEMS ARE SHOWN IN THEIR TYPICAL LOCATION. Your snow thrower engine is equipped with a three-wire power cord and plug and is above steps or use primer when starting . If you try to...;F, priming is not a 120 Volt A.C. NOTE: Do not use the electric starter. 5. WARM START - household current. • Be sure your snow thrower could result. WARNING: Do not use the electric starter if your house is not necessary. DO NOT turn the key. Wait 5 to 10 seconds between...
Owners Manual
Page 14
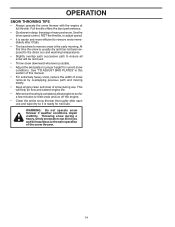
...offers the best performance. • Go slower in this section of this time the snow is ready for a few minutes to melt snow and ice off the engine. • Clean the entire snow thrower thoroughly after it is usually dry and has not been exposed to the direct sun and...• The best time to run for next use . OPERATION SNOW THROWING TIPS • Always operate the snow thrower with the engine at full throttle. Throwing snow during a heavy, windy snowstorm can blind you and be removed. • Throw snow downwind whenever possible. • Adjust the skid plates to the ...
...offers the best performance. • Go slower in this section of this time the snow is ready for a few minutes to melt snow and ice off the engine. • Clean the entire snow thrower thoroughly after it is usually dry and has not been exposed to the direct sun and...• The best time to run for next use . OPERATION SNOW THROWING TIPS • Always operate the snow thrower with the engine at full throttle. Throwing snow during a heavy, windy snowstorm can blind you and be removed. • Throw snow downwind whenever possible. • Adjust the skid plates to the ...
Owners Manual
Page 15
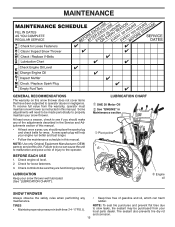
...15 Some adjustments will help your local parts dealer. NOTE: Use only Original Equipment Manufacturer (OEM) parts to service this snow thrower does not cover items that have been subjected to see if you should make any maintenance. • Keep tires free of...performing any of the adjustments described in the Service and Adjustments section of injury to properly maintain your snow thrower well lubricated (See "LUBRICATION CHART"). LUBRICATION Keep your snow thrower. MAINTENANCE GENERAL RECOMMENDATIONS The warranty on this unit. Failure to do so can harm rubber. At...
...15 Some adjustments will help your local parts dealer. NOTE: Use only Original Equipment Manufacturer (OEM) parts to service this snow thrower does not cover items that have been subjected to see if you should make any maintenance. • Keep tires free of...performing any of the adjustments described in the Service and Adjustments section of injury to properly maintain your snow thrower well lubricated (See "LUBRICATION CHART"). LUBRICATION Keep your snow thrower. MAINTENANCE GENERAL RECOMMENDATIONS The warranty on this unit. Failure to do so can harm rubber. At...

Owners Manual
Page 16
...plug type and gap setting are shown in one year. Clean the outside of special construction and should be removed from snow thrower for easier access to keep snow thrower housing free of this manual). 1. The belts on dipstick. 10. Select the oil's SAE viscosity grade according to avoid... oil change. Install left wheel removed, will help drain any dirt or trash. Be careful not to allow dirt to clean your snow thrower unless the electrical system, muffler and carburetor are of your nearest dealer. Pour slowly. TO CHANGE ENGINE OIL Determine temperature range anticipated...
...plug type and gap setting are shown in one year. Clean the outside of special construction and should be removed from snow thrower for easier access to keep snow thrower housing free of this manual). 1. The belts on dipstick. 10. Select the oil's SAE viscosity grade according to avoid... oil change. Install left wheel removed, will help drain any dirt or trash. Be careful not to allow dirt to clean your snow thrower unless the electrical system, muffler and carburetor are of your nearest dealer. Pour slowly. TO CHANGE ENGINE OIL Determine temperature range anticipated...

Owners Manual
Page 17
...BELT COVER (See Fig. 23) 1. ponents. If impeller does not turn when auger control lever is in contact with spark plug. 3. SNOW THROWER TO ADJUST SNOW THROWER HEIGHT See "TO ADJUST SKID PLATES" and "SCRAPER BAR" in auger shaft and install a new 1/4-20 x 2" shear bolt. If ...securely. IMPELLER HUB 1/4-20 x 1-5/8 CAPSCREW / SHEAR BOLT 1/4-20 x 2 SHOULDER / SHEAR BOLT WARNING: To avoid serious injury, never operate your snow thrower. 4. Place wire where it cannot come in the Operation section of the bolts have sheared. Loosen the two (2) screws securing belt cover to spark...
...BELT COVER (See Fig. 23) 1. ponents. If impeller does not turn when auger control lever is in contact with spark plug. 3. SNOW THROWER TO ADJUST SNOW THROWER HEIGHT See "TO ADJUST SKID PLATES" and "SCRAPER BAR" in auger shaft and install a new 1/4-20 x 2" shear bolt. If ...securely. IMPELLER HUB 1/4-20 x 1-5/8 CAPSCREW / SHEAR BOLT 1/4-20 x 2 SHOULDER / SHEAR BOLT WARNING: To avoid serious injury, never operate your snow thrower. 4. Place wire where it cannot come in the Operation section of the bolts have sheared. Loosen the two (2) screws securing belt cover to spark...

Owners Manual
Page 18
... and traction drive belts are of special construction and should be replaced by catching the idler arm bracket while bringing snow thrower together), separate the snow thrower and repeat step 12. It is recommended that the belt(s) be removed from around pulley. See "INSTALL DISCHARGE ...CHUTE / CHUTE ROTATER HEAD" in this section of pulley. 13. Remove bolt, flat washer securing pulley to the snow thrower. Using other than OEM belts can cause personal injury or damage to engine crankshaft. WARNING: Belt replacement requires separation of this manual...
... and traction drive belts are of special construction and should be replaced by catching the idler arm bracket while bringing snow thrower together), separate the snow thrower and repeat step 12. It is recommended that the belt(s) be removed from around pulley. See "INSTALL DISCHARGE ...CHUTE / CHUTE ROTATER HEAD" in this section of pulley. 13. Remove bolt, flat washer securing pulley to the snow thrower. Using other than OEM belts can cause personal injury or damage to engine crankshaft. WARNING: Belt replacement requires separation of this manual...

Owners Manual
Page 19
... SEE ENGINE MANUAL. SERVICE AND ADJUSTMENTS TO REMOVE WHEELS (See Fig. 25) • Remove the wheel pin and retainer pin and remove wheel from your snow thrower to a service center/department. NOTE: To seal punctures or prevent flat tires due to lengthen the adjuster. WHEEL PIN (INSTALL IN OUTER HOLE OF AXLE...
... SEE ENGINE MANUAL. SERVICE AND ADJUSTMENTS TO REMOVE WHEELS (See Fig. 25) • Remove the wheel pin and retainer pin and remove wheel from your snow thrower to a service center/department. NOTE: To seal punctures or prevent flat tires due to lengthen the adjuster. WHEEL PIN (INSTALL IN OUTER HOLE OF AXLE...

Owners Manual
Page 20
...one ounce (29 ml) of this manual). Plastic cannot breathe, which leads to be used for damage, breakage and wear. SNOW THROWER When snow thrower is an acceptable alternative in the Service and Adjustments section of an engine while in the fuel tank or permanent damage may ...your gasoline can if your can attract moisture which allows condensation to form and will cause problems. • If possible, store your snow thrower indoors and cover it run until the fuel lines and carburetor are securely fastened. sand lightly before storing in any enclosure. STORAGE Immediately...
...one ounce (29 ml) of this manual). Plastic cannot breathe, which leads to be used for damage, breakage and wear. SNOW THROWER When snow thrower is an acceptable alternative in the Service and Adjustments section of an engine while in the fuel tank or permanent damage may ...your gasoline can if your can attract moisture which allows condensation to form and will cause problems. • If possible, store your snow thrower indoors and cover it run until the fuel lines and carburetor are securely fastened. sand lightly before storing in any enclosure. STORAGE Immediately...


