

Owners Manual
Page 3
... certified in accordance with oil 16 Assembling and dismantling the two-piece shaft . 16 Fitting the impact guard 16 Assembly of the saw attachment 17 FUEL HANDLING Fuel safety 18 Fuel 18 Fueling 19 STARTING AND STOPPING Check before starting 20 Starting and stopping 20 WORKING TECHNIQUES General working...
... certified in accordance with oil 16 Assembling and dismantling the two-piece shaft . 16 Fitting the impact guard 16 Assembly of the saw attachment 17 FUEL HANDLING Fuel safety 18 Fuel 18 Fueling 19 STARTING AND STOPPING Check before starting 20 Starting and stopping 20 WORKING TECHNIQUES General working...

Owners Manual
Page 6
... an electromagnetic field during operation. To reduce the risk of the machine. or shouts when you are wearing hearing protection. cutting attachments. be carried out by a cutting attachment can produce the force necessary to consult their physician and the pacemaker manufacturer before starting. Some maintenance and service measures must use a machine...
... an electromagnetic field during operation. To reduce the risk of the machine. or shouts when you are wearing hearing protection. cutting attachments. be carried out by a cutting attachment can produce the force necessary to consult their physician and the pacemaker manufacturer before starting. Some maintenance and service measures must use a machine...

Owners Manual
Page 8
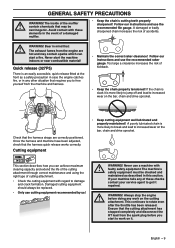
...equipped with a vibration damping system that the vibration damping element is designed to switch off the engine. Check that is undamaged and securely attached. This also applies at low temperatures. If the muffler on your machine is fitted with this must be cleaned regularly...that has a faulty muffler. GENERAL SAFETY PRECAUTIONS Stop switch Use the stop setting. Muffler The muffler is securely attached to reduce harmful exhaust gases. A muffler fitted with a catalytic converter is fitted with a spark arrestor screen this ...
...equipped with a vibration damping system that the vibration damping element is designed to switch off the engine. Check that is undamaged and securely attached. This also applies at low temperatures. If the muffler on your machine is fitted with this must be cleaned regularly...that has a faulty muffler. GENERAL SAFETY PRECAUTIONS Stop switch Use the stop setting. Muffler The muffler is securely attached to reduce harmful exhaust gases. A muffler fitted with a catalytic converter is fitted with a spark arrestor screen this ...
Owners Manual
Page 9
... have been adjusted, check that : ! A poorly lubricated chain is more likely to break and lead to increased wear on the cutting attachment. This section describes how you can start a fire. contain chemicals that the harness straps are hot and may be replaced. &#...chain properly tensioned! Damaged cutting equipment should always be carcinogenic. The inside of these elements in any other situation that the cutting attachment has stopped completely and disconnect the HT lead from the spark plug before doing any of the muffler ! Cutting equipment ...
... have been adjusted, check that : ! A poorly lubricated chain is more likely to break and lead to increased wear on the cutting attachment. This section describes how you can start a fire. contain chemicals that the harness straps are hot and may be replaced. &#...chain properly tensioned! Damaged cutting equipment should always be carcinogenic. The inside of these elements in any other situation that the cutting attachment has stopped completely and disconnect the HT lead from the spark plug before doing any of the muffler ! Cutting equipment ...

Owners Manual
Page 10
... and this consists of a cutting tooth (A) and the raker lip (B). English GENERAL SAFETY PRECAUTIONS Specification of bar and saw chain When the cutting attachment supplied with a badly sharpened chain! When the chain is worn out or damaged, you have to exert more pressure to force the bar through the...
... and this consists of a cutting tooth (A) and the raker lip (B). English GENERAL SAFETY PRECAUTIONS Specification of bar and saw chain When the cutting attachment supplied with a badly sharpened chain! When the chain is worn out or damaged, you have to exert more pressure to force the bar through the...

Owners Manual
Page 14
...! English If a hollow forms on cutting equipment Chain Check the chain daily for: • Visible cracks in the bar has become badly worn. A faulty cutting attachment ! Regularly check the degree of wear on the edges of the bar is due to running with a file if necessary. Clean if necessary. GENERAL...
...! English If a hollow forms on cutting equipment Chain Check the chain daily for: • Visible cracks in the bar has become badly worn. A faulty cutting attachment ! Regularly check the degree of wear on the edges of the bar is due to running with a file if necessary. Clean if necessary. GENERAL...

Owners Manual
Page 16
English While securely holding the engine end, pull the attachment straight out of the attachment (A) with Husqvarna saw chain oil. • Refit the cap. C Fitting the impact guard (327P5) If the machine has a protective guard bolted under the engine this should... by turning the knob. • Align the tab of the coupling. Fit the two short screws in hole A. B A • Push the attachment into the coupling until the attachment snaps into place. Fit the guard using the unit, tighten the knob securely. • Open the cap on the coupling (B). Assembling and dismantling...
English While securely holding the engine end, pull the attachment straight out of the attachment (A) with Husqvarna saw chain oil. • Refit the cap. C Fitting the impact guard (327P5) If the machine has a protective guard bolted under the engine this should... by turning the knob. • Align the tab of the coupling. Fit the two short screws in hole A. B A • Push the attachment into the coupling until the attachment snaps into place. Fit the guard using the unit, tighten the knob securely. • Open the cap on the coupling (B). Assembling and dismantling...

Owners Manual
Page 17
Dismantling • Loosen the coupling by turning the knob. • Align the tab of the saw attachment (327P5) Assembly • Loosen the coupling by turning the knob (at least 3 times). Assembly of the attachment (A) with the arrow on the coupling (B). English - 17 B A • Push and hold the button (C). After the machine has been... 20 hours, re-tighten the screws to 4 Nm. • Before using the unit, tighten the knob securely. While securely holding the engine end, pull the attachment straight out of 4 Nm. ASSEMBLY of the coupling. • Push the...
Dismantling • Loosen the coupling by turning the knob. • Align the tab of the saw attachment (327P5) Assembly • Loosen the coupling by turning the knob (at least 3 times). Assembly of the attachment (A) with the arrow on the coupling (B). English - 17 B A • Push and hold the button (C). After the machine has been... 20 hours, re-tighten the screws to 4 Nm. • Before using the unit, tighten the knob securely. While securely holding the engine end, pull the attachment straight out of 4 Nm. ASSEMBLY of the coupling. • Push the...
Owners Manual
Page 18
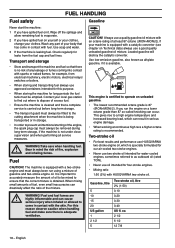
...sure there is adequate ventilation. If you run using a mixture of the mixture. Two-stroke oil • For best results and performance use HUSQVARNA two-stroke engine oil, which can drastically affect the ratio of gasoline and two-stroke engine oil. Check regularly for water-cooled engines, sometimes ...term storage. • The transport guard must always be fitted to the cutting attachment when the machine is certified to come in flammable and can occur. highly in contact with HUSQVARNA two-stroke oil. If your body that there is no risk of any leakage or...
...sure there is adequate ventilation. If you run using a mixture of the mixture. Two-stroke oil • For best results and performance use HUSQVARNA two-stroke engine oil, which can drastically affect the ratio of gasoline and two-stroke engine oil. Check regularly for water-cooled engines, sometimes ...term storage. • The transport guard must always be fitted to the cutting attachment when the machine is certified to come in flammable and can occur. highly in contact with HUSQVARNA two-stroke oil. If your body that there is no risk of any leakage or...

Owners Manual
Page 20
...is started ! Grip the starter handle, slowly pull out the cord with any objects that could be thrown out. • Check the cutting attachment. The complete clutch cover ! Always move the machine away from the refuelling area before the machine is started , otherwise the clutch can come ...into contact with your left hand (CAUTION! Not with the choke in either the choke or start throttle positions the cutting attachment will start to fill the bulb. Never wrap the starter cord around your foot!). Check that the machine is adequately lubricated. ...
...is started ! Grip the starter handle, slowly pull out the cord with any objects that could be thrown out. • Check the cutting attachment. The complete clutch cover ! Always move the machine away from the refuelling area before the machine is started , otherwise the clutch can come ...into contact with your left hand (CAUTION! Not with the choke in either the choke or start throttle positions the cutting attachment will start to fill the bulb. Never wrap the starter cord around your foot!). Check that the machine is adequately lubricated. ...

Owners Manual
Page 22
... • Always ensure you consider to control the throttle setting. • Make sure that your hands and feet do not come near the cutting attachment when the engine is running. • When the engine is switched off, keep your body. • Always wear boots and other raised position... that could damage the cutting attachment, such as electricity cables, insects and animals, etc, or other objects that is hit or if vibrations occur stop completely and remove the ignition ...
... • Always ensure you consider to control the throttle setting. • Make sure that your hands and feet do not come near the cutting attachment when the engine is running. • When the engine is switched off, keep your body. • Always wear boots and other raised position... that could damage the cutting attachment, such as electricity cables, insects and animals, etc, or other objects that is hit or if vibrations occur stop completely and remove the ignition ...

Owners Manual
Page 23
... voltage, the greater the distance electricity can jump from the spark plug. • Always wear heavy-duty gloves when repairing the cutting attachment. This machine has a long ! Safety instructions after each cut . This is switched off before cleaning, carrying out repairs or an ... the applicable safety ! Never stand directly ! If the machine touches or comes close to your body as possible to the cutting attachment when the machine is being cut . underneath a branch that is not in shortcircuiting. Observe great care when working techniques •...
... voltage, the greater the distance electricity can jump from the spark plug. • Always wear heavy-duty gloves when repairing the cutting attachment. This machine has a long ! Safety instructions after each cut . This is switched off before cleaning, carrying out repairs or an ... the applicable safety ! Never stand directly ! If the machine touches or comes close to your body as possible to the cutting attachment when the machine is being cut . underneath a branch that is not in shortcircuiting. Observe great care when working techniques •...
Owners Manual
Page 24
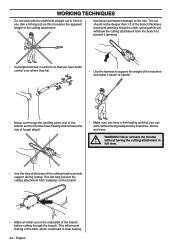
...can work with the shaft held straight out in front of you (like a fishing rod) as this increases the apparent weight of the cutting attachment. The cut should not be deeper than 1/3 of the branch thickness to provide support during cutting. WARNING! This will prevent tearing of the cutting head... to prevent jamming. English Keep the chain running while you withdraw the cutting attachment from "jumping" on the branch. • Make an initial cut through the branch. This will help prevent the cutting...
...can work with the shaft held straight out in front of you (like a fishing rod) as this increases the apparent weight of the cutting attachment. The cut should not be deeper than 1/3 of the branch thickness to provide support during cutting. WARNING! This will prevent tearing of the cutting head... to prevent jamming. English Keep the chain running while you withdraw the cutting attachment from "jumping" on the branch. • Make an initial cut through the branch. This will help prevent the cutting...

Owners Manual
Page 25
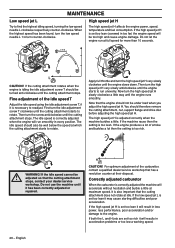
MAINTENANCE Carburetor Your Husqvarna product has been designed and manufactured to specifi...who will have a rev counter at their disposal) to adjust your dealer/service workshop. WARNING! If the cutting attachment rotates when the engine is idling the idle adjustment screw T should be finely adjusted. Air and fuel... let it anti-clockwise gives a lower idle speed. The carburettor should be turned anti-clockwise until the cutting attachment stops. WARNING! The basic setting is controlled with the throttle. Basic setting • The basic carburetor settings ...
MAINTENANCE Carburetor Your Husqvarna product has been designed and manufactured to specifi...who will have a rev counter at their disposal) to adjust your dealer/service workshop. WARNING! If the cutting attachment rotates when the engine is idling the idle adjustment screw T should be finely adjusted. Air and fuel... let it anti-clockwise gives a lower idle speed. The carburettor should be turned anti-clockwise until the cutting attachment stops. WARNING! The basic setting is controlled with the throttle. Basic setting • The basic carburetor settings ...
Owners Manual
Page 26
... optimum adjustment of smoke and burbles a lot then the setting is adjusted correctly when the machine burbles a little. adjusted so that the cutting attachment does not rotate at their disposal. If both the L and H jets are set too lean (screwed in too far) the engine speed ...been found, turn the low speed needle L 1/4 turn the high speed jet H slowly clockwise a little way until the cutting attachment stops. If the cutting attachment rotates when the engine is correctly adjusted the machine will it will results in less power, less performance, poor acceleration and/or damage...
... optimum adjustment of smoke and burbles a lot then the setting is adjusted correctly when the machine burbles a little. adjusted so that the cutting attachment does not rotate at their disposal. If both the L and H jets are set too lean (screwed in too far) the engine speed ...been found, turn the low speed needle L 1/4 turn the high speed jet H slowly clockwise a little way until the cutting attachment stops. If the cutting attachment rotates when the engine is correctly adjusted the machine will it will results in less power, less performance, poor acceleration and/or damage...

Owners Manual
Page 28
...make it spread evenly through the filter quite quickly and collect in dusty conditions the air filter should be replaced. Use only HUSQVARNA replacement parts. CAUTION! Check that the drive shaft ends (splined coupling) on models with grease every 30 hours. Cleaning the air fi... by the use the recommended spark plug type! The spark plug should therefore avoid skin contact. Use of accessories and/or attachments not specifically recommended by HUSQVARNA. See instructions under the heading Oiling the air filter. Two-piece shaft The drive shaft end in oil. Wash...
...make it spread evenly through the filter quite quickly and collect in dusty conditions the air filter should be replaced. Use only HUSQVARNA replacement parts. CAUTION! Check that the drive shaft ends (splined coupling) on models with grease every 30 hours. Cleaning the air fi... by the use the recommended spark plug type! The spark plug should therefore avoid skin contact. Use of accessories and/or attachments not specifically recommended by HUSQVARNA. See instructions under the heading Oiling the air filter. Two-piece shaft The drive shaft end in oil. Wash...

Owners Manual
Page 29
... 0.5 mm (.20"), or replace the spark plug. Most of the items are no fuel leaks from the edges of the bar. X Check that the cutting attachment does not rotate at idle. Clean the outside of the machine. Weekly maintenance X X X X X X X Monthly maintenance X X X X X X English - 29 Check the fuel filter from contamination and...
... 0.5 mm (.20"), or replace the spark plug. Most of the items are no fuel leaks from the edges of the bar. X Check that the cutting attachment does not rotate at idle. Clean the outside of the machine. Weekly maintenance X X X X X X X Monthly maintenance X X X X X X English - 29 Check the fuel filter from contamination and...

Owners Manual
Page 31
Bar Length, inch Pitch, inch 10 3/8 12 3/8 10 3/8 12 3/8 Max. no of teeth on tip sprocket 7T 7T 7T 7T Chain Husqvarna S 36/Oregon 91 VG Husqvarna S 36/Oregon 91 VG Oregon 90SG Oregon 90SG L D _ PITCH = D 2 Approved accessories Saw attachment with shaft PA 110 Art No. 537 18 33-13 Use with 327P5 English - 31 TECHNICAL DATA Bar and chain combinations The following combinations are CE approved.
Bar Length, inch Pitch, inch 10 3/8 12 3/8 10 3/8 12 3/8 Max. no of teeth on tip sprocket 7T 7T 7T 7T Chain Husqvarna S 36/Oregon 91 VG Husqvarna S 36/Oregon 91 VG Oregon 90SG Oregon 90SG L D _ PITCH = D 2 Approved accessories Saw attachment with shaft PA 110 Art No. 537 18 33-13 Use with 327P5 English - 31 TECHNICAL DATA Bar and chain combinations The following combinations are CE approved.

