

Owner Manual
Page 1
Operator's manual HUSQVARNA AUTOMOWER® 310/315/315X Read the operator's manual carefully and make sure that you understand the instructions before you use the product. EN, English
Operator's manual HUSQVARNA AUTOMOWER® 310/315/315X Read the operator's manual carefully and make sure that you understand the instructions before you use the product. EN, English
Owner Manual
Page 5
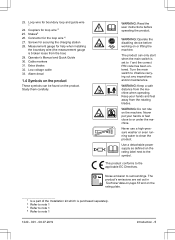
... loose from the machine when operating. Extra blades 32. Keep your hands or feet close to 0 before carrying out any inspections and/or maintenance. Operator's Manual and Quick Guide 30. Alarm decal 1.4 Symbols on the product These symbols can only start when the main switch is purchased separately. 2 Refer to note...
... loose from the machine when operating. Extra blades 32. Keep your hands or feet close to 0 before carrying out any inspections and/or maintenance. Operator's Manual and Quick Guide 30. Alarm decal 1.4 Symbols on the product These symbols can only start when the main switch is purchased separately. 2 Refer to note...
Owner Manual
Page 6
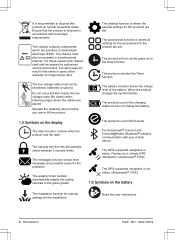
...The settings function is recycled in the charging station but do to dispose this product as it collects GPS information. (Automower® 315X) The GPS-supported navigation is put in accordance with your mobile device. The battery indicator shows the charge level of ... battery. 1.5 Symbols on the battery The installation function for manual settings for the problems. The weather timer function automatically adapts the cutting intervals to electrostatic discharge (ESD). The product is not active. (Automower® 315X) 1.6 Symbols on the display The timer function controls when...
...The settings function is recycled in the charging station but do to dispose this product as it collects GPS information. (Automower® 315X) The GPS-supported navigation is put in accordance with your mobile device. The battery indicator shows the charge level of ... battery. 1.5 Symbols on the battery The installation function for manual settings for the problems. The weather timer function automatically adapts the cutting intervals to electrostatic discharge (ESD). The product is not active. (Automower® 315X) 1.6 Symbols on the display The timer function controls when...
Owner Manual
Page 11
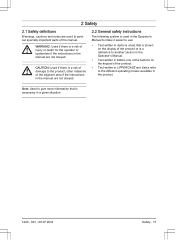
... system is used to give more information that is shown on the display of the product or is a reference to another section in the Operator's Manual. • Text written in bold is one of the buttons on the keypad of the product. • Text written in UPPERCASE and italics refer to... the different operating modes available in the manual are not obeyed. CAUTION: Used if there is a risk of damage to the product, other materials or the adjacent area if the instructions in the...
... system is used to give more information that is shown on the display of the product or is a reference to another section in the Operator's Manual. • Text written in bold is one of the buttons on the keypad of the product. • Text written in UPPERCASE and italics refer to... the different operating modes available in the manual are not obeyed. CAUTION: Used if there is a risk of damage to the product, other materials or the adjacent area if the instructions in the...
Owner Manual
Page 13
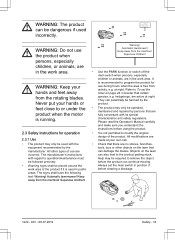
... lawnmower! Supervise children! The signs shall have the following text: Warning! WARNING: The product can be harmed by the product. Warning! Please read the Operator's Manual carefully and make sure you understand the instructions before the product can continue mowing. • Warning signs shall be used incorrectly.
... lawnmower! Supervise children! The signs shall have the following text: Warning! WARNING: The product can be harmed by the product. Warning! Please read the Operator's Manual carefully and make sure you understand the instructions before the product can continue mowing. • Warning signs shall be used incorrectly.
Owner Manual
Page 19
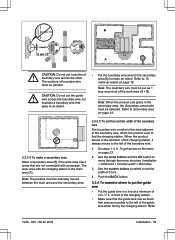
... select a corridor width of the guide wire when facing the charging station. B 0 cm / 0" A CAUTION: Do not put the guide wire across the other. must be manually moved between the main area and the secondary area. 3.3.3.5 To set the corridor width of the boundary wire. 1. CAUTION: Do not put a section of 2 m / 7 ft...
... select a corridor width of the guide wire when facing the charging station. B 0 cm / 0" A CAUTION: Do not put the guide wire across the other. must be manually moved between the main area and the secondary area. 3.3.3.5 To set the corridor width of the boundary wire. 1. CAUTION: Do not put a section of 2 m / 7 ft...
Owner Manual
Page 23
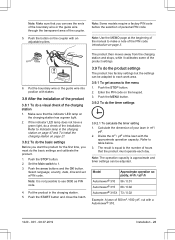
...pliers. Note: The operation capacity is not possible to use 0000 as PIN code. 4. Introduction on the coupler with a Automower® 310. 1220 - 001 - 08.07.2019 Installation - 23 Refer to the menu 1. Note: It is approximate ...3.9.2 To do the basic settings and calibrate the product. 1. Model Approximate operation capacity, m2/h / yd2 /h Automower® 310 56 / 0.01 Automower® 315 68 / 0.02 Automower® 315X 73 / 0.02 Example: A lawn of your lawn in m2 / yd2. 2. If the indicator LED lamp...To calculate the timer setting 1. Refer to the number of the manual to 1. 3.
...pliers. Note: The operation capacity is not possible to use 0000 as PIN code. 4. Introduction on the coupler with a Automower® 310. 1220 - 001 - 08.07.2019 Installation - 23 Refer to the menu 1. Note: It is approximate ...3.9.2 To do the basic settings and calibrate the product. 1. Model Approximate operation capacity, m2/h / yd2 /h Automower® 310 56 / 0.01 Automower® 315 68 / 0.02 Automower® 315X 73 / 0.02 Example: A lawn of your lawn in m2 / yd2. 2. If the indicator LED lamp...To calculate the timer setting 1. Refer to the number of the manual to 1. 3.

Owner Manual
Page 26
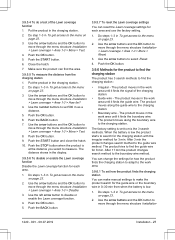
... To get access to To measure the distance from the charging station to the % of the manual settings in the Lawn coverage menu. 3.9.5.1 To disable the GPS Assisted Navigation Only for Automower® 315X. 1. However, in more complex gardens operation can be improved by carrying out some of the... area in Lawn coverage. Use the arrow buttons and the OK button to make manual settings in relation to the menu on page 23....
... To get access to To measure the distance from the charging station to the % of the manual settings in the Lawn coverage menu. 3.9.5.1 To disable the GPS Assisted Navigation Only for Automower® 315X. 1. However, in more complex gardens operation can be improved by carrying out some of the... area in Lawn coverage. Use the arrow buttons and the OK button to make manual settings in relation to the menu on page 23....
Owner Manual
Page 27
... a distance. 5. Put the product in the charging station. 2. Push the OK button. 9. Push the BACK button. 3.9.5.7 To reset the Lawn coverage settings You can make manual settings to the work area until it finds the signal of the Lawn coverage function 1. The product moves in To get access to find the...
... a distance. 5. Put the product in the charging station. 2. Push the OK button. 9. Push the BACK button. 3.9.5.7 To reset the Lawn coverage settings You can make manual settings to the work area until it finds the signal of the Lawn coverage function 1. The product moves in To get access to find the...
Owner Manual
Page 34
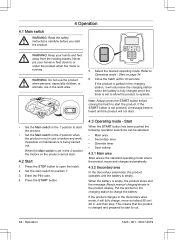
... will only leave the charging station when the battery is fully charged and if the timer is empty, the product stops and the message Needs manual charging shows in . WARNING: Do not use the product when persons, especially children, or animals, are in use or before any work area. 5. Close the...
... will only leave the charging station when the battery is fully charged and if the timer is empty, the product stops and the message Needs manual charging shows in . WARNING: Do not use the product when persons, especially children, or animals, are in use or before any work area. 5. Close the...
Owner Manual
Page 39
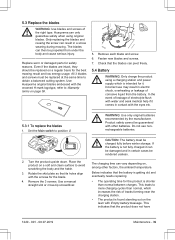
...the blades are intact, they should be guaranteed with Empty battery message. Place the product on a regular basis for it. Use a manual straight slot or cross-tip screwdriver. Rotate the skid plate so that the product does not have 1220 - 001 - 08.07.2019 ...Maintenance - 39 This indicates that its holes align with the crowned H-mark logotype, refer to position 0. Use Husqvarna original blades embossed with the screws for safety reasons. Husqvarna can pivot freely. 5.4 Battery WARNING: Only charge the product using original blades. WARNING: Use only original batteries...
...the blades are intact, they should be guaranteed with Empty battery message. Place the product on a regular basis for it. Use a manual straight slot or cross-tip screwdriver. Rotate the skid plate so that the product does not have 1220 - 001 - 08.07.2019 ...Maintenance - 39 This indicates that its holes align with the crowned H-mark logotype, refer to position 0. Use Husqvarna original blades embossed with the screws for safety reasons. Husqvarna can pivot freely. 5.4 Battery WARNING: Only charge the product using original blades. WARNING: Use only original batteries...
Owner Manual
Page 43
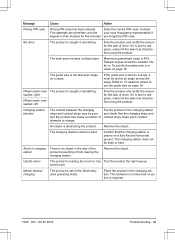
.... 1220 - 001 - 08.07.2019 Troubleshooting - 43 Enter the correct PIN code. Contact Five attempts are permitted, and the your local Husqvarna representative if keypad is tilted or bent. Refer to put the boundary wire in something . No drive The product is caught in a slope ... the product and rectify the reason for the lack of drive. Stuck in charging station There is an object in something . Needs manual charging The product is 40%. Maximum guaranteed slope is set to charge. If it from leaving the charging station. Put the product in...
.... 1220 - 001 - 08.07.2019 Troubleshooting - 43 Enter the correct PIN code. Contact Five attempts are permitted, and the your local Husqvarna representative if keypad is tilted or bent. Refer to put the boundary wire in something . No drive The product is caught in a slope ... the product and rectify the reason for the lack of drive. Stuck in charging station There is an object in something . Needs manual charging The product is 40%. Maximum guaranteed slope is set to charge. If it from leaving the charging station. Put the product in...

Owner Manual
Page 56
...of 2 years from being submerged under water, for example when heavy rain forms pools of purchase. 9 Warranty 9.1 Warranty terms Husqvarna® warranty covers this Operator's Manual. If an error occurs with the product or its power supply. Within the warranty period, we will replace the product or ...repair it at hand when contacting Husqvarna customer service. 56 - Warranty 1220 - 001 - 08.07.2019 The warranty covers ...
...of 2 years from being submerged under water, for example when heavy rain forms pools of purchase. 9 Warranty 9.1 Warranty terms Husqvarna® warranty covers this Operator's Manual. If an error occurs with the product or its power supply. Within the warranty period, we will replace the product or ...repair it at hand when contacting Husqvarna customer service. 56 - Warranty 1220 - 001 - 08.07.2019 The warranty covers ...

Parts Manual
Page 19
... 82 03-31 WORKSHOP MANUAL 31 115 82 03-36 WORKSHOP MANUAL 31 115 82 03-41 WORKSHOP MANUAL 31 115 82 03-46 WORKSHOP MANUAL 31 115 82 03-51 WORKSHOP MANUAL 31 115820356 TBD 31 115820358 TBD 31 115820359 TBD 31 115820361 TBD 31 115820362 TBD 31 115820363 TBD AUTOMOWER 315X, 2020- Remark QTY KIT...
... 82 03-31 WORKSHOP MANUAL 31 115 82 03-36 WORKSHOP MANUAL 31 115 82 03-41 WORKSHOP MANUAL 31 115 82 03-46 WORKSHOP MANUAL 31 115 82 03-51 WORKSHOP MANUAL 31 115820356 TBD 31 115820358 TBD 31 115820359 TBD 31 115820361 TBD 31 115820362 TBD 31 115820363 TBD AUTOMOWER 315X, 2020- Remark QTY KIT...


