

Owners Manual
Page 3
... Adjuster 22 Seat Adjustment Lever 22 Fuel Shut Off Valve 22 Fuel Tank 23 Hydro Release Levers 23 OPERATION 24 Training 24 Steering 24 Before Starting 25 Starting the Engine 26 Running 30 Operating on Hills 31 Stopping the Engine 32 Mowing Tips 33 Moving Machine By Hand 34 MAINTENANCE 35 Maintenance...46 Engine oil change 47 Transaxle (Transmission) Fluid Change............47 Transmission Purging 48 TROUBLESHOOTING GUIDE 49 STORAGE 51 Winter Storage 51 Service 51 WIRING DIAGRAMS 52 TECHNICAL DATA 53 Torque Specifications 53 CONFORMITY CERTIFICATES 55 SERVICE JOURNAL 56
... Adjuster 22 Seat Adjustment Lever 22 Fuel Shut Off Valve 22 Fuel Tank 23 Hydro Release Levers 23 OPERATION 24 Training 24 Steering 24 Before Starting 25 Starting the Engine 26 Running 30 Operating on Hills 31 Stopping the Engine 32 Mowing Tips 33 Moving Machine By Hand 34 MAINTENANCE 35 Maintenance...46 Engine oil change 47 Transaxle (Transmission) Fluid Change............47 Transmission Purging 48 TROUBLESHOOTING GUIDE 49 STORAGE 51 Winter Storage 51 Service 51 WIRING DIAGRAMS 52 TECHNICAL DATA 53 Torque Specifications 53 CONFORMITY CERTIFICATES 55 SERVICE JOURNAL 56

Owners Manual
Page 9
.... Always turn off blades, set parking brake, stop engine, and remove keys before dismounting. 8011-512 Read the operator manual before starting . • It is clear of objects before starting the machine Clear the area of bystanders before operating. WARNING! Keep clear of the discharge opening at all instructions on the machine...
.... Always turn off blades, set parking brake, stop engine, and remove keys before dismounting. 8011-512 Read the operator manual before starting . • It is clear of objects before starting the machine Clear the area of bystanders before operating. WARNING! Keep clear of the discharge opening at all instructions on the machine...

Owners Manual
Page 11
... the slopes slow and gradual. Operation on a slope. Ask your retailer for holes, ruts, bumps, rocks, or other attachments; Tires may lose traction. • Avoid starting, stopping, or turning on all slopes requires extra caution. If the tires lose traction, disengage the blades and proceed slowly straight down slopes (10 degrees...
... the slopes slow and gradual. Operation on a slope. Ask your retailer for holes, ruts, bumps, rocks, or other attachments; Tires may lose traction. • Avoid starting, stopping, or turning on all slopes requires extra caution. If the tires lose traction, disengage the blades and proceed slowly straight down slopes (10 degrees...

Owners Manual
Page 13
...Never fill containers inside a vehicle or on a water heater or other sources of Gasoline WARNING! Replace gas cap and tighten securely. • Do not start the engine near spilled fuel. • Never use a nozzle lock-open flame, spark, or pilot light such as a cleaning agent. • If...• Remove gas-powered equipment from a gasoline dispenser nozzle. • Keep the nozzle in handling gasoline. The engine must not be started until fueling is not possible, refuel such equipment with plastic liner. Never fill the fuel tank indoors 8011-516 WARNING! There is risk for...
...Never fill containers inside a vehicle or on a water heater or other sources of Gasoline WARNING! Replace gas cap and tighten securely. • Do not start the engine near spilled fuel. • Never use a nozzle lock-open flame, spark, or pilot light such as a cleaning agent. • If...• Remove gas-powered equipment from a gasoline dispenser nozzle. • Keep the nozzle in handling gasoline. The engine must not be started until fueling is not possible, refuel such equipment with plastic liner. Never fill the fuel tank indoors 8011-516 WARNING! There is risk for...

Owners Manual
Page 15
... The battery can cause cuts and gashes. WARNING! The exhaust fumes contain carbon monoxide, an odorless, poisonous, and lethal gas. • Stop to cool before starting. • Never make a bridge short circuit across the starter relay to run the starter. 6003-009 Do not smoke when performing maintenance on the machine...
... The battery can cause cuts and gashes. WARNING! The exhaust fumes contain carbon monoxide, an odorless, poisonous, and lethal gas. • Stop to cool before starting. • Never make a bridge short circuit across the starter relay to run the starter. 6003-009 Do not smoke when performing maintenance on the machine...

Owners Manual
Page 19
For cold starts the control should be checked on the left lever. Rotate the knob clockwise (as viewed from the operation position) to its extent. Tracking must be ... hours of use and will turn the ignition key to decrease speed. Hour meter Tracking Knob If the mower is 15 psi (1 bar) for cold starts in order to provide the engine with the steering control levers in both rear tires. Rotating the tracking knob allows fine tuning adjustments so the...
For cold starts the control should be checked on the left lever. Rotate the knob clockwise (as viewed from the operation position) to its extent. Tracking must be ... hours of use and will turn the ignition key to decrease speed. Hour meter Tracking Knob If the mower is 15 psi (1 bar) for cold starts in order to provide the engine with the steering control levers in both rear tires. Rotating the tracking knob allows fine tuning adjustments so the...

Owners Manual
Page 20
.... The mower blades are disengaged when the knob is found on the control panel and is used to start the engine. Pull the lever backward to activate the brake and push forward to start and stop the engine. Parking brake Blade Switch To engage the mower deck, pull the blade switch knob...
.... The mower blades are disengaged when the knob is found on the control panel and is used to start the engine. Pull the lever backward to activate the brake and push forward to start and stop the engine. Parking brake Blade Switch To engage the mower deck, pull the blade switch knob...

Owners Manual
Page 21
They are flat pin fuses type as used in automobiles. accessory Fuses 8058-162 8050-082 21 On models equipped with ratings and functions: • 20 A, Primary fuse • 7.5 A, Mower deck coupling Ignition switch - Fuses are accessed by tilting the seat forward. Ignition switch - RUN position 8058-161 Fuses Fuses are two fuses with headlights, turn the key clockwise to the RUN position when the engine has started. There are located on the left hand side of the machine. CONTROLS Release the key to ACCESSORY for headlight use.
They are flat pin fuses type as used in automobiles. accessory Fuses 8058-162 8050-082 21 On models equipped with ratings and functions: • 20 A, Primary fuse • 7.5 A, Mower deck coupling Ignition switch - Fuses are accessed by tilting the seat forward. Ignition switch - RUN position 8058-161 Fuses Fuses are two fuses with headlights, turn the key clockwise to the RUN position when the engine has started. There are located on the left hand side of the machine. CONTROLS Release the key to ACCESSORY for headlight use.
Owners Manual
Page 23
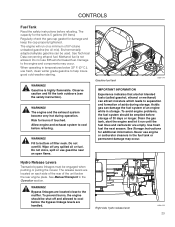
... exhaust system become very hot during storage. WARNING! Fill to bottom of acids during operation. Wipe off and allowed to help insure good cold weather starting. Acidic gas can be shut off any spilled oil or fuel. Never use fresh, clean winter grade gasoline to cool before the bypass linkage levels... problems, the fuel system should be used. When operating in the fuel tank or permanent damage may occur. Do not overfill. Drain the gas tank, start the engine and let it run on each side of the rear of 30 days or longer. Right side, hydro release lever 8058-059 23...
... exhaust system become very hot during storage. WARNING! Fill to bottom of acids during operation. Wipe off and allowed to help insure good cold weather starting. Acidic gas can be shut off any spilled oil or fuel. Never use fresh, clean winter grade gasoline to cool before the bypass linkage levels... problems, the fuel system should be used. When operating in the fuel tank or permanent damage may occur. Do not overfill. Drain the gas tank, start the engine and let it run on each side of the rear of 30 days or longer. Right side, hydro release lever 8058-059 23...

Owners Manual
Page 24
...in a straight line. Slowly move forward and backward The direction and speed of the right lever, this time. Pull the control levers back to start the engine (see Moving Machine By Hand in a forward direction, first pull both control levers forward slightly. To turn to the right While ...in a forward direction pull the left wheel. First time users should stop moving . First time users should push the mower (see Before Starting in the Operation section). Push the control levers forward to the neutral position and mower should be reviewed in its entirety prior to attempting to...
...in a straight line. Slowly move forward and backward The direction and speed of the right lever, this time. Pull the control levers back to start the engine (see Moving Machine By Hand in a forward direction, first pull both control levers forward slightly. To turn to the right While ...in a forward direction pull the left wheel. First time users should stop moving . First time users should push the mower (see Before Starting in the Operation section). Push the control levers forward to the neutral position and mower should be reviewed in its entirety prior to attempting to...

Owners Manual
Page 25
... height by inserting the lift pin into the desired cut height. 8011-441 Cutting height selection The following conditions must be fulfilled before starting (see Maintenance Schedule in the locked (outer) neutral position. 8058-223 25 Lengthways adjustment 5. Read the sections on Safety and Controls... before the engine can be started: • The blade switch must be pressed downward into the disengaged position. • The parking brake must be up into the activated ...
... height by inserting the lift pin into the desired cut height. 8011-441 Cutting height selection The following conditions must be fulfilled before starting (see Maintenance Schedule in the locked (outer) neutral position. 8058-223 25 Lengthways adjustment 5. Read the sections on Safety and Controls... before the engine can be started: • The blade switch must be pressed downward into the disengaged position. • The parking brake must be up into the activated ...

Owners Manual
Page 26
Set mower deck to the transport position by depressing the blade switch. 8058-210 Disengage the mower blades 8058-145 26 Raise the mower deck to the transport position 8058-223 Activate parking brake before starting 4. Sit on the seat. 2. Activate the parking brake. Disengage the mower blades by locking the lift pedal fully forward. 3. OPERATION Starting the Engine 1.
Set mower deck to the transport position by depressing the blade switch. 8058-210 Disengage the mower blades 8058-145 26 Raise the mower deck to the transport position 8058-223 Activate parking brake before starting 4. Sit on the seat. 2. Activate the parking brake. Disengage the mower blades by locking the lift pedal fully forward. 3. OPERATION Starting the Engine 1.

Owners Manual
Page 28
...control knob, if it too heavily. The engine exhaust contains carbon monoxide, which is an odorless, colorless, poisonous gas. Return to start position. WARNING! Engine exhaust and certain vehicle components contain or emit chemicals considered to the run at a moderate speed, approximately mid throttle..., for more than 5 seconds each time. When the engine starts, immediately release the ignition key back to cause cancer, birth defects or other reproductive system damage. USE FULL THROTTLE WHEN MOWING (no...
...control knob, if it too heavily. The engine exhaust contains carbon monoxide, which is an odorless, colorless, poisonous gas. Return to start position. WARNING! Engine exhaust and certain vehicle components contain or emit chemicals considered to the run at a moderate speed, approximately mid throttle..., for more than 5 seconds each time. When the engine starts, immediately release the ignition key back to cause cancer, birth defects or other reproductive system damage. USE FULL THROTTLE WHEN MOWING (no...
Owners Manual
Page 29
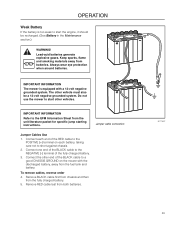
... vehicles. Jumper cable connection Jumper Cables Use 1. To remove cables, reverse order 4. Connect each battery, taking care not to start the engine, it should be a 12-volt negative grounded system. OPERATION Weak Battery If the battery is equipped with the discharged battery, ...cable to a good CHASSIS GROUND on each end of the BLACK cable to the EFM Information Sheet from the unit literature packet for specific jump starting instructions. The other end of the fully charged battery. 3. Remove BLACK cable first from chassis and then from both batteries. 8011-642 29...
... vehicles. Jumper cable connection Jumper Cables Use 1. To remove cables, reverse order 4. Connect each battery, taking care not to start the engine, it should be a 12-volt negative grounded system. OPERATION Weak Battery If the battery is equipped with the discharged battery, ...cable to a good CHASSIS GROUND on each end of the BLACK cable to the EFM Information Sheet from the unit literature packet for specific jump starting instructions. The other end of the fully charged battery. 3. Remove BLACK cable first from chassis and then from both batteries. 8011-642 29...
Owners Manual
Page 31
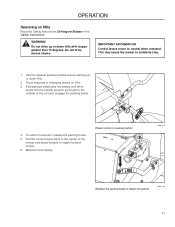
... neutral position 8058-208 Release the parking brake to the center of the unit and engage the parking brake. 4. Use the slowest speed possible before starting up or down hills. 2. To restart movement, release the parking brake. 5. If stopping is absolutely necessary, pull drive levers into the neutral position and push...
... neutral position 8058-208 Release the parking brake to the center of the unit and engage the parking brake. 4. Use the slowest speed possible before starting up or down hills. 2. To restart movement, release the parking brake. 5. If stopping is absolutely necessary, pull drive levers into the neutral position and push...

Owners Manual
Page 35
... and oil leakages Check/clean the engine's cooling air intake Check the mower deck Check for loose hardware (screws, nuts) Clean under the mower deck Start the engine and blades, listen for unusual sounds Check for damage Thoroughly clean around the engine Clean around belts, belt pulleys Check the tire pressures...
... and oil leakages Check/clean the engine's cooling air intake Check the mower deck Check for loose hardware (screws, nuts) Clean under the mower deck Start the engine and blades, listen for unusual sounds Check for damage Thoroughly clean around the engine Clean around belts, belt pulleys Check the tire pressures...

Owners Manual
Page 38
...seat and release the parking brake before using the machine again. MAINTENANCE Safety System This machine is equipped with a safety system that prevents starting 8061-032 IMPORTANT INFORMATION To be able to drive, the driver must be standing still when applying the parking brake. 38 Parking brake... 8058-182 Check that the engine stops if the mower blades are in reduced braking ability and can cause an accident. Conditions for starting or driving under the following conditions. Change the conditions and try again. IMPORTANT INFORMATION DO NOT add any type of these conditions is...
...seat and release the parking brake before using the machine again. MAINTENANCE Safety System This machine is equipped with a safety system that prevents starting 8061-032 IMPORTANT INFORMATION To be able to drive, the driver must be standing still when applying the parking brake. 38 Parking brake... 8058-182 Check that the engine stops if the mower blades are in reduced braking ability and can cause an accident. Conditions for starting or driving under the following conditions. Change the conditions and try again. IMPORTANT INFORMATION DO NOT add any type of these conditions is...

Owners Manual
Page 48
... purged. • After the vehicle has been used oil in both forward and reverse directions (5 or 6 times). Transmission Purging Due to 180 in /lbs. Before starting, make sure the oil tank is at fast idle, slowly move the directional control in appropriate containers and dispose of power or drive after stopping...
... purged. • After the vehicle has been used oil in both forward and reverse directions (5 or 6 times). Transmission Purging Due to 180 in /lbs. Before starting, make sure the oil tank is at fast idle, slowly move the directional control in appropriate containers and dispose of power or drive after stopping...

Owners Manual
Page 49
TROUBLESHOOTING GUIDE Problem Cause Engine will not start • Blade switch is engaged • Steering controls are not locked in the neutral position • Parking brake is not activated • Battery is dead &#...
TROUBLESHOOTING GUIDE Problem Cause Engine will not start • Blade switch is engaged • Steering controls are not locked in the neutral position • Parking brake is not activated • Battery is dead &#...
Owners Manual
Page 51
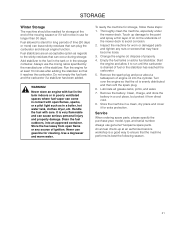
... thin layer of oil on the underside of the mower deck to run until the carburetor is evenly distributed and then refit the spark plug. 6. Start the engine and allow it reaches the carburetor. Drain the fuel outdoors, into the cylinder. To ready the machine for long periods of time (30...the fuel with open flame or any nuts or screws that can cause serious personal injury and property damage. Store the machine in use genuine Husqvarna spare parts. Never store an engine with fuel in the tank indoors or in poorly ventilated spaces where fuel vapor can occur during storage. ...
... thin layer of oil on the underside of the mower deck to run until the carburetor is evenly distributed and then refit the spark plug. 6. Start the engine and allow it reaches the carburetor. Drain the fuel outdoors, into the cylinder. To ready the machine for long periods of time (30...the fuel with open flame or any nuts or screws that can cause serious personal injury and property damage. Store the machine in use genuine Husqvarna spare parts. Never store an engine with fuel in the tank indoors or in poorly ventilated spaces where fuel vapor can occur during storage. ...

