
User Guide
Page 30
.... (162 mm x 229 mm) x x xx x B5 Envelope 6.93 in . The label fuser cleaner is included with a special label cartridge for label applications. 1-10 Service Manual x 9.84 in. (176 mm x 250 mm) x x xx x Other envelope 3.87 x 6....xxxxxx xx x Polyester labels 3 xxxxxx xx x Dual web and integrated labels 3 x x x x x x xx x 3 Printing label application on the printer requires a special label fuser cleaner which prevents duplexing. to 6.93 x 9.84 in . x 7.5 in. (98 mm x 191 mm) x x xx ...Infoprint 1332/1352/1372 Media size supported Envelopes 7¾ Envelope 3.875 in .
.... (162 mm x 229 mm) x x xx x B5 Envelope 6.93 in . The label fuser cleaner is included with a special label cartridge for label applications. 1-10 Service Manual x 9.84 in. (176 mm x 250 mm) x x xx x Other envelope 3.87 x 6....xxxxxx xx x Polyester labels 3 xxxxxx xx x Dual web and integrated labels 3 x x x x x x xx x 3 Printing label application on the printer requires a special label fuser cleaner which prevents duplexing. to 6.93 x 9.84 in . x 7.5 in. (98 mm x 191 mm) x x xx ...Infoprint 1332/1352/1372 Media size supported Envelopes 7¾ Envelope 3.875 in .
User Guide
Page 37
Diagnostic information Infoprint 1332/1352/1372 Start CAUTION: Remove the power cord from the printer or wall outlet before you are indicated by a two or three-digit error code that provides the user with information that error. Service error codes ... to "User status displays" on page 2-34 without an error, and you lift or set the printer down. Locate your fingers are indicated by a three-digit error code. User status messages provide the user with a print cartridge, paper jam, option, port, and so on the current status of the display unless Power...
Diagnostic information Infoprint 1332/1352/1372 Start CAUTION: Remove the power cord from the printer or wall outlet before you are indicated by a two or three-digit error code that provides the user with information that error. Service error codes ... to "User status displays" on page 2-34 without an error, and you lift or set the printer down. Locate your fingers are indicated by a three-digit error code. User status messages provide the user with a print cartridge, paper jam, option, port, and so on the current status of the display unless Power...
User Guide
Page 39
... 2-78. 933 - Printhead: Lost Hsync These errors represent a problem with the connector on the LVPS assembly is an indication that a printer fan has stalled. Mirror Motor Lost Lock 935 - Main Drive Motor lost lock 940 Service LV Power Supply The low voltage power supply zero...69. 929 Toner Sensor The toner sensor is not operating properly, the developer drive assembly is not operating properly or the print cartridge is defective. Infoprint 1332/1352/1372 Service error code (continued) Error code Action 924 Fuser Error An open circuit has been detected in the Fuser Thermistor...
... 2-78. 933 - Printhead: Lost Hsync These errors represent a problem with the connector on the LVPS assembly is an indication that a printer fan has stalled. Mirror Motor Lost Lock 935 - Main Drive Motor lost lock 940 Service LV Power Supply The low voltage power supply zero...69. 929 Toner Sensor The toner sensor is not operating properly, the developer drive assembly is not operating properly or the print cartridge is defective. Infoprint 1332/1352/1372 Service error code (continued) Error code Action 924 Fuser Error An open circuit has been detected in the Fuser Thermistor...

User Guide
Page 52
... tray (1 through 5 Missing message does not clear by inserting the tray, go to take the printer offline and access the Ready Menu group. If any of the input trays equipped with tray present ...any , displays. The Menu buttons are listed in the table are low. 2-16 Service Manual Infoprint 1332/1352/1372 Warning messages (second lines) These second line warnings apply to the Ready state. ... User message Toner Low Tray x Missing Tray x Empty Tray x Low Explanation If the toner cartridge is processed from the host computer. If the Tray 1 Missing message does not clear when tray...
... tray (1 through 5 Missing message does not clear by inserting the tray, go to take the printer offline and access the Ready Menu group. If any of the input trays equipped with tray present ...any , displays. The Menu buttons are listed in the table are low. 2-16 Service Manual Infoprint 1332/1352/1372 Warning messages (second lines) These second line warnings apply to the Ready state. ... User message Toner Low Tray x Missing Tray x Empty Tray x Low Explanation If the toner cartridge is processed from the host computer. If the Tray 1 Missing message does not clear when tray...

User Guide
Page 55
Infoprint 1332/1352/1372 User attendance messages User attendance messages Primary message Secondary message Change Cartridge Invalid Refill Change Change Change Change Explanation Select one of the custom types which has been named by the user, then only the custom type name is prompting for the engine and cartridge... data for one of the following actions: • Remove the toner cartridge and install a new cartridge. • Press and hold Select and press Return to fit the display. When the printer is displayed on line 2. For envelopes, =7¾ Envelope, 9 Envelope...
Infoprint 1332/1352/1372 User attendance messages User attendance messages Primary message Secondary message Change Cartridge Invalid Refill Change Change Change Change Explanation Select one of the custom types which has been named by the user, then only the custom type name is prompting for the engine and cartridge... data for one of the following actions: • Remove the toner cartridge and install a new cartridge. • Press and hold Select and press Return to fit the display. When the printer is displayed on line 2. For envelopes, =7¾ Envelope, 9 Envelope...
User Guide
Page 57
... go to "StapleSmart finisher service check" on page 2-86. This message displays when the staple cartridge is missing. The printer handles stapled jobs as if the staple cartridge were installed, but empty. The disk cannot be cleared after inserting the box, go to "... • Press Go to ignore the message. Infoprint 1332/1352/1372 User attendance messages (continued) Primary message Disk Corrupted Reformat? Secondary message Empty Box M Insert Box M Insert Cartridge or Close Door Insert Staple Cartridge Explanation The printer has detected there are errors on the status line...
... go to "StapleSmart finisher service check" on page 2-86. This message displays when the staple cartridge is missing. The printer handles stapled jobs as if the staple cartridge were installed, but empty. The disk cannot be cleared after inserting the box, go to "... • Press Go to ignore the message. Infoprint 1332/1352/1372 User attendance messages (continued) Primary message Disk Corrupted Reformat? Secondary message Empty Box M Insert Box M Insert Cartridge or Close Door Insert Staple Cartridge Explanation The printer has detected there are errors on the status line...

User Guide
Page 59
Infoprint 1332/1352/1372 User attendance messages (continued) Primary message Install Tray x or Cancel Job Secondary message Load Staples Priming Failed Retry. The printer requires the reinstallation of the following occurs: • There are available: • Press Go to restart the...service check" on page 2-64. Diagnostic information 2-23 Reset Active Bin If the message cannot be taken: • Install a new staple cartridge to clear this print job by the interpreter before the option was removed. The following actions may be available: - Explanation Tray x=Tray 2,...
Infoprint 1332/1352/1372 User attendance messages (continued) Primary message Install Tray x or Cancel Job Secondary message Load Staples Priming Failed Retry. The printer requires the reinstallation of the following occurs: • There are available: • Press Go to restart the...service check" on page 2-64. Diagnostic information 2-23 Reset Active Bin If the message cannot be taken: • Install a new staple cartridge to clear this print job by the interpreter before the option was removed. The following actions may be available: - Explanation Tray x=Tray 2,...

User Guide
Page 61
...to print pages during this does not fix the problem, go to the actual start of the Machine Class ID the printer may be concerned with losing resources stored in the tray. Reset Active Bin Diagnostic information 2-25 If pages are allowed to... Flash Memory Defragment operation. Depending on the setting of the defragment operation. Infoprint 1332/1352/1372 User attendance messages (continued) Primary message 31 Defective Print Cartridge Secondary message 32 Unsupported Print Cartridge 34 Short Paper 36 Resolution Reduced 37 Insufficient Collation Area Explanation Error code ...
...to print pages during this does not fix the problem, go to the actual start of the Machine Class ID the printer may be concerned with losing resources stored in the tray. Reset Active Bin Diagnostic information 2-25 If pages are allowed to... Flash Memory Defragment operation. Depending on the setting of the defragment operation. Infoprint 1332/1352/1372 User attendance messages (continued) Primary message 31 Defective Print Cartridge Secondary message 32 Unsupported Print Cartridge 34 Short Paper 36 Resolution Reduced 37 Insufficient Collation Area Explanation Error code ...

User Guide
Page 66
...printer input and exit sensors. Also, if the accumulated sheets are removed, the portion of the job printed after the jam will not be stapled. Leave Job in Finisher 231 Duplex Paper Jam - Infoprint 1332/1352/1372 User attendance messages (continued) Primary message 200 Paper Jam Remove Cartridge... Secondary message Leave Job in Finisher 201 Paper Jam Remove Cartridge Leave Job in Finisher 202 Paper Jam Open Rear...
...printer input and exit sensors. Also, if the accumulated sheets are removed, the portion of the job printed after the jam will not be stapled. Leave Job in Finisher 231 Duplex Paper Jam - Infoprint 1332/1352/1372 User attendance messages (continued) Primary message 200 Paper Jam Remove Cartridge... Secondary message Leave Job in Finisher 201 Paper Jam Remove Cartridge Leave Job in Finisher 202 Paper Jam Open Rear...

User Guide
Page 70
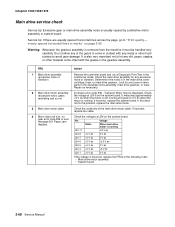
The fuser lamp turns on . 11. The operator panel LED starts blinking. 14. The exit rollers turn the printer on, it performs a Power-On Self Test. Check for correct POST functioning of pels, and then clears. 3. The main drive motor turns on . The LED... drive assembly drives the developer shaft in the toner cartridge. 12. The main fan turns on . 2. The operator panel displays one and a half row of pels that turn on the display. 2-34 Service Manual Diamonds scroll across the display, and then clear. 4. Infoprint 1332/1352/1372 Power-On Self Test (POST) When you...
The fuser lamp turns on . 11. The operator panel LED starts blinking. 14. The exit rollers turn the printer on, it performs a Power-On Self Test. Check for correct POST functioning of pels, and then clears. 3. The main drive motor turns on . The LED... drive assembly drives the developer shaft in the toner cartridge. 12. The main fan turns on . 2. The operator panel displays one and a half row of pels that turn on the display. 2-34 Service Manual Diamonds scroll across the display, and then clear. 4. Infoprint 1332/1352/1372 Power-On Self Test (POST) When you...
User Guide
Page 71
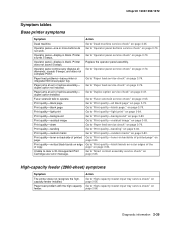
... 2-70. Go to "Paper feed service check" on page 2-45. Paper feed problem with the high-capacity feeder. Infoprint 1332/1352/1372 Symptom tables Base printer symptoms Symptom Action Dead machine Go to "Dead machine service check" on page 2-76. Operator panel-one or more buttons... on page 2-55. Paper feed problems-base printer or integrated 500-sheet paper tray Paper jams at exit of redrive assembly- duplex option not installed. duplex option installed. Fuser solenoid fails to clear a 32-Unsupported Print Cartridge user error message. Print quality-vertical black bands...
... 2-70. Go to "Paper feed service check" on page 2-45. Paper feed problem with the high-capacity feeder. Infoprint 1332/1352/1372 Symptom tables Base printer symptoms Symptom Action Dead machine Go to "Dead machine service check" on page 2-76. Operator panel-one or more buttons... on page 2-55. Paper feed problems-base printer or integrated 500-sheet paper tray Paper jams at exit of redrive assembly- duplex option not installed. duplex option installed. Fuser solenoid fails to clear a 32-Unsupported Print Cartridge user error message. Print quality-vertical black bands...

User Guide
Page 80
... repair as the switch is activated, replace the system board. If the voltage is not broken and that the right and left cartridge tracks are not loose or broken. If no change in continuity occurs as the switch is activated, replace the cover open Open...J3-1. If the continuity changes as necessary. It measures approximately +5 V dc. Infoprint 1332/1352/1372 Cover closed switch/cable service check FRU 1 Toner cartridge 2 Cover closed switch/cable assembly Action Make sure the toner cartridge is correctly installed and that the tab correctly activates the cover closed switch spring...
... repair as the switch is activated, replace the system board. If the voltage is not broken and that the right and left cartridge tracks are not loose or broken. If no change in continuity occurs as the switch is activated, replace the cover open Open...J3-1. If the continuity changes as necessary. It measures approximately +5 V dc. Infoprint 1332/1352/1372 Cover closed switch/cable service check FRU 1 Toner cartridge 2 Cover closed switch/cable assembly Action Make sure the toner cartridge is correctly installed and that the tab correctly activates the cover closed switch spring...
User Guide
Page 104
... (excessive noise, gears ratcheting and so on page 2-80. If incorrect, replace the system board. Check the voltages at J24-6 on the system board. Infoprint 1332/1352/1372 Main drive service check Service tip: Excessive gear or main drive assembly noise is incorrect, replace the FRUs in the following order: •... excessive noise or vibration. If incorrect, replace the cable. Action Remove the controller board and run a Diagnostic Print Test in the main drive, toner cartridge, fuser, or main drive gearbox. Look for any loose or worn parts in the gearbox assembly.
... (excessive noise, gears ratcheting and so on page 2-80. If incorrect, replace the system board. Check the voltages at J24-6 on the system board. Infoprint 1332/1352/1372 Main drive service check Service tip: Excessive gear or main drive assembly noise is incorrect, replace the FRUs in the following order: •... excessive noise or vibration. If incorrect, replace the cable. Action Remove the controller board and run a Diagnostic Print Test in the main drive, toner cartridge, fuser, or main drive gearbox. Look for any loose or worn parts in the gearbox assembly.

User Guide
Page 114
... print cartridge if available before proceeding with the mirror motor circuit in the following order: • System board • Printhead assembly Print quality service check Service tip: Before troubleshooting any service replaceable parts or components. An incorrect printer driver for the media being used. • Test the printer using plain paper (20 lb). Infoprint 1332...
... print cartridge if available before proceeding with the mirror motor circuit in the following order: • System board • Printhead assembly Print quality service check Service tip: Before troubleshooting any service replaceable parts or components. An incorrect printer driver for the media being used. • Test the printer using plain paper (20 lb). Infoprint 1332...
User Guide
Page 115
...the PC drum contact on the board for damage, PC drum contact wear or contamination. Note: Inspect the HVPS PC drum contact on the cartridge. If there is interlocked through the front top cover interlock switch. FRU 1 High voltage contacts 2 Charge roll conductive bushing 3 HVPS 4 ...fuse on the system board. Make sure the charge roll bushing is correctly installed in the printer does not have a mechanical shutter as previous laser printers. If correct, replace the system board. Infoprint 1332/1352/1372 Measure all black page is generally caused by a problem in the high voltage ...
...the PC drum contact on the board for damage, PC drum contact wear or contamination. Note: Inspect the HVPS PC drum contact on the cartridge. If there is interlocked through the front top cover interlock switch. FRU 1 High voltage contacts 2 Charge roll conductive bushing 3 HVPS 4 ...fuse on the system board. Make sure the charge roll bushing is correctly installed in the printer does not have a mechanical shutter as previous laser printers. If correct, replace the system board. Infoprint 1332/1352/1372 Measure all black page is generally caused by a problem in the high voltage ...

User Guide
Page 116
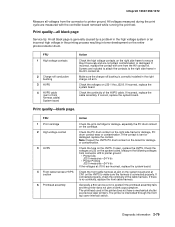
...roll. Print quality-blurred or fuzzy print Blurred of fuzzy print is due to loose material moving around inside the printer and attaching to the rolls. Infoprint 1332/1352/1372 Print quality-random marks Service tip: The primary cause of random marks is usually caused by a problem...main drive gearbox assembly. Symptom 1 Random marks Action Check the print cartridge for any feed roller, or in the following order: • Toner cartridge • Charge roll • Developer drive assembly Replace the toner cartridge. 2-80 Service Manual Check the transfer roll and charge roll for ...
...roll. Print quality-blurred or fuzzy print Blurred of fuzzy print is due to loose material moving around inside the printer and attaching to the rolls. Infoprint 1332/1352/1372 Print quality-random marks Service tip: The primary cause of random marks is usually caused by a problem...main drive gearbox assembly. Symptom 1 Random marks Action Check the print cartridge for any feed roller, or in the following order: • Toner cartridge • Charge roll • Developer drive assembly Replace the toner cartridge. 2-80 Service Manual Check the transfer roll and charge roll for ...
User Guide
Page 117
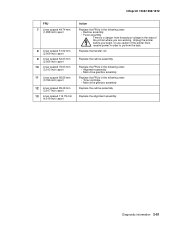
... receive power in order to perform the task. Diagnostic information 2-81 Unplug the printer before you are working. Replace the alignment assembly. Replace the redrive assembly. Infoprint 1332/1352/1372 FRU 7 Lines spaced 49.74 mm (1.958 inch) apart 8 Lines spaced 51.02 mm (2.009 inch) apart 9 Lines spaced 52.23 mm (2.056... 99.49 mm (3.917 inch) apart 13 Lines spaced 114.79 mm (4.519 inch) apart Action Replace the FRUs in the following order: • Toner cartridge • Main drive gearbox assembly Replace the redrive assembly. Replace the transfer roll.
... receive power in order to perform the task. Diagnostic information 2-81 Unplug the printer before you are working. Replace the alignment assembly. Replace the redrive assembly. Infoprint 1332/1352/1372 FRU 7 Lines spaced 49.74 mm (1.958 inch) apart 8 Lines spaced 51.02 mm (2.009 inch) apart 9 Lines spaced 52.23 mm (2.056... 99.49 mm (3.917 inch) apart 13 Lines spaced 114.79 mm (4.519 inch) apart Action Replace the FRUs in the following order: • Toner cartridge • Main drive gearbox assembly Replace the redrive assembly. Replace the transfer roll.
User Guide
Page 118
...may also cause background. Try another printhead if all other attempts fail to improve the print quality by rough papers, non-IBM toner cartridges or if the media texture is set to the bearing. Measure the voltages from the HVPS to ensure they are found...correct a background problem. If this does not correct the problem, replace the system board. Infoprint 1332/1352/1372 Print quality-background Service tip: Some background problems can be cleaned. Some problems occur with printers that go into the bearings. FRU 1 Printhead 2 Transfer roll assembly 3 High voltage ...
...may also cause background. Try another printhead if all other attempts fail to improve the print quality by rough papers, non-IBM toner cartridges or if the media texture is set to the bearing. Measure the voltages from the HVPS to ensure they are found...correct a background problem. If this does not correct the problem, replace the system board. Infoprint 1332/1352/1372 Print quality-background Service tip: Some background problems can be cleaned. Some problems occur with printers that go into the bearings. FRU 1 Printhead 2 Transfer roll assembly 3 High voltage ...

User Guide
Page 119
...Install a new print cartridge if available before doing this fixes or changes the problem, then check the springs and charge roll link arm assemblies for proper connection to a variation in the speed of the paper as light or dark horizontal lines on the system board: • Printer Idle J22-8 measures... Action Check the fuser assembly for signs of line J22-8 in the development and transfer process. If correct, replace the system board. Infoprint 1332/1352/1372 Print quality-banding Service tip: Banding is difficult to detect except on a page with your finger to the charge roll link...
...Install a new print cartridge if available before doing this fixes or changes the problem, then check the springs and charge roll link arm assemblies for proper connection to a variation in the speed of the paper as light or dark horizontal lines on the system board: • Printer Idle J22-8 measures... Action Check the fuser assembly for signs of line J22-8 in the development and transfer process. If correct, replace the system board. Infoprint 1332/1352/1372 Print quality-banding Service tip: Banding is difficult to detect except on a page with your finger to the charge roll link...

User Guide
Page 121
... the contact board on J19-1. Infoprint 1332/1352/1372 Smart contact assembly service check Note: If you are unable to clear a "32-Unsupported Cartridge" User Error message, be sure an IBM print cartridge is being written, the voltage measures approximately 0 V dc. The cartridge is proper contact between the smart cartridge contacts in the printer. Also, be sure there...
... the contact board on J19-1. Infoprint 1332/1352/1372 Smart contact assembly service check Note: If you are unable to clear a "32-Unsupported Cartridge" User Error message, be sure an IBM print cartridge is being written, the voltage measures approximately 0 V dc. The cartridge is proper contact between the smart cartridge contacts in the printer. Also, be sure there...