User Guide
Page 1
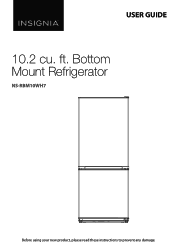
Bottom Mount Refrigerator NS-RBM10WH7 Before using your new product, please read these instructions to prevent any damage. ft. USER GUIDE 10.2 cu.
Bottom Mount Refrigerator NS-RBM10WH7 Before using your new product, please read these instructions to prevent any damage. ft. USER GUIDE 10.2 cu.
User Guide
Page 2
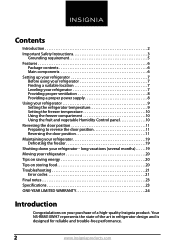
... 20 Tips on storing food 20 Troubleshooting 21 Error codes 21 Final notes 23 Specifications 23 ONE-YEAR LIMITED WARRANTY 24 Introduction Congratulations on your refrigerator - Your NS-RBM10WH7 represents the state of a high-quality Insignia product. Contents Introduction 2 Important Safety Instructions 3 Grounding requirement 5 Features 6 Package contents 6 Main components 6 Setting up your...
... 20 Tips on storing food 20 Troubleshooting 21 Error codes 21 Final notes 23 Specifications 23 ONE-YEAR LIMITED WARRANTY 24 Introduction Congratulations on your refrigerator - Your NS-RBM10WH7 represents the state of a high-quality Insignia product. Contents Introduction 2 Important Safety Instructions 3 Grounding requirement 5 Features 6 Package contents 6 Main components 6 Setting up your...

User Guide
Page 3
...'s instructions. 8 Do not install near any ventilation openings. If the provided plug does not fit into your refrigerator. 10.2 cu.ft. Bottom Mount Refrigerator Important Safety Instructions CAUTION RISK OF ELECTRIC SHOCK DO NOT OPEN This symbol indicates that the available AC power matches... the voltage requirements of this appliance. 12 Unplug this appliance during lightning storms or when it will not be used for your refrigerator. WARNING 1 Read these instructions. 2 Keep these instructions. 3 Heed all warnings. 4 Follow all instructions. 5 Do not use this ...
...'s instructions. 8 Do not install near any ventilation openings. If the provided plug does not fit into your refrigerator. 10.2 cu.ft. Bottom Mount Refrigerator Important Safety Instructions CAUTION RISK OF ELECTRIC SHOCK DO NOT OPEN This symbol indicates that the available AC power matches... the voltage requirements of this appliance. 12 Unplug this appliance during lightning storms or when it will not be used for your refrigerator. WARNING 1 Read these instructions. 2 Keep these instructions. 3 Heed all warnings. 4 Follow all instructions. 5 Do not use this ...

User Guide
Page 4
...not use mechanical devices or other means to qualified service personnel. This could result in place so that children may not easily climb inside the refrigerator. This could result in the appliance clear of obstruction. 2 WARNING-Do not touch the interior of fire or electric shock, do not ..., or has been dropped. 19 To reduce the risk of the freezer compartment with wet hands. Before you throw away your old refrigerator or freezer: 1) Take off the appliance before carrying out user maintenance on top of child entrapment. NS-RBM10WH7 14 Do not handle the plug with wet hands.
...not use mechanical devices or other means to qualified service personnel. This could result in place so that children may not easily climb inside the refrigerator. This could result in the appliance clear of obstruction. 2 WARNING-Do not touch the interior of fire or electric shock, do not ..., or has been dropped. 19 To reduce the risk of the freezer compartment with wet hands. Before you throw away your old refrigerator or freezer: 1) Take off the appliance before carrying out user maintenance on top of child entrapment. NS-RBM10WH7 14 Do not handle the plug with wet hands.

User Guide
Page 5
... as to comply with reduced physical or mental capabilities or lack of the grounding plug can negatively affect the refrigerator's performance. All refrigeration products contain refrigerants, which under the guidelines of the appliance due to avoid a hazard. 10 Follow local regulations regarding disposal ...of federal law must be removed before disposal. Use of an extension cord can result in order to flammable refrigerant and gas. This appliance is properly grounded. It is the consumer's responsibility to whether the appliance is equipped with a cord...
... as to comply with reduced physical or mental capabilities or lack of the grounding plug can negatively affect the refrigerator's performance. All refrigeration products contain refrigerants, which under the guidelines of the appliance due to avoid a hazard. 10 Follow local regulations regarding disposal ...of federal law must be removed before disposal. Use of an extension cord can result in order to flammable refrigerant and gas. This appliance is properly grounded. It is the consumer's responsibility to whether the appliance is equipped with a cord...

User Guide
Page 6
ft. bottom mount refrigerator • Hinge kit • User Guide Main components Refrigerator control panel w/LED Glass shelves Freezer temperature control Glass crisper cover Crisper Wire shelf Wire drawer NS-RBM10WH7 Butter keeper Door racks Door racks Wire shelf 6 www.insigniaproducts.com Features • 10.2 cubic foot capacity • Electronic controls • Adjustable glass shelves (2) • Humidity-controlled crisper drawer • LED lighting • Frost free Package contents • 10.2 cu.
ft. bottom mount refrigerator • Hinge kit • User Guide Main components Refrigerator control panel w/LED Glass shelves Freezer temperature control Glass crisper cover Crisper Wire shelf Wire drawer NS-RBM10WH7 Butter keeper Door racks Door racks Wire shelf 6 www.insigniaproducts.com Features • 10.2 cubic foot capacity • Electronic controls • Adjustable glass shelves (2) • Humidity-controlled crisper drawer • LED lighting • Frost free Package contents • 10.2 cu.
User Guide
Page 7
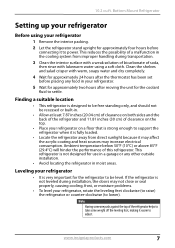
...a garage or any food in . • Allow at least 7.87 inches (20.04 cm) of clearance on both sides and the back of the refrigerator and 11.81 inches (30 cm) of soda, then rinse with warm, soapy water and dry completely. 4 Wait for approximately 24 hours after moving the... unit for approximately two hours after the thermostat has been set before connecting it to settle. Finding a suitable location • This refrigerator is not leveled during transportation. 3 Clean the interior surface with a weak solution of bicarbonate of clearance on the top. • Place your...
...a garage or any food in . • Allow at least 7.87 inches (20.04 cm) of clearance on both sides and the back of the refrigerator and 11.81 inches (30 cm) of soda, then rinse with warm, soapy water and dry completely. 4 Wait for approximately 24 hours after moving the... unit for approximately two hours after the thermostat has been set before connecting it to settle. Finding a suitable location • This refrigerator is not leveled during transportation. 3 Clean the interior surface with a weak solution of bicarbonate of clearance on the top. • Place your...
User Guide
Page 8
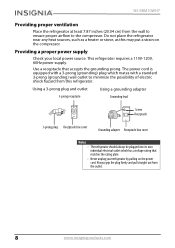
... individual electrical outlet which mates with a 3-prong (grounding) plug which has a voltage rating that accepts the grounding prong. This refrigerator requires a 110V-120V, 60Hz power supply. NS-RBM10WH7 Providing proper ventilation Place the refrigerator at least 7.87 inches (20.04 cm) from the wall to ensure proper airflow to minimize the possibility of electric...
... individual electrical outlet which mates with a 3-prong (grounding) plug which has a voltage rating that accepts the grounding prong. This refrigerator requires a 110V-120V, 60Hz power supply. NS-RBM10WH7 Providing proper ventilation Place the refrigerator at least 7.87 inches (20.04 cm) from the wall to ensure proper airflow to minimize the possibility of electric...

User Guide
Page 9
....com 9 If you can adjust the temperature up or down to your refrigerator Setting the refrigerator temperature # Item Description 1 SET button Press to restart before restarting it. Bottom Mount Refrigerator Using your personal preference. Allow 24 hours for several hours until it by... indicators 1 - 5 Light to five minutes before this time delay, the refrigerator will not start. • Large amounts of food will lower the cooling efficiency of the refrigerator. • If you turn the refrigerator on, the control panel LEDs turn on for three seconds, then displays the...
....com 9 If you can adjust the temperature up or down to your refrigerator Setting the refrigerator temperature # Item Description 1 SET button Press to restart before restarting it. Bottom Mount Refrigerator Using your personal preference. Allow 24 hours for several hours until it by... indicators 1 - 5 Light to five minutes before this time delay, the refrigerator will not start. • Large amounts of food will lower the cooling efficiency of the refrigerator. • If you turn the refrigerator on, the control panel LEDs turn on for three seconds, then displays the...

User Guide
Page 11
...the door (as it open stopper (2) Top hinge cover Cover plate www.insigniaproducts.com 11 Caution • To avoid injury to yourself or your refrigerator is unplugged and empty. • Adjust the leveling feet to their highest position. • Have someone assist you may find it more convenient to...available to assist you in the process. • Keep all of the parts you remove to use your refrigerator, you during the door reversal process. • Do not lay the refrigerator flat, as shipped): Right bottom hinge Center hinge Top hinge Right door-open from right to left to ...
...the door (as it open stopper (2) Top hinge cover Cover plate www.insigniaproducts.com 11 Caution • To avoid injury to yourself or your refrigerator is unplugged and empty. • Adjust the leveling feet to their highest position. • Have someone assist you may find it more convenient to...available to assist you in the process. • Keep all of the parts you remove to use your refrigerator, you during the door reversal process. • Do not lay the refrigerator flat, as shipped): Right bottom hinge Center hinge Top hinge Right door-open from right to left to ...
User Guide
Page 12
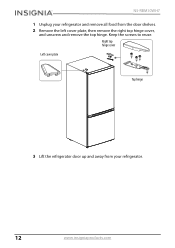
Keep the screws to reuse. Right top hinge cover Left cover plate Top hinge 3 Lift the refrigerator door up and away from your refrigerator and remove all food from the door shelves. 2 Remove the left cover plate, then remove the right top hinge cover, and unscrew and remove the top hinge. NS-RBM10WH7 1 Unplug your refrigerator. 12 www.insigniaproducts.com
Keep the screws to reuse. Right top hinge cover Left cover plate Top hinge 3 Lift the refrigerator door up and away from your refrigerator and remove all food from the door shelves. 2 Remove the left cover plate, then remove the right top hinge cover, and unscrew and remove the top hinge. NS-RBM10WH7 1 Unplug your refrigerator. 12 www.insigniaproducts.com

User Guide
Page 13
Save the screws to reuse. Bottom Mount Refrigerator 4 Unscrew the two screws holding the center hinge, remove the hinge, then lift the freezer door up and away from your refrigerator. Center hinge www.insigniaproducts.com 13 10.2 cu.ft.
Save the screws to reuse. Bottom Mount Refrigerator 4 Unscrew the two screws holding the center hinge, remove the hinge, then lift the freezer door up and away from your refrigerator. Center hinge www.insigniaproducts.com 13 10.2 cu.ft.
User Guide
Page 14
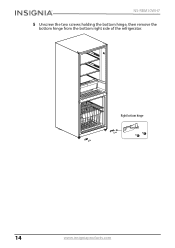
Right bottom hinge 14 www.insigniaproducts.com NS-RBM10WH7 5 Unscrew the two screws holding the bottom hinge, then remove the bottom hinge from the bottom right side of the refrigerator.
Right bottom hinge 14 www.insigniaproducts.com NS-RBM10WH7 5 Unscrew the two screws holding the bottom hinge, then remove the bottom hinge from the bottom right side of the refrigerator.

User Guide
Page 15
Bottom Mount Refrigerator 6 Remove the hinge screw plugs from the middle and bottom hinge on the left side of the refrigerator, then install those screw plugs on the right side. 7 Install the left bottom hinge (provided) on the bottom left side of the refrigerator with the screws you removed from the right bottom hinge. 10.2 cu.ft. www.insigniaproducts.com 15
Bottom Mount Refrigerator 6 Remove the hinge screw plugs from the middle and bottom hinge on the left side of the refrigerator, then install those screw plugs on the right side. 7 Install the left bottom hinge (provided) on the bottom left side of the refrigerator with the screws you removed from the right bottom hinge. 10.2 cu.ft. www.insigniaproducts.com 15
User Guide
Page 16
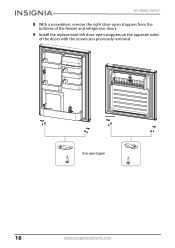
Door-open stoppers on the opposite sides of the freezer and refrigerator doors. 9 Install the replacement left door-open stoppers 16 www.insigniaproducts.com NS-RBM10WH7 8 With a screwdriver, remove the right door-open stoppers from the bottoms of the doors with the screws you previously removed.
Door-open stoppers on the opposite sides of the freezer and refrigerator doors. 9 Install the replacement left door-open stoppers 16 www.insigniaproducts.com NS-RBM10WH7 8 With a screwdriver, remove the right door-open stoppers from the bottoms of the doors with the screws you previously removed.

User Guide
Page 17
10.2 cu.ft. Bottom Mount Refrigerator 10 Place the freezer door on all sides before attaching the middle hinge. Attach the middle hinge with the screws you removed previously. Middle hinge www.insigniaproducts.com 17 Make sure that the door is aligned vertically and horizontally and that the door gasket seals on the bottom hinge.
10.2 cu.ft. Bottom Mount Refrigerator 10 Place the freezer door on all sides before attaching the middle hinge. Attach the middle hinge with the screws you removed previously. Middle hinge www.insigniaproducts.com 17 Make sure that the door is aligned vertically and horizontally and that the door gasket seals on the bottom hinge.

User Guide
Page 18
NS-RBM10WH7 11 Put the refrigerator door onto the middle hinge, then attach the top left hinge 18 www.insigniaproducts.com Attach the top left hinge to the top of the top with the cover plate you previously removed. Cover the hinge with the top left hinge cover and cover the screw holes on the right side of the refrigerator.
NS-RBM10WH7 11 Put the refrigerator door onto the middle hinge, then attach the top left hinge 18 www.insigniaproducts.com Attach the top left hinge to the top of the top with the cover plate you previously removed. Cover the hinge with the top left hinge cover and cover the screw holes on the right side of the refrigerator.

User Guide
Page 19
... in a solution of one quart of lukewarm water to child's play. Caution To prevent damage to keep the refrigerator running efficiently. 5 Dry the interior and exterior with only minimal cleaning and maintenance. Caution Use extreme caution with a dry .... • Abrasive cleaners. 1 Turn off the refrigerator and unplug it replaced. Bottom Mount Refrigerator Maintaining your refrigerator - Do this periodically to the finish, do not use with a soft cloth. Shutting down your refrigerator Your refrigerator is frost free, so you first receive it periodically...
... in a solution of one quart of lukewarm water to child's play. Caution To prevent damage to keep the refrigerator running efficiently. 5 Dry the interior and exterior with only minimal cleaning and maintenance. Caution Use extreme caution with a dry .... • Abrasive cleaners. 1 Turn off the refrigerator and unplug it replaced. Bottom Mount Refrigerator Maintaining your refrigerator - Do this periodically to the finish, do not use with a soft cloth. Shutting down your refrigerator Your refrigerator is frost free, so you first receive it periodically...
User Guide
Page 20
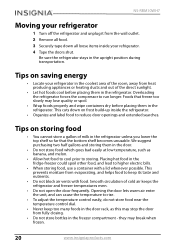
... rack, as banana, and melon. • Allow hot food to cool prior to keep too many foods in the refrigerator. Smooth circulation of cold air keeps the refrigerator and freezer temperatures even. • Do not open the door frequently. Opening the door lets warm air enter the unit... the temperature control dial. • Never keep its taste and nutrients. • Do not block air vents with a lid whenever possible. NS-RBM10WH7 Moving your refrigerator 1 Turn off the refrigerator and unplug it from the wall outlet. 2 Remove all food. 3 Securely tape down on frost build-up inside your...
... rack, as banana, and melon. • Allow hot food to cool prior to keep too many foods in the refrigerator. Smooth circulation of cold air keeps the refrigerator and freezer temperatures even. • Do not open the door frequently. Opening the door lets warm air enter the unit... the temperature control dial. • Never keep its taste and nutrients. • Do not block air vents with a lid whenever possible. NS-RBM10WH7 Moving your refrigerator 1 Turn off the refrigerator and unplug it from the wall outlet. 2 Remove all food. 3 Securely tape down on frost build-up inside your...

User Guide
Page 21
.... 10.2 cu.ft. Problem Refrigerator temperature sensor circuit Freezer defrost sensor Ambient temperature sensor Problem The refrigerator does not operate. STANDBY position. tripped. Power failure. Make sure that the refrigerator is set to repair your refrigerator yourself. Wait until LED 3 lights... breaker box and replace the fuse or or the circuit breaker is unplugged. If a power failure occurs, the refrigerator turns off. Bottom Mount Refrigerator • Do not refreeze food that the plug is restored. Troubleshooting Error codes LED display LED 1 and LED...
.... 10.2 cu.ft. Problem Refrigerator temperature sensor circuit Freezer defrost sensor Ambient temperature sensor Problem The refrigerator does not operate. STANDBY position. tripped. Power failure. Make sure that the refrigerator is set to repair your refrigerator yourself. Wait until LED 3 lights... breaker box and replace the fuse or or the circuit breaker is unplugged. If a power failure occurs, the refrigerator turns off. Bottom Mount Refrigerator • Do not refreeze food that the plug is restored. Troubleshooting Error codes LED display LED 1 and LED...