
Integration Guide
Page 2
...O34O57.htm. Per scaricare i driver piu recenti e gli aggiornamenti del BIOS, andare all 'indirizzo: http://www.intel.com/support/it . ;XO URL l.t < http://www.intel.com/NUCSupport. CrIlrICOK TeCTIVOBaHHbIX nnaHoK naMATH MO)KHO H TM 3Recb: http://www.inteLcom/NUCSupport. Aby wytwietlie listg ... unites de stockage SSD M.2 testees, accedez a : http://www.intel.com/NUCSupport. http://www.intel.com/jp/support/nnotherboards/desktop/sb/CS-O34O57.htm. -TJ TS2r'RE €I A` 01gt1- 1Al 2 : http://www.intel.com/NUCSupport. Pomoc techniczna Suporte To download the latest drivers and...
...O34O57.htm. Per scaricare i driver piu recenti e gli aggiornamenti del BIOS, andare all 'indirizzo: http://www.intel.com/support/it . ;XO URL l.t < http://www.intel.com/NUCSupport. CrIlrICOK TeCTIVOBaHHbIX nnaHoK naMATH MO)KHO H TM 3Recb: http://www.inteLcom/NUCSupport. Aby wytwietlie listg ... unites de stockage SSD M.2 testees, accedez a : http://www.intel.com/NUCSupport. http://www.intel.com/jp/support/nnotherboards/desktop/sb/CS-O34O57.htm. -TJ TS2r'RE €I A` 01gt1- 1Al 2 : http://www.intel.com/NUCSupport. Pomoc techniczna Suporte To download the latest drivers and...
User Guide
Page 2
... only at an ESD workstation using and modifying electronic equipment. Observe Safety and Regulatory Requirements If you install and test the Intel NUC, observe all warnings and cautions that could cause a short circuit Observe all warnings and cautions in the installation instructions....If such a station is off. Follow these guidelines before performing any procedures can result in personal injury or equipment damage. Intel NUC Kit NUC5i3RYH & NUC5i5RYH User Guide Before You Begin CAUTIONS The procedures in this user guide assume familiarity with the general terminology associated ...
... only at an ESD workstation using and modifying electronic equipment. Observe Safety and Regulatory Requirements If you install and test the Intel NUC, observe all warnings and cautions that could cause a short circuit Observe all warnings and cautions in the installation instructions....If such a station is off. Follow these guidelines before performing any procedures can result in personal injury or equipment damage. Intel NUC Kit NUC5i3RYH & NUC5i5RYH User Guide Before You Begin CAUTIONS The procedures in this user guide assume familiarity with the general terminology associated ...
User Guide
Page 3
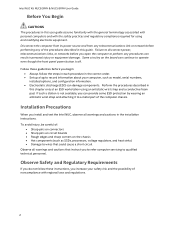
... the chassis and lift the cover. Observe the precautions in the lower memory socket. Installing and Removing Memory Intel NUC Kits NUC5i3RYH and NUC5i5RYH have two 204-pin DDR3L SO-DIMM sockets. Intel NUC Kit NUC5i3RYH & NUC5i5RYH User Guide This guide tells you plan to : • Install and remove memory • Install an M.2 SSD...
... the chassis and lift the cover. Observe the precautions in the lower memory socket. Installing and Removing Memory Intel NUC Kits NUC5i3RYH and NUC5i5RYH have two 204-pin DDR3L SO-DIMM sockets. Intel NUC Kit NUC5i3RYH & NUC5i5RYH User Guide This guide tells you plan to : • Install and remove memory • Install an M.2 SSD...
User Guide
Page 4
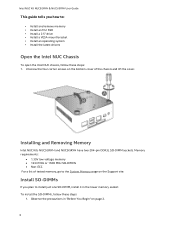
... spread the retaining clips at each end of the SO-DIMM until the retaining clips snap into the socket. 5. For a list of the socket. 6. Intel NUC Kit NUC5i3RYH & NUC5i5RYH User Guide 2. Observe the precautions in "Before You Begin" on page 2. 2. Turn off the computer and disconnect the AC power cord. 3. Turn off... a SO-DIMM, follow these steps: 1. Remove the computer's cover. 5. Reinstall and reconnect any parts you are firmly in an anti-static package. 7. Install an M.2 SSD Intel NUC Kits NUC5i3RYH and NUC5i5RYH support 80mm, 60mm, and 42mm M.2 SSDs.
... spread the retaining clips at each end of the SO-DIMM until the retaining clips snap into the socket. 5. For a list of the socket. 6. Intel NUC Kit NUC5i3RYH & NUC5i5RYH User Guide 2. Observe the precautions in "Before You Begin" on page 2. 2. Turn off the computer and disconnect the AC power cord. 3. Turn off... a SO-DIMM, follow these steps: 1. Remove the computer's cover. 5. Reinstall and reconnect any parts you are firmly in an anti-static package. 7. Install an M.2 SSD Intel NUC Kits NUC5i3RYH and NUC5i5RYH support 80mm, 60mm, and 42mm M.2 SSDs.
User Guide
Page 5
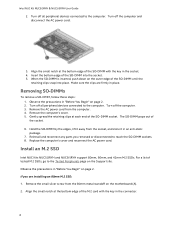
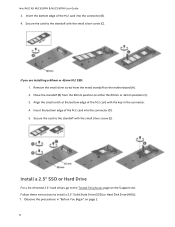
... 80mm position to install a 2.5" Solid State Drive (SSD) or Hard Disk Drive (HDD): 1. Secure the card to the standoff with the small silver screw (C). Intel NUC Kit NUC5i3RYH & NUC5i5RYH User Guide 3. If you are installing a 60mm or 42mm M.2 SSD: 1. Insert the bottom edge of the M.2 card into the connector (D). 5. Observe the precautions...
... 80mm position to install a 2.5" Solid State Drive (SSD) or Hard Disk Drive (HDD): 1. Secure the card to the standoff with the small silver screw (C). Intel NUC Kit NUC5i3RYH & NUC5i5RYH User Guide 3. If you are installing a 60mm or 42mm M.2 SSD: 1. Insert the bottom edge of the M.2 card into the connector (D). 5. Observe the precautions...
User Guide
Page 6
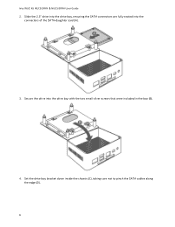
Slide the 2.5" drive into the drive bay, ensuring the SATA connectors are fully seated into the drive bay with the two small silver screws that were included in the box (B). 4. Secure the drive into the connectors of the SATA daughter card (A). 3. Set the drive bay bracket down inside the chassis (C), taking care not to pinch the SATA cables along the edge (D). 6 Intel NUC Kit NUC5i3RYH & NUC5i5RYH User Guide 2.
Slide the 2.5" drive into the drive bay, ensuring the SATA connectors are fully seated into the drive bay with the two small silver screws that were included in the box (B). 4. Secure the drive into the connectors of the SATA daughter card (A). 3. Set the drive bay bracket down inside the chassis (C), taking care not to pinch the SATA cables along the edge (D). 6 Intel NUC Kit NUC5i3RYH & NUC5i5RYH User Guide 2.

User Guide
Page 7
Attach and Use the VESA Bracket (Optional) Follow these instructions to the back of the monitor or TV. 7 Intel NUC Kit NUC5i3RYH & NUC5i5RYH User Guide Close the Chassis After all components have been installed, close the Intel NUC chassis. Using the four small black screws that were included in the box, attach the VESA bracket to attach and use the VESA mount bracket: 1.
Attach and Use the VESA Bracket (Optional) Follow these instructions to the back of the monitor or TV. 7 Intel NUC Kit NUC5i3RYH & NUC5i5RYH User Guide Close the Chassis After all components have been installed, close the Intel NUC chassis. Using the four small black screws that were included in the box, attach the VESA bracket to attach and use the VESA mount bracket: 1.

User Guide
Page 8
Refer to the bottom chassis cover of Linux that have been reported as compatible by Intel NUC owners. Attach the two slightly larger black screws to Operating System Installation for a list of Intel-validated Windows* operating systems, as well as versions of the Intel NUC. 3. Slide the Intel NUC onto the VESA mount bracket. Intel NUC Kit NUC5i3RYH & NUC5i5RYH User Guide 2. Install an Operating System Refer to Supported Operating Systems for system requirements and installation steps. 8
Refer to the bottom chassis cover of Linux that have been reported as compatible by Intel NUC owners. Attach the two slightly larger black screws to Operating System Installation for a list of Intel-validated Windows* operating systems, as well as versions of the Intel NUC. 3. Slide the Intel NUC onto the VESA mount bracket. Intel NUC Kit NUC5i3RYH & NUC5i5RYH User Guide 2. Install an Operating System Refer to Supported Operating Systems for system requirements and installation steps. 8
User Guide
Page 9
... to Download Center: Links: Intel® NUC Kit NUC5i3RYH Intel® NUC Kit NUC5i5RYH Drivers are available for the following features: Audio Bluetooth Chipset Consumer Infrared Graphics Intel® ME Intel® Rapid Storage Technology Intel® Ready Mode Technology Intel® Smart Connect Technology ...
... to Download Center: Links: Intel® NUC Kit NUC5i3RYH Intel® NUC Kit NUC5i5RYH Drivers are available for the following features: Audio Bluetooth Chipset Consumer Infrared Graphics Intel® ME Intel® Rapid Storage Technology Intel® Ready Mode Technology Intel® Smart Connect Technology ...
