

Supplementary Material
Page 2
... Memory Playback or 1.5x Speed Search of the currently broadcast program from any scenes of the program you can manually turn off the "LIVE MEMORY" function on /off the function. Filename [DR-MH30US_Sheet_003A.fm] DR-MH30US_Sheet_003A.fm Page 2 Friday, July 9, 2004 3:04 PM NOTES SWITCHING CHANNELS IN LIVE MEMORY MODE Please note that...
... Memory Playback or 1.5x Speed Search of the currently broadcast program from any scenes of the program you can manually turn off the "LIVE MEMORY" function on /off the function. Filename [DR-MH30US_Sheet_003A.fm] DR-MH30US_Sheet_003A.fm Page 2 Friday, July 9, 2004 3:04 PM NOTES SWITCHING CHANNELS IN LIVE MEMORY MODE Please note that...

Instruction Manual
Page 4
... for example, near a bath tub, wash bowl, kitchen sink or laundry tub, in its normal operation. f. HOW TO USE THIS INSTRUCTION MANUAL ● All major sections and subsections are required, be sure the service technician has used terms, and the number of other hazards. Water and... Moisture Do not use liquid cleaners or aerosol cleaners. Replacement Parts When replacement parts are listed in the manual. Object and Liquid Entry Never push objects of any mounting of each major section. Refer all servicing to qualified service personnel under ...
... for example, near a bath tub, wash bowl, kitchen sink or laundry tub, in its normal operation. f. HOW TO USE THIS INSTRUCTION MANUAL ● All major sections and subsections are required, be sure the service technician has used terms, and the number of other hazards. Water and... Moisture Do not use liquid cleaners or aerosol cleaners. Replacement Parts When replacement parts are listed in the manual. Object and Liquid Entry Never push objects of any mounting of each major section. Refer all servicing to qualified service personnel under ...

Instruction Manual
Page 6
... 40 Recording Features 41 Basic Playback 42 Playback Features 42 Live Memory Playback 43 TIMER RECORDING 46 VCR Plus+® Timer Programing 46 Manual Timer Programing 48 Automatic Satellite Program Recording 50 NAVIGATION 51 Library Database Navigation 51 Modify Original Information 52 Modify Play List Information 54 Modify... Playback With MP3/WMA/JPEG Navigation 57 EDITING 58 High Speed Dubbing (From HDD To DVD 58 Just Dubbing (From HDD To DVD 58 Manual Dubbing (From HDD To DVD 59 Original Dubbing (From DVD To HDD 59 DV Dubbing 60 Edit From A Camcorder 61 Edit To Or...
... 40 Recording Features 41 Basic Playback 42 Playback Features 42 Live Memory Playback 43 TIMER RECORDING 46 VCR Plus+® Timer Programing 46 Manual Timer Programing 48 Automatic Satellite Program Recording 50 NAVIGATION 51 Library Database Navigation 51 Modify Original Information 52 Modify Play List Information 54 Modify... Playback With MP3/WMA/JPEG Navigation 57 EDITING 58 High Speed Dubbing (From HDD To DVD 58 Just Dubbing (From HDD To DVD 58 Manual Dubbing (From HDD To DVD 59 Original Dubbing (From DVD To HDD 59 DV Dubbing 60 Edit From A Camcorder 61 Edit To Or...

Instruction Manual
Page 8
... Audio CD disc. 8 EN DISC INFORMATION Discs For Playback Only You can use discs with the following logos for this unit is "1". Since this instruction manual Allows operation with a DVD VIDEO disc. A disc cannot be played back on this unit unless the region number of the disc matches that can lead...
... Audio CD disc. 8 EN DISC INFORMATION Discs For Playback Only You can use discs with the following logos for this unit is "1". Since this instruction manual Allows operation with a DVD VIDEO disc. A disc cannot be played back on this unit unless the region number of the disc matches that can lead...

Instruction Manual
Page 20
... and set automatically by the clock setting data transmitted from the PBS channel. the Plug & Play setting will be connected for the unit to "Manual Channel Set" (੬ pg. 23). This is performed first. "AUTO" blinks on the front display panel, you perform Plug & Play setting... successfully, there is connected correctly. In this case, perform "Semiauto Clock Set" (੬ pg. 22) or "Manual Clock Set" (੬ pg. 22). ● If "- -:- -" appears on areas or reception conditions, the unit may be set . ATTENTION: ● If...
... and set automatically by the clock setting data transmitted from the PBS channel. the Plug & Play setting will be connected for the unit to "Manual Channel Set" (੬ pg. 23). This is performed first. "AUTO" blinks on the front display panel, you perform Plug & Play setting... successfully, there is connected correctly. In this case, perform "Semiauto Clock Set" (੬ pg. 22) or "Manual Clock Set" (੬ pg. 22). ● If "- -:- -" appears on areas or reception conditions, the unit may be set . ATTENTION: ● If...
Instruction Manual
Page 22
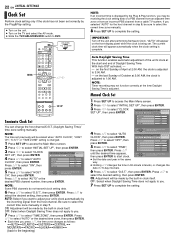
...start and end of October at the time Daylight Saving Time is complete. TIME - - : - - 5 Press rt to select the desired setting, then press ENTER. Manual Clock Set 1 Press SET UP to access the Main Menu screen. 2 Press w e to select "INITIAL SET UP", then press ENTER. 3 Press w e to... TIME ZONE AUTO press ENTER. 5 Press rt to select the desired setting, then press ENTER. Be sure to select the correct time zone manually in 15-day intervals. 6 Press rt to the beginning) Auto Daylight Saving Time This function enables automatic adjustment of April at the start clock...
...start and end of October at the time Daylight Saving Time is complete. TIME - - : - - 5 Press rt to select the desired setting, then press ENTER. Manual Clock Set 1 Press SET UP to access the Main Menu screen. 2 Press w e to select "INITIAL SET UP", then press ENTER. 3 Press w e to... TIME ZONE AUTO press ENTER. 5 Press rt to select the desired setting, then press ENTER. Be sure to select the correct time zone manually in 15-day intervals. 6 Press rt to the beginning) Auto Daylight Saving Time This function enables automatic adjustment of April at the start clock...

Instruction Manual
Page 23
... (TV or CATV) automatically during Auto Channel Set. You can add the channels you want or delete the channels you do not want to select "MANUAL CH SET", then press ENTER. 5 Add or skip the desired channels. E Repeat B - E Repeat B - C Press rt to complete the setting. Check the ...connections and start again. 5 Press SET UP to select "ADD/SKIP", then press ENTER. ADD/SKIP ADD B Press rt to select a channel number you want manually. 1 Press SET UP to access the Main Menu screen. 2 Press w e to select "INITIAL SET UP", then press ENTER. 3 Press w e to select "...
... (TV or CATV) automatically during Auto Channel Set. You can add the channels you want or delete the channels you do not want to select "MANUAL CH SET", then press ENTER. 5 Add or skip the desired channels. E Repeat B - E Repeat B - C Press rt to complete the setting. Check the ...connections and start again. 5 Press SET UP to select "ADD/SKIP", then press ENTER. ADD/SKIP ADD B Press rt to select a channel number you want manually. 1 Press SET UP to access the Main Menu screen. 2 Press w e to select "INITIAL SET UP", then press ENTER. 3 Press w e to select "...

Instruction Manual
Page 24
... OUTPUT CH", then press ENTER. Installing Controller 1 If both a cable box and a DBS receiver are used , position the Controller so its instruction manual. otherwise, the Controller cannot work correctly. ● Turn on the unit. ● Turn on the cable box and/or DBS receiver. 2 Press...DBS (Direct Broadcast Satellite) receiver. NOTES: ● The Controller is effective for "VCR Plus+® Timer Programing" (੬ pg. 46), or "Manual Timer Programing" (੬ pg. 48). ● When connecting your unit's ANTENNA IN connector. 4 Connect the Controller to the CABLE BOX connector on ...
... OUTPUT CH", then press ENTER. Installing Controller 1 If both a cable box and a DBS receiver are used , position the Controller so its instruction manual. otherwise, the Controller cannot work correctly. ● Turn on the unit. ● Turn on the cable box and/or DBS receiver. 2 Press...DBS (Direct Broadcast Satellite) receiver. NOTES: ● The Controller is effective for "VCR Plus+® Timer Programing" (੬ pg. 46), or "Manual Timer Programing" (੬ pg. 48). ● When connecting your unit's ANTENNA IN connector. 4 Connect the Controller to the CABLE BOX connector on ...
Instruction Manual
Page 46
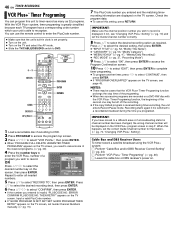
... NO. Recording starts again if it is switched to select "CONFIRM", then press ENTER. ● If the number you entered is set Guide Channel Numbers manually. (੬ pg. 70) 7 The PlusCode number you programed. Repeat to enter all needed SELECT WITH [ ] THEN PRESS [ENTER] PRESS [PROGRAM] TO EXIT 1 4 7 DELETE 23 56...
... NO. Recording starts again if it is switched to select "CONFIRM", then press ENTER. ● If the number you entered is set Guide Channel Numbers manually. (੬ pg. 70) 7 The PlusCode number you programed. Repeat to enter all needed SELECT WITH [ ] THEN PRESS [ENTER] PRESS [PROGRAM] TO EXIT 1 4 7 DELETE 23 56...
Instruction Manual
Page 48
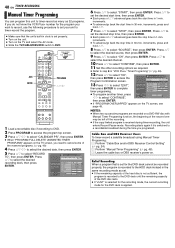
...recordable broadcast during timer-recording, the unit enters Record Pause mode. Cable Box and DBS Receiver Users To timer-record a satellite broadcast using Manual Timer Programing: A Perform "Cable Box and/or DBS Receiver Control Setting" (੬ pg. 24). NOTES: ● When two successive...rtw e to select "CALENDAR PR.", then press ENTER. ● When "PROGRAM FULL DELETE UNWANTED TIMER PROGRAMS" appears on a DVD-RW disc with Manual Timer Programing function, the beginning of the reserved programs. (੬ pg. 49) 4 Press rtw e to select the desired date, then press ENTER...
...recordable broadcast during timer-recording, the unit enters Record Pause mode. Cable Box and DBS Receiver Users To timer-record a satellite broadcast using Manual Timer Programing: A Perform "Cable Box and/or DBS Receiver Control Setting" (੬ pg. 24). NOTES: ● When two successive...rtw e to select "CALENDAR PR.", then press ENTER. ● When "PROGRAM FULL DELETE UNWANTED TIMER PROGRAMS" appears on a DVD-RW disc with Manual Timer Programing function, the beginning of the reserved programs. (੬ pg. 49) 4 Press rtw e to select the desired date, then press ENTER...

Instruction Manual
Page 49
... "SKIP", then press ENTER twice. To skip the weekly/daily programs to select "CANCEL", then press ENTER. Cancel And Change Programs ● Repeat steps in "Manual Timer Programing" (੬ pg. 48).
... "SKIP", then press ENTER twice. To skip the weekly/daily programs to select "CANCEL", then press ENTER. Cancel And Change Programs ● Repeat steps in "Manual Timer Programing" (੬ pg. 48).

Instruction Manual
Page 50
If this is the case, perform "Manual Timer Programing" (੬ pg. 48) to timer-record a satellite program. * Some DBS receivers output signals even if the power is connected to the unit's AUDIO/ S-... on the front display panel while Automatic Satellite Program Recording is in progress. ● For timer programing of the DBS receiver, refer to the instruction manual of the program. ● If you engage the Automatic Satellite Program Recording mode when the DBS receiver's power is turned back on again, the unit...
If this is the case, perform "Manual Timer Programing" (੬ pg. 48) to timer-record a satellite program. * Some DBS receivers output signals even if the power is connected to the unit's AUDIO/ S-... on the front display panel while Automatic Satellite Program Recording is in progress. ● For timer programing of the DBS receiver, refer to the instruction manual of the program. ● If you engage the Automatic Satellite Program Recording mode when the DBS receiver's power is turned back on again, the unit...
Instruction Manual
Page 59
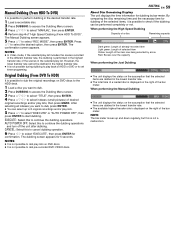
...Press rtw e to select "TITLE", then press ENTER. 4 Press rtw e to check if the dubbing can select up and down regularly, but this to select "MANUAL", then press ENTER. 4 Perform step 4 of the bar meter. AUTO POWER OFF: Select this to cancel dubbing operation. 6 Press w e to set timer-...then press MARK. CANCEL: Select this to start dubbing. EDITING EN 59 About Disc Remaining Display The unit displays the time information for 5 seconds. Manual Dubbing (From HDD To DVD) It is possible to perform dubbing in the desired transfer rate. 1 Load a recordable disc. 2 Press DUBBING to ...
...Press rtw e to select "TITLE", then press ENTER. 4 Press rtw e to check if the dubbing can select up and down regularly, but this to select "MANUAL", then press ENTER. 4 Perform step 4 of the bar meter. AUTO POWER OFF: Select this to cancel dubbing operation. 6 Press w e to set timer-...then press MARK. CANCEL: Select this to start dubbing. EDITING EN 59 About Disc Remaining Display The unit displays the time information for 5 seconds. Manual Dubbing (From HDD To DVD) It is possible to perform dubbing in the desired transfer rate. 1 Load a recordable disc. 2 Press DUBBING to ...

Instruction Manual
Page 61
.... 6 Press 7 on the camcorder slightly before the actual point from your unit as the source player and your dealer. ● Refer to the camcorder's instruction manual for the S-VIDEO input connector, depending on the connector being used. (੬ pg. 68) 4 Press REC MODE repeatedly to set the recording mode. 5 Start playback...
.... 6 Press 7 on the camcorder slightly before the actual point from your unit as the source player and your dealer. ● Refer to the camcorder's instruction manual for the S-VIDEO input connector, depending on the connector being used. (੬ pg. 68) 4 Press REC MODE repeatedly to set the recording mode. 5 Start playback...

Instruction Manual
Page 62
... the source player or as the source player for the S-VIDEO input connector, depending on another recorder as the recording deck, refer to its instruction manual. NOTES: ● All necessary cables can use your dealer. ● When you use this unit as the recording deck, press HDD or DVD to select...
... the source player or as the source player for the S-VIDEO input connector, depending on another recorder as the recording deck, refer to its instruction manual. NOTES: ● All necessary cables can use your dealer. ● When you use this unit as the recording deck, press HDD or DVD to select...

Instruction Manual
Page 70
.... ● Many TV stations can be viewed on which the Guide Channel Number's broadcast is received by your unit or cable box. AUTO CH SET MANUAL CH SET GUIDE CH SET 11 12 13 5 Press rt to select "GUIDE CH", then press ENTER. 6 Press rt to select "GUIDE CH SET", then...
.... ● Many TV stations can be viewed on which the Guide Channel Number's broadcast is received by your unit or cable box. AUTO CH SET MANUAL CH SET GUIDE CH SET 11 12 13 5 Press rt to select "GUIDE CH", then press ENTER. 6 Press rt to select "GUIDE CH SET", then...

Instruction Manual
Page 76
... NOT RECORD OR MAKE PLAY LIST DELETE UNWANTED TITLES ● Recording and/or editing cannot be changed or disappeared. ● After the manual settings were made manually seem to have been designated to be skipped. ]If you need the skipped channels, restore them are skipped over. ● Those channels.... For AV/S-video connection ]Press PROGRESSIVE SCAN for 3 or more seconds so that were made , Auto Channel Set was performed. ]Perform "Manual Clock Set" (੬ pg. 22). Whistling or howling is heard from the TV during "Semiauto Clock Set" (੬ pg. 22), or perform...
... NOT RECORD OR MAKE PLAY LIST DELETE UNWANTED TITLES ● Recording and/or editing cannot be changed or disappeared. ● After the manual settings were made manually seem to have been designated to be skipped. ]If you need the skipped channels, restore them are skipped over. ● Those channels.... For AV/S-video connection ]Press PROGRESSIVE SCAN for 3 or more seconds so that were made , Auto Channel Set was performed. ]Perform "Manual Clock Set" (੬ pg. 22). Whistling or howling is heard from the TV during "Semiauto Clock Set" (੬ pg. 22), or perform...

Instruction Manual
Page 82
... Search 28, 42 I Instant Timer Recording (ITR 38, 41 Interlaced scan 69 J Jump Search 45 L Letter Box 26 Live Memory 43 Live Memory Recording 45 M Manual Channel Set 23 Marking Positions To Play Back Again Later 29 Menu/Audio/Subtitle Language Set 21 O One Touch Replay 31, 45 On-screen Bar...
... Search 28, 42 I Instant Timer Recording (ITR 38, 41 Interlaced scan 69 J Jump Search 45 L Letter Box 26 Live Memory 43 Live Memory Recording 45 M Manual Channel Set 23 Marking Positions To Play Back Again Later 29 Menu/Audio/Subtitle Language Set 21 O One Touch Replay 31, 45 On-screen Bar...

Instruction Manual
Page 83
...CCD Image Sensor, Cartridge, Stylus (Needle) are covered for 90 days from the date of purchase; 7. WARRANTY (Only in the Owner's Manual, normal maintenance, video and audio head cleaning; 4. All products and parts thereof may also have any attachment not provided with the products,...for Television sets having a screen size 25 inches and above . Accessories; 8. There are no charge to any questions concerning your nearest JVC authorized service center, please call toll free: (800) 252-5722. THE DURATION OF ANY IMPLIED WARRANTIES, INCLUDING THE IMPLIED WARRANTY OF ...
...CCD Image Sensor, Cartridge, Stylus (Needle) are covered for 90 days from the date of purchase; 7. WARRANTY (Only in the Owner's Manual, normal maintenance, video and audio head cleaning; 4. All products and parts thereof may also have any attachment not provided with the products,...for Television sets having a screen size 25 inches and above . Accessories; 8. There are no charge to any questions concerning your nearest JVC authorized service center, please call toll free: (800) 252-5722. THE DURATION OF ANY IMPLIED WARRANTIES, INCLUDING THE IMPLIED WARRANTY OF ...