

Instruction Manual
Page 4
... not operating correctly or exhibits a marked change in safe operating condition. c. Adjust only those controls that could result in the manual. f. Replacement Parts When replacement parts are unable to restore normal operation by a qualified technician to restore the product to its ...product on pages 3 - 5 Damage Requiring Service Unplug this product near a swimming pool and the like. 4. HOW TO USE THIS INSTRUCTION MANUAL ● All major sections and subsections are covered by the operating instructions as radiators, heat registers, stoves, or other controls may fall, ...
... not operating correctly or exhibits a marked change in safe operating condition. c. Adjust only those controls that could result in the manual. f. Replacement Parts When replacement parts are unable to restore normal operation by a qualified technician to restore the product to its ...product on pages 3 - 5 Damage Requiring Service Unplug this product near a swimming pool and the like. 4. HOW TO USE THIS INSTRUCTION MANUAL ● All major sections and subsections are covered by the operating instructions as radiators, heat registers, stoves, or other controls may fall, ...
Instruction Manual
Page 7
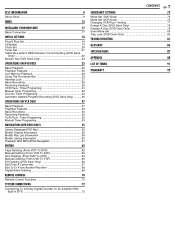
...Playback 29 Using The On-screen Bar 33 Parental Lock 37 Basic Recording 38 Recording Features 39 VCR Plus+® Timer Programing 41 Manual Timer Programing 42 On-Disc Timer Programing 43 Automatic Satellite Program Recording (DVD Deck Only) ..........46 OPERATIONS ON VCR DECK 47 ...Basic Playback 47 Playback Features 48 Basic Recording 50 Recording Features 50 VCR Plus+® Timer Programing 52 Manual Timer Programing 53 NAVIGATION (DVD DECK ONLY) 55 Library Database DVD Navi 55 Modify Original Information 56 Modify Play List Information 58 ...
...Playback 29 Using The On-screen Bar 33 Parental Lock 37 Basic Recording 38 Recording Features 39 VCR Plus+® Timer Programing 41 Manual Timer Programing 42 On-Disc Timer Programing 43 Automatic Satellite Program Recording (DVD Deck Only) ..........46 OPERATIONS ON VCR DECK 47 ...Basic Playback 47 Playback Features 48 Basic Recording 50 Recording Features 50 VCR Plus+® Timer Programing 52 Manual Timer Programing 53 NAVIGATION (DVD DECK ONLY) 55 Library Database DVD Navi 55 Modify Original Information 56 Modify Play List Information 58 ...

Instruction Manual
Page 9
... changing the disc name and/or title names and deleting programs and/or titles. ● After finalizing, it may be played back using this instruction manual Allows operation with a DVD-RW disc. Allows operation with a disc including JPEG files. DVD-R ● Can be played back. ● Discs of the disc matches...
... changing the disc name and/or title names and deleting programs and/or titles. ● After finalizing, it may be played back using this instruction manual Allows operation with a DVD-RW disc. Allows operation with a disc including JPEG files. DVD-R ● Can be played back. ● Discs of the disc matches...

Instruction Manual
Page 18
...Plug&Play Completed The current time is displayed. ● If an incorrect clock time or "- -:- -" appears on the front display panel, see "What to "Manual Channel Set" (੬ pg. 21). This is connected correctly. the Plug & Play setting will be set . If you use a cable box, Plug&Play will... Host PBS signal available in your unit. During Auto Clock Set "AUTO" blinks. We call this case, perform "Semiauto Clock Set" (੬ pg. 20) or "Manual Clock Set" (੬ pg. 20). ● If "- -:- -" appears on the front display panel, your area. Do not turn on and off . "AUTO" ...
...Plug&Play Completed The current time is displayed. ● If an incorrect clock time or "- -:- -" appears on the front display panel, see "What to "Manual Channel Set" (੬ pg. 21). This is connected correctly. the Plug & Play setting will be set . If you use a cable box, Plug&Play will... Host PBS signal available in your unit. During Auto Clock Set "AUTO" blinks. We call this case, perform "Semiauto Clock Set" (੬ pg. 20) or "Manual Clock Set" (੬ pg. 20). ● If "- -:- -" appears on the front display panel, your area. Do not turn on and off . "AUTO" ...
Instruction Manual
Page 20
.../DVD ENTER SET UP 1 2 3 4 5 6 7 8 9 0 rtw e Semiauto Clock Set You can change the host channel/D.S.T. (Daylight Saving Time)/ time zone setting manually. ON: Adjustment will be made by the Plug & Play function, you want to adjust your unit's clock automatically by the Plug&Play setting. ● Turn...channel from an adjacent time zone or from an incorrect PBS channel from the host channel. Press rt to select the correct time zone manually in clock itself . Press rt to select the desired setting, then press ENTER. OFF: Select when Daylight Saving Time does not apply...
.../DVD ENTER SET UP 1 2 3 4 5 6 7 8 9 0 rtw e Semiauto Clock Set You can change the host channel/D.S.T. (Daylight Saving Time)/ time zone setting manually. ON: Adjustment will be made by the Plug & Play function, you want to adjust your unit's clock automatically by the Plug&Play setting. ● Turn...channel from an adjacent time zone or from an incorrect PBS channel from the host channel. Press rt to select the correct time zone manually in clock itself . Press rt to select the desired setting, then press ENTER. OFF: Select when Daylight Saving Time does not apply...

Instruction Manual
Page 21
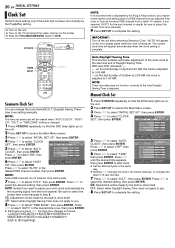
... or CATV) automatically during Auto Channel Set. D Press rt to select "CH", then press ENTER. B Press rt to select a channel number you want to select "MANUAL CH SET", then press ENTER. 6 Add or skip the desired channels. To skip channels A Press rt to select "ADD", then press ENTER. E Repeat B - C... SIGNAL-" appears on screen. To add channels A Press rt to select "ADD/SKIP", then press ENTER. B Press rt to select a channel number you want manually. 1 Press VCR/DVD repeatedly so that the DVD lamp lights up on the unit. 2 Press SET UP to access the Main Menu screen. 3 Press w ...
... or CATV) automatically during Auto Channel Set. D Press rt to select "CH", then press ENTER. B Press rt to select a channel number you want to select "MANUAL CH SET", then press ENTER. 6 Add or skip the desired channels. To skip channels A Press rt to select "ADD", then press ENTER. E Repeat B - C... SIGNAL-" appears on screen. To add channels A Press rt to select "ADD/SKIP", then press ENTER. B Press rt to select a channel number you want manually. 1 Press VCR/DVD repeatedly so that the DVD lamp lights up on the unit. 2 Press SET UP to access the Main Menu screen. 3 Press w ...

Instruction Manual
Page 22
...windows of both a cable box and a DBS receiver are used , it is effective for "VCR Plus+® Timer Programing" (੬ pg. 41), "Manual Timer Programing" (੬ pg. 42), or "On-Disc Timer Programing" (੬ pg. 43). ● When connecting your cable box, refer to select ... adhesive strip attached on the rear of your TV channels through DBS (Direct Broadcast Satellite) receiver. It can be requested by mailing in the completed JVC Cable Mouse Certificate that is included with this unit. VCR/DVD ENTER SET UP 1 2 3 4 5 6 7 8 9 0 rtw e Your unit Controller (suggested ...
...windows of both a cable box and a DBS receiver are used , it is effective for "VCR Plus+® Timer Programing" (੬ pg. 41), "Manual Timer Programing" (੬ pg. 42), or "On-Disc Timer Programing" (੬ pg. 43). ● When connecting your cable box, refer to select ... adhesive strip attached on the rear of your TV channels through DBS (Direct Broadcast Satellite) receiver. It can be requested by mailing in the completed JVC Cable Mouse Certificate that is included with this unit. VCR/DVD ENTER SET UP 1 2 3 4 5 6 7 8 9 0 rtw e Your unit Controller (suggested ...

Instruction Manual
Page 41
..., repeat steps 3 - 8. ● If "PROGRAM OVERLAPPED" appears on the TV screen, see "Changing VCR Plus+® Setting" (੬ pg. 77) and set Guide Channel Numbers manually. (੬ pg. 77) ● When "PROGRAM FULL DELETE UNWANTED TIMER PROGRAM" appears on the TV screen, you need to cancel some of the reserved programs...
..., repeat steps 3 - 8. ● If "PROGRAM OVERLAPPED" appears on the TV screen, see "Changing VCR Plus+® Setting" (੬ pg. 77) and set Guide Channel Numbers manually. (੬ pg. 77) ● When "PROGRAM FULL DELETE UNWANTED TIMER PROGRAM" appears on the TV screen, you need to cancel some of the reserved programs...

Instruction Manual
Page 42
... DVD lamp lights up on the left off . ● To disengage the timer mode, press DVD TIMER (#) again. 42 EN OPERATIONS ON DVD DECK Manual Timer Programing You can program this happens, press the number key "7" to select "DBS". C Leave the cable box or DBS receiver's power on the ...). ● Slide the TV/CABLE/DBS/DVD switch to set properly. ● Turn on the unit. ● Turn on the TV screen, you programed. B Perform "Manual Timer Programing" (੬ pg. 42). increments, press and hold rt. 7 Press w e to select "STOP", then press rt to DVD. Cable Box and DBS Receiver...
... DVD lamp lights up on the left off . ● To disengage the timer mode, press DVD TIMER (#) again. 42 EN OPERATIONS ON DVD DECK Manual Timer Programing You can program this happens, press the number key "7" to select "DBS". C Leave the cable box or DBS receiver's power on the ...). ● Slide the TV/CABLE/DBS/DVD switch to set properly. ● Turn on the unit. ● Turn on the TV screen, you programed. B Perform "Manual Timer Programing" (੬ pg. 42). increments, press and hold rt. 7 Press w e to select "STOP", then press rt to DVD. Cable Box and DBS Receiver...

Instruction Manual
Page 43
... the TV screen. NOTES: ● Even if On-Disc Timer Programing is overlapping with discs that are especially intended for On-Disc Timer Programing. ● Manual Timer Programing is not possible on the On-Disc Timer Programed disc. (੬ pg. 42) ● Basic Recording is not possible on the On-Disc...
... the TV screen. NOTES: ● Even if On-Disc Timer Programing is overlapping with discs that are especially intended for On-Disc Timer Programing. ● Manual Timer Programing is not possible on the On-Disc Timer Programed disc. (੬ pg. 42) ● Basic Recording is not possible on the On-Disc...

Instruction Manual
Page 45
...3 (you press e, the indication changes as required. ● Refer to steps 5 - 10 in "Manual Timer Programing" (੬ pg. 42). 5 Press PROG/CHECK to step 6 in "Manual Timer Programing" (੬ pg. 42). 4 Press PROG/CHECK to be recorded correctly. When the VCR ...45). C Press e. ● Each time you have just made for about 5 seconds, then the normal screen resumes. The previous screen resumes. 6 For VCR Plus+, Manual or On-Disc Timer Programing Press DVD TIMER (#). To change the program's setting. DVD TIMER (#) VCR/DVD CANCEL PROG/CHECK ENTER 1 2 3 4 5 6 7 ...
...3 (you press e, the indication changes as required. ● Refer to steps 5 - 10 in "Manual Timer Programing" (੬ pg. 42). 5 Press PROG/CHECK to step 6 in "Manual Timer Programing" (੬ pg. 42). 4 Press PROG/CHECK to be recorded correctly. When the VCR ...45). C Press e. ● Each time you have just made for about 5 seconds, then the normal screen resumes. The previous screen resumes. 6 For VCR Plus+, Manual or On-Disc Timer Programing Press DVD TIMER (#). To change the program's setting. DVD TIMER (#) VCR/DVD CANCEL PROG/CHECK ENTER 1 2 3 4 5 6 7 ...

Instruction Manual
Page 46
.... ● In step 3, if "R-LK" blinks quickly on the front display panel even though your external DBS receiver. If this is the case, perform "Manual Timer Programing" (੬ pg. 42) to timer-record a satellite program. * Some DBS receivers output signals even if the power is turned back on again,... indicator on the front display panel When the DVD deck is in progress. ● For timer programing of the DBS receiver, refer to the instruction manual of the program or may record slightly longer than a DBS receiver to the AUDIO/VIDEO INPUT (L-1) connectors, be done at the same time. 1 ...
.... ● In step 3, if "R-LK" blinks quickly on the front display panel even though your external DBS receiver. If this is the case, perform "Manual Timer Programing" (੬ pg. 42) to timer-record a satellite program. * Some DBS receivers output signals even if the power is turned back on again,... indicator on the front display panel When the DVD deck is in progress. ● For timer programing of the DBS receiver, refer to the instruction manual of the program or may record slightly longer than a DBS receiver to the AUDIO/VIDEO INPUT (L-1) connectors, be done at the same time. 1 ...

Instruction Manual
Page 49
... played back NORM HI FI Both sounds on the normal track is equipped with Progressive and to be selected. In this and adjust the tracking manually by pressing the CH buttons. 1 During playback, press CH + or - ATTENTION: ● Your TV needs to have Component video input connectors. ● ...-Fi stereo tapes are mixed and played back NOTES: ● "HIFI" should normally be compatible with automatic tracking control. to adjust the tracking manually. ● Press REC MODE again to return to the component input mode. C Press VCR/DVD repeatedly so that the DVD lamp lights up ...
... played back NORM HI FI Both sounds on the normal track is equipped with Progressive and to be selected. In this and adjust the tracking manually by pressing the CH buttons. 1 During playback, press CH + or - ATTENTION: ● Your TV needs to have Component video input connectors. ● ...-Fi stereo tapes are mixed and played back NOTES: ● "HIFI" should normally be compatible with automatic tracking control. to adjust the tracking manually. ● Press REC MODE again to return to the component input mode. C Press VCR/DVD repeatedly so that the DVD lamp lights up ...

Instruction Manual
Page 53
Manual Timer Programing You can program this unit to timer-record as many as 8 programs. If you do not know the PlusCode number for the program ...-in its place. 8 Press w e to select "CH", then press rt to DVD. increments, press and hold rt. 6 Press w e to select "STOP", then press rt to "Manual Timer Programing" (੬ pg. 42). "PROGRAM COMPLETED" appears on the DVD discs. PR START 1 8:00P 2 10:00A 3 11:30P 4 5 6 7 8 STOP CH 10:00 12 10...
Manual Timer Programing You can program this unit to timer-record as many as 8 programs. If you do not know the PlusCode number for the program ...-in its place. 8 Press w e to select "CH", then press rt to DVD. increments, press and hold rt. 6 Press w e to select "STOP", then press rt to "Manual Timer Programing" (੬ pg. 42). "PROGRAM COMPLETED" appears on the DVD discs. PR START 1 8:00P 2 10:00A 3 11:30P 4 5 6 7 8 STOP CH 10:00 12 10...

Instruction Manual
Page 54
... programs. NOTE: If you do not mind this overlap, press PROG/CHECK to be recorded correctly. When the DVD deck is in "Manual Timer Programing" (੬ pg. 53). 5 Press PROG/CHECK to steps 7 - 10 in timer standby mode, the unit is automatically... 9 0 1 rtw e Check, cancel and change the program setting Press ENTER, then go to step 4. 4 Change the program setting. ● Refer to steps 7 - 10 in "Manual Timer Programing" (੬ pg. 53). 5 Press PROG/CHECK to access the Program Check screen. The program screen appears. 4 Change the settings of programs, Program Check...
... programs. NOTE: If you do not mind this overlap, press PROG/CHECK to be recorded correctly. When the DVD deck is in "Manual Timer Programing" (੬ pg. 53). 5 Press PROG/CHECK to steps 7 - 10 in timer standby mode, the unit is automatically... 9 0 1 rtw e Check, cancel and change the program setting Press ENTER, then go to step 4. 4 Change the program setting. ● Refer to steps 7 - 10 in "Manual Timer Programing" (੬ pg. 53). 5 Press PROG/CHECK to access the Program Check screen. The program screen appears. 4 Change the settings of programs, Program Check...

Instruction Manual
Page 63
... exclusively for On-Disc Timer Programing. ● When dubbing can dub the selected scenes on the front display panel. 3 Prepare the VCR deck for dubbing. Manual Dubbing (From VCR To DVD) Dubbing A Part Of A Cassette You can not be a discrepancy of several seconds between where you intend dubbing to start, and...
... exclusively for On-Disc Timer Programing. ● When dubbing can dub the selected scenes on the front display panel. 3 Prepare the VCR deck for dubbing. Manual Dubbing (From VCR To DVD) Dubbing A Part Of A Cassette You can not be a discrepancy of several seconds between where you intend dubbing to start, and...
Instruction Manual
Page 64
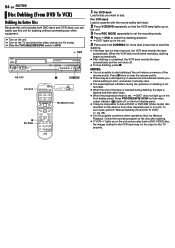
... not possible to start the dubbing. ● If the tape has not been rewound, the VCR deck rewinds the tape automatically. In such case, perform "Manual Dubbing (From DVD To VCR)" (੬ pg. 65). ● It is not possible to perform other manufacturers or on a PC. 64 EN EDITING Disc Dubbing...
... not possible to start the dubbing. ● If the tape has not been rewound, the VCR deck rewinds the tape automatically. In such case, perform "Manual Dubbing (From DVD To VCR)" (੬ pg. 65). ● It is not possible to perform other manufacturers or on a PC. 64 EN EDITING Disc Dubbing...
Instruction Manual
Page 65
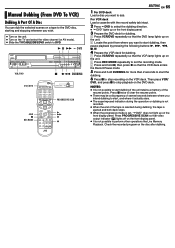
... deck Load a cassette with the record safety tab intact. 2 Press }DVD to select the dubbing direction. ● "}DVD" lights up on the front display panel. Manual Dubbing (From DVD To VCR) Dubbing A Part Of A Disc You can dub the selected scenes on a tape to the DVD disc, starting and stopping wherever...
... deck Load a cassette with the record safety tab intact. 2 Press }DVD to select the dubbing direction. ● "}DVD" lights up on the front display panel. Manual Dubbing (From DVD To VCR) Dubbing A Part Of A Disc You can dub the selected scenes on a tape to the DVD disc, starting and stopping wherever...

Instruction Manual
Page 67
... the source player and your dealer. ● Refer to select "F-1". B If the camcorder has an S-VIDEO output connector: (DVD deck only) - to the camcorder's instruction manual for the S-VIDEO input connector, depending on the connector being used. (੬ pg. 74) 4 Press REC MODE repeatedly to set the recording mode. 5 Start playback...
... the source player and your dealer. ● Refer to select "F-1". B If the camcorder has an S-VIDEO output connector: (DVD deck only) - to the camcorder's instruction manual for the S-VIDEO input connector, depending on the connector being used. (੬ pg. 74) 4 Press REC MODE repeatedly to set the recording mode. 5 Start playback...

Instruction Manual
Page 68
... another recorder. ● If connecting a unit with an S-VIDEO connector, it is recommended to use this unit as the recording deck, refer to its instruction manual. 68 EN EDITING Edit To Or From Another Recorder You can be obtained from your unit as the source player or as the source player...
... another recorder. ● If connecting a unit with an S-VIDEO connector, it is recommended to use this unit as the recording deck, refer to its instruction manual. 68 EN EDITING Edit To Or From Another Recorder You can be obtained from your unit as the source player or as the source player...