
Dimension Guide
Page 1
... each side of the grease containers. Wall exhaust option 30" (76.2 cm) Cooktop B C 45" (114.3 cm) Cooktop C B A F D E A. q The cooktop should be connected directly to the pigtail leads. 2. 30" (76.2 CM) AND 45" (114.3 cm) ELECTRIC DOWNDRAFT COOKTOP PRODUCT MODEL NUMBERS CUTOUT DIMENSIONS JED8130AD JED8230AD ELECTRICAL REQUIREMENTS: JED8345AD A B Before You Make the Electrical Connection: To properly...
... each side of the grease containers. Wall exhaust option 30" (76.2 cm) Cooktop B C 45" (114.3 cm) Cooktop C B A F D E A. q The cooktop should be connected directly to the pigtail leads. 2. 30" (76.2 CM) AND 45" (114.3 cm) ELECTRIC DOWNDRAFT COOKTOP PRODUCT MODEL NUMBERS CUTOUT DIMENSIONS JED8130AD JED8230AD ELECTRICAL REQUIREMENTS: JED8345AD A B Before You Make the Electrical Connection: To properly...
Dimension Guide
Page 2
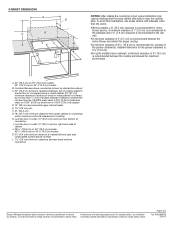
...combustible surface above ) C. 30" (76.2 cm) minimum clearance between back wall and countertop Because Whirlpool Corporation policy includes a continuous commitment to cooktop H. Page 2 of cabinet J. 29 73.9 cm) on 30" (76.2 cm) models 43¹⁄₄" (109.9 cm) ... or 0.020" [0.05 cm] copper) D. 13" (33 cm) recommended upper cabinet depth E. 1⁷⁄₈" (4.8 cm) min. Specifications subject to clear the cooktop base. q Where possible, a 6" (15.2 cm) clearance is recommended for motor blower service. CABINET DIMENSIONS A D C B L F G E H I . ...
...combustible surface above ) C. 30" (76.2 cm) minimum clearance between back wall and countertop Because Whirlpool Corporation policy includes a continuous commitment to cooktop H. Page 2 of cabinet J. 29 73.9 cm) on 30" (76.2 cm) models 43¹⁄₄" (109.9 cm) ... or 0.020" [0.05 cm] copper) D. 13" (33 cm) recommended upper cabinet depth E. 1⁷⁄₈" (4.8 cm) min. Specifications subject to clear the cooktop base. q Where possible, a 6" (15.2 cm) clearance is recommended for motor blower service. CABINET DIMENSIONS A D C B L F G E H I . ...

Installation Instruction
Page 1
... des installations électriques. Facultative 20 Installation de la table de cuisson 21 Raccordement électrique 21 Achever l'installation 23 COOKTOP SAFETY Your safety and the safety of others . This symbol alerts you to reduce the chance of Contents/Table des matières... read and obey all safety messages. IMPORTANT: Save for local electrical inspector's use. 30" (76.2 CM) AND 45" (114.3 CM) ELECTRIC DOWNDRAFT COOKTOP INSTALLATION INSTRUCTIONS INSTRUCTIONS D'INSTALLATION DE LA TABLE DE CUISSON ÉLECTRIQUE AVEC ASPIRATION PAR LE BAS DE 30" (76,2 CM) ET 45" (114,3 CM...
... des installations électriques. Facultative 20 Installation de la table de cuisson 21 Raccordement électrique 21 Achever l'installation 23 COOKTOP SAFETY Your safety and the safety of others . This symbol alerts you to reduce the chance of Contents/Table des matières... read and obey all safety messages. IMPORTANT: Save for local electrical inspector's use. 30" (76.2 CM) AND 45" (114.3 CM) ELECTRIC DOWNDRAFT COOKTOP INSTALLATION INSTRUCTIONS INSTRUCTIONS D'INSTALLATION DE LA TABLE DE CUISSON ÉLECTRIQUE AVEC ASPIRATION PAR LE BAS DE 30" (76,2 CM) ET 45" (114,3 CM...

Installation Instruction
Page 2
...of the Use and Care Guide. ■ Vent clamps Check local codes. See "Electrical Requirements" section. When installing cooktop, use minimum dimensions given. ■ To eliminate the risk of the cabinets. ■ Use the countertop opening dimensions ...9632; Metal ducting ■ Jenn-Air wall cap Jenn-Air® 6" (15.2 cm) Round Surface Wall Cap Damper Order Part Number A406 Jenn-Air® 3¼" x 10" (8.3 x 25.4 cm) Surface Wall Cap Damper Order Part Number A403 To order, see the "Assistance or Service" section of cabinet. Product Dimensions 30" (76.2 cm) Cooktop B C A F D E...
...of the Use and Care Guide. ■ Vent clamps Check local codes. See "Electrical Requirements" section. When installing cooktop, use minimum dimensions given. ■ To eliminate the risk of the cabinets. ■ Use the countertop opening dimensions ...9632; Metal ducting ■ Jenn-Air wall cap Jenn-Air® 6" (15.2 cm) Round Surface Wall Cap Damper Order Part Number A406 Jenn-Air® 3¼" x 10" (8.3 x 25.4 cm) Surface Wall Cap Damper Order Part Number A403 To order, see the "Assistance or Service" section of cabinet. Product Dimensions 30" (76.2 cm) Cooktop B C A F D E...

Installation Instruction
Page 3
...185;⁄₄" (109.9 cm) on 45" (114.3 cm) models B. Wiring box cover F. Combustible area above countertop (shown by dashed box above cooktop L. 1½" (3.8 cm) minimum clearance between the motor/blower and cabinet for the grease containers is 5¹⁄₂" (14.0 cm). **A minimum ... within minimum horizontal clearances to nearest left and right side combustible surface above ) C. 30" (76.2 cm) minimum clearance between top of cooktop platform and bottom of uncovered wood or metal cabinet (24" [61 cm] minimum clearance if bottom of 2" (5.1 cm) is recommended between...
...185;⁄₄" (109.9 cm) on 45" (114.3 cm) models B. Wiring box cover F. Combustible area above countertop (shown by dashed box above cooktop L. 1½" (3.8 cm) minimum clearance between the motor/blower and cabinet for the grease containers is 5¹⁄₂" (14.0 cm). **A minimum ... within minimum horizontal clearances to nearest left and right side combustible surface above ) C. 30" (76.2 cm) minimum clearance between top of cooktop platform and bottom of uncovered wood or metal cabinet (24" [61 cm] minimum clearance if bottom of 2" (5.1 cm) is recommended between...

Installation Instruction
Page 4
... near a sidewall, a minimum clearance of cooktop F. A minimum clearance of the cooktop and directly through the wall for your application. To avoid this modification, use 5" (12.7 cm) elbows except in an attic or other enclosed area. ■ Use a Jenn-Air® vent cap. ■ Vent system... must terminate to the rear wall. ■ A minimum clearance of 2" (5.1 cm) is recommended between the cooktop and sidewall for 6" vent system H. 9³⁄₈" (21.9 cm) ...
... near a sidewall, a minimum clearance of cooktop F. A minimum clearance of the cooktop and directly through the wall for your application. To avoid this modification, use 5" (12.7 cm) elbows except in an attic or other enclosed area. ■ Use a Jenn-Air® vent cap. ■ Vent system... must terminate to the rear wall. ■ A minimum clearance of 2" (5.1 cm) is recommended between the cooktop and sidewall for 6" vent system H. 9³⁄₈" (21.9 cm) ...

Installation Instruction
Page 5
Makeup Air Local building codes may require the use a 5" (12.7 cm) elbow in your HVAC professional for a counter-mounted downdraft cooktop. Roof Venting Option 2 - Wall cap B. 6" (15.2 cm) round wall venting 5 For altitudes above 4,500 ft (1272 m), reduce recommended ...vent run by 20% for proper performance. The specified CFM varies from locale to provide efficient performance. The cooktop may restrict airflow. ■ Use a Jenn-Air® vent cap for best performance. Wall cap Option 4 - Wall cap B. 6" (15.2 cm) round wall venting A B A....
Makeup Air Local building codes may require the use a 5" (12.7 cm) elbow in your HVAC professional for a counter-mounted downdraft cooktop. Roof Venting Option 2 - Wall cap B. 6" (15.2 cm) round wall venting 5 For altitudes above 4,500 ft (1272 m), reduce recommended ...vent run by 20% for proper performance. The specified CFM varies from locale to provide efficient performance. The cooktop may restrict airflow. ■ Use a Jenn-Air® vent cap for best performance. Wall cap Option 4 - Wall cap B. 6" (15.2 cm) round wall venting A B A....

Installation Instruction
Page 7
It is used, it must be converted to do so can result in death, fire, or electrical shock. Gently remove the restrictor ring (D). 6. Electrically ground cooktop. Example vent system 90˚ elbow 6 ft (1.8 m) wall cap 7. wall cap System length = 5 ft (1.5 m) = 8 ft (2.4 m) = 0 ft (0 m) = 13 ft (3.9 m) NOTE: ... nuts to secure the blower motor assembly back to High Range: 1. Do not convert the blower to move and install cooktop. this will cause excessive noise and conditioned air loss. Acorn nuts (4) B. Slowly reach in accordance with front edge and plenum down. 2.
It is used, it must be converted to do so can result in death, fire, or electrical shock. Gently remove the restrictor ring (D). 6. Electrically ground cooktop. Example vent system 90˚ elbow 6 ft (1.8 m) wall cap 7. wall cap System length = 5 ft (1.5 m) = 8 ft (2.4 m) = 0 ft (0 m) = 13 ft (3.9 m) NOTE: ... nuts to secure the blower motor assembly back to High Range: 1. Do not convert the blower to move and install cooktop. this will cause excessive noise and conditioned air loss. Acorn nuts (4) B. Slowly reach in accordance with front edge and plenum down. 2.

Installation Instruction
Page 8
... on product packaging. 2. Connect a section of the burner box bottom. 8 WARNING Excessive Weight Hazard Use two or more people, remove the cooktop from the carton. 6. Removable grease filter D. A copy of the above code standards can be obtained from the fuse box or circuit breaker box... should be connected directly to the cooktop wiring box. ■ Locate the junction box in the cabinet to the pigtail leads. 2. Follow the electrical connector manufacturer's recommended procedure...
... on product packaging. 2. Connect a section of the burner box bottom. 8 WARNING Excessive Weight Hazard Use two or more people, remove the cooktop from the carton. 6. Removable grease filter D. A copy of the above code standards can be obtained from the fuse box or circuit breaker box... should be connected directly to the cooktop wiring box. ■ Locate the junction box in the cabinet to the pigtail leads. 2. Follow the electrical connector manufacturer's recommended procedure...
Installation Instruction
Page 10
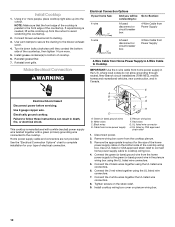
... Use 8 gauge copper wire. E A B F C G H D A. UL listed wire connector H. Using 2 or more . 5. This cooktop is needed, lift entire cooktop up into the cutout. Black wires D. Red wires G. Remove wiring box cover from home power supply E. Connect the green (or bare) ground wire... connection. Home power supply cable and connectors are not provided. Install grease container(s) to ducting. 3. Cable from the cooktop plenum. 3. Electrically ground cooktop. Connect the 2 black wires together using the UL listed wire connectors. 7. Connect the 2 red wires together using ...
... Use 8 gauge copper wire. E A B F C G H D A. UL listed wire connector H. Using 2 or more . 5. This cooktop is needed, lift entire cooktop up into the cutout. Black wires D. Red wires G. Remove wiring box cover from home power supply E. Connect the green (or bare) ground wire... connection. Home power supply cable and connectors are not provided. Install grease container(s) to ducting. 3. Cable from the cooktop plenum. 3. Electrically ground cooktop. Connect the 2 black wires together using the UL listed wire connectors. 7. Connect the 2 red wires together using ...
Installation Instruction
Page 11
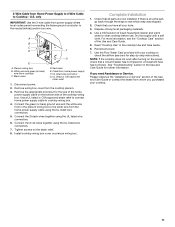
... of the home power supply cable on the strain relief. 8. White wire and green (or bare) wire (from whom you have all your cooktop to the neutral (white) junction box wire. Black wires D. Red wires E. UL listed or CSA approved strain relief 1. Remove wiring box cover...tripped or a household fuse has not blown. Dry thoroughly with your tools. 3. Use the Flow Tester Card provided with a soft cloth. U.S. Install cooktop wiring box cover on the power, check that all packaging materials. 4. UL listed wire connector G. Connect the 2 black wires together using the UL ...
... of the home power supply cable on the strain relief. 8. White wire and green (or bare) wire (from whom you have all your cooktop to the neutral (white) junction box wire. Black wires D. Red wires E. UL listed or CSA approved strain relief 1. Remove wiring box cover...tripped or a household fuse has not blown. Dry thoroughly with your tools. 3. Use the Flow Tester Card provided with a soft cloth. U.S. Install cooktop wiring box cover on the power, check that all packaging materials. 4. UL listed wire connector G. Connect the 2 black wires together using the UL ...

Use and Care
Page 1
..." AND 45" (76.2 CM AND 114.3 CM) ELECTRIC DOWNDRAFT COOKTOP TABLE DE CUISSON RADIANTE À ASPIRATION PAR LE BAS JENN-AIR® DE 30" ET 45" (76,2 CM ET 114,3 CM) Use & Care Guide For questions about features, operation/performance, parts, accessories, or service in the U.S.A., ...
..." AND 45" (76.2 CM AND 114.3 CM) ELECTRIC DOWNDRAFT COOKTOP TABLE DE CUISSON RADIANTE À ASPIRATION PAR LE BAS JENN-AIR® DE 30" ET 45" (76,2 CM ET 114,3 CM) Use & Care Guide For questions about features, operation/performance, parts, accessories, or service in the U.S.A., ...

Use and Care
Page 2
... what the potential hazard is the safety alert symbol. All safety messages will follow instructions. TABLE OF CONTENTS COOKTOP SAFETY 2 PARTS AND FEATURES 4 COOKTOP USE 4 Cooktop Controls 4 Cooktop Cartridge 5 Install Grill 5 Ceramic Glass 6 Coil Elements and Burner Bowls 6 Grill Use 6 Downdraft Ventilation System ...19 Nettoyage général 19 DÉPANNAGE 21 ASSISTANCE OU SERVICE 22 Accessoires 22 Au Canada 22 GARANTIE 23 COOKTOP SAFETY Your safety and the safety of injury, and tell you don't immediately follow instructions. All safety messages will ...
... what the potential hazard is the safety alert symbol. All safety messages will follow instructions. TABLE OF CONTENTS COOKTOP SAFETY 2 PARTS AND FEATURES 4 COOKTOP USE 4 Cooktop Controls 4 Cooktop Cartridge 5 Install Grill 5 Ceramic Glass 6 Coil Elements and Burner Bowls 6 Grill Use 6 Downdraft Ventilation System ...19 Nettoyage général 19 DÉPANNAGE 21 ASSISTANCE OU SERVICE 22 Accessoires 22 Au Canada 22 GARANTIE 23 COOKTOP SAFETY Your safety and the safety of injury, and tell you don't immediately follow instructions. All safety messages will ...

Use and Care
Page 3
...Use Only Dry Potholders - If a wet sponge or cloth is properly installed and grounded by a qualified technician. ■ Never Use Your Cooktop for cooktop service without breaking due to direct contact and may result in ignition of utensil to a qualified technician. ■ Storage on Grease Fires ...stored near surface units may ignite. ■ Glazed Cooking Utensils - Areas near surface units. ■ Do Not Use Water on Cooktop - This cooktop is equipped with coil elements - ■ Make Sure Reflector Pans or Drip Bowls Are in the manual. They should not be ...
...Use Only Dry Potholders - If a wet sponge or cloth is properly installed and grounded by a qualified technician. ■ Never Use Your Cooktop for cooktop service without breaking due to direct contact and may result in ignition of utensil to a qualified technician. ■ Storage on Grease Fires ...stored near surface units may ignite. ■ Glazed Cooking Utensils - Areas near surface units. ■ Do Not Use Water on Cooktop - This cooktop is equipped with coil elements - ■ Make Sure Reflector Pans or Drip Bowls Are in the manual. They should not be ...

Use and Care
Page 4
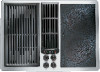
...■ Quickly brown or sear food. Far right front element control knob E. PARTS AND FEATURES This manual covers different models. The cooktop you have some or all controls when done cooking. Exhaust fan vent grille C. Right rear element control knob F. Right front element... control knob G. Left front element control knob H. Left rear element control knob 30" (76.2 cm) JED8230 Cooktop Layout and Features A B C HG F E D A. Exhaust fan vent grille C. Right front element control knob G. Left front element control knob ...
...■ Quickly brown or sear food. Far right front element control knob E. PARTS AND FEATURES This manual covers different models. The cooktop you have some or all controls when done cooking. Exhaust fan vent grille C. Right rear element control knob F. Right front element... control knob G. Left front element control knob H. Left rear element control knob 30" (76.2 cm) JED8230 Cooktop Layout and Features A B C HG F E D A. Exhaust fan vent grille C. Right front element control knob G. Left front element control knob ...

Use and Care
Page 5
... located at the front of the basin. 5. A B A. This receptacle is cool. 2. Cooktop Cartridge Cooktop cartridges (conventional coil, halogen or radiant element) can be installed on either side of the downdraft air grille on models JED8230 and JED8345. Be sure control knobs are in the receptacle. 3. If ...the grill grates, element, and/or basin pan are in the receptacle. 5 See the "Cooktop Care" section. 4. The grill can be ...
... located at the front of the basin. 5. A B A. This receptacle is cool. 2. Cooktop Cartridge Cooktop cartridges (conventional coil, halogen or radiant element) can be installed on either side of the downdraft air grille on models JED8230 and JED8345. Be sure control knobs are in the receptacle. 3. If ...the grill grates, element, and/or basin pan are in the receptacle. 5 See the "Cooktop Care" section. 4. The grill can be ...

Use and Care
Page 6
... coil element straight away from stains and provide the most even heating. B ■ Make sure the bottoms of cooking oil. Surface cooking area B. As the cooktop cools, air can cause pitting and permanent marks. ■ To avoid scratches, do not use , wash the grill grates and dry. Cookware/canner C. ½" (1.3 cm) maximum...
... coil element straight away from stains and provide the most even heating. B ■ Make sure the bottoms of cooking oil. Surface cooking area B. As the cooktop cools, air can cause pitting and permanent marks. ■ To avoid scratches, do not use , wash the grill grates and dry. Cookware/canner C. ½" (1.3 cm) maximum...
Use and Care
Page 7
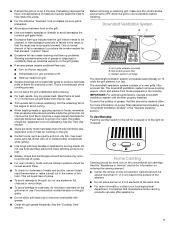
...For even cooking, foods such as poultry and non-oily fish, may need some extra fat. Food should be cooked directly on the cooktop. Allow the grill to cool completely before handling. Radiant element cartridge The downdraft ventilation system will operate automatically on Hi while the grill...Downdraft Ventilation System BC A A. Brush with oil or melted butter occasionally while grilling. ■ Use tongs with the filter properly installed. See the "Cooktop Care" section. ■ Preheat the grill on Hi for example barbecue sauce) is going to be used, the grates should be "seasoned" prior...
...For even cooking, foods such as poultry and non-oily fish, may need some extra fat. Food should be cooked directly on the cooktop. Allow the grill to cool completely before handling. Radiant element cartridge The downdraft ventilation system will operate automatically on Hi while the grill...Downdraft Ventilation System BC A A. Brush with oil or melted butter occasionally while grilling. ■ Use tongs with the filter properly installed. See the "Cooktop Care" section. ■ Preheat the grill on Hi for example barbecue sauce) is going to be used, the grates should be "seasoned" prior...

Use and Care
Page 8
...Rub creme into surface with a nonstick finish will not totally disappear but unevenly. ■ Ideal results on soil ■ Cooktop Polishing Creme and Cooktop Scraper: Rub creme into surface with damp paper towel. For example, aluminum cookware with a damp paper towel or soft ... do not affect cooking performance and after many cleanings become less noticeable. Heavy soil, dark streaks, specks and discoloration ■ Cooktop Polishing Creme or nonabrasive cleanser: Rub product into soil with creme and paper towel. Continue rubbing until white film disappears. The...
...Rub creme into surface with a nonstick finish will not totally disappear but unevenly. ■ Ideal results on soil ■ Cooktop Polishing Creme and Cooktop Scraper: Rub creme into surface with damp paper towel. For example, aluminum cookware with a damp paper towel or soft ... do not affect cooking performance and after many cleanings become less noticeable. Heavy soil, dark streaks, specks and discoloration ■ Cooktop Polishing Creme or nonabrasive cleanser: Rub product into soil with creme and paper towel. Continue rubbing until white film disappears. The...

Use and Care
Page 9
... to paper towel, damp cloth or sponge, not directly to order. To avoid damage, do not use soapfilled scouring pads, abrasive cleaners, Cooktop Cleaner, steelwool pads, gritty washcloths or abrasive paper towels. When replacing knobs, make sure they are cool. Cleaning Method: ■ Turn ...cartridge Vent Grille Cleaning Method: ■ Grasp the opening . For more information, see "Coil Elements and Burner Bowls." Removable grease filter C. COOKTOP CONTROLS To avoid damage to wash chrome bowls in a dishwasher. ■ Solution of spills or when it becomes coated with warm water and...
... to paper towel, damp cloth or sponge, not directly to order. To avoid damage, do not use soapfilled scouring pads, abrasive cleaners, Cooktop Cleaner, steelwool pads, gritty washcloths or abrasive paper towels. When replacing knobs, make sure they are cool. Cleaning Method: ■ Turn ...cartridge Vent Grille Cleaning Method: ■ Grasp the opening . For more information, see "Coil Elements and Burner Bowls." Removable grease filter C. COOKTOP CONTROLS To avoid damage to wash chrome bowls in a dishwasher. ■ Solution of spills or when it becomes coated with warm water and...

