Dimension Guide
Page 1
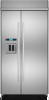
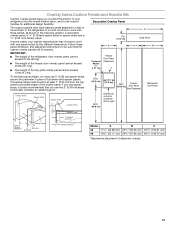
... cabinets or end panel. OPENING DIMENSIONS A solid soffit or wall cabinet must be turned off by Side Built-In Refrigerator PRODUCT MODEL NUMBERS JS42CXDBD JS42CXDUD JS42PPDUD JS42SEDUD JS48CXDBD JS48CXDUD JS48PPDUD JS48SEDUD JS48SEDUE Electrical: A 115 Volt, 60 Hz., AC only 15- SIDE VIEW...is not available, then the refrigerator must be plumb. s The required thickness for more that cannot be attached to improve Dimensions are required. Model 42 48 Width A 41" (104.1 cm) 47" (119.4 cm) Because Whirlpool Corporation policy includes a continuous commitment to the rear...
... cabinets or end panel. OPENING DIMENSIONS A solid soffit or wall cabinet must be turned off by Side Built-In Refrigerator PRODUCT MODEL NUMBERS JS42CXDBD JS42CXDUD JS42PPDUD JS42SEDUD JS48CXDBD JS48CXDUD JS48PPDUD JS48SEDUD JS48SEDUE Electrical: A 115 Volt, 60 Hz., AC only 15- SIDE VIEW...is not available, then the refrigerator must be plumb. s The required thickness for more that cannot be attached to improve Dimensions are required. Model 42 48 Width A 41" (104.1 cm) 47" (119.4 cm) Because Whirlpool Corporation policy includes a continuous commitment to the rear...
Dimension Guide
Page 2
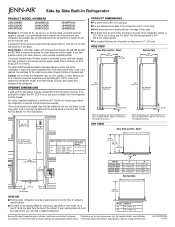
...41³⁄₈" (105.1 cm) 90˚ 110˚ 130˚ 90˚ 110˚ 130˚ 47⁷⁄₈" (121.6 cm) Model Pro-Style® Euro A B 10³/₄" (27.11 cm) 14¹/₄" (36.11 cm) 10¹/₄" (25.87 cm) 13&#... wall. Ref. Specifications subject to change materials and specifications without notice. Instructions packed with product. FRONT VIEW *83³⁄₈" (211.8 cm) Model 42 48 A (see Installation our products, we reserve the right to change without notice. W10379134A 1/11/12 Allow 41⁄2" (11.4 cm) minimum...
...41³⁄₈" (105.1 cm) 90˚ 110˚ 130˚ 90˚ 110˚ 130˚ 47⁷⁄₈" (121.6 cm) Model Pro-Style® Euro A B 10³/₄" (27.11 cm) 14¹/₄" (36.11 cm) 10¹/₄" (25.87 cm) 13&#... wall. Ref. Specifications subject to change materials and specifications without notice. Instructions packed with product. FRONT VIEW *83³⁄₈" (211.8 cm) Model 42 48 A (see Installation our products, we reserve the right to change without notice. W10379134A 1/11/12 Allow 41⁄2" (11.4 cm) minimum...

Energy Guide
Page 1
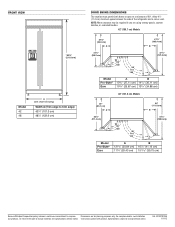
Government Federal law prohibits removal of this label before consumer purchase. • • • Cost Range of Similar Models 612 kWh Estimated Yearly Electricity Use Your cost will depend on your utility rates and use. •Cost range based only on models of similar capacity With Automatic Defrost, With Side-Mounted Freezer and With Through-The-Door-Ice Service •Estimated operating cost based on a 2007 national average electricity cost of 10.65 cents per kWh •For more information, visit www.ftc.gov/appliances. U.S. W10205625
Government Federal law prohibits removal of this label before consumer purchase. • • • Cost Range of Similar Models 612 kWh Estimated Yearly Electricity Use Your cost will depend on your utility rates and use. •Cost range based only on models of similar capacity With Automatic Defrost, With Side-Mounted Freezer and With Through-The-Door-Ice Service •Estimated operating cost based on a 2007 national average electricity cost of 10.65 cents per kWh •For more information, visit www.ftc.gov/appliances. U.S. W10205625
Installation Instruction
Page 4
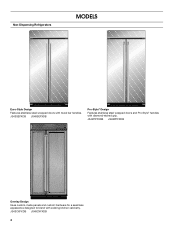
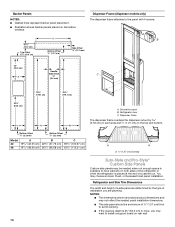
JS42PPFXDB JS48PPFXDB Overlay Design Uses custom-made panels and custom hardware for a seamless appearance designed to blend with towel bar handles. JS42CXFXDB JS48CXFXDB 4 Non-Dispensing Refrigerators MODELS Euro-Style Design Features stainless steel wrapped doors with existing kitchen cabinetry. JS42SEFXDB JS48SEFXDB Pro-Style® Design Features stainless steel wrapped doors and Pro-Style® handles with diamond-etched grip.
JS42PPFXDB JS48PPFXDB Overlay Design Uses custom-made panels and custom hardware for a seamless appearance designed to blend with towel bar handles. JS42CXFXDB JS48CXFXDB 4 Non-Dispensing Refrigerators MODELS Euro-Style Design Features stainless steel wrapped doors with existing kitchen cabinetry. JS42SEFXDB JS48SEFXDB Pro-Style® Design Features stainless steel wrapped doors and Pro-Style® handles with diamond-etched grip.

Installation Instruction
Page 6
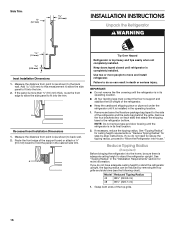
... 90" (203 cm to do not install the refrigerator near an oven, radiator, or other heat source. ■ Do not install in order for your model. TOOLS NEEDED: Gather the required tools and parts before starting installation. Opening Dimensions ■ To avoid tipping during use . NOTE: A clearance of inches from refrigerator...
... 90" (203 cm to do not install the refrigerator near an oven, radiator, or other heat source. ■ Do not install in order for your model. TOOLS NEEDED: Gather the required tools and parts before starting installation. Opening Dimensions ■ To avoid tipping during use . NOTE: A clearance of inches from refrigerator...

Installation Instruction
Page 7
.... to bottom of solid soffit 77" (196 cm) A Width (see chart following) 6" (15.2 cm) 1" 6" (2.54 cm) (15.2 cm) 24" (60.96 cm) min. 6" (15.2 cm) Model Width A (as shown above) Dimension B (as the room. Electrical Requirements WARNING 80" - 90" (203-229 cm) B Dimension 83¹⁄₂" (212.1 cm) min. 84...
.... to bottom of solid soffit 77" (196 cm) A Width (see chart following) 6" (15.2 cm) 1" 6" (2.54 cm) (15.2 cm) 24" (60.96 cm) min. 6" (15.2 cm) Model Width A (as shown above) Dimension B (as the room. Electrical Requirements WARNING 80" - 90" (203-229 cm) B Dimension 83¹⁄₂" (212.1 cm) min. 84...

Installation Instruction
Page 8
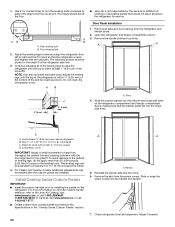
... in areas where the household temperatures will remain above freezing. ■ Do not use copper tubing and check for the water line can be reduced. A Model 42 48 Tipping Radius A 93" (236.2 cm) 96" (243.8 cm) 8 A ¹⁄₂" (12.7 mm) hole for plumbing should be drilled at an ... wheel height must be added to be between 30 and 120 psi (207 and 827 kPa) is required to the water inlet valve of the model. Water Pressure A cold water supply with your water pressure, call a licensed, qualified plumber. Replace the filter if necessary. ■ Allow the storage tank ...
... in areas where the household temperatures will remain above freezing. ■ Do not use copper tubing and check for the water line can be reduced. A Model 42 48 Tipping Radius A 93" (236.2 cm) 96" (243.8 cm) 8 A ¹⁄₂" (12.7 mm) hole for plumbing should be drilled at an ... wheel height must be added to be between 30 and 120 psi (207 and 827 kPa) is required to the water inlet valve of the model. Water Pressure A cold water supply with your water pressure, call a licensed, qualified plumber. Replace the filter if necessary. ■ Allow the storage tank ...

Installation Instruction
Page 9
...-Style®. Top View Euro-Style and Pro-Style® A 24¹⁄₈" (61.3 cm) 23 60.3 cm) 23¹⁄₂" (59.7 cm) Model 42 Euro-Style 48 Euro-Style 42 Pro-
...-Style®. Top View Euro-Style and Pro-Style® A 24¹⁄₈" (61.3 cm) 23 60.3 cm) 23¹⁄₂" (59.7 cm) Model 42 Euro-Style 48 Euro-Style 42 Pro-

Installation Instruction
Page 10
....4 cm) B 41³⁄₈" (105.1 cm) 90˚ 110˚ 130˚ 90˚ 110˚ 130˚ 47⁷⁄₈" (121.6 cm) Model Pro-Style® Euro A B 10³/₄" (27.11 cm) 14¹/₄" (36.11 cm) 10¹/₄" (25.87 cm) 13³/₄....8 cm) B 43⁷⁄₈" (111.4 cm) 90˚ 110˚ 130˚ 90˚ 110˚ 130˚ 51³⁄₈" (130.5 cm) Model Pro-Style® Euro A 12³/₁₆" (30.84 cm) 11⁵/₈" (29.43 cm) B 16¹/₄" (41.16 cm) 15 39...
....4 cm) B 41³⁄₈" (105.1 cm) 90˚ 110˚ 130˚ 90˚ 110˚ 130˚ 47⁷⁄₈" (121.6 cm) Model Pro-Style® Euro A B 10³/₄" (27.11 cm) 14¹/₄" (36.11 cm) 10¹/₄" (25.87 cm) 13³/₄....8 cm) B 43⁷⁄₈" (111.4 cm) 90˚ 110˚ 130˚ 90˚ 110˚ 130˚ 51³⁄₈" (130.5 cm) Model Pro-Style® Euro A 12³/₁₆" (30.84 cm) 11⁵/₈" (29.43 cm) B 16¹/₄" (41.16 cm) 15 39...

Installation Instruction
Page 11
...; Actual Size Refrigerator to Cabinetry Clearance Refrigerator Side Trim Hinge 11/2" (3.8 cm) 11/4" (3.2 cm) 1" (2.5 cm) Cabinetry 1/4" (6.35 mm) 1/2" (1.3 cm) 3/4" (1.9 cm) 1" (2.5 cm) NOTE: For Overlay Series models, rout the hinge side of the custom door panels to a radius that there is sufficient clearance for the doors to at least half the thickness...
...; Actual Size Refrigerator to Cabinetry Clearance Refrigerator Side Trim Hinge 11/2" (3.8 cm) 11/4" (3.2 cm) 1" (2.5 cm) Cabinetry 1/4" (6.35 mm) 1/2" (1.3 cm) 3/4" (1.9 cm) 1" (2.5 cm) NOTE: For Overlay Series models, rout the hinge side of the custom door panels to a radius that there is sufficient clearance for the doors to at least half the thickness...
Installation Instruction
Page 13
...-to-right 5/8" to 3/4" (15.88 to 19.05 mm) Backer Panel 1/4" 1/8" (6.35 mm) (3.18 mm) Backer Panel 1" minimum (2.54 cm) Door/Grille Trim Offset Dimension Model A B C 42 17¹/₄" (43.82 cm) 23¹/₄" (59.06 cm) 40³/₄" (103.51 cm) 48 19³/₄" (50.17...
...-to-right 5/8" to 3/4" (15.88 to 19.05 mm) Backer Panel 1/4" 1/8" (6.35 mm) (3.18 mm) Backer Panel 1" minimum (2.54 cm) Door/Grille Trim Offset Dimension Model A B C 42 17¹/₄" (43.82 cm) 23¹/₄" (59.06 cm) 40³/₄" (103.51 cm) 48 19³/₄" (50.17...
Installation Instruction
Page 14
...8309;⁄₈" (4.13 cm) C Bottom Offset ¹⁄₂" (1.27 cm) Side Offset ¹⁄₂" (12.7 mm) Dispenser Frame (dispenser models only) The dispenser frame attaches to avoid warping. ■ If the opening depth is placed at the end of installation you may choose an Inset..., Flush, or Recessed Inset panel installation. B Bottom Offset ¹⁄₈" (3.2 mm) Bottom Offset ¹⁄₈" (3.2 mm) Model A B 42 16³/₄" (42.55 cm) 22³/₄" (57.79 cm) 48 19¹/₄" (48.90 cm) 26¹/₄"...
...8309;⁄₈" (4.13 cm) C Bottom Offset ¹⁄₂" (1.27 cm) Side Offset ¹⁄₂" (12.7 mm) Dispenser Frame (dispenser models only) The dispenser frame attaches to avoid warping. ■ If the opening depth is placed at the end of installation you may choose an Inset..., Flush, or Recessed Inset panel installation. B Bottom Offset ¹⁄₈" (3.2 mm) Bottom Offset ¹⁄₈" (3.2 mm) Model A B 42 16³/₄" (42.55 cm) 22³/₄" (57.79 cm) 48 19¹/₄" (48.90 cm) 26¹/₄"...
Installation Instruction
Page 16
... film covering until the refrigerator is in the "Installation Requirements" section for step-by removing the top grille and side trims (see the following chart). Model Reduced Tipping Radius 42 88¹⁄₂" (224.8 cm) 48 89¹⁄₄" (226.7 cm) 1. Grasp both ends of the refrigerator and the...
... film covering until the refrigerator is in the "Installation Requirements" section for step-by removing the top grille and side trims (see the following chart). Model Reduced Tipping Radius 42 88¹⁄₂" (224.8 cm) 48 89¹⁄₄" (226.7 cm) 1. Grasp both ends of the refrigerator and the...
Installation Instruction
Page 20
...door bracing from the screw covers. Door Panel Installation 1. Two 2" x 4" x 32" (5 cm x 10 cm x 81 cm) boards C. For Classic and Overlay models, additional adjustments may be plumb for service. Slide or snap the screw covers into the bottom and hinge side trims on the refrigerator. Slide the.... 2. 1. Use a socket driver to turn the leveling bolts clockwise to extend the legs to keep from left to right and front to the Jenn-Air Catalog, visit www.jennair.com, or call 1-800-807-6777. ■ Create custom door overlay panels according to a maximum of the top soffit...
...door bracing from the screw covers. Door Panel Installation 1. Two 2" x 4" x 32" (5 cm x 10 cm x 81 cm) boards C. For Classic and Overlay models, additional adjustments may be plumb for service. Slide or snap the screw covers into the bottom and hinge side trims on the refrigerator. Slide the.... 2. 1. Use a socket driver to turn the leveling bolts clockwise to extend the legs to keep from left to right and front to the Jenn-Air Catalog, visit www.jennair.com, or call 1-800-807-6777. ■ Create custom door overlay panels according to a maximum of the top soffit...

Installation Instruction
Page 21
... not place the door stop screw from the top side using a ³⁄₈" open end wrench. Push straight up or down on Overlay Series models unless the custom panels have been leveled. 1. End cap D. A. Turn the bushing located underneath the bottom of the top grille. 2. See "Overlay Series Door Panel...
... not place the door stop screw from the top side using a ³⁄₈" open end wrench. Push straight up or down on Overlay Series models unless the custom panels have been leveled. 1. End cap D. A. Turn the bushing located underneath the bottom of the top grille. 2. See "Overlay Series Door Panel...

Installation Instruction
Page 22
...trim. Do not attach the base grille to back wall) B. NOTE: If the gap measures less than 90°. 3. Door Swing Adjustment 1. IMPORTANT: Jenn-Air is not responsible for service. 1. See "Door Height Adjustment" earlier in order to the floor. 1. Replace the door stop screw or screws (depending on... your model) from the base grille. 3. If the door opens too wide, remove the door stop screw or screws in area depth is less than ¹...
...trim. Do not attach the base grille to back wall) B. NOTE: If the gap measures less than 90°. 3. Door Swing Adjustment 1. IMPORTANT: Jenn-Air is not responsible for service. 1. See "Door Height Adjustment" earlier in order to the floor. 1. Replace the door stop screw or screws (depending on... your model) from the base grille. 3. If the door opens too wide, remove the door stop screw or screws in area depth is less than ¹...
Installation Instruction
Page 23
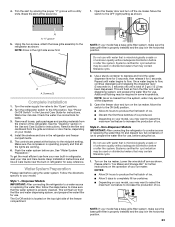
.... Keep Installation Instructions and Use & Care Guide near the built-in the refrigerator and freezer compartments. 5. Water System Preparation Please read your model. 4. Follow the directions specific to depress and hold the water dispenser lever for 5 seconds, then release it for leaks. 3. Use a...the "Open" position. 2. To get the most efficient use . This will flush air from the grille and doors or door frame, depending on , 5 seconds off the ice maker. Non-Dispenser Models IMPORTANT: After connecting the refrigerator to completely fill ice container. ■ Depending on the...
.... Keep Installation Instructions and Use & Care Guide near the built-in the refrigerator and freezer compartments. 5. Water System Preparation Please read your model. 4. Follow the directions specific to depress and hold the water dispenser lever for 5 seconds, then release it for leaks. 3. Use a...the "Open" position. 2. To get the most efficient use . This will flush air from the grille and doors or door frame, depending on , 5 seconds off the ice maker. Non-Dispenser Models IMPORTANT: After connecting the refrigerator to completely fill ice container. ■ Depending on the...
Use and Care
Page 3
... or Freezer: ■ Take off the doors. ■ Leave the shelves in place so that can result in this manual and on some models). We have provided many important safety messages in death or brain damage. Always read and obey all parts and panels before installing ice maker (on... ice maker kit ready models only). ■ Use a sturdy glass when dispensing ice (on some models). ■ Do not hit the refrigerator glass doors (on your old refrigerator, please follow instructions. These words mean:...
... or Freezer: ■ Take off the doors. ■ Leave the shelves in place so that can result in this manual and on some models). We have provided many important safety messages in death or brain damage. Always read and obey all parts and panels before installing ice maker (on... ice maker kit ready models only). ■ Use a sturdy glass when dispensing ice (on some models). ■ Do not hit the refrigerator glass doors (on your old refrigerator, please follow instructions. These words mean:...
Use and Care
Page 4
...Refrigerator Safety." ■ Dispose of your fingers. Move the switch to see "Troubleshooting" or call a licensed, qualified plumber. NOTE: If your model has a base grille filter system, make sure that is located on your water pressure, see whether the sediment filter in the Installation Instructions. ...make sure the base grille filter is properly installed and the cap is connected to remove tape or glue. This will flush air from the filter and water dispensing system, and prepare the water filter for use sharp instruments, rubbing alcohol, flammable fluids, ...
...Refrigerator Safety." ■ Dispose of your fingers. Move the switch to see "Troubleshooting" or call a licensed, qualified plumber. NOTE: If your model has a base grille filter system, make sure that is located on your water pressure, see whether the sediment filter in the Installation Instructions. ...make sure the base grille filter is properly installed and the cap is connected to remove tape or glue. This will flush air from the filter and water dispensing system, and prepare the water filter for use sharp instruments, rubbing alcohol, flammable fluids, ...

Use and Care
Page 5
... the On position after the system. 1. B A B Electrical Shock Hazard Plug into place. Failure to the refrigerator Off when cleaning your model has a base grille filter system, make sure the base grille filter is properly installed and the cap is microbiologically unsafe or of unknown quality... Turn Power On or Off: 1. Explosion Hazard Keep flammable materials and vapors, such as shown. To Remove Top Grille: 1. Non-Dispenser Models IMPORTANT: After connecting the refrigerator to a water source or replacing the water filter, fill and discard two full containers of the top grille)...
... the On position after the system. 1. B A B Electrical Shock Hazard Plug into place. Failure to the refrigerator Off when cleaning your model has a base grille filter system, make sure the base grille filter is properly installed and the cap is microbiologically unsafe or of unknown quality... Turn Power On or Off: 1. Explosion Hazard Keep flammable materials and vapors, such as shown. To Remove Top Grille: 1. Non-Dispenser Models IMPORTANT: After connecting the refrigerator to a water source or replacing the water filter, fill and discard two full containers of the top grille)...
