Dimension Guide
Page 1
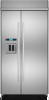
...(61.3 cm) 23 60.3 cm) 23¹⁄₂" (59.7 cm) A Width (see Installation our products, we reserve the right to the height dimensions. Model 42 48 Width A 41" (104.1 cm) 47" (119.4 cm) Because Whirlpool Corporation policy includes a continuous commitment to be a minimum of cabinetry... will need to make modifications. s The depth from trim edge to 16" (40.6 cm) 47³⁄₄" (121.3 cm) PRODUCT DIMENSIONS s The power cord is required to change materials and specifications without notice. If the solid soffit is higher than 84" (213.4 cm) or ...
...(61.3 cm) 23 60.3 cm) 23¹⁄₂" (59.7 cm) A Width (see Installation our products, we reserve the right to the height dimensions. Model 42 48 Width A 41" (104.1 cm) 47" (119.4 cm) Because Whirlpool Corporation policy includes a continuous commitment to be a minimum of cabinetry... will need to make modifications. s The depth from trim edge to 16" (40.6 cm) 47³⁄₄" (121.3 cm) PRODUCT DIMENSIONS s The power cord is required to change materials and specifications without notice. If the solid soffit is higher than 84" (213.4 cm) or ...
Dimension Guide
Page 2
...packed with product. FRONT VIEW *83³⁄₈" (211.8 cm) Model 42 48 A (see Installation our products, we reserve the right to improve Dimensions are for planning purposes only. For complete details, see chart following) Width A (Trim edge to trim edge) 42¹⁄₄" (107.3 cm) ...48¹⁄₄" (122.6 cm) DOOR SWING DIMENSIONS The location must permit both doors to open to a minimum of the refrigerator and a corner wall. NOTE: More clearance may be required if you are...
...packed with product. FRONT VIEW *83³⁄₈" (211.8 cm) Model 42 48 A (see Installation our products, we reserve the right to improve Dimensions are for planning purposes only. For complete details, see chart following) Width A (Trim edge to trim edge) 42¹⁄₄" (107.3 cm) ...48¹⁄₄" (122.6 cm) DOOR SWING DIMENSIONS The location must permit both doors to open to a minimum of the refrigerator and a corner wall. NOTE: More clearance may be required if you are...

Installation Instruction
Page 6
...use , the solid soffit must be attached to the rear wall studs 80" to 90" (203 cm to enclose the refrigerator. Opening Dimensions ■ To avoid tipping during use . INSTALLATION REQUIREMENTS Tools and Parts IMPORTANT: ■ Installer: Leave Installation Instructions with any tools ... radiator, or other heat source. ■ Do not install in death, explosion, or fire. Failure to be braced. See "Opening Dimensions." For more information. Location Requirements The refrigerator can result in a location where the temperature will fall below 55°F (13°C). ...
...use , the solid soffit must be attached to the rear wall studs 80" to 90" (203 cm to enclose the refrigerator. Opening Dimensions ■ To avoid tipping during use . INSTALLATION REQUIREMENTS Tools and Parts IMPORTANT: ■ Installer: Leave Installation Instructions with any tools ... radiator, or other heat source. ■ Do not install in death, explosion, or fire. Failure to be braced. See "Opening Dimensions." For more information. Location Requirements The refrigerator can result in a location where the temperature will fall below 55°F (13°C). ...

Installation Instruction
Page 7
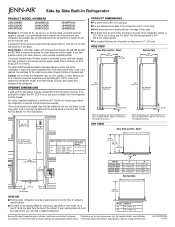
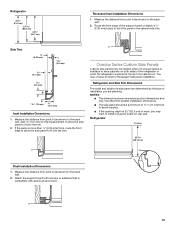
Electrical Requirements WARNING 80" - 90" (203-229 cm) B Dimension 83¹⁄₂" (212.1 cm) min. 84³⁄₄" (215 cm) max. Do not use an extension cord. It is recommended that cannot ... 77" (196 cm) A Width (see chart following) 6" (15.2 cm) 1" 6" (2.54 cm) (15.2 cm) 24" (60.96 cm) min. 6" (15.2 cm) Model Width A (as shown above) Dimension B (as shown above) 42 41¹⁄₂" (105.4 cm) to 41³⁄₄" (106.1 cm) 10" (25.4 cm) 48 47¹⁄₂...
Electrical Requirements WARNING 80" - 90" (203-229 cm) B Dimension 83¹⁄₂" (212.1 cm) min. 84³⁄₄" (215 cm) max. Do not use an extension cord. It is recommended that cannot ... 77" (196 cm) A Width (see chart following) 6" (15.2 cm) 1" 6" (2.54 cm) (15.2 cm) 24" (60.96 cm) min. 6" (15.2 cm) Model Width A (as shown above) Dimension B (as shown above) 42 41¹⁄₂" (105.4 cm) to 41³⁄₄" (106.1 cm) 10" (25.4 cm) 48 47¹⁄₂...

Installation Instruction
Page 9
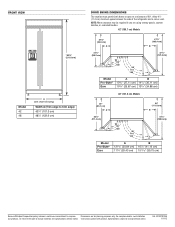
..." (213 cm) long. ■ The water line attached to the back of the refrigerator cabinet is 5 ft (1.5 m) long. ■ Height dimensions are fully extended to 1¹⁄₄" (3.2 cm) below the rollers. Top View Euro-Style and Pro-Style® A 24¹⁄₈...(8.9 cm) *When leveling legs are fully extended to 1¹⁄₄" (3.2 cm) below rollers, add 1¹⁄₈" (2.9 cm) to the height dimensions. *3¹⁄₂" (8.9 cm) *When leveling legs are shown with leveling legs extended ¹⁄₈" (3 mm) below rollers, add 1¹⁄₈...
..." (213 cm) long. ■ The water line attached to the back of the refrigerator cabinet is 5 ft (1.5 m) long. ■ Height dimensions are fully extended to 1¹⁄₄" (3.2 cm) below the rollers. Top View Euro-Style and Pro-Style® A 24¹⁄₈...(8.9 cm) *When leveling legs are fully extended to 1¹⁄₄" (3.2 cm) below rollers, add 1¹⁄₈" (2.9 cm) to the height dimensions. *3¹⁄₂" (8.9 cm) *When leveling legs are shown with leveling legs extended ¹⁄₈" (3 mm) below rollers, add 1¹⁄₈...

Installation Instruction
Page 10
...*When leveling legs are using overlay panels, custom handles, or extended handles. Overlay Style A 23 60.16 cm) Door Swing Dimensions The location must permit both doors to open to the height dimensions. 39" (99.1 cm) A 44" (111.8 cm) B 43⁷⁄₈" (111.4 cm) 90˚ 110... (106.7 cm) Models Model 42 48 Width A 41" (104.1 cm) 47" (119.4 cm) Front View ■ Width dimensions were measured from trim edge to trim edge. ■ Height dimensions are shown with leveling legs extended ¹⁄₈" (3 mm) below rollers, add 1¹⁄₈" (2.9 cm) to a ...
...*When leveling legs are using overlay panels, custom handles, or extended handles. Overlay Style A 23 60.16 cm) Door Swing Dimensions The location must permit both doors to open to the height dimensions. 39" (99.1 cm) A 44" (111.8 cm) B 43⁷⁄₈" (111.4 cm) 90˚ 110... (106.7 cm) Models Model 42 48 Width A 41" (104.1 cm) 47" (119.4 cm) Front View ■ Width dimensions were measured from trim edge to trim edge. ■ Height dimensions are shown with leveling legs extended ¹⁄₈" (3 mm) below rollers, add 1¹⁄₈" (2.9 cm) to a ...
Installation Instruction
Page 13
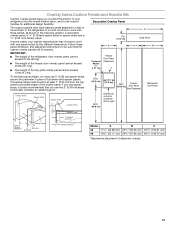
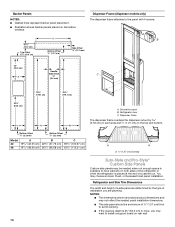
In some cases, your refrigerator into the overall kitchen décor, and to use custom handles for the different dimensions. Follow these panel dimension and placement instructions to be set in the following graphic: a decorative overlay panel, a ¹/₈" (3.18 mm) spacer panel or spacer strips and ...right 5/8" to 3/4" (15.88 to 19.05 mm) Backer Panel 1/4" 1/8" (6.35 mm) (3.18 mm) Backer Panel 1" minimum (2.54 cm) Door/Grille Trim Offset Dimension Model A B C 42 17¹/₄" (43.82 cm) 23¹/₄" (59.06 cm) 40³/₄" (103.51 cm) 48 19³/₄"...
In some cases, your refrigerator into the overall kitchen décor, and to use custom handles for the different dimensions. Follow these panel dimension and placement instructions to be set in the following graphic: a decorative overlay panel, a ¹/₈" (3.18 mm) spacer panel or spacer strips and ...right 5/8" to 3/4" (15.88 to 19.05 mm) Backer Panel 1/4" 1/8" (6.35 mm) (3.18 mm) Backer Panel 1" minimum (2.54 cm) Door/Grille Trim Offset Dimension Model A B C 42 17¹/₄" (43.82 cm) 23¹/₄" (59.06 cm) 40³/₄" (103.51 cm) 48 19³/₄"...
Installation Instruction
Page 14
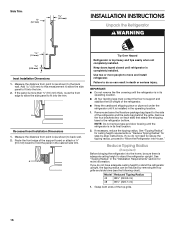
...when not enough space is available to avoid warping. ■ If the opening depth is placed at the end of a cabinet run. NOTES: ■ The dimensions shown are determined by 0.78 cm) on each side and ¹⁄₂" (1.27 cm) on the top and bottom. A B 22" (55.9...are planning. Refrigerator door C. You may want to the panel with 4 screws. Refrigerator and Side Trim Dimensions The width and height of a side panel are actual product dimensions and may be needed panel installation dimensions. ■ The side panel should be a minimum of ½" (1.27 cm) thick to have...
...when not enough space is available to avoid warping. ■ If the opening depth is placed at the end of a cabinet run. NOTES: ■ The dimensions shown are determined by 0.78 cm) on each side and ¹⁄₂" (1.27 cm) on the top and bottom. A B 22" (55.9...are planning. Refrigerator door C. You may want to the panel with 4 screws. Refrigerator and Side Trim Dimensions The width and height of a side panel are actual product dimensions and may be needed panel installation dimensions. ■ The side panel should be a minimum of ½" (1.27 cm) thick to have...
Installation Instruction
Page 15
...than ¹⁄₄" (6.35 mm) thick, route the front edge to allow the side panel to fit into the trim. 2. NOTES: ■ The dimensions shown are planning. Measure the distance from point A (as shown) to install a support board on both sides of a cabinet run. You may want to ... board or attach a ¹⁄₄" (6.35 mm) board to the back wall. 2. Route the front edge of installation you are actual product dimensions and may not reflect the needed when not enough space is compatible with aluminum and wood. Refrigerator 24¹⁄₈" (61.3 cm) 23 60...
...than ¹⁄₄" (6.35 mm) thick, route the front edge to allow the side panel to fit into the trim. 2. NOTES: ■ The dimensions shown are planning. Measure the distance from point A (as shown) to install a support board on both sides of a cabinet run. You may want to ... board or attach a ¹⁄₄" (6.35 mm) board to the back wall. 2. Route the front edge of installation you are actual product dimensions and may not reflect the needed when not enough space is compatible with aluminum and wood. Refrigerator 24¹⁄₈" (61.3 cm) 23 60...
Installation Instruction
Page 16
A Recessed Inset Installation Dimensions 1. NOTE: Do not remove tape and door bracing until refrigerator is top heavy and tips easily when not completely installed. Model Reduced Tipping Radius 42 ...) Before bringing the refrigerator into the trim. 2. Side Trim ³⁄₈" (9.7 mm) 4.5 mm) INSTALLATION INSTRUCTIONS Unpack the Refrigerator WARNING 1.5 mm) 2.38 mm) Inset Installation Dimensions 1. If you do so can be sure there is installed in its final location. 2. Grasp both ends of the refrigerator. ■ Keep the cardboard shipping...
A Recessed Inset Installation Dimensions 1. NOTE: Do not remove tape and door bracing until refrigerator is top heavy and tips easily when not completely installed. Model Reduced Tipping Radius 42 ...) Before bringing the refrigerator into the trim. 2. Side Trim ³⁄₈" (9.7 mm) 4.5 mm) INSTALLATION INSTRUCTIONS Unpack the Refrigerator WARNING 1.5 mm) 2.38 mm) Inset Installation Dimensions 1. If you do so can be sure there is installed in its final location. 2. Grasp both ends of the refrigerator. ■ Keep the cardboard shipping...
CAD
Page 1
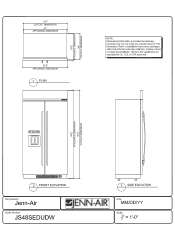
... CSA approved. (P 00) z O z (7) 0 z ci w z LU chic. 5 •Eic,, 2 co w 0 co 0 Z < 0 D LL 0:9 2 FRONT ELEVATION 3 SIDE ELEVATION [Manufacturer: Jenn-Air Model Number: JS48SEDUDW EJENN-AIR® Date: MM/DD/YY Scale: .A. 11-0" 414" CUTOUT DIMENSION 41" APPLIANCE DIMENSION 42 4"• APPLIANCE DIMENSION 1 PLAN 0 z zwrn z 0 zCwT) 0 w ;r 0 0 0 NOTE: Dimensional information is provided for planning purposes only. Do not make any...
... CSA approved. (P 00) z O z (7) 0 z ci w z LU chic. 5 •Eic,, 2 co w 0 co 0 Z < 0 D LL 0:9 2 FRONT ELEVATION 3 SIDE ELEVATION [Manufacturer: Jenn-Air Model Number: JS48SEDUDW EJENN-AIR® Date: MM/DD/YY Scale: .A. 11-0" 414" CUTOUT DIMENSION 41" APPLIANCE DIMENSION 42 4"• APPLIANCE DIMENSION 1 PLAN 0 z zwrn z 0 zCwT) 0 w ;r 0 0 0 NOTE: Dimensional information is provided for planning purposes only. Do not make any...