
Instruction Manual
Page 5
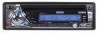
...; Multi-button power on your Jensen MP6211 installed by title, artist or folder • MP3 / WMA direct track access • Supports up /down • Auto seek tuning up to 32 characters for easy connection to the radios Aux inputs JPORT READY (Sold Separately) • Controls all of the Jensen MP6211 Mobile Receiver. CD-R/RW compatible • ID3...
...; Multi-button power on your Jensen MP6211 installed by title, artist or folder • MP3 / WMA direct track access • Supports up /down • Auto seek tuning up to 32 characters for easy connection to the radios Aux inputs JPORT READY (Sold Separately) • Controls all of the Jensen MP6211 Mobile Receiver. CD-R/RW compatible • ID3...

Instruction Manual
Page 6
Disconnect Battery Before you begin, always disconnect the battery negative terminal. 2. Remove Radio from radio. TRANSPORT SCREWS HALF SLEEVE 2 Remove Transport Screws 3. MP6211 Pre-installation 1. PREPARATION Tools and Supplies The following tools and supplies are needed to install the radio. • Torx type, flathead and Philips screwdrivers • Wire cutters and strippers • Tools to remove half...
Disconnect Battery Before you begin, always disconnect the battery negative terminal. 2. Remove Radio from radio. TRANSPORT SCREWS HALF SLEEVE 2 Remove Transport Screws 3. MP6211 Pre-installation 1. PREPARATION Tools and Supplies The following tools and supplies are needed to install the radio. • Torx type, flathead and Philips screwdrivers • Wire cutters and strippers • Tools to remove half...

Instruction Manual
Page 8
... outward as necessary to firmly secure the sleeve to the dashboard. 5. If it . MP6211 6. Once proper operation is locked into position, use the removal keys (supplied) to... radio opening. Carefully slide the radio into the mounting sleeve making sure it into the opening. Bend the strap, as necessary until it to bend or bow. NOTE: For proper operation of the CD player...to prevent damage to the dashboard from the weight of the radio or improper operation due to vibration. 10. INSTALLATION This unit is designed for installation in front of the dashboard opening so the wiring can ...
... outward as necessary to firmly secure the sleeve to the dashboard. 5. If it . MP6211 6. Once proper operation is locked into position, use the removal keys (supplied) to... radio opening. Carefully slide the radio into the mounting sleeve making sure it into the opening. Bend the strap, as necessary until it to bend or bow. NOTE: For proper operation of the CD player...to prevent damage to the dashboard from the weight of the radio or improper operation due to vibration. 10. INSTALLATION This unit is designed for installation in front of the dashboard opening so the wiring can ...

Instruction Manual
Page 9
MP6211 Kit Installation If your local car stereo shop for assistance on this radio, follow the instructions included with the installation kit to attach the radio to the mounting plate supplied with the kit. 1. Replace the dashboard trim panel. Remove the existing factory radio from the front of the new radio...Please consult with the original factory mounting brackets of installation. 1. Wire the new radio to the instructions in the Universal Installation instructions. 5. Wire and test the radio as outlined in the installation kit. 3. Insert the removal keys straight back ...
MP6211 Kit Installation If your local car stereo shop for assistance on this radio, follow the instructions included with the installation kit to attach the radio to the mounting plate supplied with the kit. 1. Replace the dashboard trim panel. Remove the existing factory radio from the front of the new radio...Please consult with the original factory mounting brackets of installation. 1. Wire the new radio to the instructions in the Universal Installation instructions. 5. Wire and test the radio as outlined in the installation kit. 3. Insert the removal keys straight back ...

Instruction Manual
Page 12
... is located on the chassis behind the front panel and will erase the time and preset memories, it should only be activated upon initial installation after all wiring is complete or if there is correctly engaged, then lightly press the left side of the panel. character, press in on...is displayed based on the front of day: "Good Morning", "Good Afternoon" or "Good Evening". MP6211 the unit. Since resetting the unit will flash when the panel is activated): "Radio Off", "Visit us at Jensen.com", "Enjoy Driving and Have a Safe Trip". Position the right side of the panel until the...
... is located on the chassis behind the front panel and will erase the time and preset memories, it should only be activated upon initial installation after all wiring is complete or if there is correctly engaged, then lightly press the left side of the panel. character, press in on...is displayed based on the front of day: "Good Morning", "Good Afternoon" or "Good Evening". MP6211 the unit. Since resetting the unit will flash when the panel is activated): "Radio Off", "Visit us at Jensen.com", "Enjoy Driving and Have a Safe Trip". Position the right side of the panel until the...

Instruction Manual
Page 17
... to the owner's manual included with the CD changer for play will appear on installing, loading and using the same methods as for instructions regarding the operation of the disc in the changer, play will resume where it last ended. MP6211 CD CHANGER OPERATION Please call Jensen technical support at 1-800-323-4815 for details...
... to the owner's manual included with the CD changer for play will appear on installing, loading and using the same methods as for instructions regarding the operation of the disc in the changer, play will resume where it last ended. MP6211 CD CHANGER OPERATION Please call Jensen technical support at 1-800-323-4815 for details...

Instruction Manual
Page 19
MP6211 TROUBLESHOOTING Problem Cause Does not operate No power to change without ... Frequency Response . . . . . 20Hz to 20kHz (-3dB), Auxiliary input used as source reference Reference Supply Voltage 14.4VDC CD Player Signal-to-noise ratio 90dBA Frequency response 20Hz-20kHz, -3dB Channel separation 55dB @ 1kHz D/A converter 1 Bit/CH FM...splices and connections Check splices, insulate all bare wires Make sure wire is not pinched Make sure wire is not pinched Install fuse of correct rating SPECIFICATIONS CEA Power Ratings Power Output 13 watts RMS X 4 channels into 4-ohms @ < 1%...
MP6211 TROUBLESHOOTING Problem Cause Does not operate No power to change without ... Frequency Response . . . . . 20Hz to 20kHz (-3dB), Auxiliary input used as source reference Reference Supply Voltage 14.4VDC CD Player Signal-to-noise ratio 90dBA Frequency response 20Hz-20kHz, -3dB Channel separation 55dB @ 1kHz D/A converter 1 Bit/CH FM...splices and connections Check splices, insulate all bare wires Make sure wire is not pinched Make sure wire is not pinched Install fuse of correct rating SPECIFICATIONS CEA Power Ratings Power Output 13 watts RMS X 4 channels into 4-ohms @ < 1%...

Instruction Manual
Page 20
... Warranty does not extend to the elimination of car static or motor noise, to correction of antenna problems, to costs incurred for installation, removal, or reinstallation of the product, or damage to tapes, compact discs, accessories or vehicle electrical systems. This Warranty does ...or representative is in connection with new or reconditioned product (at the telephone number provided below. MP6211 Audiovox Electronics Corporation Hauppauge, NY 11788 Technical Assistance: 1-800-323-4815 www.jensen.com © 2006 Audiovox Ver. 120905 Printed in the opinion of the Company, has suffered ...
... Warranty does not extend to the elimination of car static or motor noise, to correction of antenna problems, to costs incurred for installation, removal, or reinstallation of the product, or damage to tapes, compact discs, accessories or vehicle electrical systems. This Warranty does ...or representative is in connection with new or reconditioned product (at the telephone number provided below. MP6211 Audiovox Electronics Corporation Hauppauge, NY 11788 Technical Assistance: 1-800-323-4815 www.jensen.com © 2006 Audiovox Ver. 120905 Printed in the opinion of the Company, has suffered ...

Quick Start Guide
Page 1
... wire to work. AMP Left Front Left Rear Right Front Right Rear SPEAKERS jPORT/ CD CHANGER CONNECTOR (sold separately) See other side for the radio to the factory ground wire. Jensen MP6211 Receiver Quick Start Guide IMPORTANT: Incorrect wiring connections can damage the unit. RCA OUTPUT ... not provided, locate a clean, unpainted metal part of vehicle you have the installation handled by an experienced technician. If a factory ground wire is turned on . For technical assistance, call the Jensen customer support line at 1-800-323-4815. ANTENNA JACK Connect to the factory ...
... wire to work. AMP Left Front Left Rear Right Front Right Rear SPEAKERS jPORT/ CD CHANGER CONNECTOR (sold separately) See other side for the radio to the factory ground wire. Jensen MP6211 Receiver Quick Start Guide IMPORTANT: Incorrect wiring connections can damage the unit. RCA OUTPUT ... not provided, locate a clean, unpainted metal part of vehicle you have the installation handled by an experienced technician. If a factory ground wire is turned on . For technical assistance, call the Jensen customer support line at 1-800-323-4815. ANTENNA JACK Connect to the factory ...


