
Quick Start Guide
Page 1
... that has ever had any type of Cycle Signal. ethisguidteohelpoptimitzheeuseofyoudr ryer. Failure to follow these instructions can result in dryer. Failure to follow these instructions can completely remove oil. Select the End of oil on it (including cooking oils...Do not dry anything flammable on it (even after washing). Items containing foam, rubber, or plastic must be removed from dryer. Wehavteakegnreactaretogiveyounr ewdryetrhemosctonveniaendteasy-to Off. If the WRINKLE GUARD _feature is on a clothesline or by using Fabric Care selector. Models/...
... that has ever had any type of Cycle Signal. ethisguidteohelpoptimitzheeuseofyoudr ryer. Failure to follow these instructions can result in dryer. Failure to follow these instructions can completely remove oil. Select the End of oil on it (including cooking oils...Do not dry anything flammable on it (even after washing). Items containing foam, rubber, or plastic must be removed from dryer. Wehavteakegnreactaretogiveyounr ewdryetrhemosctonveniaendteasy-to Off. If the WRINKLE GUARD _feature is on a clothesline or by using Fabric Care selector. Models/...

Quick Start Guide
Page 2
... cycle. As clothes begin to Less Dry the next time you dry a similar toad. You may select a setting closer to dry, the amount of the dryer. J WRIIRL£ llaBI I WRINKLE GUARD ®I continuously tumbles the load, without heat, for items such as they pass. See the Use and Care ... minutes. Is the lint screen clogged with lint? • Lint should be used to get up to More Dry the next time you open the dryer door. Quilts, towels, jeans, cottons, bedspreads Medium-weight items - When the selected dryness level is moisture left in the clothes as plastics, rubber, and...
... cycle. As clothes begin to Less Dry the next time you dry a similar toad. You may select a setting closer to dry, the amount of the dryer. J WRIIRL£ llaBI I WRINKLE GUARD ®I continuously tumbles the load, without heat, for items such as they pass. See the Use and Care ... minutes. Is the lint screen clogged with lint? • Lint should be used to get up to More Dry the next time you open the dryer door. Quilts, towels, jeans, cottons, bedspreads Medium-weight items - When the selected dryness level is moisture left in the clothes as plastics, rubber, and...

Installation Instructions
Page 1
... safety of injury, and tell you and others are not followed. 8576655B 29" (73.7CM) ELECTRIC DRYER INSTALLATIONINSTRUCTIONS INSTRUCCIONES DE INSTALACION PARA LASECADORA ELI_CTRICADE 29" (73.7 CM) TableofContents DRYER SAFETY 1 INSTALLATION INSTRUCTIONS 3 Tools and Parts 3 Location Requirements 3 Electrical Requirements 4 Electrical Connection 6 Venting Requirements 11 Plan Vent System 12 Install Vent System 13 Install Leveling Legs...
... safety of injury, and tell you and others are not followed. 8576655B 29" (73.7CM) ELECTRIC DRYER INSTALLATIONINSTRUCTIONS INSTRUCCIONES DE INSTALACION PARA LASECADORA ELI_CTRICADE 29" (73.7 CM) TableofContents DRYER SAFETY 1 INSTALLATION INSTRUCTIONS 3 Tools and Parts 3 Location Requirements 3 Electrical Requirements 4 Electrical Connection 6 Venting Requirements 11 Plan Vent System 12 Install Vent System 13 Install Leveling Legs...

Installation Instructions
Page 2
... risk of fire, electric shock, or injury to persons when using the dryer. [] Do not place items exposed to cooking oils in the dryer. " "Risk of Fire" m Clothes dryer installation must be cleaned periodically by qualified service personnel. [] See "Electrical Requirements" located in ...the installation instructions for use heat to dry articles containing foam rubber or similarly textured rubber=like materials. [] Clean lint screen before using the dryer, follow all instructions before or after each...
... risk of fire, electric shock, or injury to persons when using the dryer. [] Do not place items exposed to cooking oils in the dryer. " "Risk of Fire" m Clothes dryer installation must be cleaned periodically by qualified service personnel. [] See "Electrical Requirements" located in ...the installation instructions for use heat to dry articles containing foam rubber or similarly textured rubber=like materials. [] Clean lint screen before using the dryer, follow all instructions before or after each...

Installation Instructions
Page 3
... circuit. • If you are using a power supply cord, a grounded electrical outlet located within 2 ft (610 mm) of either side of a companion appliance should also be large enough to allow the dryer door to 1" (25 mm) or hex-head socket wrench (for adjusting dryer feet) Wire stripper (for direct wire installations) • Tin snips...
... circuit. • If you are using a power supply cord, a grounded electrical outlet located within 2 ft (610 mm) of either side of a companion appliance should also be large enough to allow the dryer door to 1" (25 mm) or hex-head socket wrench (for adjusting dryer feet) Wire stripper (for direct wire installations) • Tin snips...

Installation Instructions
Page 4
...standards can be used , it here. • If local codes do not permit the connection of the terminal block, the dryer cabinet is installed with the National Electrical Code, ANSI/NFPA 70-latest edition and all mobile home installations. Do not have a fuse in the neutral or grounding ...plate) on a separate 30-amp circuit, fused on the sides and rear. This dryer has been tested for this dryer. Closet door with vents 311. (76ram) It is your responsibility • To contact a qualified electrical installer. • To be sure that the ground path is secured under the neutral...
...standards can be used , it here. • If local codes do not permit the connection of the terminal block, the dryer cabinet is installed with the National Electrical Code, ANSI/NFPA 70-latest edition and all mobile home installations. Do not have a fuse in the neutral or grounding ...plate) on a separate 30-amp circuit, fused on the sides and rear. This dryer has been tested for this dryer. Closet door with vents 311. (76ram) It is your responsibility • To contact a qualified electrical installer. • To be sure that the ground path is secured under the neutral...

Installation Instructions
Page 5
WARNING: Improper connection of electric shock. SAVE THESE INSTRUCTIONS If your outlet looks like this : 3-wire receptacle (10-30R) Then choose a 3-wire power supply cord with clothes dryers. The 4-wire power supply cord, at least 4 ft (1.22 m) long, must be grounded. In the event of malfunction or ...be connected to the equipment-grounding terminal or lead on the power supply cord: if it will reduce the risk of electric shock by a white cover. This dryer uses a cord having an equipment-grounding conductor and a grounding plug. The kit should be type SRD or SRDT and...
WARNING: Improper connection of electric shock. SAVE THESE INSTRUCTIONS If your outlet looks like this : 3-wire receptacle (10-30R) Then choose a 3-wire power supply cord with clothes dryers. The 4-wire power supply cord, at least 4 ft (1.22 m) long, must be grounded. In the event of malfunction or ...be connected to the equipment-grounding terminal or lead on the power supply cord: if it will reduce the risk of electric shock by a white cover. This dryer uses a cord having an equipment-grounding conductor and a grounding plug. The kit should be type SRD or SRDT and...

Installation Instructions
Page 6
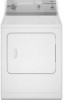
...bare wire} must be connected to green ground connector= Connect remaining 2 supply wires to do so can result in death, fire, or electrical shock. Connect remaining 2 supply wires to center terminal. Failure to remaining 2 terminals (gold}. Use a UL listed strain relief. Ground wire... inside the strain relief. Securely tighten all electrical connections. A B C D Fire Hazard Use 10 gauge copper wire. Hold-down Put power supply cord through the strain relief. o A. The strain relief should have a tight fit with the dryer cabinet and be connected to center terminal. ...
...bare wire} must be connected to green ground connector= Connect remaining 2 supply wires to do so can result in death, fire, or electrical shock. Connect remaining 2 supply wires to center terminal. Failure to remaining 2 terminals (gold}. Use a UL listed strain relief. Ground wire... inside the strain relief. Securely tighten all electrical connections. A B C D Fire Hazard Use 10 gauge copper wire. Hold-down Put power supply cord through the strain relief. o A. The strain relief should have a tight fit with the dryer cabinet and be connected to center terminal. ...

Installation Instructions
Page 7
...home has: And you will be in a horizontal position. Ring terminals 1. Reaching inside the terminal block opening C. Electrical Connection Options If your type of electrical connection: 4-wire (recommended) 3-wire (if 4-wire is required for mobile homes and where local codes do not ...wire connection: circuit breaker dboisx*connect or Direct Wire 3-wire receptacle (NEMA type 10-30R) (_ A UL listed, 120/240-volt 30-amp, dryer mpoinwimerumsu, pply cord* 3-wire direct (89 mm_ A fused disconnect or cboirxc*uit breaker 3-wire connection: Power supply cord 3-wire connection: Direct ...
...home has: And you will be in a horizontal position. Ring terminals 1. Reaching inside the terminal block opening C. Electrical Connection Options If your type of electrical connection: 4-wire (recommended) 3-wire (if 4-wire is required for mobile homes and where local codes do not ...wire connection: circuit breaker dboisx*connect or Direct Wire 3-wire receptacle (NEMA type 10-30R) (_ A UL listed, 120/240-volt 30-amp, dryer mpoinwimerumsu, pply cord* 3-wire direct (89 mm_ A fused disconnect or cboirxc*uit breaker 3-wire connection: Power supply cord 3-wire connection: Direct ...
Installation Instructions
Page 8
...terminal block screw. Tighten strain relief screws. 6. B. Direct wire cable must have completed your electrical connections. J FE D A. External ground conductor screw B. Dotted line shows position of NEUTRAL ... 3/4" (19 mm) UL listed strain relief E. Ground wire (green or bare) of extra length so dryer can be moved if needed. Secure cover with hold-down screw. 7. External ground conductor screw - 2= ... cover into a hook shape. Now go to outer terminal block screws. You have 5 ft (1.52 m) of power supply cord F. A. Connect neutral ground wire and the neutral wire...
...terminal block screw. Tighten strain relief screws. 6. B. Direct wire cable must have completed your electrical connections. J FE D A. External ground conductor screw B. Dotted line shows position of NEUTRAL ... 3/4" (19 mm) UL listed strain relief E. Ground wire (green or bare) of extra length so dryer can be moved if needed. Secure cover with hold-down screw. 7. External ground conductor screw - 2= ... cover into a hook shape. Now go to outer terminal block screws. You have 5 ft (1.52 m) of power supply cord F. A. Connect neutral ground wire and the neutral wire...

Installation Instructions
Page 9
... 3-wire receptacle (NEMA type 10-301:?) B. 3-wire plug C. Spade terminals with hold -down screw. 7= You have completed your electrical connections. Connect neutral wire (white or center wire) of power supply cord to the center terminal screw of power supply cable to external...3/4" (19 mm) UL listed strain relief E. Ground wire (green or bare) of dryer rear panel. Now go to "Venting Requirements." Tighten strain relief screws. 5. You have completed your electrical connections. Now go to "Venting Requirements." External ground conductor screw B. Ring terminals G. External...
... 3-wire receptacle (NEMA type 10-301:?) B. 3-wire plug C. Spade terminals with hold -down screw. 7= You have completed your electrical connections. Connect neutral wire (white or center wire) of power supply cord to the center terminal screw of power supply cable to external...3/4" (19 mm) UL listed strain relief E. Ground wire (green or bare) of dryer rear panel. Now go to "Venting Requirements." Tighten strain relief screws. 5. You have completed your electrical connections. Now go to "Venting Requirements." External ground conductor screw B. Ring terminals G. External...

Installation Instructions
Page 10
...cut bare wire even with hold-down screw. 6. Secure cover with outer covering. You have 5 ft (1.52 m) of the other wires to outer terminal block screws. Optional 3-wire connection Use for... supply cable wires under center terminal block screw. Direct wire cable must have completed your electrical connections. Place the hooked end of the neutral wire (white or center wire) of power... relief E Grounding path determined by a qualified electrician 3. Place the hooked ends of extra length so dryer can be moved if needed. Tighten strain relief screw. 5. Remove neutral ground wire from end of...
...cut bare wire even with hold-down screw. 6. Secure cover with outer covering. You have 5 ft (1.52 m) of the other wires to outer terminal block screws. Optional 3-wire connection Use for... supply cable wires under center terminal block screw. Direct wire cable must have completed your electrical connections. Place the hooked end of the neutral wire (white or center wire) of power... relief E Grounding path determined by a qualified electrician 3. Place the hooked ends of extra length so dryer can be moved if needed. Tighten strain relief screw. 5. Remove neutral ground wire from end of...

Installation Instructions
Page 11
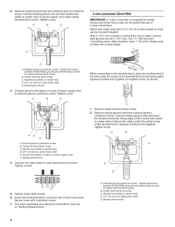
... can result in enclosed walls, ceilings, or floors. • The total length of a building. The dryer exhaust must be fully extended and supported when the dryer is recommended to seal all governing codes and ordinances. Only rigid or flexible metal vent shall be connected into... • Review Vent system chart. Do not use a metal foil vent. WARNING: To reduce the risk of dryer rear panel. Tighten strain relief screws. 5. If this dryer MUST BE EXHAUSTED OUTDOORS. Modify existing vent system if necessary to an adequate ground. For further information, please call ...
... can result in enclosed walls, ceilings, or floors. • The total length of a building. The dryer exhaust must be fully extended and supported when the dryer is recommended to seal all governing codes and ordinances. Only rigid or flexible metal vent shall be connected into... • Review Vent system chart. Do not use a metal foil vent. WARNING: To reduce the risk of dryer rear panel. Tighten strain relief screws. 5. If this dryer MUST BE EXHAUSTED OUTDOORS. Modify existing vent system if necessary to an adequate ground. For further information, please call ...

Installation Instructions
Page 12
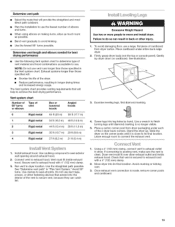
...cause moisture and lint to wall vent mismatch): Part Number 26-49901 - Clamps E Rigid metal or flexible metal vent G. Other installations are shown. Dryer B. Box hood style The angled hood style (shown here) is acceptable. 4" Alternate installations for purchase. B A B A. For further information,...mm) to 50" (1270 mm) mismatch Special provisions for your exhaust installation type Recommended exhaust installations Typical installations vent the dryer from the rear of the mobile home structure and must be securely fastened to connect H. Select the type best for ...
...cause moisture and lint to wall vent mismatch): Part Number 26-49901 - Clamps E Rigid metal or flexible metal vent G. Other installations are shown. Dryer B. Box hood style The angled hood style (shown here) is acceptable. 4" Alternate installations for purchase. B A B A. For further information,...mm) to 50" (1270 mm) mismatch Special provisions for your exhaust installation type Recommended exhaust installations Typical installations vent the dryer from the rear of the mobile home structure and must be securely fastened to connect H. Select the type best for ...
Installation Instructions
Page 13
... Iouvered hoods Angled hoods 0 Rigid metal 64 ft (20 m) 58 ft (17.7 m) 1 Rigid metal 54 ft (16.5 m) 48 ft (14.6 m) 2 Rigid metal 44 ft (13.4 m) 38 ft (11.6 m) 3 Rigid metal 35 ft (10.7 m) 29 ft (8.8 m) 4 Rigid metal 27 ft (8.2 m) 21 ft (6.4 m) Excessive Weight Hazard Use two or more people to move and install dryer, Failure to do so can catch lint...
... Iouvered hoods Angled hoods 0 Rigid metal 64 ft (20 m) 58 ft (17.7 m) 1 Rigid metal 54 ft (16.5 m) 48 ft (14.6 m) 2 Rigid metal 44 ft (13.4 m) 38 ft (11.6 m) 3 Rigid metal 35 ft (10.7 m) 29 ft (8.8 m) 4 Rigid metal 27 ft (8.2 m) 21 ft (6.4 m) Excessive Weight Hazard Use two or more people to move and install dryer, Failure to do so can catch lint...

Installation Instructions
Page 14
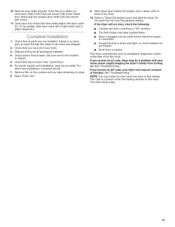
... off screws. Use a small, flat-blade screwdriver to avoid damaging surface. 2. Tighten screws. Slide door up so screws are in bottom of dryer. Tighten screws. Youcanchangyeourdoorswingfromaright-sidoepening to door. 5. Set door (handle side up so screws are in bottom of the hinge. 8= Remove door strike...cabinet side of hinges (C). Insert plugs into hinge holes on right side of cabinet. 9= Insert screws into bottom holes on left side of dryer to gently remove 4 hinge hole plugs (D) on the side where hinges were just removed. 1. Place towel (A) on top of cabinet....
... off screws. Use a small, flat-blade screwdriver to avoid damaging surface. 2. Tighten screws. Slide door up so screws are in bottom of dryer. Tighten screws. Youcanchangyeourdoorswingfromaright-sidoepening to door. 5. Set door (handle side up so screws are in bottom of the hinge. 8= Remove door strike...cabinet side of hinges (C). Insert plugs into hinge holes on right side of cabinet. 9= Insert screws into bottom holes on left side of dryer to gently remove 4 hinge hole plugs (D) on the side where hinges were just removed. 1. Place towel (A) on top of cabinet....
Installation Instructions
Page 15
... vent is needed, slide door catch left or right within slot to see what was skipped. 2. See "Level Dryer." 6. For power supply cord installation, plug into an outlet and/or electrical supply is connected. • Household fuse is intact and tight, or circuit breaker has not tripped. •...; Dryer door is an extra part, go away. 15 Remove film on the console and any dust. 10. g. Wipe dryer drum interior thoroughly with screw. Select...
... vent is needed, slide door catch left or right within slot to see what was skipped. 2. See "Level Dryer." 6. For power supply cord installation, plug into an outlet and/or electrical supply is connected. • Household fuse is intact and tight, or circuit breaker has not tripped. •...; Dryer door is an extra part, go away. 15 Remove film on the console and any dust. 10. g. Wipe dryer drum interior thoroughly with screw. Select...


