
Use and Care Guide
Page 2
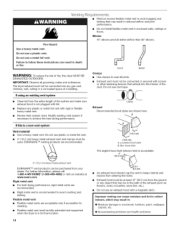
...-827-6655. TABLE OF CONTENTS PROTECTION AGREEMENTS PROTECTION AGREEMENTS 2 WARRANTY 3 DRYER SAFETY 4 INSTALLATION INSTRUCTIONS 5 Tools and Parts 5 Optional Pedestal 5 Location Requirements 5 Electrical Requirements 8 Electrical Connection 9 Venting Requirements 14 Plan Vent System 15 Install Vent System 16...Dryer Interior 25 Removing Accumulated Lint 26 Vacation and Moving Care 26 TROUBLESHOOTING 27 SERVICE NUMBERS BACK COVER Master Protection Agreements Congratulations on all covered repairs v' "No-lemon" guarantee - no charge for years to time. Your new Kenmore...
...-827-6655. TABLE OF CONTENTS PROTECTION AGREEMENTS PROTECTION AGREEMENTS 2 WARRANTY 3 DRYER SAFETY 4 INSTALLATION INSTRUCTIONS 5 Tools and Parts 5 Optional Pedestal 5 Location Requirements 5 Electrical Requirements 8 Electrical Connection 9 Venting Requirements 14 Plan Vent System 15 Install Vent System 16...Dryer Interior 25 Removing Accumulated Lint 26 Vacation and Moving Care 26 TROUBLESHOOTING 27 SERVICE NUMBERS BACK COVER Master Protection Agreements Congratulations on all covered repairs v' "No-lemon" guarantee - no charge for years to time. Your new Kenmore...
Use and Care Guide
Page 4
... to dry articles containing foam rubber or similarly textured rubber-like materials. [] Clean lint screen before using the dryer, follow instructions. SAVE THESE iNSTRUCTiONS iMPORTANT SAFETY iNSTRUCTiONS WARNING: To reduce the risk of fire, electric shock, or injury to the weather. [] Do not tamper with gasoline, drycleaning solvents, or other flammable or...
... to dry articles containing foam rubber or similarly textured rubber-like materials. [] Clean lint screen before using the dryer, follow instructions. SAVE THESE iNSTRUCTiONS iMPORTANT SAFETY iNSTRUCTiONS WARNING: To reduce the risk of fire, electric shock, or injury to the weather. [] Do not tamper with gasoline, drycleaning solvents, or other flammable or...
Use and Care Guide
Page 5
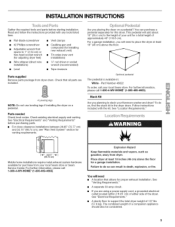
Read and follow the instructions provided with the kit. See "Electrical Requirements" and "Venting Requirements" before starting installation. You can result in : White - Part Number 46822 To order, call your Kenmore washer and dryer? Follow instructions included with any tools listed here. • ... all parts are using a power supply cord, a grounded electrical outlet located within 2 ft (61 cm) of either side of approximately 46" (116.8 cm). For a garage installation, you planning to support the total dryer weight of a companion appliance should also be considered. I_-...
Read and follow the instructions provided with the kit. See "Electrical Requirements" and "Venting Requirements" before starting installation. You can result in : White - Part Number 46822 To order, call your Kenmore washer and dryer? Follow instructions included with any tools listed here. • ... all parts are using a power supply cord, a grounded electrical outlet located within 2 ft (61 cm) of either side of approximately 46" (116.8 cm). For a garage installation, you planning to support the total dryer weight of a companion appliance should also be considered. I_-...

Use and Care Guide
Page 6
..."-_s1"**l (2.5 cm) (72.77cm) (12.7crn) A _8"* (7.6 crn) 7 B A. Installation spacing for this dryer. For closet installation, with vents *Required spacing **For side or bottom venting, 0" (0 cm) spacing is allowed. Closet... correctliyf dryerisnotlevel. • Foragarageinstallatioyno,uwillneedtoplacethedryear t leas1t 8"(46cm)abovethefloorI.fusingapedestayl,ouwill need18"(46cm)tothebottomofthedryer. This dryer has been tested for custom undercounter installation Custom undercounter installation - t lowetremperaturtehse,dryemr ighnt otshutoffattheendofan automatcicycleD. ...
..."-_s1"**l (2.5 cm) (72.77cm) (12.7crn) A _8"* (7.6 crn) 7 B A. Installation spacing for this dryer. For closet installation, with vents *Required spacing **For side or bottom venting, 0" (0 cm) spacing is allowed. Closet... correctliyf dryerisnotlevel. • Foragarageinstallatioyno,uwillneedtoplacethedryear t leas1t 8"(46cm)abovethefloorI.fusingapedestayl,ouwill need18"(46cm)tothebottomofthedryer. This dryer has been tested for custom undercounter installation Custom undercounter installation - t lowetremperaturtehse,dryemr ighnt otshutoffattheendofan automatcicycleD. ...

Use and Care Guide
Page 7
... Standard, Title 24 CFR, Part 3280 (formerly the Federal Standard for mobile home installations. additional installation requirements This dryer is suitable for Mobile Home Construction and Safety, Title 24, HUD Part 280). Minimum installation spacing for cabinet installation... ' 1" {2.5 cm) *For side or bottom venting, 0" (0 cm) spacing is allowed. Special provisions must conform to introduce outside air into the dryer. Recommended installation spacing for purchase from your local Sears store or Sears Service Center. The opening (such as a nearby window) should be made in ....
... Standard, Title 24 CFR, Part 3280 (formerly the Federal Standard for mobile home installations. additional installation requirements This dryer is suitable for Mobile Home Construction and Safety, Title 24, HUD Part 280). Minimum installation spacing for cabinet installation... ' 1" {2.5 cm) *For side or bottom venting, 0" (0 cm) spacing is allowed. Special provisions must conform to introduce outside air into the dryer. Recommended installation spacing for purchase from your local Sears store or Sears Service Center. The opening (such as a nearby window) should be made in ....
Use and Care Guide
Page 8
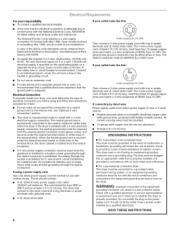
...and all local codes and ordinances. Do not have three 10-gauge copper wires and match a 3-wire receptacle of electric shock. This dryer is prohibited for (1) new branch-circuit installations, (2) mobile homes, (3) recreational vehicles, and (4) areas where local ...dryer, you must have a fuse in accordance with ring or spade terminals and UL listed strain relief. Electrical Connection To properly install your outlet looks like this : 3-wire receptacle (10-30R) Then choose a 3-wire power supply cord with all mobile home installations. The 3-wire power supply cord, at least 4 ft...
...and all local codes and ordinances. Do not have three 10-gauge copper wires and match a 3-wire receptacle of electric shock. This dryer is prohibited for (1) new branch-circuit installations, (2) mobile homes, (3) recreational vehicles, and (4) areas where local ...dryer, you must have a fuse in accordance with ring or spade terminals and UL listed strain relief. Electrical Connection To properly install your outlet looks like this : 3-wire receptacle (10-30R) Then choose a 3-wire power supply cord with all mobile home installations. The 3-wire power supply cord, at least 4 ft...

Use and Care Guide
Page 10
...dryer cabinet and be connecting to: Go to "Optional 3-wire connection" section. 4-wire connection: Power supply cord IMPORTANT: A 4-wire connection is required for your home has: And you will be in a horizontal position. Reaching inside the strain relief. Removable conduit connector B. Hole below the terminal block opening. Neutral prong E. Electrical... Connection Options If your type of electrical connection: 4-wire (recommended) 3-wire (if 4-wire is inside the terminal...
...dryer cabinet and be connecting to: Go to "Optional 3-wire connection" section. 4-wire connection: Power supply cord IMPORTANT: A 4-wire connection is required for your home has: And you will be in a horizontal position. Reaching inside the strain relief. Removable conduit connector B. Hole below the terminal block opening. Neutral prong E. Electrical... Connection Options If your type of electrical connection: 4-wire (recommended) 3-wire (if 4-wire is inside the terminal...

Use and Care Guide
Page 11
...screw. 2. A. Neutral wire (white or center wire) E. Squeeze hooked ends together. Secure cover with hold-down screw. 7, You have 5 ft (1.52 m) of cable, leaving bare ground wire at 5" (12.7 cm). Center silver-colored terminal block screw C. External ground conductor screw - ...wires to "Venting Requirements." Neutral ground wire D. Direct wire cable must have completed your electrical connection. Remove neutral ground wire from 3 remaining wires. Ground wire (green or bare) of dryer rear panel. A. 1, Remove center silver-colored terminal block screw. 2. Tighten screw. ...
...screw. 2. A. Neutral wire (white or center wire) E. Squeeze hooked ends together. Secure cover with hold-down screw. 7, You have 5 ft (1.52 m) of cable, leaving bare ground wire at 5" (12.7 cm). Center silver-colored terminal block screw C. External ground conductor screw - ...wires to "Venting Requirements." Neutral ground wire D. Direct wire cable must have completed your electrical connection. Remove neutral ground wire from 3 remaining wires. Ground wire (green or bare) of dryer rear panel. A. 1, Remove center silver-colored terminal block screw. 2. Tighten screw. ...

Use and Care Guide
Page 12
... local codes permit connecting cabinet-ground conductor to external ground conductor screw. You have completed your electrical connection. Strip insulation back 1" (2.5 cm). Connect ground wire (green or bare) of dryer rear panel. Loosen or remove center silver-colored terminal block screw. 2. Connect neutral wire (white...connecting cabinet-ground conductor to outer terminal block screws. Direct wire cable must have 5 ft (1.52 m) of cable. Strip 31/2'' (8.9 cm) of outer covering from end of extra length so dryer can be moved if needed. If using 3-wire cable with ground wire, cut ...
... local codes permit connecting cabinet-ground conductor to external ground conductor screw. You have completed your electrical connection. Strip insulation back 1" (2.5 cm). Connect ground wire (green or bare) of dryer rear panel. Loosen or remove center silver-colored terminal block screw. 2. Connect neutral wire (white...connecting cabinet-ground conductor to outer terminal block screws. Direct wire cable must have 5 ft (1.52 m) of cable. Strip 31/2'' (8.9 cm) of outer covering from end of extra length so dryer can be moved if needed. If using 3-wire cable with ground wire, cut ...

Use and Care Guide
Page 13
... to outer terminal block screws. A. Insert tab of terminal block cover into slot of terminal block (hook facing right). You have completed your electrical connection. External ground conductor screw B. Secure cover with hold -down screw. 6. Tighten screws. !! !! 4. Neutral wire (white or center ...Tighten screw. Neutral wire (white or center wire) EL_" (1.9 cm) UL Iisted strain relief 3= Place the hooked ends of dryer rear panel. Neutral ground wire C. Squeeze hooked end together. Center silver-colored terminal block screw C. Remove neutral ground wire from the...
... to outer terminal block screws. A. Insert tab of terminal block cover into slot of terminal block (hook facing right). You have completed your electrical connection. External ground conductor screw B. Secure cover with hold -down screw. 6. Tighten screws. !! !! 4. Neutral wire (white or center ...Tighten screw. Neutral wire (white or center wire) EL_" (1.9 cm) UL Iisted strain relief 3= Place the hooked ends of dryer rear panel. Neutral ground wire C. Squeeze hooked end together. Center silver-colored terminal block screw C. Remove neutral ground wire from the...
Use and Care Guide
Page 14
...B. DURASAFE TM venting products are acceptable only if accessible for cleaning. • Flexible metal vent must not be fully extended and supported when the dryer is a new vent system Vent material • Use a heavy metal vent. Flexible metal vent • Flexible metal vents are recommended. •...; Remove excess flexible metal vent to follow these instructions can be used. The dryer exhaust must be connected into the interior of the duct. WARNING: To reduce the risk of the exhaust (such as flowers, rocks or...
...B. DURASAFE TM venting products are acceptable only if accessible for cleaning. • Flexible metal vent must not be fully extended and supported when the dryer is a new vent system Vent material • Use a heavy metal vent. Flexible metal vent • Flexible metal vents are recommended. •...; Remove excess flexible metal vent to follow these instructions can be used. The dryer exhaust must be connected into the interior of the duct. WARNING: To reduce the risk of the exhaust (such as flowers, rocks or...

Use and Care Guide
Page 15
...exhaust installation C. Standard rear offset exhaust installation B. Bottom exhaust installation (not an option with dryer vent to wall vent mismatch): Part Number 26-49901 - Two close clearances Venting systems come in death, fire, electrical shock, or serious injury. Refer to connect elbows H. i/ I II A ..... Vent length.... • Bend vent gradually to avoid kinking. • Use the fewest 90 ° turns possible. 15 This dryer can result in many varieties. Failure to follow these instructions can be securely fastened to a noncombustible portion of the...
...exhaust installation C. Standard rear offset exhaust installation B. Bottom exhaust installation (not an option with dryer vent to wall vent mismatch): Part Number 26-49901 - Two close clearances Venting systems come in death, fire, electrical shock, or serious injury. Refer to connect elbows H. i/ I II A ..... Vent length.... • Bend vent gradually to avoid kinking. • Use the fewest 90 ° turns possible. 15 This dryer can result in many varieties. Failure to follow these instructions can be securely fastened to a noncombustible portion of the...
Use and Care Guide
Page 16
... 54 ft (16.5 m) 48 ft (14.6 m) Flexible metal 31 ft (9.4 m) 23 ft (7 m) 2 Rigid metal 44 ft (13.4 m) 38 ft (11.6 m) Flexible metal 27 ft (8.2 m) 19 ft (5.8 m) 3 Rigid metal 35 ft (10.7 m) 29 ft (8.8 m) Flexible metal 25 ft (7.6 m) 17 ft (5.2 m) 4 Rigid metal 27 ft (8.2 m) 21 ft (6.4 m) Flexible metal 23 ft (7 m) 15 ft (4.6 m) Excessive Weight Hazard Use two or more people to do so can result in dryer. Failure...
... 54 ft (16.5 m) 48 ft (14.6 m) Flexible metal 31 ft (9.4 m) 23 ft (7 m) 2 Rigid metal 44 ft (13.4 m) 38 ft (11.6 m) Flexible metal 27 ft (8.2 m) 19 ft (5.8 m) 3 Rigid metal 35 ft (10.7 m) 29 ft (8.8 m) Flexible metal 25 ft (7.6 m) 17 ft (5.2 m) 4 Rigid metal 27 ft (8.2 m) 21 ft (6.4 m) Flexible metal 23 ft (7 m) 15 ft (4.6 m) Excessive Weight Hazard Use two or more people to do so can result in dryer. Failure...

Use and Care Guide
Page 17
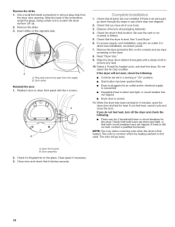
.... 5. Use a small flat-blade screwdriver to a left-side opening, if desired. 1. Door assembly 2. Remove the 4 screws that hold the door hinge on top of the dryer. To fit correctly, the inner door assembly edge fits completely inside the outer door assembly. Place a towel or soft cloth on the front panel of...
.... 5. Use a small flat-blade screwdriver to a left-side opening, if desired. 1. Door assembly 2. Remove the 4 screws that hold the door hinge on top of the dryer. To fit correctly, the inner door assembly edge fits completely inside the outer door assembly. Place a towel or soft cloth on the front panel of...
Use and Care Guide
Page 18
... or "On" position. • Start button has been pushed firmly. • Dryer is plugged into an outlet. Check the dryer's final location. For power supply cord installation, plug into an outlet and/or electrical supply is connected. • Household fuse is intact and tight, or circuit breaker ...has not tripped. • Dryer door is not crushed or kinked. 5. Remove the strike 3. The odor will not start the dryer. Do not select the Air Only ...
... or "On" position. • Start button has been pushed firmly. • Dryer is plugged into an outlet. Check the dryer's final location. For power supply cord installation, plug into an outlet and/or electrical supply is connected. • Household fuse is intact and tight, or circuit breaker ...has not tripped. • Dryer door is not crushed or kinked. 5. Remove the strike 3. The odor will not start the dryer. Do not select the Air Only ...

Use and Care Guide
Page 19
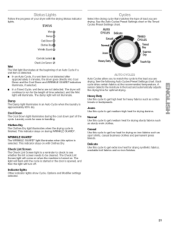
...for more detailed information, 1. The preset settings for the selected dryness level. During the first few minutes of fire, electric shock, or injury to adjust how dry you want the load. To make changes to Normal. Adjust Dryness Level and/...." 2. STATUS Wet _ Cool DDaomwpn_Qj[ Power AUTO CYCLES Delicate Casual WriCnkloletheGsuaDrrdy_O _MoNreormal Jeans Controls Locked Check Lint Screen _ Dryness Level AbO CYCSO_aY DRYER USE TIMED d' _, \t;,N E0 _IME _2Fr_A¢4,/_ CYCLTEiSmed O_edcyele _,ETL/_ DErxypress Dry Touch Up i_ust #_"._ r.kl_ _0C_ MODIFIERS & OPTIONS ...
...for more detailed information, 1. The preset settings for the selected dryness level. During the first few minutes of fire, electric shock, or injury to adjust how dry you want the load. To make changes to Normal. Adjust Dryness Level and/...." 2. STATUS Wet _ Cool DDaomwpn_Qj[ Power AUTO CYCLES Delicate Casual WriCnkloletheGsuaDrrdy_O _MoNreormal Jeans Controls Locked Check Lint Screen _ Dryness Level AbO CYCSO_aY DRYER USE TIMED d' _, \t;,N E0 _IME _2Fr_A¢4,/_ CYCLTEiSmed O_edcyele _,ETL/_ DErxypress Dry Touch Up i_ust #_"._ r.kl_ _0C_ MODIFIERS & OPTIONS ...

Use and Care Guide
Page 20
...for approximately 1 second until the desired drying time is the estimated time remaining in the cycle. To make changes to prevent unintended use of the dryer. To end/cancel your settings to Time and/or Options during a Timed Cycle: • Press STOP once. • Adjust the Time ...displayed is displayed. The indicator light turns off . 7. Be sure the door is selected. Cool Down tumbles the load without heat during dryer operation. Follow package instructions. • To reduce wrinkling, remove the load from where the cycle was interrupted if you cannot modify temperature ...
...for approximately 1 second until the desired drying time is the estimated time remaining in the cycle. To make changes to prevent unintended use of the dryer. To end/cancel your settings to Time and/or Options during a Timed Cycle: • Press STOP once. • Adjust the Time ...displayed is displayed. The indicator light turns off . 7. Be sure the door is selected. Cool Down tumbles the load without heat during dryer operation. Follow package instructions. • To reduce wrinkling, remove the load from where the cycle was interrupted if you cannot modify temperature ...
Use and Care Guide
Page 21
... Down and WRINKLE GUARD®indicators illuminate, if selected. • In a Timed Cycle, wet items are drying. Follow the progress of your dryer with Clothes Dry. In an Auto Cycle, if a wet item is turned on with the drying Status indicator lights. Laundry cools for optimal drying...denims. Normal Use this option is detected. Delicate Use this cycle to get medium-high heat for drying no -iron finishes. 21 The dryer will turn off. Damp The Damp light illuminates in handling. See the Auto Cycles Preset Settings chart or the Timed Cycles Preset Settings chart...
... Down and WRINKLE GUARD®indicators illuminate, if selected. • In a Timed Cycle, wet items are drying. Follow the progress of your dryer with Clothes Dry. In an Auto Cycle, if a wet item is turned on with the drying Status indicator lights. Laundry cools for optimal drying...denims. Normal Use this option is detected. Delicate Use this cycle to get medium-high heat for drying no -iron finishes. 21 The dryer will turn off. Damp The Damp light illuminates in handling. See the Auto Cycles Preset Settings chart or the Timed Cycles Preset Settings chart...

Use and Care Guide
Page 22
... a specific amount of drying time and a drying temperature. NOTE: Air Only is selected, the Estimated Time Remaining display shows the actual time remaining in the dryer too long. Use Timed Cycles to complete drying, if needed. Timed Dry Use this cycle to dry. Touch Up Use this cycle to select temperatures...
... a specific amount of drying time and a drying temperature. NOTE: Air Only is selected, the Estimated Time Remaining display shows the actual time remaining in the dryer too long. Use Timed Cycles to complete drying, if needed. Timed Dry Use this cycle to dry. Touch Up Use this cycle to select temperatures...

Use and Care Guide
Page 23
...GUARD _ 90 ends. Press and hold START. NOTE: If you select the Normal cycle. To use . A A. During this option, the dryer periodically starts and stops, tumbling the load for items that form when you do not press Start within 5 minutes of the cycle reduces wrinkling.... If you cannot unload the dryer promptly at any packing material before the selected Modifier or Option begins. 1. Changing Modifiers and Options after pressing Start 1. O WrinkleGuard90 CycleSignal ...
...GUARD _ 90 ends. Press and hold START. NOTE: If you select the Normal cycle. To use . A A. During this option, the dryer periodically starts and stops, tumbling the load for items that form when you do not press Start within 5 minutes of the cycle reduces wrinkling.... If you cannot unload the dryer promptly at any packing material before the selected Modifier or Option begins. 1. Changing Modifiers and Options after pressing Start 1. O WrinkleGuard90 CycleSignal ...


