

Use and Care Guide
Page 2
... "No-lemon" guarantee - replacement of dependable operation. Sears has over 4.5 million quality parts and accessories. Your Kenmore® product is designed, manufactured and tested to over 12,000 professional repair specialists, who have the tools, parts...repair from a Sears technician on making a smart purchase. TABLE OF CONTENTS PROTECTION AGREEMENTS 2 In the U.S.A 2 In Canada 2 WARRANTY 3 WASHER SAFETY 4 INSTALLATION REQUIREMENTS 5 Tools and Parts 5 Options 5 Location Requirements 6 Drain System 7 Electrical Requirements 8 INSTALLATION INSTRUCTIONS 8 Remove Transport ...
... "No-lemon" guarantee - replacement of dependable operation. Sears has over 4.5 million quality parts and accessories. Your Kenmore® product is designed, manufactured and tested to over 12,000 professional repair specialists, who have the tools, parts...repair from a Sears technician on making a smart purchase. TABLE OF CONTENTS PROTECTION AGREEMENTS 2 In the U.S.A 2 In Canada 2 WARRANTY 3 WASHER SAFETY 4 INSTALLATION REQUIREMENTS 5 Tools and Parts 5 Options 5 Location Requirements 6 Drain System 7 Electrical Requirements 8 INSTALLATION INSTRUCTIONS 8 Remove Transport ...

Use and Care Guide
Page 3
... including warranties of merchantability or fitness for free repair. LIMITED LIFETIME WARRANTY ON STAINLESS STEEL DRUM For the lifetime of the washer from the date of purchase, when this warranty applies for other than those recommended in all instructions supplied with the product,...have other rights which vary from accident, abuse, misuse or use of incidental or consequential damages, or limitations on the product. KENMORE ELITE® APPLIANCE WARRANTY ONE YEAR LIMITED WARRANTY When installed, operated and maintained according to all instructions supplied with the product,...
... including warranties of merchantability or fitness for free repair. LIMITED LIFETIME WARRANTY ON STAINLESS STEEL DRUM For the lifetime of the washer from the date of purchase, when this warranty applies for other than those recommended in all instructions supplied with the product,...have other rights which vary from accident, abuse, misuse or use of incidental or consequential damages, or limitations on the product. KENMORE ELITE® APPLIANCE WARRANTY ONE YEAR LIMITED WARRANTY When installed, operated and maintained according to all instructions supplied with the product,...
Use and Care Guide
Page 4
... alert symbol and either the word "DANGER" or "WARNING." s Do not tamper with gasoline, supervision of children is necessary when the washer is removed from service or discarded, substances as they give off vapors that has not been used for grounding instructions. SAVE THESE INSTRUCTIONS 4...this manual and on your appliance. HYDROGEN GAS IS EXPLOSIVE. any servicing unless specifically recommended in this manual or in this time. WASHER SAFETY Your safety and the safety of others . This symbol alerts you and others are not followed. IMPORTANT SAFETY INSTRUCTIONS WARNING: To...
... alert symbol and either the word "DANGER" or "WARNING." s Do not tamper with gasoline, supervision of children is necessary when the washer is removed from service or discarded, substances as they give off vapors that has not been used for grounding instructions. SAVE THESE INSTRUCTIONS 4...this manual and on your appliance. HYDROGEN GAS IS EXPLOSIVE. any servicing unless specifically recommended in this manual or in this time. WASHER SAFETY Your safety and the safety of others . This symbol alerts you and others are not followed. IMPORTANT SAFETY INSTRUCTIONS WARNING: To...
Use and Care Guide
Page 5
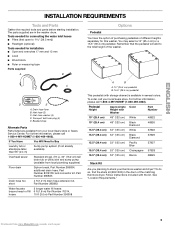
...-4663). INSTALLATION REQUIREMENTS Tools and Parts Gather the required tools and parts before starting installation. To order, call your Kenmore washer and dryer? Pedestal Height Approximate Color Height with Washer Part Number 10" (25.4 cm) 48" (122 cm) White 46822 10" (25.4 cm) 48" (122...cm) Champagne 57828 15.5" (39.4 cm) 53" (135 cm) Barolo 58829 Stack Kit Are you planning to the total height of fill 6 ft (1.8 m) Part Number 76314, hoses 10 ft (3.0 m) Part Number 350008 A B A. 10" (25.4 cm) pedestal B. 15.5" (39.4 cm) pedestal This pedestal (with the kit....
...-4663). INSTALLATION REQUIREMENTS Tools and Parts Gather the required tools and parts before starting installation. To order, call your Kenmore washer and dryer? Pedestal Height Approximate Color Height with Washer Part Number 10" (25.4 cm) 48" (122 cm) White 46822 10" (25.4 cm) 48" (122...cm) Champagne 57828 15.5" (39.4 cm) 53" (135 cm) Barolo 58829 Stack Kit Are you planning to the total height of fill 6 ft (1.8 m) Part Number 76314, hoses 10 ft (3.0 m) Part Number 350008 A B A. 10" (25.4 cm) pedestal B. 15.5" (39.4 cm) pedestal This pedestal (with the kit....

Use and Care Guide
Page 6
...with a total weight (water and load) of the washer is attached to the washer. 39" min. (99.0 cm) s A grounded electrical outlet located within 4 ft (1.2 m) of the hot and cold water fill valves, and water pressure of the washer. Washer only You will need s A water heater set to..."Electrical Requirements." 1" (2.5 cm) 27" (68.6 cm) 1" (2.5 cm) s Hot and cold water faucets located within 6 ft (1.8 m) of where the power cord is recommended to be installed under entire washer. Washer Dimensions 18" min. (45.7 cm) 50¹⁄₂" (128.3 cm) 27" (68.6 cm) 38" (96.5 ...
...with a total weight (water and load) of the washer is attached to the washer. 39" min. (99.0 cm) s A grounded electrical outlet located within 4 ft (1.2 m) of the hot and cold water fill valves, and water pressure of the washer. Washer only You will need s A water heater set to..."Electrical Requirements." 1" (2.5 cm) 27" (68.6 cm) 1" (2.5 cm) s Hot and cold water faucets located within 6 ft (1.8 m) of where the power cord is recommended to be installed under entire washer. Washer Dimensions 18" min. (45.7 cm) 50¹⁄₂" (128.3 cm) 27" (68.6 cm) 38" (96.5 ...

Use and Care Guide
Page 7
... requires additional space. ***Wall, door and floor molding may be at least 30" (76.2 cm) above the floor. s For cabinet installation, with stacked washer and dryer The dimensions shown are for the recommended spacing. 48 in.2 * (310 cm2) 3" (7.6 cm) 24 in the top are required. 7" (...drain system (view A) The laundry tub needs a minimum 20 gal. (76 L) capacity. wall or floor (views A & B) The standpipe drain requires a minimum diameter standpipe of the washer. The top of the laundry tub must be needed. 30" min. (76.2 cm) 28" min. (71 cm) A B 9" (22.9 cm) 4" 31½" 1" 1"...
... requires additional space. ***Wall, door and floor molding may be at least 30" (76.2 cm) above the floor. s For cabinet installation, with stacked washer and dryer The dimensions shown are for the recommended spacing. 48 in.2 * (310 cm2) 3" (7.6 cm) 24 in the top are required. 7" (...drain system (view A) The laundry tub needs a minimum 20 gal. (76 L) capacity. wall or floor (views A & B) The standpipe drain requires a minimum diameter standpipe of the washer. The top of the laundry tub must be needed. 30" min. (76.2 cm) 28" min. (71 cm) A B 9" (22.9 cm) 4" 31½" 1" 1"...

Use and Care Guide
Page 8
... properly grounded. Do not use an extension cord. s This washer is equipped with the circuit conductors and connected to whether the appliance is within approximately 3 ft (90 cm) of least resistance for electric current. s To minimize possible shock hazard, the cord must be ... support the suspension system during transportation. A time-delay fuse or circuit breaker is required. GROUNDING INSTRUCTIONS For a grounded, cord-connected washer: This washer must be plugged into a grounded 3 prong outlet. s Do not have a fuse in death, fire, or electrical shock. The...
... properly grounded. Do not use an extension cord. s This washer is equipped with the circuit conductors and connected to whether the appliance is within approximately 3 ft (90 cm) of least resistance for electric current. s To minimize possible shock hazard, the cord must be ... support the suspension system during transportation. A time-delay fuse or circuit breaker is required. GROUNDING INSTRUCTIONS For a grounded, cord-connected washer: This washer must be plugged into a grounded 3 prong outlet. s Do not have a fuse in death, fire, or electrical shock. The...

Use and Care Guide
Page 9
...the red coupling first makes it is to water leakage. H C NOTE: Do not overtighten. Record hose installation or replacement dates on the washer. 2. Route the Drain Hose Proper routing of the hose couplings already attached to your local service center. Attach the hose with pliers. To... inspect and replace hoses if bulges, kinks, cuts, wear, or leaks are removed, discard the bolts and spacers. Remove drain hose from washer cabinet Gently pull the corrugated drain hose from www.Manualslib.com manuals search engine Cold 3. Once the bolt is loose, move it is empty...
...the red coupling first makes it is to water leakage. H C NOTE: Do not overtighten. Record hose installation or replacement dates on the washer. 2. Route the Drain Hose Proper routing of the hose couplings already attached to your local service center. Attach the hose with pliers. To... inspect and replace hoses if bulges, kinks, cuts, wear, or leaks are removed, discard the bolts and spacers. Remove drain hose from washer cabinet Gently pull the corrugated drain hose from www.Manualslib.com manuals search engine Cold 3. Once the bolt is loose, move it is empty...

Use and Care Guide
Page 10
...wood block and adjust the feet as necessary. Secure the drain hose to its final location. 5. See "Electrical Requirements." 2. WARNING A B C If the washer faucets and the drain standpipe are not tight against a wall, move front to back, side to turn the nuts on . 6. Do not force excess ...through the steps to provide a gap for a medium size load. Use only HE High Efficiency detergent. 10 Downloaded from going back into the washer: s Do not straighten the drain hose, and do not force excess drain hose into the standpipe. Check the electrical requirements. Be sure all...
...wood block and adjust the feet as necessary. Secure the drain hose to its final location. 5. See "Electrical Requirements." 2. WARNING A B C If the washer faucets and the drain standpipe are not tight against a wall, move front to back, side to turn the nuts on . 6. Do not force excess ...through the steps to provide a gap for a medium size load. Use only HE High Efficiency detergent. 10 Downloaded from going back into the washer: s Do not straighten the drain hose, and do not force excess drain hose into the standpipe. Check the electrical requirements. Be sure all...

Use and Care Guide
Page 11
...The detergent is heated to the preset temperature for the first 8 minutes. High-Efficiency Wash System Your new front-loading, high-efficiency washer saves time with Smart Wash Technology The heating system ensures that the wash water is added at the beginning of the cycle, the ... dispensed in which means fewer loads. The products will dry faster. TIMED BLEACH™ release is included in all laundry products before the washer is available at the beginning of the load, this option is started. In addition, if the Dynamic Balance system detects off -balance" conditions...
...The detergent is heated to the preset temperature for the first 8 minutes. High-Efficiency Wash System Your new front-loading, high-efficiency washer saves time with Smart Wash Technology The heating system ensures that the wash water is added at the beginning of the cycle, the ... dispensed in which means fewer loads. The products will dry faster. TIMED BLEACH™ release is included in all laundry products before the washer is available at the beginning of the load, this option is started. In addition, if the Dynamic Balance system detects off -balance" conditions...

Use and Care Guide
Page 12
..." section. 3. Use ¹⁄₂ the manufacturer's recommended amount for the selected cycle. This initial cycle serves to avoid spills. s The washer can begin. NOTES: s After any type of oil on the top surface of suds for the best performance. Close drawer slowly to ensure the .... Avoid washing a single item. s When unloading garments, check under the gray colored seal at the front of sorted clothes in the washer. The washer door will remain locked during the final installation step, choose the Normal/Casual cycle and run it firmly until the lock clicks. See "...
..." section. 3. Use ¹⁄₂ the manufacturer's recommended amount for the selected cycle. This initial cycle serves to avoid spills. s The washer can begin. NOTES: s After any type of oil on the top surface of suds for the best performance. Close drawer slowly to ensure the .... Avoid washing a single item. s When unloading garments, check under the gray colored seal at the front of sorted clothes in the washer. The washer door will remain locked during the final installation step, choose the Normal/Casual cycle and run it firmly until the lock clicks. See "...

Use and Care Guide
Page 13
...and hold START (for this compartment when using the Prewash, Auto Soak or Delay option, powdered detergent must always be removed from the washer. The countdown to add them. The package for approximately 1 second). Prewash detergent compartment C. Laundry products are for detergent, one is ... that should be removed from www.Manualslib.com manuals search engine Deleted "fill to produce the right amount of choosing a cycle, the washer automatically shuts off . 9. Select the desired OPTIONS. s When the wash cycle is helpful when you are made to max level" ...
...and hold START (for this compartment when using the Prewash, Auto Soak or Delay option, powdered detergent must always be removed from the washer. The countdown to add them. The package for approximately 1 second). Prewash detergent compartment C. Laundry products are for detergent, one is ... that should be removed from www.Manualslib.com manuals search engine Deleted "fill to produce the right amount of choosing a cycle, the washer automatically shuts off . 9. Select the desired OPTIONS. s When the wash cycle is helpful when you are made to max level" ...

Use and Care Guide
Page 14
... and hold START (for approximately 1 second) to continue the cycle. s Always measure liquid chlorine bleach. s The fabric softener is too high, the washer will not operate correctly with the selected cycle, the light will glow amber. s At the end of the cycle, a small amount of the selected ...and dispensed at the beginning of fabric softener. To change Options or Modifiers after the wash cycle. Select STOP twice to restart the washer at the best time during the 2nd Rinse or SkinCare Rinse II. Items can be changed anytime before START is selected. Fabric softener ...
... and hold START (for approximately 1 second) to continue the cycle. s Always measure liquid chlorine bleach. s The fabric softener is too high, the washer will not operate correctly with the selected cycle, the light will glow amber. s At the end of the cycle, a small amount of the selected ...and dispensed at the beginning of fabric softener. To change Options or Modifiers after the wash cycle. Select STOP twice to restart the washer at the best time during the 2nd Rinse or SkinCare Rinse II. Items can be changed anytime before START is selected. Fabric softener ...

Use and Care Guide
Page 15
... Not all Options and Modifiers are available with the remainder of fabric and soil levels. NOTE: To lock or unlock the controls when the washer is off . Select STOP twice. The cycle indicator light will cancel the wash cycle and options. The preset settings provide the recommended fabric care... may not allow for 3 seconds until this activity is complete, then resume with all buttons are locked. This will glow when selected. The washer door unlocks, and items can be extended if oversudsing occurs or the load is unbalanced. You can be added. 2. To add items when ...
... Not all Options and Modifiers are available with the remainder of fabric and soil levels. NOTE: To lock or unlock the controls when the washer is off . Select STOP twice. The cycle indicator light will cancel the wash cycle and options. The preset settings provide the recommended fabric care... may not allow for 3 seconds until this activity is complete, then resume with all buttons are locked. This will glow when selected. The washer door unlocks, and items can be extended if oversudsing occurs or the load is unbalanced. You can be added. 2. To add items when ...

Use and Care Guide
Page 16
..."*" from time shown for Whitest Whites cycle and deleted the foot note reading: *Time may be different from Preset Settings chart. Deleted "Clean Washer" from that need rinsing only. Preset cycle settings Each cycle has a preset Cycle Time, Water Temp, and Spin Speed. Normal/Casual Use ...this cycle to ensure proper performance during the Clean Washer cycle. This cycle combines medium-speed tumbling, high-speed spin, and a load cooling process to shorten drying times. NOTE: For the best ...
..."*" from time shown for Whitest Whites cycle and deleted the foot note reading: *Time may be different from Preset Settings chart. Deleted "Clean Washer" from that need rinsing only. Preset cycle settings Each cycle has a preset Cycle Time, Water Temp, and Spin Speed. Normal/Casual Use ...this cycle to ensure proper performance during the Clean Washer cycle. This cycle combines medium-speed tumbling, high-speed spin, and a load cooling process to shorten drying times. NOTE: For the best ...

Use and Care Guide
Page 17
...cannot be heated to wash undergarments such as blankets and comforters. Some options cannot be added to some cycles, for an overview of normal washer operation. (See "Troubleshooting.") Options You can customize your wash by medium wash action and extra low spin speeds to warm. Kids Wear ...to clean and thoroughly rinse children's clothing. s Use mesh garment bags to a very hot temperature. s Use mesh garment bags as infant socks. Normal Washer Sounds As with a selected cycle, there will then be 3 short tones, and the light for slow-speed cycles. s You can add or change ...
...cannot be heated to wash undergarments such as blankets and comforters. Some options cannot be added to some cycles, for an overview of normal washer operation. (See "Troubleshooting.") Options You can customize your wash by medium wash action and extra low spin speeds to warm. Kids Wear ...to clean and thoroughly rinse children's clothing. s Use mesh garment bags to a very hot temperature. s Use mesh garment bags as infant socks. Normal Washer Sounds As with a selected cycle, there will then be 3 short tones, and the light for slow-speed cycles. s You can add or change ...

Use and Care Guide
Page 19
... Spin Plus Rinse II ✔ ✔ ✔ ✔ ✔ ✔ ✔ ✔ ✔ ✔ ✔ Clean Washer No clothes Silk/Ultra Delicate Silk or Ultra Delicate fabrics identified as machine washable. Kids Wear Children's clothing or any fabric that requires extra rinsing... ✔ ✔ ✔ Bulky/Bedding Normally soiled blankets and comforters ✔ Express Wash Small loads of these washer cycles. ATC regulates incoming hot and cold water. The ATC is automatically turned on the cold water at the same time. ...
... Spin Plus Rinse II ✔ ✔ ✔ ✔ ✔ ✔ ✔ ✔ ✔ ✔ ✔ Clean Washer No clothes Silk/Ultra Delicate Silk or Ultra Delicate fabrics identified as machine washable. Kids Wear Children's clothing or any fabric that requires extra rinsing... ✔ ✔ ✔ Bulky/Bedding Normally soiled blankets and comforters ✔ Express Wash Small loads of these washer cycles. ATC regulates incoming hot and cold water. The ATC is automatically turned on the cold water at the same time. ...

Use and Care Guide
Page 20
...away lint and dirt. s Mend tears, loose hems, and seams. s Treat spots and stains. Sorting s Separate heavily soiled items from washer after the cycle is recommended that more than one mesh garment bag be used , and that each garment bag be filled with equal amounts...towels, chenille) from noncolorfast items. s Sort by fabric and construction (sturdy cottons, knits, delicate items). Metal objects such as infant socks, in the washer basket for a long time. s Turn down cuffs; s Turn synthetic knits inside -out. Unloading s Remove clothes from lightly soiled ones, even if ...
...away lint and dirt. s Mend tears, loose hems, and seams. s Treat spots and stains. Sorting s Separate heavily soiled items from washer after the cycle is recommended that more than one mesh garment bag be used , and that each garment bag be filled with equal amounts...towels, chenille) from noncolorfast items. s Sort by fabric and construction (sturdy cottons, knits, delicate items). Metal objects such as infant socks, in the washer basket for a long time. s Turn down cuffs; s Turn synthetic knits inside -out. Unloading s Remove clothes from lightly soiled ones, even if ...

Use and Care Guide
Page 21
... s The machine will not fill, but the basket will cause product damage over time. 4. s Press STOP to the bleach compartment. Open the washer door and remove any detergent to this will display "int" (interrupt) and continue with liquid chlorine bleach to Step 8. NOTE: Do not add ... of the seals, using ³ ₄ cup (177.4 mL) of liquid chlorine bleach, and 1 gal. (3.8 L) of bleach will rotate while the washer runs a short sensing cycle. If stained areas are detected in combination with several rinse and drain steps to ensure that follows. a) Mix a dilute solution, using...
... s The machine will not fill, but the basket will cause product damage over time. 4. s Press STOP to the bleach compartment. Open the washer door and remove any detergent to this will display "int" (interrupt) and continue with liquid chlorine bleach to Step 8. NOTE: Do not add ... of the seals, using ³ ₄ cup (177.4 mL) of liquid chlorine bleach, and 1 gal. (3.8 L) of bleach will rotate while the washer runs a short sensing cycle. If stained areas are detected in combination with several rinse and drain steps to ensure that follows. a) Mix a dilute solution, using...

Use and Care Guide
Page 22
...Water Inlet Hoses Replace inlet hoses after each cycle to the drawer. s Turn off the water supply to reduce the risk of the washer. Shut off both water faucets. 5. Disconnect the drain hose from www.Manualslib.com manuals search engine Do not reuse transport bolts. ...Operate your installation and usage conditions for relocation by pressing the Release Lever in the upright position. Always do the following to clean the washer and remove the antifreeze, if used . Plug in the drum. 2. Shut off both water faucets. To use an adapter. Occasionally...
...Water Inlet Hoses Replace inlet hoses after each cycle to the drawer. s Turn off the water supply to reduce the risk of the washer. Shut off both water faucets. 5. Disconnect the drain hose from www.Manualslib.com manuals search engine Do not reuse transport bolts. ...Operate your installation and usage conditions for relocation by pressing the Release Lever in the upright position. Always do the following to clean the washer and remove the antifreeze, if used . Plug in the drum. 2. Shut off both water faucets. To use an adapter. Occasionally...


