
Instruction Manual
Page 1
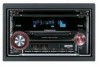
... Register your new CD-receiver. Familiarity with installation and operation procedures will help you call upon your records Record the serial number, found on the back of the unit, in the space provided below. KENWOOD DUAL DIN SIZED CD RECEIVER DPX301 INSTRUCTION MANUAL Kenwood Corporation SIRIUS* READY H)@Radio® READ y ign W. Refer to read through...
... Register your new CD-receiver. Familiarity with installation and operation procedures will help you call upon your records Record the serial number, found on the back of the unit, in the space provided below. KENWOOD DUAL DIN SIZED CD RECEIVER DPX301 INSTRUCTION MANUAL Kenwood Corporation SIRIUS* READY H)@Radio® READ y ign W. Refer to read through...
Instruction Manual
Page 2
... Track/File/Disc/Folder Repeat Scan Play Random Play Magazine Random Play Folder Select Text/Title Scroll HD Radio control features 19 About HD Radio Tuning Menu system 20 Menu System Activating Security Code Deactivating Security Code Touch Sensor Tone Manual Clock Adjustment ...-in Auxiliary input Setting CD Read Setting Demonstration mode Setting Basic Operations of remote control 26 Accessories/ Installation Procedure 28 Connecting Wires to Terminals 29 Installing the Escutcheon 30 Installation 31 Removing the Unit 32 Troubleshooting Guide 33 Specifications 36 2 I English
... Track/File/Disc/Folder Repeat Scan Play Random Play Magazine Random Play Folder Select Text/Title Scroll HD Radio control features 19 About HD Radio Tuning Menu system 20 Menu System Activating Security Code Deactivating Security Code Touch Sensor Tone Manual Clock Adjustment ...-in Auxiliary input Setting CD Read Setting Demonstration mode Setting Basic Operations of remote control 26 Accessories/ Installation Procedure 28 Connecting Wires to Terminals 29 Installing the Escutcheon 30 Installation 31 Removing the Unit 32 Troubleshooting Guide 33 Specifications 36 2 I English
Instruction Manual
Page 3
...8226; Connect the equipment into an outlet on , or inside the product relating to laser product safety. Kenwood Corporation 2967-3, ISHIKAWA-MACHI, HACHIOJI-SHI TOKYO, JAPAN KENWOOD CORP. NOTE This equipment has been tested and found to comply with the limits for help. If ... than those specified herein may result in accordance with the instructions. This equipment may cause harmful interference to radio or television reception, which the receiver is not installed and used in hazardous radiation exposure. CERTIFIES THIS EQUIPMENT CONFORMS TO DHHS REGULATIONS N0.21 CFR 1040. 10...
...8226; Connect the equipment into an outlet on , or inside the product relating to laser product safety. Kenwood Corporation 2967-3, ISHIKAWA-MACHI, HACHIOJI-SHI TOKYO, JAPAN KENWOOD CORP. NOTE This equipment has been tested and found to comply with the limits for help. If ... than those specified herein may result in accordance with the instructions. This equipment may cause harmful interference to radio or television reception, which the receiver is not installed and used in hazardous radiation exposure. CERTIFIES THIS EQUIPMENT CONFORMS TO DHHS REGULATIONS N0.21 CFR 1040. 10...
Instruction Manual
Page 4
...damage to the machine, take the following precautions: • Make sure to ground the unit to a negative 12V DC power supply. • Do not install the unit in 1998 or later can damage both your unit and the CD changer if you could damage the unit. If you use a new... to play. Safety precautions AWARNING To prevent injury or fire, take the following precautions: • To prevent a short circuit, never put or leave any Kenwood disc changers/ CD players released in . Use only the screws provided. For safety's sake, leave the mounting and wiring work to the "N" position for...
...damage to the machine, take the following precautions: • Make sure to ground the unit to a negative 12V DC power supply. • Do not install the unit in 1998 or later can damage both your unit and the CD changer if you could damage the unit. If you use a new... to play. Safety precautions AWARNING To prevent injury or fire, take the following precautions: • To prevent a short circuit, never put or leave any Kenwood disc changers/ CD players released in . Use only the screws provided. For safety's sake, leave the mounting and wiring work to the "N" position for...
Instruction Manual
Page 5
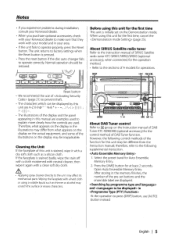
...operate properly, press the Reset button. Notes • If you experience problems during installation, consult your Kenwood dealer. • When you purchase optional accessories, check with your Kenwood dealer to make sure that they work with your area. • If the unit...Before using this unitareA-Z0-9 0 ; When using a volatile liquid such as a silicon cloth. About SIRIUS Satellite radio tuner Refer to the instruction manual of SIRIUS Satellite radio tuner KTC-SR901/SR902/SR903 (optional accessory), when connected, for the operation method. • Refer to the sections...
...operate properly, press the Reset button. Notes • If you experience problems during installation, consult your Kenwood dealer. • When you purchase optional accessories, check with your Kenwood dealer to make sure that they work with your area. • If the unit...Before using this unitareA-Z0-9 0 ; When using a volatile liquid such as a silicon cloth. About SIRIUS Satellite radio tuner Refer to the instruction manual of SIRIUS Satellite radio tuner KTC-SR901/SR902/SR903 (optional accessory), when connected, for the operation method. • Refer to the sections...

Instruction Manual
Page 28
Accessories/Installation Procedure Accessories 5. Press the reset button. Reconnect the 8 battery. 8. Always connect those wires to the car chassis (ground), you connect the ignition wire (red) and the battery wire (yellow) to the power source running through the fuse box. AWARNING If you may cause a short circuit, that in your car. 7. Install the unit in turn may start a fire. Connect the wiring harness connector to the unit. 6.
Accessories/Installation Procedure Accessories 5. Press the reset button. Reconnect the 8 battery. 8. Always connect those wires to the car chassis (ground), you connect the ignition wire (red) and the battery wire (yellow) to the power source running through the fuse box. AWARNING If you may cause a short circuit, that in your car. 7. Install the unit in turn may start a fire. Connect the wiring harness connector to the unit. 6.

Instruction Manual
Page 30
... Accessory® 3 Fold double-sided adhesive (accessory C)) along the slit and attach it fits the opening of the center console. Accessory® O ICI 30 I English Installing the Escutcheon For General Motors 1 Refer to the section (page 32) and then remove the hard rubber frame. 2 Cut out accessory © to meet the...
... Accessory® 3 Fold double-sided adhesive (accessory C)) along the slit and attach it fits the opening of the center console. Accessory® O ICI 30 I English Installing the Escutcheon For General Motors 1 Refer to the section (page 32) and then remove the hard rubber frame. 2 Cut out accessory © to meet the...
Instruction Manual
Page 31
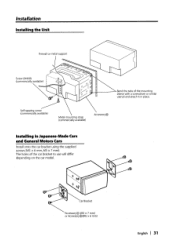
...mounting sleeve with a screwdriver or similar utensil and attach it in Japanese-Made Cars and General Motors Cars Install onto the car bracket using the supplied screws (M5 x 6 mm, M5 x 7 mm). Installation Installing the Unit Firewall or metal support Screw (M4X8) (commercially available) Bend the tabs of the car bracket... to use will differ depending on the car model. Self-tapping screw (commercially available) Metal mounting strap (commercially available) Accessory® Installing in place. Car Bracket Accessory® (MS x 7 mm) or Accessory®(M5 x 6 mm) English I 31
...mounting sleeve with a screwdriver or similar utensil and attach it in Japanese-Made Cars and General Motors Cars Install onto the car bracket using the supplied screws (M5 x 6 mm, M5 x 7 mm). Installation Installing the Unit Firewall or metal support Screw (M4X8) (commercially available) Bend the tabs of the car bracket... to use will differ depending on the car model. Self-tapping screw (commercially available) Metal mounting strap (commercially available) Accessory® Installing in place. Car Bracket Accessory® (MS x 7 mm) or Accessory®(M5 x 6 mm) English I 31

Instruction Manual
Page 36
... (±1 dB) : 20 Hz - 20 kHz Input Maximum Voltage : 1200 mV Input Impedance : 100 kQ General Operating voltage (11 - 16V allowable) : 14.4 V Current consumption : 10 A Installation Size (W x H x D) : 182 x 100 x 155 mm 7-3/16 x 3-15/16 x 6-1/8 inch Weight : 3.4 lbs (1.55 kg) 36 I English
... (±1 dB) : 20 Hz - 20 kHz Input Maximum Voltage : 1200 mV Input Impedance : 100 kQ General Operating voltage (11 - 16V allowable) : 14.4 V Current consumption : 10 A Installation Size (W x H x D) : 182 x 100 x 155 mm 7-3/16 x 3-15/16 x 6-1/8 inch Weight : 3.4 lbs (1.55 kg) 36 I English

Instruction Manual
Page 39
... to any shipping charges if it to a product defect. If the problem or your units are not covered by Kenwood. U.S.A. INSTALLATION OR REMOVAL CHARGES, DAMAGE TO OTHER PROPERTY CAUSED BY ANY DEFECTS IN KENWOOD CAR STEREO COMPONENTS, DAMAGES BASED UPON INCONVENIENCE, LOSS OF USE OF THE PRODUCT; Any product which the serial number...
... to any shipping charges if it to a product defect. If the problem or your units are not covered by Kenwood. U.S.A. INSTALLATION OR REMOVAL CHARGES, DAMAGE TO OTHER PROPERTY CAUSED BY ANY DEFECTS IN KENWOOD CAR STEREO COMPONENTS, DAMAGES BASED UPON INCONVENIENCE, LOSS OF USE OF THE PRODUCT; Any product which the serial number...


