Instruction Manual
Page 2
... Theft Deterrent Faceplate TEL Mute Tuner features Tuning Tuning Mode Station Preset Memory Auto Memory Entry Preset Tuning CD player features Playing CD Fast Forwarding and Reversing Track Search Track Repeat Scan Play Random Play Menu system Menu System Touch Sensor ...Tone Manual Clock Adjustment DSI (Disabled System Indicator) Switching preout CRSC (Clean Reception System Circuit) Built-in Auxiliary input Setting 3 Accessories/ Installation Procedure 14 3 Connecting Wires...
... Theft Deterrent Faceplate TEL Mute Tuner features Tuning Tuning Mode Station Preset Memory Auto Memory Entry Preset Tuning CD player features Playing CD Fast Forwarding and Reversing Track Search Track Repeat Scan Play Random Play Menu system Menu System Touch Sensor ...Tone Manual Clock Adjustment DSI (Disabled System Indicator) Switching preout CRSC (Clean Reception System Circuit) Built-in Auxiliary input Setting 3 Accessories/ Installation Procedure 14 3 Connecting Wires...

Instruction Manual
Page 3
...the display in the illustrations may differ from the CD and damage the unit. • If you experience problems during installation, consult your Kenwood dealer. • When you could damage the unit. For safety's sake, leave the mounting and wiring work with your Kenwood dealer to make sure that they work to professionals... If you turn on the car heater in cold weather, dew or condensation may form on the lens in the CD player of the display and the panel appearing in temperatures below 5 ˚C (41 ˚F). • The illustrations of the unit. In such a situation, remove ...
...the display in the illustrations may differ from the CD and damage the unit. • If you experience problems during installation, consult your Kenwood dealer. • When you could damage the unit. For safety's sake, leave the mounting and wiring work with your Kenwood dealer to make sure that they work to professionals... If you turn on the car heater in cold weather, dew or condensation may form on the lens in the CD player of the display and the panel appearing in temperatures below 5 ˚C (41 ˚F). • The illustrations of the unit. In such a situation, remove ...

Instruction Manual
Page 7
...the possibility of equipment and can be damaged by shocks or jolts. • Keep the faceplate in . When a call ends Hang up the MUTE wire to use the TEL Mute feature, you to (page 15). Reattaching the Faceplate 1 Align the projections on the unit with the grooves on the ... the Control knob for at least 1 second. Listening to the audio during a call comes in its faceplate case while detached. (Faceplate case: Accessory of KDC-135 Subwoofer Output Turning the Subwoofer output ON or OFF. The "CALL" display disappears and the audio system comes back ON. ⁄ • To use ...
...the possibility of equipment and can be damaged by shocks or jolts. • Keep the faceplate in . When a call ends Hang up the MUTE wire to use the TEL Mute feature, you to (page 15). Reattaching the Faceplate 1 Align the projections on the unit with the grooves on the ... the Control knob for at least 1 second. Listening to the audio during a call comes in its faceplate case while detached. (Faceplate case: Accessory of KDC-135 Subwoofer Output Turning the Subwoofer output ON or OFF. The "CALL" display disappears and the audio system comes back ON. ⁄ • To use ...
Instruction Manual
Page 14
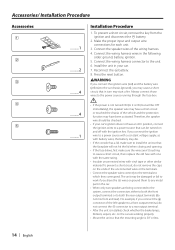
... a short-circuit or touched the chassis of the vehicle and the protection function may be turned on the ends of the unconnected wires or the terminals. • Connect the speaker wires correctly to the terminals to a power source that the mounting angle is 30° or less. 14 | English Install the... are working properly. • Mount the unit so that can be damaged or fail to work if you connect the + connector of the wiring harness. 4. Connect the wiring harness connector to the power source running through the fuse box. ¤ • If the power is not turned ON (or it is...
... a short-circuit or touched the chassis of the vehicle and the protection function may be turned on the ends of the unconnected wires or the terminals. • Connect the speaker wires correctly to the terminals to a power source that the mounting angle is 30° or less. 14 | English Install the... are working properly. • Mount the unit so that can be damaged or fail to work if you connect the + connector of the wiring harness. 4. Connect the wiring harness connector to the power source running through the fuse box. ¤ • If the power is not turned ON (or it is...
Instruction Manual
Page 15
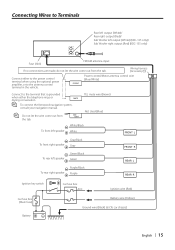
... output (Red) (KDC-135 only) Fuse (10A) FM/AM antenna input If no connections are made, do not let the wire come out from the tab. Connecting Wires to the antenna control terminal in the vehicle. Wiring harness (Accessory1) Connect either the telephone rings or MUTE during conversation. ⁄ To connect the Kenwood navigation system, consult...
... output (Red) (KDC-135 only) Fuse (10A) FM/AM antenna input If no connections are made, do not let the wire come out from the tab. Connecting Wires to the antenna control terminal in the vehicle. Wiring harness (Accessory1) Connect either the telephone rings or MUTE during conversation. ⁄ To connect the Kenwood navigation system, consult...
Instruction Manual
Page 18
... display the user of the vehicle, and then the protection function is activated. ➪ Wire or insulate the speaker cable properly and press the reset button. IN (Blink): The CD player section is upside-down. If the "DCER" code does not disappear, consult your systems condition. Before calling service,...a malfunction in your unit may be disabled by some reason. ➪ Press the reset button on the unit. Radio reception is poor. ✔ The car antenna is scratched a lot. The CD is not extended. ☞ Pull the antenna out all the way. If the "E-99" code does not disappear...
... display the user of the vehicle, and then the protection function is activated. ➪ Wire or insulate the speaker cable properly and press the reset button. IN (Blink): The CD player section is upside-down. If the "DCER" code does not disappear, consult your systems condition. Before calling service,...a malfunction in your unit may be disabled by some reason. ➪ Press the reset button on the unit. Radio reception is poor. ✔ The car antenna is scratched a lot. The CD is not extended. ☞ Pull the antenna out all the way. If the "E-99" code does not disappear...


