Instruction Manuals
Page 6
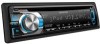
...the source. *AM- / Selects the previous/next folder. 1 ( -) / 2 (+ ) #FM+ - Confirms selection. Selects track/file. Turns off automatically after about 20 minutes have elapsed under the standby mode. Skips a song (for radio station. SRC • "PANDORA" is selectable ... an iPod is connected or a disc is ready, playback also starts. Fast-forwards/reverses tracks if pressed and held . Main unit Remote controller General operation Turns on . • If the source is loaded. The illustration and button names used for the difference: iPod 1 ( -) 2 (+ ) 3 (ALL RDM)...
...the source. *AM- / Selects the previous/next folder. 1 ( -) / 2 (+ ) #FM+ - Confirms selection. Selects track/file. Turns off automatically after about 20 minutes have elapsed under the standby mode. Skips a song (for radio station. SRC • "PANDORA" is selectable ... an iPod is connected or a disc is ready, playback also starts. Fast-forwards/reverses tracks if pressed and held . Main unit Remote controller General operation Turns on . • If the source is loaded. The illustration and button names used for the difference: iPod 1 ( -) 2 (+ ) 3 (ALL RDM)...
Instruction Manuals
Page 7
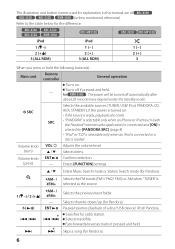
...Selects Random Play. (page 11) - Setting the demonstration mode 1 Press the volume knob to enter [FUNCTION]. 2 Turn the volume knob to select [DEMO MODE], then press to enter. 3 Turn the volume knob to the previous item. General operation Changes the display information. For : iPod - Selects "iPod" ...the main unit will also exit from the setting mode.) Getting started Canceling the display demonstration (except for ) The display demonstration is always turned on unless you turn on the power (or after you reset the unit), the display shows: [CANCEL DEMO] \ [PRESS] \ [VOLUME KNOB] 1...
...Selects Random Play. (page 11) - Setting the demonstration mode 1 Press the volume knob to enter [FUNCTION]. 2 Turn the volume knob to select [DEMO MODE], then press to enter. 3 Turn the volume knob to the previous item. General operation Changes the display information. For : iPod - Selects "iPod" ...the main unit will also exit from the setting mode.) Getting started Canceling the display demonstration (except for ) The display demonstration is always turned on unless you turn on the power (or after you reset the unit), the display shows: [CANCEL DEMO] \ [PRESS] \ [VOLUME KNOB] 1...
Instruction Manuals
Page 8
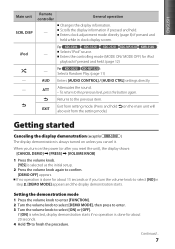
...enter minute adjustment. When you use the audio file with KENWOOD Music Editor. In the Instruction manual, the term "USB device" is available from the following web site: www.kenwood.com/cs/ce/ For further information on the display. 5 Turn the volume knob to adjust the hour, then press ...to update the firmware, see: www.kenwood.com/cs/ce/ About "KENWOOD Music Editor" This unit supports the PC application "KENWOOD Music Editor Light ver1.1" or ...
...enter minute adjustment. When you use the audio file with KENWOOD Music Editor. In the Instruction manual, the term "USB device" is available from the following web site: www.kenwood.com/cs/ce/ For further information on the display. 5 Turn the volume knob to adjust the hour, then press ...to update the firmware, see: www.kenwood.com/cs/ce/ About "KENWOOD Music Editor" This unit supports the PC application "KENWOOD Music Editor Light ver1.1" or ...
Instruction Manuals
Page 9
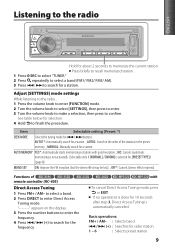
... 2 seconds to confirm. Adjust [SETTINGS] mode settings While listening to the radio... 1 Press the volume knob to enter [FUNCTION] mode. 2 Turn the volume knob to select [SETTINGS], then press to enter. 3 Turn the volume knob to make a selection, then press to memorize the current station. See table below for selection. 4 Hold to...
... 2 seconds to confirm. Adjust [SETTINGS] mode settings While listening to the radio... 1 Press the volume knob to enter [FUNCTION] mode. 2 Turn the volume knob to select [SETTINGS], then press to enter. 3 Turn the volume knob to make a selection, then press to memorize the current station. See table below for selection. 4 Hold to...
Instruction Manuals
Page 10
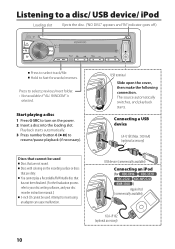
... into the loading slot. Attempt to select previous/next folder. • Not available if "ALL RANDOM" is selected. Playback starts automatically. 3 Press number button 6 ( ) to turn on the recording surface or discs that are not round. Start playing a disc 1 Press SRC to resume/pause playback (if necessary). Connecting a USB device CA...
... into the loading slot. Attempt to select previous/next folder. • Not available if "ALL RANDOM" is selected. Playback starts automatically. 3 Press number button 6 ( ) to turn on the recording surface or discs that are not round. Start playing a disc 1 Press SRC to resume/pause playback (if necessary). Connecting a USB device CA...
Instruction Manuals
Page 11
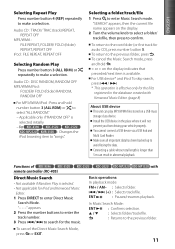
... OFF MP3/WMA/iPod : FOLDER/ FOLD (folder) RANDOM, RANDOM OFF For MP3/WMA/iPod : Press and hold . < or > on the display. 2 Turn the volume knob to select a folder/ track/file, then press to confirm. Applicable only if "RANDOM OFF" is selected. • Not applicable for the files... operations: In playback mode: FM+ / AM- : Selects folder. 4 / ¢ (+) : Selects track/file. Install the USB device in abnormal playback. with Kenwood Music Editor. (page 8) About USB device This unit can result in the place where it will not prevent you from driving your vehicle properly. Audio...
... OFF MP3/WMA/iPod : FOLDER/ FOLD (folder) RANDOM, RANDOM OFF For MP3/WMA/iPod : Press and hold . < or > on the display. 2 Turn the volume knob to select a folder/ track/file, then press to confirm. Applicable only if "RANDOM OFF" is selected. • Not applicable for the files... operations: In playback mode: FM+ / AM- : Selects folder. 4 / ¢ (+) : Selects track/file. Install the USB device in abnormal playback. with Kenwood Music Editor. (page 8) About USB device This unit can result in the place where it will not prevent you from driving your vehicle properly. Audio...
Instruction Manuals
Page 12
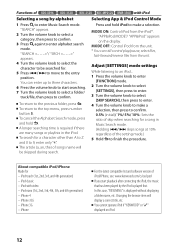
...press to enter. 3 Turn the volume knob to select [SKIP SEARCH], then press to enter. 4 Turn the volume knob to confirm. iPod with iPod Selecting App & iPod Control Mode Press and hold . iPhone For the latest compatible list and software version of iPod/iPhone, see: www.kenwood.com/cs/ce/ipod ...If you start searching. 7 Turn the volume knob to select a folder/ track/file, then press to make a selection. To return to the top menu, ...
...press to enter. 3 Turn the volume knob to select [SKIP SEARCH], then press to enter. 4 Turn the volume knob to confirm. iPod with iPod Selecting App & iPod Control Mode Press and hold . iPhone For the latest compatible list and software version of iPod/iPhone, see: www.kenwood.com/cs/ce/ipod ...If you start searching. 7 Turn the volume knob to select a folder/ track/file, then press to make a selection. To return to the top menu, ...
Instruction Manuals
Page 13
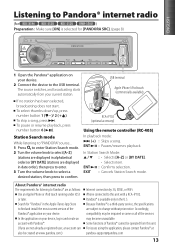
To skip a song, press ¢. Station Search mode While listening to "PANDORA" source... 1 Press to enter Station Search mode. 2 Turn the volume knob to select [A-Z] (stations are displayed in alphabetical order) or [BY DATE] (stations are not already a registered user, an account ... Search for "Pandora" in and create an account with a KCA-iP102. Pandora® is available only in date order), then press to enter. 3 Turn the volume knob to select a desired station, then press to confirm. For issues using the application, please contact Pandora® at www.pandora.com.) Internet...
To skip a song, press ¢. Station Search mode While listening to "PANDORA" source... 1 Press to enter Station Search mode. 2 Turn the volume knob to select [A-Z] (stations are displayed in alphabetical order) or [BY DATE] (stations are not already a registered user, an account ... Search for "Pandora" in and create an account with a KCA-iP102. Pandora® is available only in date order), then press to enter. 3 Turn the volume knob to select a desired station, then press to confirm. For issues using the application, please contact Pandora® at www.pandora.com.) Internet...
Instruction Manuals
Page 14
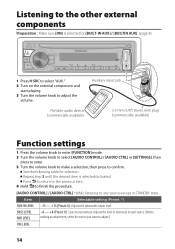
...the following table for [BUILT-IN AUX] / [BUILTIN AUX]. (page 8) 1 Press SRC to select "AUX." 2 Turn on the external component and start playing. 3 Turn the volume knob to adjust the volume. Listening to the other external components Preparation : Make sure [ON] is selected/activated... plug (commercially available) Function settings 1 Press the volume knob to enter [FUNCTION] mode. 2 Turn the volume knob to select [AUDIO CONTROL] / [AUDIO CTRL] or [SETTINGS], then press to enter. 3 Turn the volume knob to make a selection, then press to memorize in STANDBY state... Press to return...
...the following table for [BUILT-IN AUX] / [BUILTIN AUX]. (page 8) 1 Press SRC to select "AUX." 2 Turn on the external component and start playing. 3 Turn the volume knob to adjust the volume. Listening to the other external components Preparation : Make sure [ON] is selected/activated... plug (commercially available) Function settings 1 Press the volume knob to enter [FUNCTION] mode. 2 Turn the volume knob to select [AUDIO CONTROL] / [AUDIO CTRL] or [SETTINGS], then press to enter. 3 Turn the volume knob to make a selection, then press to memorize in STANDBY state... Press to return...
Instruction Manuals
Page 15
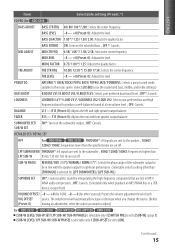
...F15 (Preset: 0): Adjusts the rear and front speaker output balance. TRE LEVEL -8 - +8 (Preset: 0): Adjusts the level. SUBWOOFER SET/ ON*: Turns on the extended bass. ; SUB-W PHASE REVERSE/ REV (180°)/ NORMAL/ NORM (0°)*: Selects the phase angle of each VOL OFFSET source.... MID Q FACTOR 0.75/ 1.00 */ 1.25: Adjusts the quality factor. OFF*: Cancels. BALANCE L15 - BASS EXTEND ON: Turns on the subwoofer output. ; OFF: Cancels. ENGLISH Item Selectable setting (Preset: *) EQ PRO (for [LPF SUBWOOFER] / [LPF SUB-W].) SUPREME SET...
...F15 (Preset: 0): Adjusts the rear and front speaker output balance. TRE LEVEL -8 - +8 (Preset: 0): Adjusts the level. SUBWOOFER SET/ ON*: Turns on the extended bass. ; SUB-W PHASE REVERSE/ REV (180°)/ NORMAL/ NORM (0°)*: Selects the phase angle of each VOL OFFSET source.... MID Q FACTOR 0.75/ 1.00 */ 1.25: Adjusts the quality factor. OFF*: Cancels. BALANCE L15 - BASS EXTEND ON: Turns on the subwoofer output. ; OFF: Cancels. ENGLISH Item Selectable setting (Preset: *) EQ PRO (for [LPF SUBWOOFER] / [LPF SUB-W].) SUPREME SET...
Instruction Manuals
Page 16
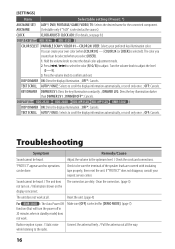
.... Check to be sure the terminals of the speaker leads are dirty. Reset the unit. (page 4) For : The Auto Power Off function (that will turn on. / Information shown on the display is selected as the source.) CLOCK CLOCK ADJUST/ CLOCK ADJ: (For details, see page 8.) DISP & KEY (...SCROLL AUTO*/ ONCE: Selects to confirm and exit. OFF: Cancels. Sound cannot be selected when you select [USER]. 1. Clean the connectors. (page 3) not turn the power off in 20 minutes when in standby mode) does not work at all the way. 16 DISP DIMMER ON: Dims the display illumination...
.... Check to be sure the terminals of the speaker leads are dirty. Reset the unit. (page 4) For : The Auto Power Off function (that will turn on. / Information shown on the display is selected as the source.) CLOCK CLOCK ADJUST/ CLOCK ADJ: (For details, see page 8.) DISP & KEY (...SCROLL AUTO*/ ONCE: Selects to confirm and exit. OFF: Cancels. Sound cannot be selected when you select [USER]. 1. Clean the connectors. (page 3) not turn the power off in 20 minutes when in standby mode) does not work at all the way. 16 DISP DIMMER ON: Dims the display illumination...
Instruction Manuals
Page 17
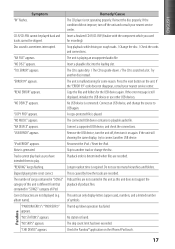
If the condition did not improve, turn off , then turn the unit off the unit and consult your nearest service center. Insert a playable disc into the loading slot. "TOC ERROR" appears. The CD is quite ... 99" appears. If the error message is different from that playback of iPod. Connect an USB device, and change the disc. Remove the USB device, turn it on the unit. If the unit still showing the same display, try to another track or change the source to play back as this...
If the condition did not improve, turn off , then turn the unit off the unit and consult your nearest service center. Insert a playable disc into the loading slot. "TOC ERROR" appears. The CD is quite ... 99" appears. If the error message is different from that playback of iPod. Connect an USB device, and change the disc. Remove the USB device, turn it on the unit. If the unit still showing the same display, try to another track or change the source to play back as this...

Instruction Manuals
Page 18
...enclosure become hot. Install this unit during installation, consult your vehicle. Mount the unit so that can only be installed in the console of your Kenwood dealer. 18 Connect the speaker wires correctly to the terminals to the car's chassis again after the use your car's ignition does not have an... wires or the terminals. After the unit is 30° or less. on the ends of the console (if any metal part in turn may be turned on and off with the ignition key. Metal part such as with vinyl tape or other similar material. Mounting and wiring this work if...
...enclosure become hot. Install this unit during installation, consult your vehicle. Mount the unit so that can only be installed in the console of your Kenwood dealer. 18 Connect the speaker wires correctly to the terminals to the car's chassis again after the use your car's ignition does not have an... wires or the terminals. After the unit is 30° or less. on the ends of the console (if any metal part in turn may be turned on and off with the ignition key. Metal part such as with vinyl tape or other similar material. Mounting and wiring this work if...
Instruction Manuals
Page 62
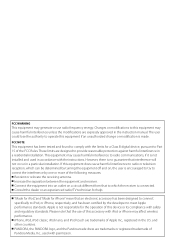
..., which the receiver is not installed and used with safety and regulatory standards. However, there is no guarantee that to which can be determined by turning the equipment off and on a circuit different from that interference will not occur in accordance with iPod or iPhone may cause harmful interference to meet...
..., which the receiver is not installed and used with safety and regulatory standards. However, there is no guarantee that to which can be determined by turning the equipment off and on a circuit different from that interference will not occur in accordance with iPod or iPhone may cause harmful interference to meet...


