
Instruction Manual
Page 2
... Manual Clock Adjustment Date Adjustment AMP Control Picture downloading Demonstration mode setting Theft Deterrent Faceplate Audio Adjustments 23 Audio Control Adjusting the detail of Audio Control Audio Setup Speaker Setting Audio Preset Memory Audio Preset Recall Satellite Radio tuner...Installation/Removing the Unit 35 Troubleshooting Guide 37 Specifications 39 • iPod is trademark of Dolby Laboratories. 2 | KDC-X792/KDC-X692/KDC-MP738U/KDC-MP638U Contents Before use 3 Basic Operation 4 General functions Tuner functions Disc & Audio file play functions Function Control 6...
... Manual Clock Adjustment Date Adjustment AMP Control Picture downloading Demonstration mode setting Theft Deterrent Faceplate Audio Adjustments 23 Audio Control Adjusting the detail of Audio Control Audio Setup Speaker Setting Audio Preset Memory Audio Preset Recall Satellite Radio tuner...Installation/Removing the Unit 35 Troubleshooting Guide 37 Specifications 39 • iPod is trademark of Dolby Laboratories. 2 | KDC-X792/KDC-X692/KDC-MP738U/KDC-MP638U Contents Before use 3 Basic Operation 4 General functions Tuner functions Disc & Audio file play functions Function Control 6...
Instruction Manual
Page 6
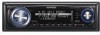
... that of the iPod. Switches to Monaural to enable demonstration. Sets the receive mode of HD Radio. 32 Displays the Electronic Serial Number of the audio control. Sets the text display color. Ç ÅıÇÎ 9 ÅıÇ 10 6 | KDC-X792/KDC-X692/KDC-MP738U/KDC-MP638U Setting the operation check sound (beep sound) ON/OFF. 1 sec...
... that of the iPod. Switches to Monaural to enable demonstration. Sets the receive mode of HD Radio. 32 Displays the Electronic Serial Number of the audio control. Sets the text display color. Ç ÅıÇÎ 9 ÅıÇ 10 6 | KDC-X792/KDC-X692/KDC-MP738U/KDC-MP638U Setting the operation check sound (beep sound) ON/OFF. 1 sec...

Instruction Manual
Page 8
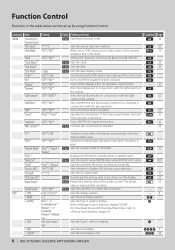
...display part 2 Status display 3 Icon display part 4 Graphic display part 5 Clock display 6 Display (varied depending on the source) 7 G-Analyzer display part 8 | KDC-X792/KDC-X692/KDC-MP738U/KDC-MP638U For the functions accompanied by the description of the setting procedure and so forth, the reference page numbers are examples of item Press ...Select your desired setup item is displayed in the Entry column in seconds. Some items require you can make a setting. About Display Type Shown below are displayed. 4 Exit Function Control mode Press the [FNC] button for 1 or 2 ...
...display part 2 Status display 3 Icon display part 4 Graphic display part 5 Clock display 6 Display (varied depending on the source) 7 G-Analyzer display part 8 | KDC-X792/KDC-X692/KDC-MP738U/KDC-MP638U For the functions accompanied by the description of the setting procedure and so forth, the reference page numbers are examples of item Press ...Select your desired setup item is displayed in the Entry column in seconds. Some items require you can make a setting. About Display Type Shown below are displayed. 4 Exit Function Control mode Press the [FNC] button for 1 or 2 ...

Instruction Manual
Page 20
... the Control knob towards up or down. 4 Exit Clock adjustment mode Press the [FNC] button. ⁄ • You can do this adjustment when "MENU" > "SYNC" in (page 6) is set to "OFF". (KDC-X792 only) Function of KDC-X792/KDC-X692 When LX AMP unit connecting AMP Control You can... it towards up or down . 4 Exit Date adjustment mode Press the [FNC] button. 20 | KDC-X792/KDC-X692/KDC-MP738U/KDC-MP638U For how to select Function Control items, refer to (page 6). 2 Enter Clock adjustment mode Press the Control knob for at least 1 second. The date display blinks. 3 Adjusting Date...
... the Control knob towards up or down. 4 Exit Clock adjustment mode Press the [FNC] button. ⁄ • You can do this adjustment when "MENU" > "SYNC" in (page 6) is set to "OFF". (KDC-X792 only) Function of KDC-X792/KDC-X692 When LX AMP unit connecting AMP Control You can... it towards up or down . 4 Exit Date adjustment mode Press the [FNC] button. 20 | KDC-X792/KDC-X692/KDC-MP738U/KDC-MP638U For how to select Function Control items, refer to (page 6). 2 Enter Clock adjustment mode Press the Control knob for at least 1 second. The date display blinks. 3 Adjusting Date...


