
Instruction Manual
Page 4
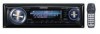
.... Tuner ("TUNER") , USB or iPod ("USB" or "iPod"), CD ("Compact Disc") , Auxiliary input ("AUX"), and Standby ("STANDBY") Press at least 1 second to turn the Control knob or push ...back on. When the power is a call Text/Title scroll Control knob Scrolls the CD, audio file, and Radio text display when pushing toward up the environment. Volume control [AUD] Turn the knob... audio system is connected, the source name for each time pushing toward down. 4 | KDC-X792/KDC-X692/KDC-MP738U/KDC-MP638U Refer to set up . Muting volume upon reception of (page 6). SRC Select mode...
.... Tuner ("TUNER") , USB or iPod ("USB" or "iPod"), CD ("Compact Disc") , Auxiliary input ("AUX"), and Standby ("STANDBY") Press at least 1 second to turn the Control knob or push ...back on. When the power is a call Text/Title scroll Control knob Scrolls the CD, audio file, and Radio text display when pushing toward up the environment. Volume control [AUD] Turn the knob... audio system is connected, the source name for each time pushing toward down. 4 | KDC-X792/KDC-X692/KDC-MP738U/KDC-MP638U Refer to set up . Muting volume upon reception of (page 6). SRC Select mode...

Instruction Manual
Page 7
.... Condition Page Å Ï 12 Ï 12 17, 27 *Factory setting *1 Function of KDC-X792. *2 Function of KDC-X692. *3 Function of (page 24) to "ON". : Refer to the reference page. Å-&#... the music repeatedly. When set to "ON", plays the music in standby state. : Can be set while Audio file source of CD/USB/iPod. : Can be set while Audio file source of the ...CD/ Disc changer source. : Can be set while Disc changer source. : Can be set during FM reception. : Can be set while accessing AUX source. : Can be set while HD Radio source. : Can be set during Satellite radio...
.... Condition Page Å Ï 12 Ï 12 17, 27 *Factory setting *1 Function of KDC-X792. *2 Function of KDC-X692. *3 Function of (page 24) to "ON". : Refer to the reference page. Å-&#... the music repeatedly. When set to "ON", plays the music in standby state. : Can be set while Audio file source of CD/USB/iPod. : Can be set while Audio file source of the ...CD/ Disc changer source. : Can be set while Disc changer source. : Can be set during FM reception. : Can be set while accessing AUX source. : Can be set while HD Radio source. : Can be set during Satellite radio...

Instruction Manual
Page 9
...Station name* (FM) Radio text plus* (FM) Radio text (FM)*1 Frequency Clock Date Blank Display "SNPS" "Title/Artist" "Station Name" "Radio Text Plus" "Radio Text" "Frequency" "Clock" "Date" "Blank" * Information of Radio text plus is displayed. (KDC-X792 only)/ *1 KDC-X792 only In CD & External disc source ...Display "Title/Artist" "Album/Artist" "Folder Name" "File Name" "P-Time" "Time Bar" "Clock" "Date" "Blank" In Standby Information Standby Clock Date Blank Display "Source Name" "Clock" "Date" "Blank" In Auxiliary input source Information Auxiliary input name Clock Date Blank Display ...
...Station name* (FM) Radio text plus* (FM) Radio text (FM)*1 Frequency Clock Date Blank Display "SNPS" "Title/Artist" "Station Name" "Radio Text Plus" "Radio Text" "Frequency" "Clock" "Date" "Blank" * Information of Radio text plus is displayed. (KDC-X792 only)/ *1 KDC-X792 only In CD & External disc source ...Display "Title/Artist" "Album/Artist" "Folder Name" "File Name" "P-Time" "Time Bar" "Clock" "Date" "Blank" In Standby Information Standby Clock Date Blank Display "Source Name" "Clock" "Date" "Blank" In Auxiliary input source Information Auxiliary input name Clock Date Blank Display ...
Instruction Manual
Page 12
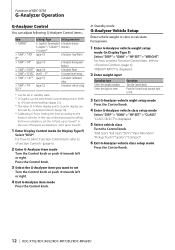
... G-Counter display can be switched to (page 6). In the case of frequent accelerations, set the G-Point up to the kinds of KDC-X792 G-Analyzer Operation G-Analyzer Control You can be reset by (page 14). *3 Calibrating G-Point. Setting the level according to "Level3". ...Van/ Mini-Van"/ "Pickup Truck"/ "Sporty"/ "Compact" 6 Exit G-Analyzer vehicle class setup mode Press the Control knob. 12 | KDC-X792/KDC-X692/KDC-MP738U/KDC-MP638U In Standby mode G-Analyzer Vehicle Setup Enter vehicle weight or class to (page 6). 2 Enter G-Analyzer item mode Turn the Control knob or push it...
... G-Counter display can be switched to (page 6). In the case of frequent accelerations, set the G-Point up to the kinds of KDC-X792 G-Analyzer Operation G-Analyzer Control You can be reset by (page 14). *3 Calibrating G-Point. Setting the level according to "Level3". ...Van/ Mini-Van"/ "Pickup Truck"/ "Sporty"/ "Compact" 6 Exit G-Analyzer vehicle class setup mode Press the Control knob. 12 | KDC-X792/KDC-X692/KDC-MP738U/KDC-MP638U In Standby mode G-Analyzer Vehicle Setup Enter vehicle weight or class to (page 6). 2 Enter G-Analyzer item mode Turn the Control knob or push it...

Instruction Manual
Page 13
... "DISP" > "GMA" > "STOP.W". Calibration of horizontal direction Press the Control knob. G-Analyzer Stop Watch The control of straight direction Start moving the vehicle ahead. In Standby mode G-Analyzer Calibration Setup G-Analyzer requires calibration for at a level place where you to complete the calibration, "No Calibration" is displayed. "Running" is displayed. 3 Start...
... "DISP" > "GMA" > "STOP.W". Calibration of horizontal direction Press the Control knob. G-Analyzer Stop Watch The control of straight direction Start moving the vehicle ahead. In Standby mode G-Analyzer Calibration Setup G-Analyzer requires calibration for at a level place where you to complete the calibration, "No Calibration" is displayed. "Running" is displayed. 3 Start...

Instruction Manual
Page 19
... Code with a 4 digit number of the Security Code and treasure it up. 1 Select Security Code item during Menu mode (In Standby mode) Select the "Security Clear" display. Deactivating Security Code To deactivate the Security Code function. 1 Select Security Code item during Menu mode (In... Standby mode) "Security Set" is displayed. Other Functions Activating Security Code ⁄ • You can use the audio unit when the unit is...
... Code with a 4 digit number of the Security Code and treasure it up. 1 Select Security Code item during Menu mode (In Standby mode) Select the "Security Clear" display. Deactivating Security Code To deactivate the Security Code function. 1 Select Security Code item during Menu mode (In... Standby mode) "Security Set" is displayed. Other Functions Activating Security Code ⁄ • You can use the audio unit when the unit is...

Instruction Manual
Page 20
...) Function of KDC-X792/KDC-X692 When LX AMP unit connecting AMP Control You can control the LX AMP connected to the LX AMP. 4 Adjust the AMP Control item Push the Control knob towards right or left . Date Adjustment 1 Select Date Adjustment item during Menu mode (In Standby mode) Select the... each item Turn the Control knob or push it towards up or down . 4 Exit Date adjustment mode Press the [FNC] button. 20 | KDC-X792/KDC-X692/KDC-MP738U/KDC-MP638U For how to select Function Control items, refer to (page 6). 2 Enter AMP Control mode Press the Control knob for at least 1 second...
...) Function of KDC-X792/KDC-X692 When LX AMP unit connecting AMP Control You can control the LX AMP connected to the LX AMP. 4 Adjust the AMP Control item Push the Control knob towards right or left . Date Adjustment 1 Select Date Adjustment item during Menu mode (In Standby mode) Select the... each item Turn the Control knob or push it towards up or down . 4 Exit Date adjustment mode Press the [FNC] button. 20 | KDC-X792/KDC-X692/KDC-MP738U/KDC-MP638U For how to select Function Control items, refer to (page 6). 2 Enter AMP Control mode Press the Control knob for at least 1 second...

Instruction Manual
Page 21
...knob towards up or down. Demonstration mode setting Turning the demonstration mode ON/OFF. 1 Select Demonstration item during Menu mode (In Standby mode) Select the "DISP Data DL" display. display blinks. 6 Select files to be downloaded Turn the Control knob or push...USB device ("USB") or CD-R/RW ("CD"). 5 Enter the downloading mode Turn the Control knob to (page 6). 3 Enter downloading mode Press the Control knob for the download of KDC-X792 Picture downloading Downloading movies, wallpapers and G-Graphic. Function of application, please browse "http://www.kenwood.net-disp. Wallpaper: ...
...knob towards up or down. Demonstration mode setting Turning the demonstration mode ON/OFF. 1 Select Demonstration item during Menu mode (In Standby mode) Select the "DISP Data DL" display. display blinks. 6 Select files to be downloaded Turn the Control knob or push...USB device ("USB") or CD-R/RW ("CD"). 5 Enter the downloading mode Turn the Control knob to (page 6). 3 Enter downloading mode Press the Control knob for the download of KDC-X792 Picture downloading Downloading movies, wallpapers and G-Graphic. Function of application, please browse "http://www.kenwood.net-disp. Wallpaper: ...
Instruction Manual
Page 24
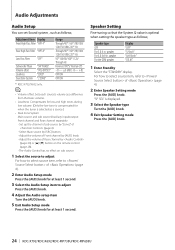
...Press the [AUD] knob for at least 1 second. speaker For the OEM speaker Display "OFF" "5/4inch" "6x9/6inch" "O.E.M." 1 Enter Standby Select the "STANDBY" display. Adjustment Item Display Front High Pass Filter "HPF-F" Rear High Pass Filter "HPF-R" Low Pass Filter "LPF" Subwoofer Phase Volume offset ... Hz 50*1/60/80/100*1/120/ Through Hz Reverse (180°)/ Normal (0°) -8 - ±0 (AUX: -8- +8) OFF/ON OFF/ON *1 KDC-X792/X692 only. ⁄ • Volume offset: Sets each source's volume as a difference from the basic volume. • Loudness: Compensates for low and high...
...Press the [AUD] knob for at least 1 second. speaker For the OEM speaker Display "OFF" "5/4inch" "6x9/6inch" "O.E.M." 1 Enter Standby Select the "STANDBY" display. Adjustment Item Display Front High Pass Filter "HPF-F" Rear High Pass Filter "HPF-R" Low Pass Filter "LPF" Subwoofer Phase Volume offset ... Hz 50*1/60/80/100*1/120/ Through Hz Reverse (180°)/ Normal (0°) -8 - ±0 (AUX: -8- +8) OFF/ON OFF/ON *1 KDC-X792/X692 only. ⁄ • Volume offset: Sets each source's volume as a difference from the basic volume. • Loudness: Compensates for low and high...
Instruction Manual
Page 25
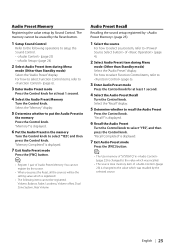
... is displayed. 6 Put the Audio Preset in (page 23) is changed to of (page 4). 2 Select Audio Preset item during Menu mode (Other than Standby mode) Select the "Audio Preset" display. is registered. • The following operations to (page 6). 3 Enter Audio Preset mode Press the Control knob for...Control items, refer to setup the Sound Control. - (page 23) - (page 24) 2 Select Audio Preset item during Menu mode (Other than Standby mode) Select the "Audio Preset" display. The memory cannot be erased by the Reset button. 1 Setup Sound Control Refer to the following items ...
... is displayed. 6 Put the Audio Preset in (page 23) is changed to of (page 4). 2 Select Audio Preset item during Menu mode (Other than Standby mode) Select the "Audio Preset" display. is registered. • The following operations to (page 6). 3 Enter Audio Preset mode Press the Control knob for...Control items, refer to setup the Sound Control. - (page 23) - (page 24) 2 Select Audio Preset item during Menu mode (Other than Standby mode) Select the "Audio Preset" display. The memory cannot be erased by the Reset button. 1 Setup Sound Control Refer to the following items ...


