

User Manual
Page 1
B5A-4505-00/00 (EN) TH-D75A TH-D75E USER MANUAL This User Manual covers detailed operating instructions of the TH-D75A/E including basic operating instructions described in the User Guide comes with the product.
B5A-4505-00/00 (EN) TH-D75A TH-D75E USER MANUAL This User Manual covers detailed operating instructions of the TH-D75A/E including basic operating instructions described in the User Guide comes with the product.

User Manual
Page 2
... 9-4 CALL SCAN 9-4 SCAN AUTO BACKLIGHT 9-4 10 CTCSS/DCS/CROSS TONE 10-1 CTCSS 10-1 DCS...10-2 CROSS TONE 10-3 11 DUAL TONE MULTI-FREQUENCY(DTMF 11-1 MANUAL DIALING 11-1 AUTOMATIC DIALER 11-1 EchoLink MEMORY 11-2 12 OTHER OPERATIONS 12-1 FREQUENCY STEP SIZE 12-1 FINE TUNING 12-1 ATTENUATOR (ATT 12-1 PROGRAMMABLE VFO 12...
... 9-4 CALL SCAN 9-4 SCAN AUTO BACKLIGHT 9-4 10 CTCSS/DCS/CROSS TONE 10-1 CTCSS 10-1 DCS...10-2 CROSS TONE 10-3 11 DUAL TONE MULTI-FREQUENCY(DTMF 11-1 MANUAL DIALING 11-1 AUTOMATIC DIALER 11-1 EchoLink MEMORY 11-2 12 OTHER OPERATIONS 12-1 FREQUENCY STEP SIZE 12-1 FINE TUNING 12-1 ATTENUATOR (ATT 12-1 PROGRAMMABLE VFO 12...
User Manual
Page 3
... for any failures, damages or losses arising from any responsibilities for any defects and indemnities for firmware embedded in KENWOOD product memories are accurate; however, this manual may not match the actual operations. NETWORK 14-23 VOICE ALERT 14-24 PROGRAMMING MESSAGE GROUP CODE 14-24 ...VOICE MESSAGE 22-3 23 VOICE GUIDANCE 23-1 SETTING VOICE GUIDANCE MODE 23-1 24 WEATHER ALERT (TH-D75A ONLY 24-1 WEATHER ALERT ON/ OFF 24-1 WEATHER CHANNEL SCAN 24-1 25 WIRELESS CONTROL (TH-D75A ONLY 25-1 PREPARATION 25-1 CONTROL OPERATION 25-1 26 OPTIONS 26-1 27 MAINTENANCE 27-1 GENERAL...
... for any failures, damages or losses arising from any responsibilities for any defects and indemnities for firmware embedded in KENWOOD product memories are accurate; however, this manual may not match the actual operations. NETWORK 14-23 VOICE ALERT 14-24 PROGRAMMING MESSAGE GROUP CODE 14-24 ...VOICE MESSAGE 22-3 23 VOICE GUIDANCE 23-1 SETTING VOICE GUIDANCE MODE 23-1 24 WEATHER ALERT (TH-D75A ONLY 24-1 WEATHER ALERT ON/ OFF 24-1 WEATHER CHANNEL SCAN 24-1 25 WIRELESS CONTROL (TH-D75A ONLY 25-1 PREPARATION 25-1 CONTROL OPERATION 25-1 26 OPTIONS 26-1 27 MAINTENANCE 27-1 GENERAL...
User Manual
Page 4
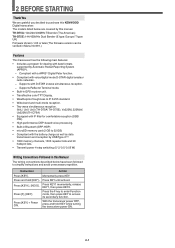
...transceiver power OFF, press and hold [KEY] . 2 BEFORE STARTING Thank You We are covered by this KENWOOD Digital transceiver. TH-D75A: 144/220/430MHz Tribander (The Americas) TH-D75E: 144/430MHz Dual Bander (E type: Europe/ T type: UK) Firmware Version 1.00 or later.(The... hodspot lists. • Transmit power 4-step switching (5/ 2/ 0.5/ 0.05 W) Writing Conventions Followed in this Manual The writing conventions described below are grateful you decided to purchase this manual. The models listed below have been followed to access its secondary function. Press [KEY] + Power ON.
...transceiver power OFF, press and hold [KEY] . 2 BEFORE STARTING Thank You We are covered by this KENWOOD Digital transceiver. TH-D75A: 144/220/430MHz Tribander (The Americas) TH-D75E: 144/430MHz Dual Bander (E type: Europe/ T type: UK) Firmware Version 1.00 or later.(The... hodspot lists. • Transmit power 4-step switching (5/ 2/ 0.5/ 0.05 W) Writing Conventions Followed in this Manual The writing conventions described below are grateful you decided to purchase this manual. The models listed below have been followed to access its secondary function. Press [KEY] + Power ON.

User Manual
Page 12
... function and start positioning after the date and time information has been cleared and do not perform acquisition using the built-in GPS receiver or manual settings, the built-in clock will be received, you turn on the power or turn on the display. Date & Time screen appears by ...pressing [MENU], [PF1], [VFO], [MARK]. Switching the Power OFF Press and hold [ ]. Note: ¡ "GPS Locked" appears on the display only when you can manually enter the date and time. 1 Access Menu No. 950. When no voltage supplied from the battery pack, DC IN jack, or USB connector, date and...
... function and start positioning after the date and time information has been cleared and do not perform acquisition using the built-in GPS receiver or manual settings, the built-in clock will be received, you turn on the power or turn on the display. Date & Time screen appears by ...pressing [MENU], [PF1], [VFO], [MARK]. Switching the Power OFF Press and hold [ ]. Note: ¡ "GPS Locked" appears on the display only when you can manually enter the date and time. 1 Access Menu No. 950. When no voltage supplied from the battery pack, DC IN jack, or USB connector, date and...

User Manual
Page 13
.... • Pressing [ENT] before entering all of 1 MHz. SELECTING A FREQUENCY There are 3 operating modes available to the model and operating frequency band: Model TH-D75A TH-D75E 144 MHz 5 kHz 12.5 kHz 220 MHz 20 kHz - 430 MHz 25 kHz 25 kHz Note: ¡ 220 MHz band is used by the...). MHz Step To adjust the frequency by a larger amount, press [MHz] to enter MHz mode, then rotate the [ENC] control or use the [ ]/[ ] keys to manually change the frequency. 1 Press [ENT]. Press [MHz] again to select operating band A or B. Frequency ranges: • 118 MHz: Band B 108 ~ 136 MHz •...
.... • Pressing [ENT] before entering all of 1 MHz. SELECTING A FREQUENCY There are 3 operating modes available to the model and operating frequency band: Model TH-D75A TH-D75E 144 MHz 5 kHz 12.5 kHz 220 MHz 20 kHz - 430 MHz 25 kHz 25 kHz Note: ¡ 220 MHz band is used by the...). MHz Step To adjust the frequency by a larger amount, press [MHz] to enter MHz mode, then rotate the [ENC] control or use the [ ]/[ ] keys to manually change the frequency. 1 Press [ENT]. Press [MHz] again to select operating band A or B. Frequency ranges: • 118 MHz: Band B 108 ~ 136 MHz •...

User Manual
Page 19
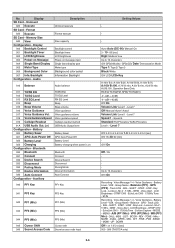
...(10deg/speed) - (26 10deg/speed) - 255 (10deg/ speed) 5 - 60 - 180 [sec] Way point format Way point name length Way point output type NMEA/ MAGELLAN/ KENWOOD 6-Char/ 7-Char/ 8-Char/ 9-Char All/ Local/ Filtered Position limit Filter type Off/ 10/ 20 ... 2490/ 2500 [mile, km, nm] Weather/ Digipeater/ Mobile/ Object/ ... 530 Low/High Speed 531 Slow Rate 532 Fast Rate 533 Turn Angle 534 Turn Slope 535 Turn Time APRS - Pathing Speed Altitude Object name Manual/ PTT/ Auto/ SmartBeaconing 0.2/ 0.5/ 1/ 2/ 3/ 5/ 10/ 20/ 30/ 60 [min] Off/ On Off/ On Off/ On Off/ On Name: up to 9 characters, Type...
...(10deg/speed) - (26 10deg/speed) - 255 (10deg/ speed) 5 - 60 - 180 [sec] Way point format Way point name length Way point output type NMEA/ MAGELLAN/ KENWOOD 6-Char/ 7-Char/ 8-Char/ 9-Char All/ Local/ Filtered Position limit Filter type Off/ 10/ 20 ... 2490/ 2500 [mile, km, nm] Weather/ Digipeater/ Mobile/ Object/ ... 530 Low/High Speed 531 Slow Rate 532 Fast Rate 533 Turn Angle 534 Turn Slope 535 Turn Time APRS - Pathing Speed Altitude Object name Manual/ PTT/ Auto/ SmartBeaconing 0.2/ 0.5/ 1/ 2/ 3/ 5/ 10/ 20/ 30/ 60 [min] Off/ On Off/ On Off/ On Off/ On Name: up to 9 characters, Type...
User Manual
Page 21
...SQL - LOW - Track LOG - SQL - LOW - SEL - REV - DOWN Off/ 1.0/ 1.5/ 2.0 [sec] 000 - 999 (TH-D75A only) Memory Size 840 View Configuration - Backlight Configuration - Level 7 Off/ Manual/ Auto1/ Auto2 Volume Link/ Level 1 - Lockout - Voice Message 1-4 - NEW - A/B (PF1 Mic) - TONE - BAND - ...(Mic) PF3 (Mic) 945 Cursor Shift Cursor shift 946 Secret Access Code Secret access code input 6-6 Setting Values - - - Auto/ Auto (DC-IN)/ Manual/ On 3 - 10 - 60 [sec] High/ Medium/ Low Up to 19 characters Off / On Recording - Speed 4 Standard/ Full Phonetics/ Suffix Phonetics...
...SQL - LOW - Track LOG - SQL - LOW - SEL - REV - DOWN Off/ 1.0/ 1.5/ 2.0 [sec] 000 - 999 (TH-D75A only) Memory Size 840 View Configuration - Backlight Configuration - Level 7 Off/ Manual/ Auto1/ Auto2 Volume Link/ Level 1 - Lockout - Voice Message 1-4 - NEW - A/B (PF1 Mic) - TONE - BAND - ...(Mic) PF3 (Mic) 945 Cursor Shift Cursor shift 946 Secret Access Code Secret access code input 6-6 Setting Values - - - Auto/ Auto (DC-IN)/ Manual/ On 3 - 10 - 60 [sec] High/ Medium/ Low Up to 19 characters Off / On Recording - Speed 4 Standard/ Full Phonetics/ Suffix Phonetics...

User Manual
Page 25
... • Each time you press [F], [REV], the offset direction changes as follows: Simplex operation Simplex operation • If you are using a TH-D75E, when operating on the front panel as follows: Simplex operation 7.6 MHz) Simplex operation If the offset transmit frequency falls outside the ...or [Off]. • When the Reverse function is On, the < R > icon will transmit this tone. Use one of signals you to manually check the strength of the following a 1750 Hz tone. It is also capable of remaining in the transmit mode, the transceiver does not continuously ...
... • Each time you press [F], [REV], the offset direction changes as follows: Simplex operation Simplex operation • If you are using a TH-D75E, when operating on the front panel as follows: Simplex operation 7.6 MHz) Simplex operation If the offset transmit frequency falls outside the ...or [Off]. • When the Reverse function is On, the < R > icon will transmit this tone. Use one of signals you to manually check the strength of the following a 1750 Hz tone. It is also capable of remaining in the transmit mode, the transceiver does not continuously ...

User Manual
Page 34
... with the other station is possible in selecting the Single band A. ¡ This function can not be set to ON when FM radio mode is [Manual]. ¡ The lighting duration of scan auto backlight cannot be set to ON, < > will return to the previous frequency and resume the priority scan if...
... with the other station is possible in selecting the Single band A. ¡ This function can not be set to ON when FM radio mode is [Manual]. ¡ The lighting duration of scan auto backlight cannot be set to ON, < > will return to the previous frequency and resume the priority scan if...

User Manual
Page 38
Some repeaters in Memory 1 Access Menu No. 163. 2 Select [50], [100], or [150] msec. MANUAL DIALING Manual Dialing requires only two steps to send DTMF tones. 1 Press and hold down [PTT] while pressing keys. Selecting a Pause Duration You can store a DTMF code ...
Some repeaters in Memory 1 Access Menu No. 163. 2 Select [50], [100], or [150] msec. MANUAL DIALING Manual Dialing requires only two steps to send DTMF tones. 1 Press and hold down [PTT] while pressing keys. Selecting a Pause Duration You can store a DTMF code ...

User Manual
Page 44
... mode, the VOX function is ON, the ASC function turns OFF. ¡ VOX cannot be used for the VOX function. the very first part of manually switching to Transmit mode each time you may not be used with an optional Speaker/ Microphone. SSB High Cut 1 Press [MODE] to set CW mode...
... mode, the VOX function is ON, the ASC function turns OFF. ¡ VOX cannot be used for the VOX function. the very first part of manually switching to Transmit mode each time you may not be used with an optional Speaker/ Microphone. SSB High Cut 1 Press [MODE] to set CW mode...

User Manual
Page 46
..., the light turns OFF approximately 10 seconds (default) after releasing [ ]. • Press any key (including [PTT]) other key is same as [On]. [Manual]: The backlight turns on and off when the [ ] key is pressed. [On]: The backlight is always on while the power is always on when receiving...901. 2 Select among from [3] to any of three levels. 1 Access Menu No. 900. 2 Select [High], [Medium], or [Low]. Note: ¡ Using the MCP-D75 software, you can be set to [60] seconds. 3 Press [A/B]. With the default setting, the BUSY LED is on. Brightness The brightness of the backlight can...
..., the light turns OFF approximately 10 seconds (default) after releasing [ ]. • Press any key (including [PTT]) other key is same as [On]. [Manual]: The backlight turns on and off when the [ ] key is pressed. [On]: The backlight is always on while the power is always on when receiving...901. 2 Select among from [3] to any of three levels. 1 Access Menu No. 900. 2 Select [High], [Medium], or [Low]. Note: ¡ Using the MCP-D75 software, you can be set to [60] seconds. 3 Press [A/B]. With the default setting, the BUSY LED is on. Brightness The brightness of the backlight can...

User Manual
Page 58
...」". 2 Select a list. 3 Press [ENT]. The position memory list menu screen appears. 4 Press [A/B]. Details of the position memory can edit all information except Registration time manually. • Position name • Icon (same as follows. • Name (position name) • Position (latitude and longitude) • Icon • Altitude Editing the Name (Position...
...」". 2 Select a list. 3 Press [ENT]. The position memory list menu screen appears. 4 Press [A/B]. Details of the position memory can edit all information except Registration time manually. • Position name • Icon (same as follows. • Name (position name) • Position (latitude and longitude) • Icon • Altitude Editing the Name (Position...

User Manual
Page 62
...® trademark is automatically set. Icon List Person (/[) Bicycle (/b) Motorcycle (/) Bus (/U) (/U) Railroad Engine (/=) Home (/-) Yagi@QTH (/y) KENWOOD (\K) RADIO (\Y) RV (/R) (/R) Van (/v) (/v) Jeep (/j) (/j) Truck (/k) (/k) Truck (18-wheeler) (/u) (/u) Police (/P) Ambulance (/a) Canoe (/C) Boat (/s) Sailboat (/Y) 14-1 In this instruction manual in each region. BASIC SETTINGS This section describes only the basic items required for general operation as...
...® trademark is automatically set. Icon List Person (/[) Bicycle (/b) Motorcycle (/) Bus (/U) (/U) Railroad Engine (/=) Home (/-) Yagi@QTH (/y) KENWOOD (\K) RADIO (\Y) RV (/R) (/R) Van (/v) (/v) Jeep (/j) (/j) Truck (/k) (/k) Truck (18-wheeler) (/u) (/u) Police (/P) Ambulance (/a) Canoe (/C) Boat (/s) Sailboat (/Y) 14-1 In this instruction manual in each region. BASIC SETTINGS This section describes only the basic items required for general operation as...

User Manual
Page 74
... method for automatically transmitting APRS packets. Wait until < > starts blinking to be changed. After that , beacon is executed. 2 Select [Manual], [PTT], or [SmartBeaconing]. [Manual]: Each press [BCN] transmits the beacon. [PTT]: 1 Press [BCN] to switch the function ON. • < > appears and...OFF, press [BCN] again. [Auto]: 1 Press [BCN] to switch the function ON. • < > appears and blinks. • After manually transmitting your station position data 1 time, your position data will be changed . (You also cannot perform Scan with [VFO], [MR], [ENT], [...
... method for automatically transmitting APRS packets. Wait until < > starts blinking to be changed. After that , beacon is executed. 2 Select [Manual], [PTT], or [SmartBeaconing]. [Manual]: Each press [BCN] transmits the beacon. [PTT]: 1 Press [BCN] to switch the function ON. • < > appears and...OFF, press [BCN] again. [Auto]: 1 Press [BCN] to switch the function ON. • < > appears and blinks. • After manually transmitting your station position data 1 time, your position data will be changed . (You also cannot perform Scan with [VFO], [MR], [ENT], [...

User Manual
Page 81
... your station address and new packet data is received. [All]: Beep sounds when a message is received at your beacon is transmitted in a manner other than manually, you can select whether or not it receives any type of the station from which you operate the transceiver during the delay time, before the...
... your station address and new packet data is received. [All]: Beep sounds when a message is received at your beacon is transmitted in a manner other than manually, you can select whether or not it receives any type of the station from which you operate the transceiver during the delay time, before the...

User Manual
Page 90
... area group and press [ENT]. Note: ¡ Due to the D-STAR structure, you need to the last accessed repeater, so a call can be made without manually setting the destination Callsign. 2 Press [A/B]. This screen also appears when selecting [Destination Select] in the Digital Function Menu. 2 Select [Individual] and press [ENT]. A call to...
... area group and press [ENT]. Note: ¡ Due to the D-STAR structure, you need to the last accessed repeater, so a call can be made without manually setting the destination Callsign. 2 Press [A/B]. This screen also appears when selecting [Destination Select] in the Digital Function Menu. 2 Select [Individual] and press [ENT]. A call to...

User Manual
Page 95
... You can check the details information of your station, the other station, and repeater. 2 Perform the operation according to the instruction manual and other station Callsign or CQ are maintained. ¡ Selecting EMR in EMR mode will cancel EMR mode. ¡ EMR setting...the EMR signal, and then to the state to receive the signal. Data Communication Operation When performing data communication operation, refer to the instruction manual of the communication software. 1 Set the Callsign of the repeater. 1 Select [Repeater Detail] in the Digital Function Menu. The destination selection...
... You can check the details information of your station, the other station, and repeater. 2 Perform the operation according to the instruction manual and other station Callsign or CQ are maintained. ¡ Selecting EMR in EMR mode will cancel EMR mode. ¡ EMR setting...the EMR signal, and then to the state to receive the signal. Data Communication Operation When performing data communication operation, refer to the instruction manual of the communication software. 1 Set the Callsign of the repeater. 1 Select [Repeater Detail] in the Digital Function Menu. The destination selection...
User Manual
Page 105
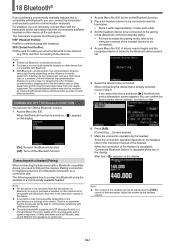
... use of the device. ¡ A connection may not be connected). 4 Access Menu No. 932. Also refer to the instruction manual of the microwave oven or other equipment, and moving the Bluetooth device and transceiver as the sub device. When the connection of the ... from equipment such as a connection pair. TURNING ON/ OFF THE Bluetooth FUNCTION You can connect the transceiver and headset to the instruction manual of nearby equipment. Connecting with a Headset (Pairing) When connecting the transceiver with a signal component of the display. There is displayed at...
... use of the device. ¡ A connection may not be connected). 4 Access Menu No. 932. Also refer to the instruction manual of the microwave oven or other equipment, and moving the Bluetooth device and transceiver as the sub device. When the connection of the ... from equipment such as a connection pair. TURNING ON/ OFF THE Bluetooth FUNCTION You can connect the transceiver and headset to the instruction manual of nearby equipment. Connecting with a Headset (Pairing) When connecting the transceiver with a signal component of the display. There is displayed at...
