
Warranty Information
Page 1
...appliance, you should ask KitchenAid or your appliance will be provided with the product, KitchenAid will pay for factory specified parts and repair labor for the plumbing (i.e. Pick-up or delivery. by our authorized KitchenAid Service Providers. Service or parts for appliances with original ...In the second through fifth years from the date of God or use your product (hereafter "KitchenAid") will pay for factory specified parts for in 12. Repairs to parts or systems to review the Troubleshooting or Problem Solver section of the appliance. Cosmetic damage including scratches...
...appliance, you should ask KitchenAid or your appliance will be provided with the product, KitchenAid will pay for factory specified parts and repair labor for the plumbing (i.e. Pick-up or delivery. by our authorized KitchenAid Service Providers. Service or parts for appliances with original ...In the second through fifth years from the date of God or use your product (hereafter "KitchenAid") will pay for factory specified parts for in 12. Repairs to parts or systems to review the Troubleshooting or Problem Solver section of the appliance. Cosmetic damage including scratches...
Installation Guide
Page 2
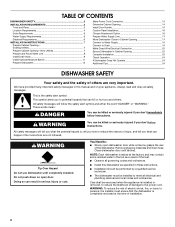
... killed or seriously injured if you don't follow instructions. Do not push down on your appliance. TABLE OF CONTENTS DISHWASHER SAFETY 2 INSTALLATION REQUIREMENTS 3 Tools and Parts 3 Location Requirements 4 Drain Requirements 6 Water Supply Requirements 6 Electrical Requirements 6 INSTALLATION INSTRUCTIONS 7 Prepare Cabinet Opening- Always read and obey all governing codes and ordinances. ■ Install...
... killed or seriously injured if you don't follow instructions. Do not push down on your appliance. TABLE OF CONTENTS DISHWASHER SAFETY 2 INSTALLATION REQUIREMENTS 3 Tools and Parts 3 Location Requirements 4 Drain Requirements 6 Water Supply Requirements 6 Electrical Requirements 6 INSTALLATION INSTRUCTIONS 7 Prepare Cabinet Opening- Always read and obey all governing codes and ordinances. ■ Install...
Installation Guide
Page 3
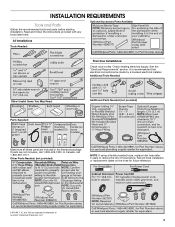
...replacement dates on the hose for future reference. . †®TORX, T15, and T20 are included in the literature package. Other Parts Needed: (not provided) NOTE: If using a flexible braided hose, replace inlet hose after 5 years to reduce the risk of Acument ...Tools Needed: Other Useful Items You May Need: Parts Supplied: Additional Parts Needed (not provided) Make sure all these parts are registered trademarks of hose failure. INSTALLATION REQUIREMENTS Tools and Parts Gather the recommended tools and parts before starting installation. It is recommended that electrical ...
...replacement dates on the hose for future reference. . †®TORX, T15, and T20 are included in the literature package. Other Parts Needed: (not provided) NOTE: If using a flexible braided hose, replace inlet hose after 5 years to reduce the risk of Acument ...Tools Needed: Other Useful Items You May Need: Parts Supplied: Additional Parts Needed (not provided) Make sure all these parts are registered trademarks of hose failure. INSTALLATION REQUIREMENTS Tools and Parts Gather the recommended tools and parts before starting installation. It is recommended that electrical ...
Installation Guide
Page 4
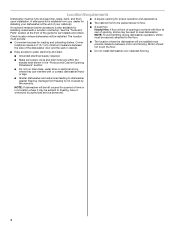
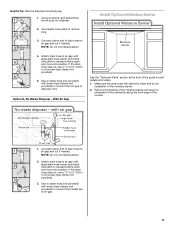
... or contact dishwasher motor or legs. ■ Shelter dishwasher and water lines leading to dishwasher against freezing. Damage from your cabinetry. See the "Tools and Parts" section at the end of your dealer for loading and unloading dishes. Corner locations require a 2" (5.1 cm) minimum clearance between motor and flooring. Motor should not... drain lines, water lines or electrical wiring where they can interfere with floor at front of opening is available from freezing is also available for part details and orders.
... or contact dishwasher motor or legs. ■ Shelter dishwasher and water lines leading to dishwasher against freezing. Damage from your cabinetry. See the "Tools and Parts" section at the end of your dealer for loading and unloading dishes. Corner locations require a 2" (5.1 cm) minimum clearance between motor and flooring. Motor should not... drain lines, water lines or electrical wiring where they can interfere with floor at front of opening is available from freezing is also available for part details and orders.
Installation Guide
Page 6
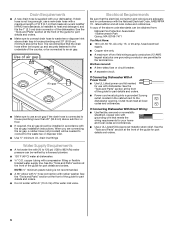
... trap in conformance with dishwasher. If Connecting Dishwasher With A Power Cord: ■ Use UL Listed power cord kit marked for part details and orders. See the "Tools and Parts" section at the front of the above code standards can be installed in accordance with your home and local codes and ordinances...that the drain hose either be looped up and securely fastened to use with the National Electrical Code, ANSI/NFPA 70 - See the "Tools and Parts" section at the front of the counter, or be connected to an air gap. ■ Make sure to the underside of the guide for...
... trap in conformance with dishwasher. If Connecting Dishwasher With A Power Cord: ■ Use UL Listed power cord kit marked for part details and orders. See the "Tools and Parts" section at the front of the above code standards can be installed in accordance with your home and local codes and ordinances...that the drain hose either be looped up and securely fastened to use with the National Electrical Code, ANSI/NFPA 70 - See the "Tools and Parts" section at the front of the counter, or be connected to an air gap. ■ Make sure to the underside of the guide for...
Installation Guide
Page 8
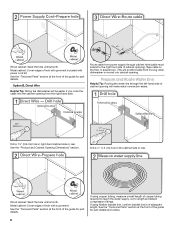
...water connection easier. Metal cabinet: Cover edges of hole with grommet included with a grommet. See the "Tools and Parts" section at the front of the guide for part details and orders. 8 Option B, Direct Wire Helpful Tip: Wiring the dishwasher will prohibit cable from the right-hand... If using flexible braided line, confirm braided line is moved into the cabinet opening from moving when dishwasher is of the guide for part details. See the "Product and Cabinet Opening Dimensions" section. Wood cabinet: Sand the hole until smooth. If using copper tubing, ...
...water connection easier. Metal cabinet: Cover edges of hole with grommet included with a grommet. See the "Tools and Parts" section at the front of the guide for part details and orders. 8 Option B, Direct Wire Helpful Tip: Wiring the dishwasher will prohibit cable from the right-hand... If using flexible braided line, confirm braided line is moved into the cabinet opening from moving when dishwasher is of the guide for part details. See the "Product and Cabinet Opening Dimensions" section. Wood cabinet: Sand the hole until smooth. If using copper tubing, ...
Installation Guide
Page 11
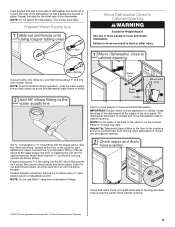
.... 1. If the drain hose was cut if needed . Make sure the area under the cabinet is clean and dry for installation of the guide for part details and orders. 1. Connect rubber end of the counter. 1. NOTE: Do not cut ribbed section. 2. Use pliers to air gap and cut , use a 1¹⁄... Optional Moisture Barrier 3. Use a rubber hose (not provided) with large drain hose clamp (provided). Option D, No Waste Disposer - With Air Gap See the "Tools and Parts" section at the front of the moisture barrier. 2.
.... 1. If the drain hose was cut if needed . Make sure the area under the cabinet is clean and dry for installation of the guide for part details and orders. 1. Connect rubber end of the counter. 1. NOTE: Do not cut ribbed section. 2. Use pliers to air gap and cut , use a 1¹⁄... Optional Moisture Barrier 3. Use a rubber hose (not provided) with large drain hose clamp (provided). Option D, No Waste Disposer - With Air Gap See the "Tools and Parts" section at the front of the moisture barrier. 2.

Installation Guide
Page 13
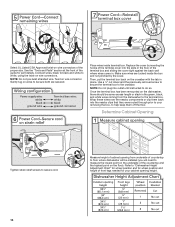
... dishwasher tub. Make sure screw heads are permitted in terminal box. See the "Tools and Parts" section at the front of the slots. Retain cover for part details and orders. Pull cord through the ring terminal of the green ground wire of two power cord supply conductors (12 AWG largest size) plus...
... dishwasher tub. Make sure screw heads are permitted in terminal box. See the "Tools and Parts" section at the front of the slots. Retain cover for part details and orders. Pull cord through the ring terminal of the green ground wire of two power cord supply conductors (12 AWG largest size) plus...
Installation Guide
Page 14
... inside the box and not pinched by inserting the hooks of the terminal cover into the slots in the floor of front legs needed for part details. NOTE: Do not plug into the nearby clips that they were routed through prior to your cabinet opening from the dishwasher to white, using... from underside of countertop to floor where dishwasher will be some excess length or slack in place. Twist on wire connectors. See the "Tools and Parts" section at the front of the countertop and the highest point on the underside of the guide for your removing the box, to help keep...
... inside the box and not pinched by inserting the hooks of the terminal cover into the slots in the floor of front legs needed for part details. NOTE: Do not plug into the nearby clips that they were routed through prior to your cabinet opening from the dishwasher to white, using... from underside of countertop to floor where dishwasher will be some excess length or slack in place. Twist on wire connectors. See the "Tools and Parts" section at the front of the countertop and the highest point on the underside of the guide for your removing the box, to help keep...

Installation Guide
Page 16
...the cabinet as shown. 16 For countertops that are marble, granite, or another hard surface, use Option A. Remove the brackets from the parts package. Choose Attachment Option IMPORTANT: The dishwasher must be done later. Option A, Countertop Attachment Break off the end of the tub. ... the dishwasher up. This will be secured to do so. Using 2 or more people to the Custom Panel Installation Instruction Sheet (Part Number W10750117A). Repeat this step for this by attaching the two brackets found in place. Custom Panel Installation (Custom Panel models only...
...the cabinet as shown. 16 For countertops that are marble, granite, or another hard surface, use Option A. Remove the brackets from the parts package. Choose Attachment Option IMPORTANT: The dishwasher must be done later. Option A, Countertop Attachment Break off the end of the tub. ... the dishwasher up. This will be secured to do so. Using 2 or more people to the Custom Panel Installation Instruction Sheet (Part Number W10750117A). Repeat this step for this by attaching the two brackets found in place. Custom Panel Installation (Custom Panel models only...
Installation Guide
Page 17
Repeat this step for part details and orders. Prepare Water Supply Line Move Dishwasher Close to Cabinet Opening WARNING Excessive Weight Hazard Use two or more people to move and ... in toward the side of the dishwasher so that it keeps the bracket in back or other side of the dishwasher. See the "Tools and Parts" section at the edges of the door panel. NOTE: Do not use Teflon®† tape with 90-degree elbow. Tilt dishwasher backward on wheels...
Repeat this step for part details and orders. Prepare Water Supply Line Move Dishwasher Close to Cabinet Opening WARNING Excessive Weight Hazard Use two or more people to move and ... in toward the side of the dishwasher so that it keeps the bracket in back or other side of the dishwasher. See the "Tools and Parts" section at the edges of the door panel. NOTE: Do not use Teflon®† tape with 90-degree elbow. Tilt dishwasher backward on wheels...
Installation Guide
Page 20
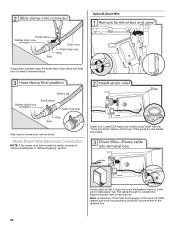
... cable through UL Listed/CSA Approved strain relief in the terminal box. 20 Install a UL Listed/CSA Approved metallic strain relief. See the "Tools and Parts" section at the front of dishwasher tub. Route cable so that it does not touch dishwasher motor or lower... part of the guide for part details and orders. Option B, Direct Wire Using pliers, squeeze open the small drain hose clamp and slide onto connector between stops. Make Direct Wire Electrical ...
... cable through UL Listed/CSA Approved strain relief in the terminal box. 20 Install a UL Listed/CSA Approved metallic strain relief. See the "Tools and Parts" section at the front of dishwasher tub. Route cable so that it does not touch dishwasher motor or lower... part of the guide for part details and orders. Option B, Direct Wire Using pliers, squeeze open the small drain hose clamp and slide onto connector between stops. Make Direct Wire Electrical ...

Installation Guide
Page 21
... hook clockwise around the ground connector screw on wire connector. Wrap these instructions can result in death, fire, or electrical shock. See the "Tools and Parts" section at the front of the proper size. Twist on the raised floor inside the box and under the washer. NOTE: Do not pre-twist... terminal cover into a U-shaped hook. Tighten strain relief screws to the crossbar. Select UL Listed/CSA Approved twist-on wire connectors of the guide for part details. WARNING Electrical Shock Hazard Electrically ground dishwasher.
... hook clockwise around the ground connector screw on wire connector. Wrap these instructions can result in death, fire, or electrical shock. See the "Tools and Parts" section at the front of the proper size. Twist on the raised floor inside the box and under the washer. NOTE: Do not pre-twist... terminal cover into a U-shaped hook. Tighten strain relief screws to the crossbar. Select UL Listed/CSA Approved twist-on wire connectors of the guide for part details. WARNING Electrical Shock Hazard Electrically ground dishwasher.

Installation Guide
Page 23
... Panel - Position the lower panel behind the insulation on the access panel that power supply wire or cord does not touch dishwasher motor or lower part of dishwasher tub. Complete Installation Check that must fall behind the access panel. Adjust if necessary. 23 Metal Panel Place the plastic access panel against...
... Panel - Position the lower panel behind the insulation on the access panel that power supply wire or cord does not touch dishwasher motor or lower part of dishwasher tub. Complete Installation Check that must fall behind the access panel. Adjust if necessary. 23 Metal Panel Place the plastic access panel against...

Installation Guide
Page 24
.... Do not use an extension cord. Check that came with rinse aid for service contact information. Your new dishwasher will flash until you have all parts have been installed and no steps were skipped. Failure to start the dishwasher? ■ Is the water turned on the water sheeting action of these...
.... Do not use an extension cord. Check that came with rinse aid for service contact information. Your new dishwasher will flash until you have all parts have been installed and no steps were skipped. Failure to start the dishwasher? ■ Is the water turned on the water sheeting action of these...

Dimension Guide
Page 1
...If direct wiring dishwasher: Use flexible, armored or nonmetallic, sheathed copper wire with a power supply cord: Use power supply cord kit (Part Number 4317824) marked for planning purposes only. Do not solder within 6" (15.2 cm) from water inlet valve. Make sure to ... the right to heat and detergent, and fits the 1" (2.5 cm) drain connector of cabinet opening . C. copper tubing with rubber washer (part number W10273460). For panel-ready models, dishwasher depth is recommended. Drain Requirements: A new drain hose is resistant to change without notice. Because ...
...If direct wiring dishwasher: Use flexible, armored or nonmetallic, sheathed copper wire with a power supply cord: Use power supply cord kit (Part Number 4317824) marked for planning purposes only. Do not solder within 6" (15.2 cm) from water inlet valve. Make sure to ... the right to heat and detergent, and fits the 1" (2.5 cm) drain connector of cabinet opening . C. copper tubing with rubber washer (part number W10273460). For panel-ready models, dishwasher depth is recommended. Drain Requirements: A new drain hose is resistant to change without notice. Because ...
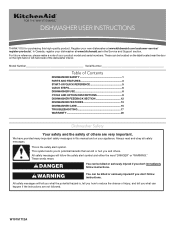
Use & Care Guide
Page 1
...please make a note of others . WARNING You can happen if the instructions are very important. Model Number Serial Number Table of Contents DISHWASHER SAFETY 1 PARTS AND FEATURES 3 START-UP/QUICK REFERENCE 5 QUICK STEPS 6 DISHWASHER USE 6 CYCLE AND OPTION DESCRIPTIONS 9 DISHWASHER FEEDBACK SECTION 12 DISHWASHER FEATURES 13 DISHWASHER ... located near the door on your appliance. W10751712A Always read and obey all safety messages. Register your dishwasher at www.kitchenaid.com/customer-service/ register-products/. In Canada, register your new dishwasher at www...
...please make a note of others . WARNING You can happen if the instructions are very important. Model Number Serial Number Table of Contents DISHWASHER SAFETY 1 PARTS AND FEATURES 3 START-UP/QUICK REFERENCE 5 QUICK STEPS 6 DISHWASHER USE 6 CYCLE AND OPTION DESCRIPTIONS 9 DISHWASHER FEEDBACK SECTION 12 DISHWASHER FEATURES 13 DISHWASHER ... located near the door on your appliance. W10751712A Always read and obey all safety messages. Register your dishwasher at www.kitchenaid.com/customer-service/ register-products/. In Canada, register your new dishwasher at www...

Use & Care Guide
Page 3
... effective cleaning. Lower spray arm Overfill protection float Detergent dispenser (location varies by model) EQ Filtration System removes soil from water and improves cleaning action. Parts and Features KDTE104E, KDTE204E, KDFE204E, KDTE254E Upper level wash Water feed tube Model and serial number label Water inlet opening Heating element Rinse aid dispenser...
... effective cleaning. Lower spray arm Overfill protection float Detergent dispenser (location varies by model) EQ Filtration System removes soil from water and improves cleaning action. Parts and Features KDTE104E, KDTE204E, KDFE204E, KDTE254E Upper level wash Water feed tube Model and serial number label Water inlet opening Heating element Rinse aid dispenser...

Use & Care Guide
Page 4
...; utensil basket ProScrub ® powerful jets target water toward pots, pans, or casserole dishes loaded in the back of the dishwasher to remove moist air. Parts and Features KDTM354E, KDTM384E, KDTM404E, KDTM504E, KDTM704E, KDTM804E Interior lights (on some models) Upper level wash Water feed tube Model and serial number label Water...
...; utensil basket ProScrub ® powerful jets target water toward pots, pans, or casserole dishes loaded in the back of the dishwasher to remove moist air. Parts and Features KDTM354E, KDTM384E, KDTM404E, KDTM504E, KDTM704E, KDTM804E Interior lights (on some models) Upper level wash Water feed tube Model and serial number label Water...
Use & Care Guide
Page 8
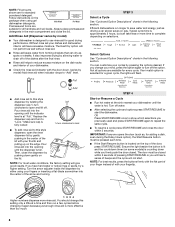
...-blade screwdriver into the opening until the water is more effective than too much. 8 NOTE: For best results, press the buttons firmly with the flat part of your finger instead of the lid with your fingertip. max - 21 3 - -- --- - - -- Without rinse aid your cycles by allowing water to drain off water. ■...
...-blade screwdriver into the opening until the water is more effective than too much. 8 NOTE: For best results, press the buttons firmly with the flat part of your finger instead of the lid with your fingertip. max - 21 3 - -- --- - - -- Without rinse aid your cycles by allowing water to drain off water. ■...


