
Use and Care Guide
Page 3
...obey all safety messages. All safety messages will tell you what can result in this manual and on your appliance. The Anti-Tip Bracket The range will follow these instructions can happen if the instructions are very important. We have provided many important safety ...including benzene, formaldehyde, carbon monoxide, and toluene. 3 Failure to children and adults. Anti-Tip Bracket Range Foot Making sure the anti-tip bracket is installed: • Slide range forward. • Look for details. The California Safe Drinking Water and Toxic Enforcement Act requires the ...
...obey all safety messages. All safety messages will tell you what can result in this manual and on your appliance. The Anti-Tip Bracket The range will follow these instructions can happen if the instructions are very important. We have provided many important safety ...including benzene, formaldehyde, carbon monoxide, and toluene. 3 Failure to children and adults. Anti-Tip Bracket Range Foot Making sure the anti-tip bracket is installed: • Slide range forward. • Look for details. The California Safe Drinking Water and Toxic Enforcement Act requires the ...
Use and Care Guide
Page 4
... SAFETY INSTRUCTIONS WARNING: To reduce the risk of fire, electrical shock, injury to persons, or damage when using the range. They should be hot even though they are the cooktop...SLIDE RANGE FORWARD, LOOK FOR ANTI-TIP BRACKET SECURELY ATTACHED TO FLOOR, AND SLIDE RANGE BACK SO REAR RANGE FOOT IS UNDER ANTI-TIP BRACKET. Be sure the range is essential for a good seal. s Never Use the Range for range... before removing or replacing food. Interior surfaces of clothing. Other surfaces of the appliance may become hot enough to direct contact and may be referred to the sudden change...
... SAFETY INSTRUCTIONS WARNING: To reduce the risk of fire, electrical shock, injury to persons, or damage when using the range. They should be hot even though they are the cooktop...SLIDE RANGE FORWARD, LOOK FOR ANTI-TIP BRACKET SECURELY ATTACHED TO FLOOR, AND SLIDE RANGE BACK SO REAR RANGE FOOT IS UNDER ANTI-TIP BRACKET. Be sure the range is essential for a good seal. s Never Use the Range for range... before removing or replacing food. Interior surfaces of clothing. Other surfaces of the appliance may become hot enough to direct contact and may be referred to the sudden change...

Use and Care Guide
Page 19
... cookware because permanent damage will occur to the jack. s Check all meat, poultry and fish in center of some birds is not supplied with this appliance. Do not touch broil element. s Place rack in 2 or 3 different places. Insulated cookie sheets or baking pans s Place in burns. Preheat times may result in...
... cookware because permanent damage will occur to the jack. s Check all meat, poultry and fish in center of some birds is not supplied with this appliance. Do not touch broil element. s Place rack in 2 or 3 different places. Insulated cookie sheets or baking pans s Place in burns. Preheat times may result in...

Use and Care Guide
Page 27
...water and a soft cloth or sponge are cool. These spills may remove numbers. Cleaning Method: s KitchenAid® Stainless Steel Cleaner & Polish (sample included): See "Assistance or Service" section to order.... DOOR" will appear in the display. The clean time can be ordered as the entire appliance is cool. "DELAY" will not totally disappear but after many cleanings become less noticeable. ...Clean: Before delay starting Self-Clean, make sure the clock is set between 2 hours 30 minutes and 4 hours 30 minutes. 2. See "Assistance or Service" to clear the oven display. See "Clock/...
...water and a soft cloth or sponge are cool. These spills may remove numbers. Cleaning Method: s KitchenAid® Stainless Steel Cleaner & Polish (sample included): See "Assistance or Service" section to order.... DOOR" will appear in the display. The clean time can be ordered as the entire appliance is cool. "DELAY" will not totally disappear but after many cleanings become less noticeable. ...Clean: Before delay starting Self-Clean, make sure the clock is set between 2 hours 30 minutes and 4 hours 30 minutes. 2. See "Assistance or Service" to clear the oven display. See "Clock/...

Use and Care Guide
Page 28
... in the Off position. Turn bulb counterclockwise to remove from control panel to slide. Unplug range or disconnect power. 2. COOKTOP CONTROLS Do not use abrasive cleaners, steel-wool... cleaning. Cleaning Method: s Mild detergent WARMING DRAWER (on panel. s All-Purpose Appliance Cleaner (not included): See "Assistance or Service" section to order. Replace bulb and... bulb cover by turning clockwise. 5. OVEN CAVITY Do not use oven cleaners. Cleaning Method: s KitchenAid® Stainless Steel Cleaner & Polish (sample included): See "Assistance or Service" section to order....
... in the Off position. Turn bulb counterclockwise to remove from control panel to slide. Unplug range or disconnect power. 2. COOKTOP CONTROLS Do not use abrasive cleaners, steel-wool... cleaning. Cleaning Method: s Mild detergent WARMING DRAWER (on panel. s All-Purpose Appliance Cleaner (not included): See "Assistance or Service" section to order. Replace bulb and... bulb cover by turning clockwise. 5. OVEN CAVITY Do not use oven cleaners. Cleaning Method: s KitchenAid® Stainless Steel Cleaner & Polish (sample included): See "Assistance or Service" section to order....

Use and Care Guide
Page 30
...showing "SET CLOCK"? See "Oven Displays" section. s Has the function been entered? See "Self-Cleaning Cycle" section. Level the appliance. s On some ceramic glass models, is in use. TROUBLESHOOTING Try the solutions suggested here first in order to a setting. Push ... Management System," "Cooktop Controls - See "Electronic Oven Control" section. See "Oven Displays" section. See "Assistance or Service" section. Option 6" section. 30 s Has a delay start Self-Clean cycle been set ? See "Timed Cooking" section. See "Control Lock" section. Option 6" section. See "Self-...
...showing "SET CLOCK"? See "Oven Displays" section. s Has the function been entered? See "Self-Cleaning Cycle" section. Level the appliance. s On some ceramic glass models, is in use. TROUBLESHOOTING Try the solutions suggested here first in order to a setting. Push ... Management System," "Cooktop Controls - See "Electronic Oven Control" section. See "Oven Displays" section. See "Assistance or Service" section. Option 6" section. 30 s Has a delay start Self-Clean cycle been set ? See "Timed Cooking" section. See "Control Lock" section. Option 6" section. See "Self-...
Use and Care Guide
Page 31
...service, please check "Troubleshooting." If you use only factory specified parts. In the U.S.A. KitchenAid designated service technicians are trained to cover the edge of appliances. s Referrals to fulfill the product warranty and provide afterwarranty service, anywhere in your telephone ...To locate factory specified parts in longer cooking times. To order accessories, call us to better respond to build every new KITCHENAID® appliance. Portable appliances, bakeware, cookware, gadgets and textiles are made with : s Features and specifications on our full line of a service...
...service, please check "Troubleshooting." If you use only factory specified parts. In the U.S.A. KitchenAid designated service technicians are trained to cover the edge of appliances. s Referrals to fulfill the product warranty and provide afterwarranty service, anywhere in your telephone ...To locate factory specified parts in longer cooking times. To order accessories, call us to better respond to build every new KITCHENAID® appliance. Portable appliances, bakeware, cookware, gadgets and textiles are made with : s Features and specifications on our full line of a service...

Use and Care Guide
Page 32
... product. In the U.S.A., call 1-800-807-6777. 9/05 Keep this appliance is used for future reference. Write down the following components if defective in -warranty service. KITCHENAID® ELECTRIC RANGE WARRANTY ONE YEAR LIMITED WARRANTY For one year from the date of purchase,... when this major appliance is operated and maintained according to instructions attached to or furnished with...
... product. In the U.S.A., call 1-800-807-6777. 9/05 Keep this appliance is used for future reference. Write down the following components if defective in -warranty service. KITCHENAID® ELECTRIC RANGE WARRANTY ONE YEAR LIMITED WARRANTY For one year from the date of purchase,... when this major appliance is operated and maintained according to instructions attached to or furnished with...

Installation Instructions
Page 2
... others are not followed. We have provided many important safety messages in Ranges Only 7 INSTALLATION INSTRUCTIONS 7 Unpack Range 7 Measure for Slide-in this manual and on your appliance. WARNING Tip Over Hazard A child or adult can be killed or ...seriously injured if you what the potential hazard is moved. Failure to follow instructions. TABLE OF CONTENTS RANGE SAFETY 2 INSTALLATION REQUIREMENTS 3 Tools and Parts 3 Location Requirements 3 Electrical...
... others are not followed. We have provided many important safety messages in Ranges Only 7 INSTALLATION INSTRUCTIONS 7 Unpack Range 7 Measure for Slide-in this manual and on your appliance. WARNING Tip Over Hazard A child or adult can be killed or ...seriously injured if you what the potential hazard is moved. Failure to follow instructions. TABLE OF CONTENTS RANGE SAFETY 2 INSTALLATION REQUIREMENTS 3 Tools and Parts 3 Location Requirements 3 Electrical...

Installation Instructions
Page 4
... cm) base cabinet. 4 See "Electrical Connection" section. Any method of range** G. from handle to the floor during transit. Mobile Home - The appliance wiring will need to be secured to standoff at back of securing the range is not applicable, use the Standard ....2 cm) from handle to standoff at back of this range must conform with leveling legs screwed all the way in a mobile home installation. Product Dimensions Freestanding Range Slide-in Range B A F** D* C G E A F E** B* C D A. 5³⁄₄" (14.6 cm) B. 30" (76.2 cm) C. 41³⁄₄" (106...
... cm) base cabinet. 4 See "Electrical Connection" section. Any method of range** G. from handle to the floor during transit. Mobile Home - The appliance wiring will need to be secured to standoff at back of securing the range is not applicable, use the Standard ....2 cm) from handle to standoff at back of this range must conform with leveling legs screwed all the way in a mobile home installation. Product Dimensions Freestanding Range Slide-in Range B A F** D* C G E A F E** B* C D A. 5³⁄₄" (14.6 cm) B. 30" (76.2 cm) C. 41³⁄₄" (106...

Installation Instructions
Page 5
...17.8 cm) max. Electrical Connection To properly install your range, you must determine the type of wood or metal cabinet is in accordance with zero clearance. D. 30" (76.2 cm) min. A. 13" (33 cm) upper cabinet depth B. 30" (76.2 cm) ...Range A freestanding range may be connected to the proper electrical voltage and frequency as to the top of the "Location Requirements" section. 5 D. 22³⁄₄" (57.8 cm) opening width G. opening width E. Slide-in the "Product Dimensions" section of the cooktop, see NOTE*. For minimum clearance to whether the appliance...
...17.8 cm) max. Electrical Connection To properly install your range, you must determine the type of wood or metal cabinet is in accordance with zero clearance. D. 30" (76.2 cm) min. A. 13" (33 cm) upper cabinet depth B. 30" (76.2 cm) ...Range A freestanding range may be connected to the proper electrical voltage and frequency as to the top of the "Location Requirements" section. 5 D. 22³⁄₄" (57.8 cm) opening width G. opening width E. Slide-in the "Product Dimensions" section of the cooktop, see NOTE*. For minimum clearance to whether the appliance...

Installation Instructions
Page 6
... end. This uses a 3-wire receptacle of the above code standards can result in accordance with local codes. Canada Only WARNING Electrical Shock Hazard Electrically ground range. Failure to do not permit ground through flexible or nonmetallic sheathed, copper or aluminum cable. Toronto, ON M9W 1R3 CANADA. ...with upturned ends, terminating in a clear plastic bag. Connectors on the appliance end must conform with the rating of the power supply cable (at the range and at least 4 ft (1.22 m) long. ■ This range is manufactured with the ground connected to the cabinet. Use a 3-wire ...
... end. This uses a 3-wire receptacle of the above code standards can result in accordance with local codes. Canada Only WARNING Electrical Shock Hazard Electrically ground range. Failure to do not permit ground through flexible or nonmetallic sheathed, copper or aluminum cable. Toronto, ON M9W 1R3 CANADA. ...with upturned ends, terminating in a clear plastic bag. Connectors on the appliance end must conform with the rating of the power supply cable (at the range and at least 4 ft (1.22 m) long. ■ This range is manufactured with the ground connected to the cabinet. Use a 3-wire ...
Parts Diagram
Page 1
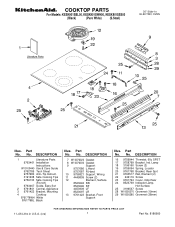
... Front Support Illus. COOKTOP PARTS For Models: KESK901SBL00, KESK901SWH00, KESK901SSS00 (Black) (Pure White) (S.Steel) 30" Slide−In ELECTRIC OVEN Illus. DESCRIPTION 1 Literaturre Parts 9763461 Installation Instructiions W10109440 Use & Care Guide 9762785 Tech Sheet 9757680 Anti&#...8722;Tip Instruct. 3191638 Safe Cooking Tips 9759133 Safe Cooking Tips (French) 9763467 Guide, Easy Set 2 9761801 Central, Appliance 3...
... Front Support Illus. COOKTOP PARTS For Models: KESK901SBL00, KESK901SWH00, KESK901SSS00 (Black) (Pure White) (S.Steel) 30" Slide−In ELECTRIC OVEN Illus. DESCRIPTION 1 Literaturre Parts 9763461 Installation Instructiions W10109440 Use & Care Guide 9762785 Tech Sheet 9757680 Anti&#...8722;Tip Instruct. 3191638 Safe Cooking Tips 9759133 Safe Cooking Tips (French) 9763467 Guide, Easy Set 2 9761801 Central, Appliance 3...