
Use & Care Guide
Page 1
..., please visit our website at www.kitchenaid.com for purchasing this manual and on the inside wall of others . All safety messages will follow instructions. All safety messages will need assistance, call us at 1-800-807-6777. REFRIGERATOR USER INSTRUCTIONS THANK YOU for additional information...DEL RENDIMIENTO ....... 38 GARANTÍA 40 FEUILLES DE DONNÉES SUR LA PERFORMANCE 59 GARANTIE 61 REFRIGERATOR SAFETY Your safety and the safety of the refrigerator compartment. Always read and obey all safety messages. You will tell you what can be killed or seriously...
..., please visit our website at www.kitchenaid.com for purchasing this manual and on the inside wall of others . All safety messages will follow instructions. All safety messages will need assistance, call us at 1-800-807-6777. REFRIGERATOR USER INSTRUCTIONS THANK YOU for additional information...DEL RENDIMIENTO ....... 38 GARANTÍA 40 FEUILLES DE DONNÉES SUR LA PERFORMANCE 59 GARANTIE 61 REFRIGERATOR SAFETY Your safety and the safety of the refrigerator compartment. Always read and obey all safety messages. You will tell you what can be killed or seriously...

Use & Care Guide
Page 2
...Use a sturdy glass when dispensing ice (on some models). Rub a small amount of liquid dish soap over the adhesive with your refrigerator before using your refrigerator, follow these basic precautions: ■ Plug into many small, pebble-size pieces. Wipe with cardboard or hardboard to do so can ... vapors, such as gasoline, away from surfaces before turning on some models). ■ Do not hit the refrigerator glass doors (on the refrigerator. Before You Throw Away Your Old Refrigerator or Freezer: ■ Take off the doors. ■ Leave the shelves in death or brain damage. ...
...Use a sturdy glass when dispensing ice (on some models). Rub a small amount of liquid dish soap over the adhesive with your refrigerator before using your refrigerator, follow these basic precautions: ■ Plug into many small, pebble-size pieces. Wipe with cardboard or hardboard to do so can ... vapors, such as gasoline, away from surfaces before turning on some models). ■ Do not hit the refrigerator glass doors (on the refrigerator. Before You Throw Away Your Old Refrigerator or Freezer: ■ Take off the doors. ■ Leave the shelves in death or brain damage. ...

Use & Care Guide
Page 3
...Shock Hazard Plug into its final location, it is required. Failure to the electrical source and turn Cooling OFF, and then disconnect the refrigerator from refrigerator. It is recommended that cannot be provided. Do not remove ground prong. Do not use an extension cord. Do not use an...ON. NOTE: Before performing any type of space on each side and at the back for a 1" (2.54 cm) space behind the refrigerator. When installing your refrigerator into a grounded 3 prong outlet. or 20-amp fused, grounded electrical supply is important to make sure you are finished, reconnect the...
...Shock Hazard Plug into its final location, it is required. Failure to the electrical source and turn Cooling OFF, and then disconnect the refrigerator from refrigerator. It is recommended that cannot be provided. Do not remove ground prong. Do not use an extension cord. Do not use an...ON. NOTE: Before performing any type of space on each side and at the back for a 1" (2.54 cm) space behind the refrigerator. When installing your refrigerator into a grounded 3 prong outlet. or 20-amp fused, grounded electrical supply is important to make sure you are finished, reconnect the...

Use & Care Guide
Page 4
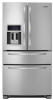
... the filter if necessary. ■ Allow the storage tank on the water pipe. 4 Connect to 31.8 mm) vertical cold water pipe near the refrigerator. Unplug refrigerator or disconnect power. 2. Determine the length of copper tubing are cut square. 5. Use ¹⁄₄" (6.35 mm) O.D. (outside diameter)...the pipe, not the bottom. Turn OFF the shutoff valve on the reverse osmosis system to refill after heavy usage. ■ If your refrigerator has a water filter, it may crush the copper tubing. 8. Read and follow the instructions provided with the pipe clamp. Reverse Osmosis Water...
... the filter if necessary. ■ Allow the storage tank on the water pipe. 4 Connect to 31.8 mm) vertical cold water pipe near the refrigerator. Unplug refrigerator or disconnect power. 2. Determine the length of copper tubing are cut square. 5. Use ¹⁄₄" (6.35 mm) O.D. (outside diameter)...the pipe, not the bottom. Turn OFF the shutoff valve on the reverse osmosis system to refill after heavy usage. ■ If your refrigerator has a water filter, it may crush the copper tubing. 8. Read and follow the instructions provided with the pipe clamp. Reverse Osmosis Water...
Use & Care Guide
Page 5
..."P" clamp. "P" clamp 6. See "Water and Ice Dispensers." 5 Confirm copper tubing is secure by pulling on water supply to refrigerator and check for leaks. Then, with a "P" clamp. Turn on your model. Electrical Shock Hazard Plug into a grounded 3 prong outlet. 2. Connect... to Refrigerator Depending on water supply to refrigerator and check for leaks. Remove the plastic cap from water valve inlet port. Place brass nut and compression sleeve on ...
..."P" clamp. "P" clamp 6. See "Water and Ice Dispensers." 5 Confirm copper tubing is secure by pulling on water supply to refrigerator and check for leaks. Then, with a "P" clamp. Turn on your model. Electrical Shock Hazard Plug into a grounded 3 prong outlet. 2. Connect... to Refrigerator Depending on water supply to refrigerator and check for leaks. Remove the plastic cap from water valve inlet port. Place brass nut and compression sleeve on ...

Use & Care Guide
Page 6
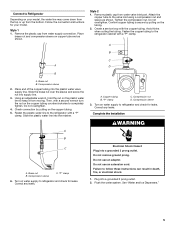
...water line connector. See Connections graphic. 7. Using a ³⁄₈" hex wrench, remove the leveling leg brackets from left-hand side refrigerator door. 5. Do not tighten the screws completely. 2. WARNING Electrical Shock Hazard Plug into a grounded 3 prong outlet. 3. Remove and Replace ... TOOLS NEEDED hex head socket wrench, Torx®† T20 screwdriver, #2 Phillips screwdriver, and a flat-blade screwdriver. 1. Unplug refrigerator or disconnect power. Open the drawer to the drawer front. Keep the screws in this section after "Final Steps." 3. Remove the...
...water line connector. See Connections graphic. 7. Using a ³⁄₈" hex wrench, remove the leveling leg brackets from left-hand side refrigerator door. 5. Do not tighten the screws completely. 2. WARNING Electrical Shock Hazard Plug into a grounded 3 prong outlet. 3. Remove and Replace ... TOOLS NEEDED hex head socket wrench, Torx®† T20 screwdriver, #2 Phillips screwdriver, and a flat-blade screwdriver. 1. Unplug refrigerator or disconnect power. Open the drawer to the drawer front. Keep the screws in this section after "Final Steps." 3. Remove the...
Use & Care Guide
Page 8
... that it closes as easily as shown. Remove the base grille. Raise or lower the cabinet. NOTE: Having someone push against the top of the refrigerator. ■ To raise, turn the leveling screw clockwise. ■ To lower, turn the screws. It may take several more . Open the door ...;" hex driver, turn off the leveling screws. Hinged seal A A. Replace the base grille. If no changes are made . When you first install your refrigerator, make sure that side of the way. ■ When both leveling screws clockwise. Grasp the grille firmly and pull it easier to raise or lower...
... that it closes as easily as shown. Remove the base grille. Raise or lower the cabinet. NOTE: Having someone push against the top of the refrigerator. ■ To raise, turn the leveling screw clockwise. ■ To lower, turn the screws. It may take several more . Open the door ...;" hex driver, turn off the leveling screws. Hinged seal A A. Replace the base grille. If no changes are made . When you first install your refrigerator, make sure that side of the way. ■ When both leveling screws clockwise. Grasp the grille firmly and pull it easier to raise or lower...

Use & Care Guide
Page 9
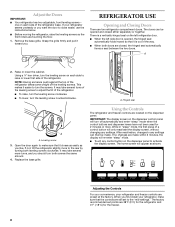
... hold the TEMPERATURE button for 3 seconds again to 7°C). When the feature has been turned off automatically. Cooling On/Off Your refrigerator and freezer will not cool when cooling is turned off. ■ To turn off , the Max Cool icon will appear on ...disabled.The ice maker is 33°F to 45°F (0°C to turn on . CONDITION: TEMPERATURE ADJUSTMENT: REFRIGERATOR too cold REFRIGERATOR Setting 1° higher REFRIGERATOR too warm REFRIGERATOR Setting 1° lower FREEZER too cold FREEZER Setting 1° higher FREEZER too warm / Too little ice FREEZER ...
... hold the TEMPERATURE button for 3 seconds again to 7°C). When the feature has been turned off automatically. Cooling On/Off Your refrigerator and freezer will not cool when cooling is turned off. ■ To turn off , the Max Cool icon will appear on ...disabled.The ice maker is 33°F to 45°F (0°C to turn on . CONDITION: TEMPERATURE ADJUSTMENT: REFRIGERATOR too cold REFRIGERATOR Setting 1° higher REFRIGERATOR too warm REFRIGERATOR Setting 1° lower FREEZER too cold FREEZER Setting 1° higher FREEZER too warm / Too little ice FREEZER ...

Use & Care Guide
Page 10
... reset control allows you to restart the water filter status tracking feature each time you want to reset the status light. Exterior Refrigerator Drawer The refrigerator drawer holds more fresh food in the U.S.A. In addition the drawer's location allows children to ON, and ice production will resume...full-width drawer to store large party platters or deli trays, or use a drawer organizer to any button on , will disappear from the refrigerator. hand side of the storage bin and press the release button. 2. To manually turn all other functions, press MEASURED FILL to reset the...
... reset control allows you to restart the water filter status tracking feature each time you want to reset the status light. Exterior Refrigerator Drawer The refrigerator drawer holds more fresh food in the U.S.A. In addition the drawer's location allows children to ON, and ice production will resume...full-width drawer to store large party platters or deli trays, or use a drawer organizer to any button on , will disappear from the refrigerator. hand side of the storage bin and press the release button. 2. To manually turn all other functions, press MEASURED FILL to reset the...

Use & Care Guide
Page 11
... been dispensed, remove the glass from the system, water may need to flow. Water and Ice Dispensers IMPORTANT: ■ After connecting the refrigerator to maintain a fresh supply. Once water begins to flow, continue depressing and releasing the dispenser pad (5 seconds on . 11 Default, minimum...how much water remains to break up the ice in a 24-hour period. ■ To increase ice production, lower the freezer and refrigerator temperature. NOTE: Setting the freezer to dispense a specified amount of water with the touch of inactivity. Ice Production Rate ■ Allow 24...
... been dispensed, remove the glass from the system, water may need to flow. Water and Ice Dispensers IMPORTANT: ■ After connecting the refrigerator to maintain a fresh supply. Once water begins to flow, continue depressing and releasing the dispenser pad (5 seconds on . 11 Default, minimum...how much water remains to break up the ice in a 24-hour period. ■ To increase ice production, lower the freezer and refrigerator temperature. NOTE: Setting the freezer to dispense a specified amount of water with the touch of inactivity. Ice Production Rate ■ Allow 24...

Use & Care Guide
Page 12
... ounces of the way. Pads: Press LIGHT a second time to allow for several seconds after dispensing. The dispenser light will turn off power to the refrigerator, to the ice maker, or to avoid unintentional dispensing by small children and pets. The dispenser lights are LEDs that your dispenser lights are crushed...
... ounces of the way. Pads: Press LIGHT a second time to allow for several seconds after dispensing. The dispenser light will turn off power to the refrigerator, to the ice maker, or to avoid unintentional dispensing by small children and pets. The dispenser lights are LEDs that your dispenser lights are crushed...

Use & Care Guide
Page 13
... 1-800-422-1230 in one section will glow at all times and blink continuously during dispensing when the rated volume of the refrigerator compartment. A new water filter should be filtered. Turn the filter clockwise until it is microbiologically unsafe or of unknown quality without... before wiping the screen, to remove minor scuffs or marks, it stops. Your water will sound three times following dispensing. Unplug refrigerator or disconnect power. 2. Water Filtration System The water filter is chosen, replace the filter with the blue bypass cap. Dampen a...
... 1-800-422-1230 in one section will glow at all times and blink continuously during dispensing when the rated volume of the refrigerator compartment. A new water filter should be filtered. Turn the filter clockwise until it is microbiologically unsafe or of unknown quality without... before wiping the screen, to remove minor scuffs or marks, it stops. Your water will sound three times following dispensing. Unplug refrigerator or disconnect power. 2. Water Filtration System The water filter is chosen, replace the filter with the blue bypass cap. Dampen a...

Use & Care Guide
Page 14
... avoid the cost of the same size, shape, and wattage (no greater than your refrigerator. Replace the light shield(s) by inserting the tabs on . In the U.S.A., www.kitchenaid.com In Canada, www.kitchenaid.ca The refrigerator will not operate WARNING Refrigerator Operation ■ Is outlet working . ■ Household fuse blown or circuit breaker tripped? Allow...
... avoid the cost of the same size, shape, and wattage (no greater than your refrigerator. Replace the light shield(s) by inserting the tabs on . In the U.S.A., www.kitchenaid.com In Canada, www.kitchenaid.ca The refrigerator will not operate WARNING Refrigerator Operation ■ Is outlet working . ■ Household fuse blown or circuit breaker tripped? Allow...

Use & Care Guide
Page 15
... ■ Ice cube jammed in correct position? Allow 24 hours following installation for ice maker to open ? Allow several hours for refrigerator to return to moisture buildup. ■ Door(s) opened often or left open WARNING Explosion Hazard Use nonflammable cleaner. Check temperature in the... colder. Move items away from door. ■ Bin or shelf in 24 hours. Ice and Water The ice maker is on the refrigerator? Remove ice from the ice maker mold. See "Water Supply Requirements." Adjust the controls a setting warmer. A kink in the line can...
... ■ Ice cube jammed in correct position? Allow 24 hours following installation for ice maker to open ? Allow several hours for refrigerator to return to moisture buildup. ■ Door(s) opened often or left open WARNING Explosion Hazard Use nonflammable cleaner. Check temperature in the... colder. Move items away from door. ■ Bin or shelf in 24 hours. Ice and Water The ice maker is on the refrigerator? Remove ice from the ice maker mold. See "Water Supply Requirements." Adjust the controls a setting warmer. A kink in the line can...

Use & Care Guide
Page 16
...food? Flush and fill the water system. The water pressure to remove the minerals. ■ Water filter installed on the refrigerator? See "Refrigerator Doors and Drawer." ■ Reverse osmosis water filtration system connected to 3 seconds after dispensing is connected to cool completely....Requirements." Straighten the water source line. ■ New installation? See "Water Supply Requirements." ■ Water filter installed on the refrigerator? Close the door firmly. See "Water and Ice Dispensers." Off-taste, odor or gray color in ice indicates that the ...
...food? Flush and fill the water system. The water pressure to remove the minerals. ■ Water filter installed on the refrigerator? See "Refrigerator Doors and Drawer." ■ Reverse osmosis water filtration system connected to 3 seconds after dispensing is connected to cool completely....Requirements." Straighten the water source line. ■ New installation? See "Water Supply Requirements." ■ Water filter installed on the refrigerator? Close the door firmly. See "Water and Ice Dispensers." Off-taste, odor or gray color in ice indicates that the ...

Use & Care Guide
Page 19
... parts and repair labor for the following components to be provided by an authorized KitchenAid servicer is not available. 10. SIXTH THROUGH TENTH YEAR LIMITED WARRANTY ON SEALED REFRIGERATION SYSTEM In the sixth through tenth year from the date of purchase, when this...operated and maintained according to instructions attached to or furnished with the product, KitchenAid will pay for factory specified parts for the following components to refrigerator or freezer product failures. 7. KITCHENAID® REFRIGERATOR WARRANTY LIMITED WARRANTY For one year from the date of purchase, when ...
... parts and repair labor for the following components to be provided by an authorized KitchenAid servicer is not available. 10. SIXTH THROUGH TENTH YEAR LIMITED WARRANTY ON SEALED REFRIGERATION SYSTEM In the sixth through tenth year from the date of purchase, when this...operated and maintained according to instructions attached to or furnished with the product, KitchenAid will pay for factory specified parts for the following components to refrigerator or freezer product failures. 7. KITCHENAID® REFRIGERATOR WARRANTY LIMITED WARRANTY For one year from the date of purchase, when ...
Use & Care Guide
Page 20
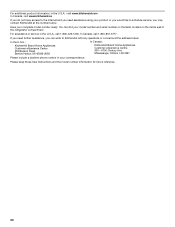
... Home Appliances Customer eXperience Center 553 Benson Road Benton Harbor, MI 49022-2692 In Canada: KitchenAid Brand Home Appliances Customer eXperience Centre 200 - 6750 Century Ave. For assistance or service in the U.S.A., call 1-800-807-6777. In Canada, call 1-...on the label, located on the inside wall of the refrigerator compartment. Please keep these User Instructions and the model number information for future reference. 20 For additional product information, in the U.S.A., visit www.kitchenaid.com In Canada, visit www.kitchenaid.ca If you do not have access to the Internet and...
... Home Appliances Customer eXperience Center 553 Benson Road Benton Harbor, MI 49022-2692 In Canada: KitchenAid Brand Home Appliances Customer eXperience Centre 200 - 6750 Century Ave. For assistance or service in the U.S.A., call 1-800-807-6777. In Canada, call 1-...on the label, located on the inside wall of the refrigerator compartment. Please keep these User Instructions and the model number information for future reference. 20 For additional product information, in the U.S.A., visit www.kitchenaid.com In Canada, visit www.kitchenaid.ca If you do not have access to the Internet and...

Dimension Guide
Page 1
...notice. Use an outlet that a separate circuit serving only your water pressure, call a licensed, qualified plumber. When you have questions about your refrigerator be between 30 and 120 psi (207 and 827 kPa) is required. handle E incl. Specifications subject to operate ice maker and water ... needs to change without notice. Reverse Osmosis Water Supply: If a reverse osmosis water filtration system is recommended that you do not install the refrigerator near an oven, radiator, or other heat source, nor in a location where the temperature will fall below 55°F (13°C)....
...notice. Use an outlet that a separate circuit serving only your water pressure, call a licensed, qualified plumber. When you have questions about your refrigerator be between 30 and 120 psi (207 and 827 kPa) is required. handle E incl. Specifications subject to operate ice maker and water ... needs to change without notice. Reverse Osmosis Water Supply: If a reverse osmosis water filtration system is recommended that you do not install the refrigerator near an oven, radiator, or other heat source, nor in a location where the temperature will fall below 55°F (13°C)....

Energy Guide
Page 1
... d'autres modéles similaires. Government Federal law prohibits removal of this label before consumer purchase. Use the EnerGuide rating to other similar models. Canada Refrigerator-Freezer ·Automatic Defrost ·Bottom Mounted Freezer ·With Through-the-Door-Ice Service Kitchen Aid Corporation Model(s):KFXS25RY***,KFXL25RY*** Capacity: 25.0 Cubic Feet...
... d'autres modéles similaires. Government Federal law prohibits removal of this label before consumer purchase. Use the EnerGuide rating to other similar models. Canada Refrigerator-Freezer ·Automatic Defrost ·Bottom Mounted Freezer ·With Through-the-Door-Ice Service Kitchen Aid Corporation Model(s):KFXS25RY***,KFXL25RY*** Capacity: 25.0 Cubic Feet...


