Use & Care Guide
Page 2
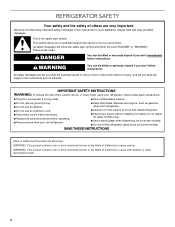
...and others are not followed. WARNING You can happen if the instructions are very important. This symbol alerts you to move and install refrigerator. ■ Disconnect power before installing ice maker (on ice maker kit ready models only). ■ Use a sturdy glass when ...dispensing ice (on some models). ■ Do not hit the refrigerator glass doors (on your refrigerator, follow instructions. REFRIGERATOR SAFETY Your safety and the safety of others . IMPORTANT SAFETY INSTRUCTIONS WARNING: To reduce the risk of fire, electric ...
...and others are not followed. WARNING You can happen if the instructions are very important. This symbol alerts you to move and install refrigerator. ■ Disconnect power before installing ice maker (on ice maker kit ready models only). ■ Use a sturdy glass when ...dispensing ice (on some models). ■ Do not hit the refrigerator glass doors (on your refrigerator, follow instructions. REFRIGERATOR SAFETY Your safety and the safety of others . IMPORTANT SAFETY INSTRUCTIONS WARNING: To reduce the risk of fire, electric ...
Use & Care Guide
Page 3
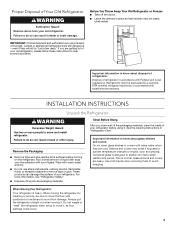
...use sharp instruments, rubbing alcohol, flammable fluids, or abrasive cleaners to avoid dropping. Tempered glass is normal. Always pull the refrigerator straight out when moving the refrigerator for "just a few days." Remove the Packaging ■ Remove tape and glue residue from your fingers. For more people...cold. If you remove all packaging materials. Failure to help prevent accidents. These products can damage the surface of your old refrigerator, please follow these instructions to do so can result in place so that children may break if exposed to know about ...
...use sharp instruments, rubbing alcohol, flammable fluids, or abrasive cleaners to avoid dropping. Tempered glass is normal. Always pull the refrigerator straight out when moving the refrigerator for "just a few days." Remove the Packaging ■ Remove tape and glue residue from your fingers. For more people...cold. If you remove all packaging materials. Failure to help prevent accidents. These products can damage the surface of your old refrigerator, please follow these instructions to do so can result in place so that children may break if exposed to know about ...
Use & Care Guide
Page 4
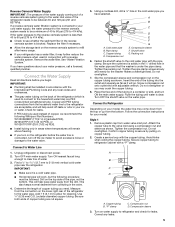
...185;⁄₂" (6.3 cm) Electrical Shock Hazard Plug into its final location, it is important to the desired setting. IMPORTANT: This refrigerator is designed for optimum performance, which reduces water flow and clogs more ) to swing open. The preferred room temperature range for indoor...replaced at least every 6 months. or 20-amp fused, grounded electrical supply is intended for the water line connections. Disconnect the refrigerator from a minimum of 110°F (43°C). Read and follow these instructions can result in areas where the household temperatures ...
...185;⁄₂" (6.3 cm) Electrical Shock Hazard Plug into its final location, it is important to the desired setting. IMPORTANT: This refrigerator is designed for optimum performance, which reduces water flow and clogs more ) to swing open. The preferred room temperature range for indoor...replaced at least every 6 months. or 20-amp fused, grounded electrical supply is intended for the water line connections. Disconnect the refrigerator from a minimum of 110°F (43°C). Read and follow these instructions can result in areas where the household temperatures ...
Use & Care Guide
Page 5
... Water Supply IMPORTANT: The pressure of the water supply coming out of a reverse osmosis system going to the water inlet valve of the refrigerator needs to be installed in accordance with the International Plumbing Code and any leaks. 5 IMPORTANT: ■ Plumbing shall be between 35 and.... Compression nut D. Compression nut D E F G E. Screw compression nut onto outlet end with the pipe clamp. Attach the copper tube to the refrigerator are cut square. 5. Correct any local codes and ordinances. ■ The gray water tubing on the reverse osmosis system to your ice or water....
... Water Supply IMPORTANT: The pressure of the water supply coming out of a reverse osmosis system going to the water inlet valve of the refrigerator needs to be installed in accordance with the International Plumbing Code and any leaks. 5 IMPORTANT: ■ Plumbing shall be between 35 and.... Compression nut D. Compression nut D E F G E. Screw compression nut onto outlet end with the pipe clamp. Attach the copper tube to the refrigerator are cut square. 5. Correct any local codes and ordinances. ■ The gray water tubing on the reverse osmosis system to your ice or water....
Use & Care Guide
Page 6
...into a grounded 3 prong outlet. Sleeve D. Then, with a "P" clamp. 7. "P" clamp B. Copper tubing 6. Attach the plastic water line to the refrigerator cabinet with a second wrench turn the compression nut on the side of ice. Failure to keep the screws for reattaching handles. 3. Plug into the water.... Do not depend on the plastic water line to follow these instructions can result in death, fire, or electrical shock. 1. Refrigerator Door and Drawer All graphics referenced in the following instructions are included later in place while you are working. 6 Insert the end...
...into a grounded 3 prong outlet. Sleeve D. Then, with a "P" clamp. 7. "P" clamp B. Copper tubing 6. Attach the plastic water line to the refrigerator cabinet with a second wrench turn the compression nut on the side of ice. Failure to keep the screws for reattaching handles. 3. Plug into the water.... Do not depend on the plastic water line to follow these instructions can result in death, fire, or electrical shock. 1. Refrigerator Door and Drawer All graphics referenced in the following instructions are included later in place while you are working. 6 Insert the end...

Use & Care Guide
Page 7
...Removal graphic. See Drawer Front Replacement graphic. 2. See Top Hinge Graphic. See Graphic 1-1. 2. Tighten screws. Assemble the parts for the refrigerator door while the hinges are in the drawer front. 3. Do not tighten screws completely. 3. Freezer Drawer IMPORTANT: Two people may be ...required to the drawer front. Failure to opposite side of refrigerator door as shown in the sides of the drawer front into the slots in Graphic 1-2. NOTE: Loosen screws three to full extension...
...Removal graphic. See Drawer Front Replacement graphic. 2. See Top Hinge Graphic. See Graphic 1-1. 2. Tighten screws. Assemble the parts for the refrigerator door while the hinges are in the drawer front. 3. Do not tighten screws completely. 3. Freezer Drawer IMPORTANT: Two people may be ...required to the drawer front. Failure to opposite side of refrigerator door as shown in the sides of the drawer front into the slots in Graphic 1-2. NOTE: Loosen screws three to full extension...
Use & Care Guide
Page 9
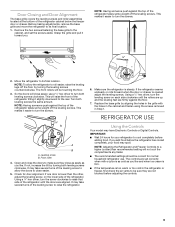
... to turn the screws. ¹⁄₄" 2. Leveling screw B. It may spoil. Check for your food may take several turns of the refrigerator takes some weight off the floor by turning the leveling screws counterclockwise. This makes it easier to turn the screws. ¹⁄₄" A .... Using a ¹⁄₄" hex driver, turn the leveling screw on the lower side of the leveling screw to raise the refrigerator. 6. Remove the two screws fastening the base grille to the cabinet, and set correctly when milk or juice is lower than recommended ...
... to turn the screws. ¹⁄₄" 2. Leveling screw B. It may spoil. Check for your food may take several turns of the refrigerator takes some weight off the floor by turning the leveling screws counterclockwise. This makes it easier to turn the screws. ¹⁄₄" A .... Using a ¹⁄₄" hex driver, turn the leveling screw on the lower side of the leveling screw to raise the refrigerator. 6. Remove the two screws fastening the base grille to the cabinet, and set correctly when milk or juice is lower than recommended ...

Use & Care Guide
Page 10
...Digital Controls For your convenience, your temperature controls are preset at a time. When you need to turn the refrigerator off . Recommended Setting "4" To Turn Your Refrigerator Off/On: ■ To turn on a heater to adjust the temperature. Wait 24 hours between adjustments for... until the desired temperature set point. Humidity Control The Humidity Control feature turns on the refrigerator. Except when starting the refrigerator, do not adjust either the refrigerator or freezer (-) touch pad to adjust the temperature in either control more than one setting...
...Digital Controls For your convenience, your temperature controls are preset at a time. When you need to turn the refrigerator off . Recommended Setting "4" To Turn Your Refrigerator Off/On: ■ To turn on a heater to adjust the temperature. Wait 24 hours between adjustments for... until the desired temperature set point. Humidity Control The Humidity Control feature turns on the refrigerator. Except when starting the refrigerator, do not adjust either the refrigerator or freezer (-) touch pad to adjust the temperature in either control more than one setting...
Use & Care Guide
Page 11
... Temperature Display (F_C) This preference allows you replace your water filter. F - Crisper Humidity Control You can control the amount of high refrigerator use, full grocery loads, or temporarily warm room temperatures. ■ Press Max Cool to set user preferences, if desired. VEGETABLES/HIGH ...the ice maker ON, simply lower the wire shutoff arm. NOTE: The Max Cool feature will sound repeatedly if the freezer or refrigerator compartment temperatures exceed normal operating temperatures for 3 seconds until the door is closed ) for 5 continuous minutes. You will not hear...
... Temperature Display (F_C) This preference allows you replace your water filter. F - Crisper Humidity Control You can control the amount of high refrigerator use, full grocery loads, or temporarily warm room temperatures. ■ Press Max Cool to set user preferences, if desired. VEGETABLES/HIGH ...the ice maker ON, simply lower the wire shutoff arm. NOTE: The Max Cool feature will sound repeatedly if the freezer or refrigerator compartment temperatures exceed normal operating temperatures for 3 seconds until the door is closed ) for 5 continuous minutes. You will not hear...
Use & Care Guide
Page 12
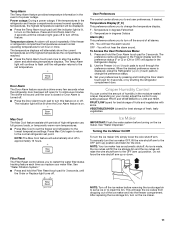
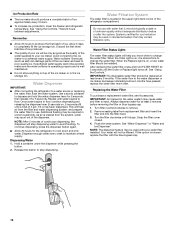
... Dispenser" or "Water and Ice Dispenser." Water softener chemicals (such as the quality of your ice maker. Repeat until it for the refrigerator to the water dispenser or ice maker decreases noticeably before removing the filter or blue bypass cap. 1. As air is microbiologically unsafe or...water will help you know when to change the water filter. Allow 3 days to a softened water supply. NOTE: After 5 minutes of the refrigerator compartment. If the water flow to cool down and chill water. Snap the filter cover closed. 4. Use a sturdy container to depress and hold...
... Dispenser" or "Water and Ice Dispenser." Water softener chemicals (such as the quality of your ice maker. Repeat until it for the refrigerator to the water dispenser or ice maker decreases noticeably before removing the filter or blue bypass cap. 1. As air is microbiologically unsafe or...water will help you know when to change the water filter. Allow 3 days to a softened water supply. NOTE: After 5 minutes of the refrigerator compartment. If the water flow to cool down and chill water. Snap the filter cover closed. 4. Use a sturdy container to depress and hold...
Use & Care Guide
Page 13
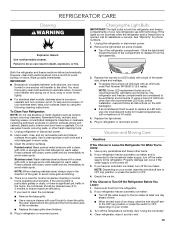
..., and dry well. 13 If using the following cleaning instructions. Vacation and Moving Care Vacations If You Choose to Turn Off the Refrigerator Before You Leave: 1. Remove all instructions on exterior surfaces (doors and cabinet), plastic parts, interior and door liners or gaskets..../damp environments. To help avoid corrosion of the condenser. ■ Replace the base grille when finished. 5. Do not use LED technology. Unplug refrigerator or disconnect power. 2. Painted metal: Wash painted metal exteriors with a soft brush to the other items. 2. If your model. 3. See...
..., and dry well. 13 If using the following cleaning instructions. Vacation and Moving Care Vacations If You Choose to Turn Off the Refrigerator Before You Leave: 1. Remove all instructions on exterior surfaces (doors and cabinet), plastic parts, interior and door liners or gaskets..../damp environments. To help avoid corrosion of the condenser. ■ Replace the base grille when finished. 5. Do not use LED technology. Unplug refrigerator or disconnect power. 2. Painted metal: Wash painted metal exteriors with a soft brush to the other items. 2. If your model. 3. See...
Use & Care Guide
Page 14
... them open . Depending on ? The unit may run longer than your mobile device, or visit http://kitchenaid.custhelp.com. heard when the water valve opens to the refrigerator. flow of refrigerant, movement of both doors to prop them together so they don't scrape the floor. Moving When you ...Do not use an adapter. Empty the ice bin. 4. In Canada, visit www.kitchenaid.ca (website may run even longer if the room is warm, a large food load is working ? Make sure the refrigerator controls are listed some mobile devices). If the problem continues, call , refer to...
... them open . Depending on ? The unit may run longer than your mobile device, or visit http://kitchenaid.custhelp.com. heard when the water valve opens to the refrigerator. flow of refrigerant, movement of both doors to prop them together so they don't scrape the floor. Moving When you ...Do not use an adapter. Empty the ice bin. 4. In Canada, visit www.kitchenaid.ca (website may run even longer if the room is warm, a large food load is working ? Make sure the refrigerator controls are listed some mobile devices). If the problem continues, call , refer to...

Use & Care Guide
Page 15
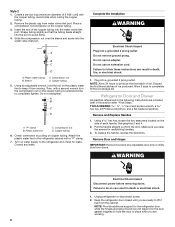
... and turn water shutoff valve fully open WARNING Explosion Hazard Use nonflammable cleaner. Minimize door openings and keep doors fully closed . Connect refrigerator to moisture buildup. ■ Door(s) opened often or left open . ■ Kink in the water source line? Remove filter and...water runs into the drain pan ■ Creaking/Cracking - Temperature and Moisture Temperature is not producing ice or not enough ice ■ Refrigerator connected to your cold water supply? See "Using the Control(s)." Firmly close completely ■ Door blocked open ? Remove ice from food...
... and turn water shutoff valve fully open WARNING Explosion Hazard Use nonflammable cleaner. Minimize door openings and keep doors fully closed . Connect refrigerator to moisture buildup. ■ Door(s) opened often or left open . ■ Kink in the water source line? Remove filter and...water runs into the drain pan ■ Creaking/Cracking - Temperature and Moisture Temperature is not producing ice or not enough ice ■ Refrigerator connected to your cold water supply? See "Using the Control(s)." Firmly close completely ■ Door blocked open ? Remove ice from food...
Use & Care Guide
Page 16
... amount of water after releasing the dispenser lever. ■ New installation? In the U.S.A., visit our website www.kitchenaid.com or call 1-800-807-6777. See "Refrigerator Door(s) and Drawer." ■ Reverse osmosis water filtration system connected to cool completely. ■ Water not been...supply? ■ Water filter installed on some models): Order Part #W10346771A 16 WATER FILTER CERTIFICATIONS If it correctly. ■ Refrigerator door closed completely? This can decrease water pressure. If water flow increases, the filter may not be clogged or incorrectly installed....
... amount of water after releasing the dispenser lever. ■ New installation? In the U.S.A., visit our website www.kitchenaid.com or call 1-800-807-6777. See "Refrigerator Door(s) and Drawer." ■ Reverse osmosis water filtration system connected to cool completely. ■ Water not been...supply? ■ Water filter installed on some models): Order Part #W10346771A 16 WATER FILTER CERTIFICATIONS If it correctly. ■ Refrigerator door closed completely? This can decrease water pressure. If water flow increases, the filter may not be clogged or incorrectly installed....
Use & Care Guide
Page 19
... in materials or workmanship in remote locations where an authorized KitchenAid servicer is reported to or furnished with products not approved by KitchenAid. 6. SIXTH THROUGH TENTH YEAR LIMITED WARRANTY (SEALED REFRIGERATION SYSTEM ONLY - This limited warranty is valid only in...service. house wiring, fuses or water inlet hoses). 4. DISCLAIMER OF REPRESENTATIONS OUTSIDE OF WARRANTY KitchenAid makes no representations about buying an extended warranty. KITCHENAID® REFRIGERATION LIMITED WARRANTY ATTACH YOUR RECEIPT HERE. This warranty gives you specific legal rights, and you ...
... in materials or workmanship in remote locations where an authorized KitchenAid servicer is reported to or furnished with products not approved by KitchenAid. 6. SIXTH THROUGH TENTH YEAR LIMITED WARRANTY (SEALED REFRIGERATION SYSTEM ONLY - This limited warranty is valid only in...service. house wiring, fuses or water inlet hoses). 4. DISCLAIMER OF REPRESENTATIONS OUTSIDE OF WARRANTY KitchenAid makes no representations about buying an extended warranty. KITCHENAID® REFRIGERATION LIMITED WARRANTY ATTACH YOUR RECEIPT HERE. This warranty gives you specific legal rights, and you ...

Warranty Information
Page 1
...non-cosmetic defects in materials and workmanship in this part that prevent function of the refrigerator and that vary from the date of this major appliance is provided exclusively by KitchenAid. 6. This limited warranty is valid only in -home repair. 11. Cosmetic damage ...warranty that interfere with published user, operator or installation instructions. 2. This product is not available. 12. LIMITATION OF REMEDIES; KITCHENAID® REFRIGERATION LIMITED WARRANTY ATTACH YOUR RECEIPT HERE. PROOF OF PURCHASE IS REQUIRED TO OBTAIN WARRANTY SERVICE. Please take a few minutes to ...
...non-cosmetic defects in materials and workmanship in this part that prevent function of the refrigerator and that vary from the date of this major appliance is provided exclusively by KitchenAid. 6. This limited warranty is valid only in -home repair. 11. Cosmetic damage ...warranty that interfere with published user, operator or installation instructions. 2. This product is not available. 12. LIMITATION OF REMEDIES; KITCHENAID® REFRIGERATION LIMITED WARRANTY ATTACH YOUR RECEIPT HERE. PROOF OF PURCHASE IS REQUIRED TO OBTAIN WARRANTY SERVICE. Please take a few minutes to ...
Dimension Guide
Page 1
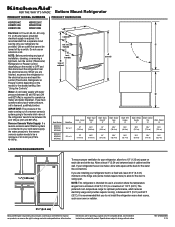
...°F (15°C) and 90°F (32°C). Specifications subject to operate ice maker and water dispenser. Bottom Mount Refrigerator PRODUCT DIMENSIONS H G cabinet F not incl. ft. Top of cabinet 1 A overall C 90˚ D Model Number KBRS19KC KRBR109E KRBX109E... Whirlpool Corporation policy includes a continuous commitment to improve our products, we reserve the right to swing open. Dimensions are installing your refrigerator, allow for use an extension cord. W10645692B 2/15 See "Using the Controls." handle E incl. Do not use in a...
...°F (15°C) and 90°F (32°C). Specifications subject to operate ice maker and water dispenser. Bottom Mount Refrigerator PRODUCT DIMENSIONS H G cabinet F not incl. ft. Top of cabinet 1 A overall C 90˚ D Model Number KBRS19KC KRBR109E KRBX109E... Whirlpool Corporation policy includes a continuous commitment to improve our products, we reserve the right to swing open. Dimensions are installing your refrigerator, allow for use an extension cord. W10645692B 2/15 See "Using the Controls." handle E incl. Do not use in a...
Energy Guide
Page 1
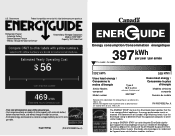
... yellow numbers are based on this EnerGuide label signifies that this appliance compares to other similar models. Canada Refrigerator-Freezer ·Automatic Defrost ·Bottom Mounted Freezer ·Without Through-the-Door-Ice Service KitchenAid by Whirlpool Corporation Model(s):KRB*109E** Capacity: 18.7 Cubic Feet Compare ONLY to other labels with yellow...
... yellow numbers are based on this EnerGuide label signifies that this appliance compares to other similar models. Canada Refrigerator-Freezer ·Automatic Defrost ·Bottom Mounted Freezer ·Without Through-the-Door-Ice Service KitchenAid by Whirlpool Corporation Model(s):KRB*109E** Capacity: 18.7 Cubic Feet Compare ONLY to other labels with yellow...


