
User's Guide
Page 6
Product Overview Top and Bottom Views 123 4 CRV3, KAA2HR, AA/Lithium, AA/NiMH, AA/NiMn 5 Top 1 Self Timer/Burst button 2 Speaker 3 Flash/Status button 4 Shutter button 6 7 8 Bottom 5 Battery door 6 Tripod socket/locator, dock 6000 7 Dock connector 8 Locator, dock 6000 iv
Product Overview Top and Bottom Views 123 4 CRV3, KAA2HR, AA/Lithium, AA/NiMH, AA/NiMn 5 Top 1 Self Timer/Burst button 2 Speaker 3 Flash/Status button 4 Shutter button 6 7 8 Bottom 5 Battery door 6 Tripod socket/locator, dock 6000 7 Dock connector 8 Locator, dock 6000 iv
User's Guide
Page 7
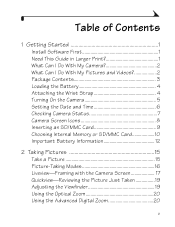
... an SD/MMC Card 9 Choosing Internal Memory or SD/MMC Card 10 Important Battery Information 12 2 Taking Pictures 15 Take a Picture 15 Picture-Taking Modes 16 Liveview-Framing with the Camera Screen 17 Quickview-Reviewing the Picture Just Taken 19 Adjusting the Viewfinder 19 Using the Optical Zoom 20 Using the Advanced Digital Zoom 20 v
... an SD/MMC Card 9 Choosing Internal Memory or SD/MMC Card 10 Important Battery Information 12 2 Taking Pictures 15 Take a Picture 15 Picture-Taking Modes 16 Liveview-Framing with the Camera Screen 17 Quickview-Reviewing the Picture Just Taken 19 Adjusting the Viewfinder 19 Using the Optical Zoom 20 Using the Advanced Digital Zoom 20 v

User's Guide
Page 10
.../MMC Card 70 Print With or Without a Computer 70 9 Using the Camera Dock 6000 71 Camera Dock 6000 Package Contents 71 Installing the Custom Camera Insert 72 Connecting the Camera Dock 6000 73 Installing the Rechargeable Battery 74 Docking the Camera 75 Charging the Battery 76 Transferring Pictures With the Dock 77 Reviewing Pictures and Videos 78...
.../MMC Card 70 Print With or Without a Computer 70 9 Using the Camera Dock 6000 71 Camera Dock 6000 Package Contents 71 Installing the Custom Camera Insert 72 Connecting the Camera Dock 6000 73 Installing the Rechargeable Battery 74 Docking the Camera 75 Charging the Battery 76 Transferring Pictures With the Dock 77 Reviewing Pictures and Videos 78...

User's Guide
Page 15
Chapter 1 Package Contents 1 4 2 5 3 1 Camera 2 Custom insert (for camera dock, see page 72) 3 CRV3 battery (non-rechargeable) 4 USB cable 5 Audio/Video cable (for viewing pictures and videos on television) Not shown: User's Guide, Quick Start Guide, wrist strap, Kodak EasyShare software CD. (In some countries, the User's Guide is provided on a CD.) Contents may change without notice. 3
Chapter 1 Package Contents 1 4 2 5 3 1 Camera 2 Custom insert (for camera dock, see page 72) 3 CRV3 battery (non-rechargeable) 4 USB cable 5 Audio/Video cable (for viewing pictures and videos on television) Not shown: User's Guide, Quick Start Guide, wrist strap, Kodak EasyShare software CD. (In some countries, the User's Guide is provided on a CD.) Contents may change without notice. 3

User's Guide
Page 16
Attaching the Wrist Strap 1 Thread the short loop of the camera, slide the battery door and lift to make sure your camera operates dependably, do not use in your camera. 1 Turn off the camera. 2 On the bottom of the wrist strap through the wrist strap post. 2 Thread the long loop through the short loop. 3 Pull until...
Attaching the Wrist Strap 1 Thread the short loop of the camera, slide the battery door and lift to make sure your camera operates dependably, do not use in your camera. 1 Turn off the camera. 2 On the bottom of the wrist strap through the wrist strap post. 2 Thread the long loop through the short loop. 3 Pull until...

User's Guide
Page 18
... time is removed for details. 6 to advance to automatically update the camera clock when you connect the camera. delete share EasyShare CX6445 OK 1 SET DATE & TIME is YYYY/MM/DD. Press the OK button. See the Kodak EasyShare software Help for an extended time. menu (Select Cancel to set the... date and time at a later time.) review The Date & Time screen appears. 2 Go to highlight Date & Time, then press the OK button. The setting remains until you turn on the camera or if the battery...
... time is removed for details. 6 to advance to automatically update the camera clock when you connect the camera. delete share EasyShare CX6445 OK 1 SET DATE & TIME is YYYY/MM/DD. Press the OK button. See the Kodak EasyShare software Help for an extended time. menu (Select Cancel to set the... date and time at a later time.) review The Date & Time screen appears. 2 Go to highlight Date & Time, then press the OK button. The setting remains until you turn on the camera or if the battery...
User's Guide
Page 20
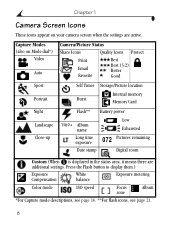
... Portrait Internal memory Burst Memory Card Night Landscape Close-up Flash** Battery power TRIP+ Album name Long time exposure Low Exhausted 072 Pictures remaining Date stamp Digital zoom Custom (When is displayed in the status area, it means there are active. Capture Modes (also on your camera screen when the settings are additional settings.
... Portrait Internal memory Burst Memory Card Night Landscape Close-up Flash** Battery power TRIP+ Album name Long time exposure Low Exhausted 072 Pictures remaining Date stamp Digital zoom Custom (When is displayed in the status area, it means there are active. Capture Modes (also on your camera screen when the settings are additional settings.

User's Guide
Page 24
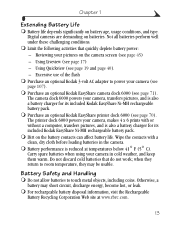
Number of batteries. Kodak Battery Replacement Types/Battery Life Your camera can use the replacement batteries listed above. For acceptable battery life, and to make sure your needs-and get the best performance. Actual battery life may vary based on batteries, visit http://www.kodak.com/global/en/service/batteries/batteryUsage.jhtml 12 CRV3 lithium battery (included with the Kodak EasyShare camera dock 6000 and printer...
Number of batteries. Kodak Battery Replacement Types/Battery Life Your camera can use the replacement batteries listed above. For acceptable battery life, and to make sure your needs-and get the best performance. Actual battery life may vary based on batteries, visit http://www.kodak.com/global/en/service/batteries/batteryUsage.jhtml 12 CRV3 lithium battery (included with the Kodak EasyShare camera dock 6000 and printer...
User's Guide
Page 25
... pictures on the battery contacts can affect battery life. Excessive use of the flash ! The camera dock 6000 powers your camera in the camera. ! Battery Safety and Handling ! Chapter 1 Extending Battery Life ! Digital cameras are demanding on battery age, usage conditions, and type. Using Liveview (see page 45) - Purchase an optional Kodak EasyShare printer dock 6000 (see page 71). Battery performance is reduced...
... pictures on the battery contacts can affect battery life. Excessive use of the flash ! The camera dock 6000 powers your camera in the camera. ! Battery Safety and Handling ! Chapter 1 Extending Battery Life ! Digital cameras are demanding on battery age, usage conditions, and type. Using Liveview (see page 45) - Purchase an optional Kodak EasyShare printer dock 6000 (see page 71). Battery performance is reduced...

User's Guide
Page 29
...whenever the camera is set the exposure and focus, then EasyShare CX6445 press the rest of the way down to frame your subject in the camera screen. Chapter 2 Liveview-Framing with a black bar at the top of the screen. OK Framing marks 5 To turn on Liveview, the camera screen displays... IMPORTANT: Liveview quickly depletes battery power; To change the Liveview setting so that it sparingly. 1 Turn the Mode dial to any On position. 2 Press the OK button to Best (3:2), the Liveview image is displayed at a 3:2 aspect ratio, as shown, with the Camera Screen When you turn on ...
...whenever the camera is set the exposure and focus, then EasyShare CX6445 press the rest of the way down to frame your subject in the camera screen. Chapter 2 Liveview-Framing with a black bar at the top of the screen. OK Framing marks 5 To turn on Liveview, the camera screen displays... IMPORTANT: Liveview quickly depletes battery power; To change the Liveview setting so that it sparingly. 1 Turn the Mode dial to any On position. 2 Press the OK button to Best (3:2), the Liveview image is displayed at a 3:2 aspect ratio, as shown, with the Camera Screen When you turn on ...
User's Guide
Page 31
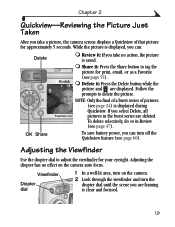
... burst series of that picture for approximately 5 seconds. Viewfinder Diopter dial 1 In a well-lit area, turn on the camera auto focus. If you select Delete, all EasyShare CX644 pictures in Review (see page 47). Adjusting the diopter has no action, the picture is saved. ! To delete ...selectively, do so in the burst series are deleted. OK Share To save battery power, you can : Delete delete !...
... burst series of that picture for approximately 5 seconds. Viewfinder Diopter dial 1 In a well-lit area, turn on the camera auto focus. If you select Delete, all EasyShare CX644 pictures in Review (see page 47). Adjusting the diopter has no action, the picture is saved. ! To delete ...selectively, do so in the burst series are deleted. OK Share To save battery power, you can : Delete delete !...
User's Guide
Page 57
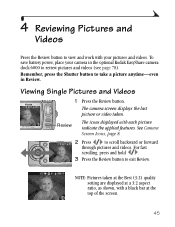
..., with each picture indicate the applied features. To save battery power, place your pictures and videos. Remember, press the Shutter button to scroll backward or forward through pictures and videos. delete share EasyShare CX6445 2 Press to take a picture anytime-even in the optional Kodak EasyShare camera dock 6000 to review pictures and videos (see page 78...
..., with each picture indicate the applied features. To save battery power, place your pictures and videos. Remember, press the Shutter button to scroll backward or forward through pictures and videos. delete share EasyShare CX6445 2 Press to take a picture anytime-even in the optional Kodak EasyShare camera dock 6000 to review pictures and videos (see page 78...

User's Guide
Page 63
... the camera returns to highlight Begin Show, then press the OK button. To scroll through the seconds quickly, press and hold . 3 Press the OK button. See Kodak EasyShare software Help for 5 seconds. The interval setting remains until you took them. To save battery power, use an optional Kodak AC ... 2 Select a display interval. Each picture and video is displayed once, in the order in the appropriate album folder. Chapter 4 EasyShare software opens and categorizes your pictures and videos on any external device, see page 107). You can increase the display interval to up ...
... the camera returns to highlight Begin Show, then press the OK button. To scroll through the seconds quickly, press and hold . 3 Press the OK button. See Kodak EasyShare software Help for 5 seconds. The interval setting remains until you took them. To save battery power, use an optional Kodak AC ... 2 Select a display interval. Each picture and video is displayed once, in the order in the appropriate album folder. Chapter 4 EasyShare software opens and categorizes your pictures and videos on any external device, see page 107). You can increase the display interval to up ...

User's Guide
Page 64
... OK button. 2 Press to highlight On, then press the OK button. Refer to the television video-in port (yellow) and audio-in port (white). The camera screen turns off; When you start a slide show, it repeats until you cancel it by pressing the OK button or until you change it. The... Loop setting remains until battery power is running. 52 NOTE: The slide show stops if you connect or disconnect the cable while the slide show is exhausted. Displaying Pictures/Videos...
... OK button. 2 Press to highlight On, then press the OK button. Refer to the television video-in port (yellow) and audio-in port (white). The camera screen turns off; When you start a slide show, it repeats until you cancel it by pressing the OK button or until you change it. The... Loop setting remains until battery power is running. 52 NOTE: The slide show stops if you connect or disconnect the cable while the slide show is exhausted. Displaying Pictures/Videos...

User's Guide
Page 72
... button. 4 Press to select the new default quantity, then press the OK button. 5 Press the Menu button to exit the menu. To save battery power, turn off Quickview. 1 Press the Menu button. 2 Press to highlight Setup , then press the OK button. 3 Press to highlight Quickview ...video, Quickview displays it . Chapter 6 Changing the Default Print Quantity The Default Print Quantity setting determines the value that is displayed on the camera screen for approximately 5 seconds (see the picture or video, press the Review button. This setting remains until you change it . 60 This...
... button. 4 Press to select the new default quantity, then press the OK button. 5 Press the Menu button to exit the menu. To save battery power, turn off Quickview. 1 Press the Menu button. 2 Press to highlight Setup , then press the OK button. 3 Press to highlight Quickview ...video, Quickview displays it . Chapter 6 Changing the Default Print Quantity The Default Print Quantity setting determines the value that is displayed on the camera screen for approximately 5 seconds (see the picture or video, press the Review button. This setting remains until you change it . 60 This...

User's Guide
Page 73
... a viewfinder (see page 17). Liveview is Liveview Off. You can still press the OK button to turn it . 61 The camera screen is on whenever the camera is on (in Still Modes The Liveview feature lets you change the Liveview default to On: 1 Press the Menu button. 2... Press to highlight Setup , then press the OK button. 3 Press to highlight Liveview , then press the OK button. 4 Press to exit the menu. IMPORTANT: Liveview quickly depletes battery...
... a viewfinder (see page 17). Liveview is Liveview Off. You can still press the OK button to turn it . 61 The camera screen is on whenever the camera is on (in Still Modes The Liveview feature lets you change the Liveview default to On: 1 Press the Menu button. 2... Press to highlight Setup , then press the OK button. 3 Press to highlight Liveview , then press the OK button. 4 Press to exit the menu. IMPORTANT: Liveview quickly depletes battery...

User's Guide
Page 83
..., 5-volt to power your camera alone. 71 9 Using the Camera Dock 6000 The Kodak EasyShare camera dock 6000: ! Makes it easy to transfer pictures and videos to the camera. Camera Dock 6000 Package Contents 1 Camera dock 6000 (with your camera without the dock. Charges the included Kodak EasyShare Ni-MH rechargeable battery pack. (Install the battery pack in the camera for charging.) ! You can...
..., 5-volt to power your camera alone. 71 9 Using the Camera Dock 6000 The Kodak EasyShare camera dock 6000: ! Makes it easy to transfer pictures and videos to the camera. Camera Dock 6000 Package Contents 1 Camera dock 6000 (with your camera without the dock. Charges the included Kodak EasyShare Ni-MH rechargeable battery pack. (Install the battery pack in the camera for charging.) ! You can...

User's Guide
Page 86
... the orientation shown. CAUTION: The battery pack can damage your camera. To take full advantage of the camera. 2 Install the Ni-MH rechargeable battery pack as illustrated. CARA/V3Ni,MKAHA,2AHAR/,NiAA/MLinthium, Chapter 9 Installing the Rechargeable Battery You received a non-rechargeable CRV3 starter battery with the Kodak EasyShare Ni-MH rechargeable battery pack that is not charged when...
... the orientation shown. CAUTION: The battery pack can damage your camera. To take full advantage of the camera. 2 Install the Ni-MH rechargeable battery pack as illustrated. CARA/V3Ni,MKAHA,2AHAR/,NiAA/MLinthium, Chapter 9 Installing the Rechargeable Battery You received a non-rechargeable CRV3 starter battery with the Kodak EasyShare Ni-MH rechargeable battery pack that is not charged when...

User's Guide
Page 87
Push down the camera dock foot. NOTE: If the Kodak EasyShare Ni-MH rechargeable battery pack requires charging, charging begins (see page 76). 75 Charging Transfer lights light The camera is seated. Foot Connector 3 Match the connector and alignment pins on the camera dock to the computer: Alignment Pins 1 Flip down until the camera is securely seated. The...
Push down the camera dock foot. NOTE: If the Kodak EasyShare Ni-MH rechargeable battery pack requires charging, charging begins (see page 76). 75 Charging Transfer lights light The camera is seated. Foot Connector 3 Match the connector and alignment pins on the camera dock to the computer: Alignment Pins 1 Flip down until the camera is securely seated. The...

User's Guide
Page 88
Chapter 9 Charging the Battery 1 Make sure the Kodak EasyShare Ni-MH rechargeable battery pack is damaged. Charging stops if you turn on , charging resumes when the camera enters auto power-off the camera and place it in the camera (see page 74). Slowly return to extreme temperatures. If the battery requires charging, charging begins after a brief battery check. ! Battery or connector...
Chapter 9 Charging the Battery 1 Make sure the Kodak EasyShare Ni-MH rechargeable battery pack is damaged. Charging stops if you turn on , charging resumes when the camera enters auto power-off the camera and place it in the camera (see page 74). Slowly return to extreme temperatures. If the battery requires charging, charging begins after a brief battery check. ! Battery or connector...


