User Guide
Page 2
Contents 1 Introduction 1 Scanner features 1 Supporting documentation 2 Safety information 3 User precautions 3 Environmental information 4 European Union 4 EMC statements 4 United States 4 Japan 5 Korean 5 Acoustic emission 5 Power system connection 5 2 Getting Started 6 What's in the box 6 System requirements 6 Installing the scanner 7 Installing the Kodak Driver Software 7 Windows operating systems 7 Linux operating systems 9 Connecting the power cord to the scanner 10 Disconnecting...
Contents 1 Introduction 1 Scanner features 1 Supporting documentation 2 Safety information 3 User precautions 3 Environmental information 4 European Union 4 EMC statements 4 United States 4 Japan 5 Korean 5 Acoustic emission 5 Power system connection 5 2 Getting Started 6 What's in the box 6 System requirements 6 Installing the scanner 7 Installing the Kodak Driver Software 7 Windows operating systems 7 Linux operating systems 9 Connecting the power cord to the scanner 10 Disconnecting...
User Guide
Page 5
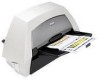
...; Scans up to 30.5 x 86 cm / 12 x 34 inches using and maintaining the Kodak i1400 Series Scanners. desktop duplex color scanner that scans up to 75 ppm (300 dpi, black and white, landscape orientation) letter-size documents. Kodak i1420 Scanner - Kodak i1440 Scanner - desktop simplex color scanner that support TIFF, JPEG, RTF, PDF and searchable PDF • Easily replaceable feed...
...; Scans up to 30.5 x 86 cm / 12 x 34 inches using and maintaining the Kodak i1400 Series Scanners. desktop duplex color scanner that scans up to 75 ppm (300 dpi, black and white, landscape orientation) letter-size documents. Kodak i1420 Scanner - Kodak i1440 Scanner - desktop simplex color scanner that support TIFF, JPEG, RTF, PDF and searchable PDF • Easily replaceable feed...

User Guide
Page 6
This guide is also available: • Quick Start Guide - Supporting documentation In addition to use the basic image processing features. provides a step-by-step procedure for installing the scanner. • Image Processing Guide - explains how to this User's Guide, the following documentation is provided on the installation CD in PDF format and can also be downloaded from the website (www.Kodak.com/go/docimaging). 2 A-61550 July 2008
This guide is also available: • Quick Start Guide - Supporting documentation In addition to use the basic image processing features. provides a step-by-step procedure for installing the scanner. • Image Processing Guide - explains how to this User's Guide, the following documentation is provided on the installation CD in PDF format and can also be downloaded from the website (www.Kodak.com/go/docimaging). 2 A-61550 July 2008
User Guide
Page 15
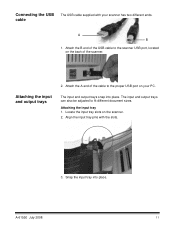
... place. Attaching the input tray 1. A-61550 July 2008 11 The input and output trays can also be adjusted to the proper USB port on your scanner has two different ends. Align the input tray pins with your PC. Attach the B end of the USB cable to the... scanner USB port, located on the scanner. 2. Attach the A end of the scanner. Locate the input tray slots on the back of the cable to fit different document sizes. Snap the input tray into place. Connecting the USB cable The USB...
... place. Attaching the input tray 1. A-61550 July 2008 11 The input and output trays can also be adjusted to the proper USB port on your scanner has two different ends. Align the input tray pins with your PC. Attach the B end of the USB cable to the... scanner USB port, located on the scanner. 2. Attach the A end of the scanner. Locate the input tray slots on the back of the cable to fit different document sizes. Snap the input tray into place. Connecting the USB cable The USB...

User Guide
Page 17
... to adjust the space between the feed module and separator module for documents that require special handling. holds up to 100 documents (20 lb/75 g/m2) in place. 6 Input tray extender - Scanner components Front view 1 7 2 3 4 5 6 1 Scanner cover - illuminates or flashes indicating scanner status. 4 Scanner cover release lever - A-61550 July 2008 13 push up to the internal...
... to adjust the space between the feed module and separator module for documents that require special handling. holds up to 100 documents (20 lb/75 g/m2) in place. 6 Input tray extender - Scanner components Front view 1 7 2 3 4 5 6 1 Scanner cover - illuminates or flashes indicating scanner status. 4 Scanner cover release lever - A-61550 July 2008 13 push up to the internal...

User Guide
Page 18
NOTE:The Kodak i1410 Scanner does not have an upper imaging guide. 14 A-61550 July 2008 provides access to obtain optimum image quality. keep imaging guides clean to the rear rollers for cleaning. 4 Front roller cover - provides smooth transport of documents. 2 Rollers - provides...feed module tires. 5 Feed module - provides smooth document feeding and separation of various sizes, thicknesses and textures of documents through the scanner. 3 Rear roller cover - This cover needs to the feed module. provides smooth document feeding and separation of various sizes, thicknesses and ...
NOTE:The Kodak i1410 Scanner does not have an upper imaging guide. 14 A-61550 July 2008 provides access to obtain optimum image quality. keep imaging guides clean to the rear rollers for cleaning. 4 Front roller cover - provides smooth transport of documents. 2 Rollers - provides...feed module tires. 5 Feed module - provides smooth document feeding and separation of various sizes, thicknesses and textures of documents through the scanner. 3 Rear roller cover - This cover needs to the feed module. provides smooth document feeding and separation of various sizes, thicknesses and ...
User Guide
Page 20
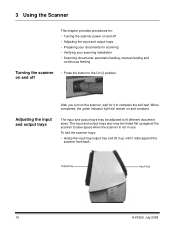
... flat up until it rests against the scanner to complete the self-test. When completed, the green indicator light will remain on the scanner, wait for scanning • Verifying your documents for it up against the scanner front/back. To fold the scanner trays: • Grasp the input tray.../output tray and lift it to save space when the scanner is not in use. Adjusting the...
... flat up until it rests against the scanner to complete the self-test. When completed, the green indicator light will remain on the scanner, wait for scanning • Verifying your documents for it up against the scanner front/back. To fold the scanner trays: • Grasp the input tray.../output tray and lift it to save space when the scanner is not in use. Adjusting the...
User Guide
Page 23
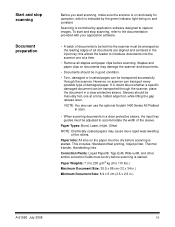
... to 110 lbs.) Maximum Document Size: 30.5 x 86 cm (12 x 34 in.) Minimum Document Size: 8.9 x 5 cm (3.5 x 2.5 in a clear protective sleeve, the input tray guides must be dry before scanning is started . However, no scanner can use the optional Kodak i1400 Series A3 Flatbed to... scan. • When scanning documents in .) A-61550 July 2008 19 Staples and paper clips on and constant. NOTE: You also can transport...
... to 110 lbs.) Maximum Document Size: 30.5 x 86 cm (12 x 34 in.) Minimum Document Size: 8.9 x 5 cm (3.5 x 2.5 in a clear protective sleeve, the input tray guides must be dry before scanning is started . However, no scanner can use the optional Kodak i1400 Series A3 Flatbed to... scan. • When scanning documents in .) A-61550 July 2008 19 Staples and paper clips on and constant. NOTE: You also can transport...
User Guide
Page 24
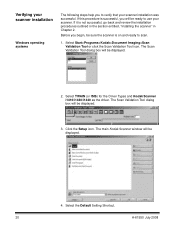
...will be sure the scanner is on and ready to scan. 1. Select Start>Programs>Kodak>Document Imaging>Scan Validation Tool or click the Scan Validation Tool icon. The main Kodak Scanner window will be displayed. 2. Before you begin, be displayed. 4. Verifying your scanner installation Windows operating systems... section entitled, "Installing the scanner" in Chapter 2. The Scan Validation Tool dialog box will be displayed. 3. Select the Default Setting Shortcut. 20 A-61550 July 2008 Select TWAIN (or ISIS) for the Driver Types and Kodak Scanner i1410/i1420/i1440 as the driver. The Scan...
...will be sure the scanner is on and ready to scan. 1. Select Start>Programs>Kodak>Document Imaging>Scan Validation Tool or click the Scan Validation Tool icon. The main Kodak Scanner window will be displayed. 2. Before you begin, be displayed. 4. Verifying your scanner installation Windows operating systems... section entitled, "Installing the scanner" in Chapter 2. The Scan Validation Tool dialog box will be displayed. 3. Select the Default Setting Shortcut. 20 A-61550 July 2008 Select TWAIN (or ISIS) for the Driver Types and Kodak Scanner i1410/i1420/i1440 as the driver. The Scan...
User Guide
Page 25
... you are scanning one side of the document will be scanned. For an i1420 or i1440 Scanner both sides of the document will be scanned. If you have a Kodak i1410 Scanner, be scanned and displayed in the Scan Validation Tool window. Window display icons Linux operating systems Application software The documents will be found in power saver...
... you are scanning one side of the document will be scanned. For an i1420 or i1440 Scanner both sides of the document will be scanned. If you have a Kodak i1410 Scanner, be scanned and displayed in the Scan Validation Tool window. Window display icons Linux operating systems Application software The documents will be found in power saver...

User Guide
Page 30
... without saving any unapplied changes. Display settings prior to scanning: if selected, the main Kodak Scanner window will be displayed before the document(s) are scanned, allowing you did not save your changes, a message will be displayed. The main Kodak Scanner window will be displayed each time the function is run . If you made on the...
... without saving any unapplied changes. Display settings prior to scanning: if selected, the main Kodak Scanner window will be displayed before the document(s) are scanned, allowing you did not save your changes, a message will be displayed. The main Kodak Scanner window will be displayed each time the function is run . If you made on the...

User Guide
Page 32
...Steps 2 and 11. 13. By default your documents will be stored within your scanner Setting Shortcut before scanning, check Display settings prior to change your "My Documents" folder. If desired, select a different Setting Shortcut based on the type of document you want to scanning from the Smart Touch ...Configuration dialog box. 11. If you want to change it, enter the folder name or click Browse to saving check box on the main Kodak Scanner window. 10. 6. If you want to ...
...Steps 2 and 11. 13. By default your documents will be stored within your scanner Setting Shortcut before scanning, check Display settings prior to change your "My Documents" folder. If desired, select a different Setting Shortcut based on the type of document you want to scanning from the Smart Touch ...Configuration dialog box. 11. If you want to change it, enter the folder name or click Browse to saving check box on the main Kodak Scanner window. 10. 6. If you want to ...

User Guide
Page 36
... as the leading edge). Position the documents face down with the leading edge centered in documents may damage the scanner. 1. Pull out the output tray extender, if necessary. 6. If you are scanning one-sided documents or if you have a Kodak i1410 Scanner, be sure the side you want ...to scan into the automatic document feeder in the "Document preparation" section. IMPORTANT...
... as the leading edge). Position the documents face down with the leading edge centered in documents may damage the scanner. 1. Pull out the output tray extender, if necessary. 6. If you are scanning one-sided documents or if you have a Kodak i1410 Scanner, be sure the side you want ...to scan into the automatic document feeder in the "Document preparation" section. IMPORTANT...
User Guide
Page 38
... the ink cartridge and ink blotter strips. The Document Printer/Enhanced Printer operates at full scanner speed. any information that the software allows you to enter can be configured to the printer. NOTES: • Clean the scanner's paper path components daily when using the printer.... • You cannot print on the CD or your scanning application documentation for using a Setting Shortcut (TWAIN GUI). 4 Document Printing This chapter provides instructions for more information ...
... the ink cartridge and ink blotter strips. The Document Printer/Enhanced Printer operates at full scanner speed. any information that the software allows you to enter can be configured to the printer. NOTES: • Clean the scanner's paper path components daily when using the printer.... • You cannot print on the CD or your scanning application documentation for using a Setting Shortcut (TWAIN GUI). 4 Document Printing This chapter provides instructions for more information ...
User Guide
Page 40
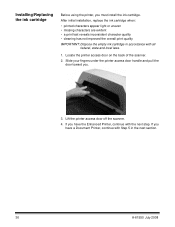
.../Replacing the ink cartridge Before using the printer, you . 3. Lift the printer access door off the scanner. 4. Slide your fingers under the printer access door handle and pull the door toward you must install the ink cartridge. If you have the Enhanced ...; cleaning has not improved the overall print quality IMPORTANT: Dispose the empty ink cartridge in the next section. 36 A-61550 July 2008 If you have a Document Printer, continue with Step 5 in accordance with the next step.
.../Replacing the ink cartridge Before using the printer, you . 3. Lift the printer access door off the scanner. 4. Slide your fingers under the printer access door handle and pull the door toward you must install the ink cartridge. If you have the Enhanced ...; cleaning has not improved the overall print quality IMPORTANT: Dispose the empty ink cartridge in the next section. 36 A-61550 July 2008 If you have a Document Printer, continue with Step 5 in accordance with the next step.

User Guide
Page 45
... access door. 41 Changing print positions The horizontal print position can only print in place. 6. Lift the printer access door off the scanner. Align the slot on the printer you can be slightly different depending on the printer carrier with the desired position and slide the printer.... A-61550 July 2008 Print positions 5. Locate the printer access door on the printer carrier and remove it from the trailing edge of the document, even if the information has not been completely printed 4. The photos may be changed manually. NOTE: Changing the print position is the same...
... access door. 41 Changing print positions The horizontal print position can only print in place. 6. Lift the printer access door off the scanner. Align the slot on the printer you can be slightly different depending on the printer carrier with the desired position and slide the printer.... A-61550 July 2008 Print positions 5. Locate the printer access door on the printer carrier and remove it from the trailing edge of the document, even if the information has not been completely printed 4. The photos may be changed manually. NOTE: Changing the print position is the same...
User Guide
Page 47
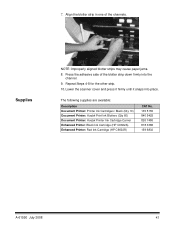
.... 10. The following supplies are available: Description Document Printer: Printer Ink Cartridges / Black (Qty 10) Document Printer: Kodak Print Ink Blotters (Qty 60) Document Printer: Kodak Printer Ink Cartridge Carrier Enhanced Printer: Black Ink ...Cartridge (HP C6602A) Enhanced Printer: Red Ink Cartridge (HP C6602R) CAT No. 135 5155 840 5425 826 7486 818 3386 159 6832 A-61550 July 2008 43 Press the adhesive side of the channels. Lower the scanner...
.... 10. The following supplies are available: Description Document Printer: Printer Ink Cartridges / Black (Qty 10) Document Printer: Kodak Print Ink Blotters (Qty 60) Document Printer: Kodak Printer Ink Cartridge Carrier Enhanced Printer: Black Ink ...Cartridge (HP C6602A) Enhanced Printer: Red Ink Cartridge (HP C6602R) CAT No. 135 5155 840 5425 826 7486 818 3386 159 6832 A-61550 July 2008 43 Press the adhesive side of the channels. Lower the scanner...

User Guide
Page 49
Some document types generate more paper dust and debris and may damage the rubber tires. After cleaning, inspect the tires for wear and replace the separator module ... a vacuum cleaner to ensure the best possible image quality. Tire debris does not always mean that the tires are worn or damaged. 5 Maintenance Cleaning your scanner and preventative maintenance on the feed and separator modules is required to remove debris from the rubber tires on a regular basis is normal. A-61550 July...
Some document types generate more paper dust and debris and may damage the rubber tires. After cleaning, inspect the tires for wear and replace the separator module ... a vacuum cleaner to ensure the best possible image quality. Tire debris does not always mean that the tires are worn or damaged. 5 Maintenance Cleaning your scanner and preventative maintenance on the feed and separator modules is required to remove debris from the rubber tires on a regular basis is normal. A-61550 July...

User Guide
Page 50
... Consumables Kit for i1400 Series Scanners Kodak Extra-Large Feeder Consumables Kit for i1400 Series Scanners Kodak Imaging Guide Set for i1400 Series Scanners (1 upper guide, 1 lower guide) Document Printer: Printer Ink Cartridges (10) Document Printer: Kodak Printer Ink Blotters (60) Document Printer: Kodak Printer Ink Cartridge Carrier Enhanced Printer: Black Ink Cartridges (HP C6602A) Enhanced Printer: Red Ink Cartridge...
... Consumables Kit for i1400 Series Scanners Kodak Extra-Large Feeder Consumables Kit for i1400 Series Scanners Kodak Imaging Guide Set for i1400 Series Scanners (1 upper guide, 1 lower guide) Document Printer: Printer Ink Cartridges (10) Document Printer: Kodak Printer Ink Blotters (60) Document Printer: Kodak Printer Ink Cartridge Carrier Enhanced Printer: Black Ink Cartridges (HP C6602A) Enhanced Printer: Red Ink Cartridge...

User Guide
Page 51
Remove any documents from the feeder area. 3. With one hand, push the separator module release lever back and with the other hand lift the separator module up to unlatch the scanner cover. 4. Pull up and out of position. Power down the scanner. 2. A-61550 July 2008 47 Lift up the scanner cover release to open the scanner cover. 5. Cleaning the separator module 1.
Remove any documents from the feeder area. 3. With one hand, push the separator module release lever back and with the other hand lift the separator module up to unlatch the scanner cover. 4. Pull up and out of position. Power down the scanner. 2. A-61550 July 2008 47 Lift up the scanner cover release to open the scanner cover. 5. Cleaning the separator module 1.


