
User Guide
Page 2
... in the host computer 2-2 Installing the Kodak Driver software 2-2 Installing the FireWire cable 2-2 Attaching the power cord 2-3 Powering up the host computer 2-3 Scanner components 2-3 3 Using the Scanner 3-1 Turning the scanner on and off 3-1 Starting and stopping scanning 3-1 Manually pausing and resuming the scanner 3-2 Automatically pausing and resuming the scanner 3-2 Manually ending scanning 3-2 Document preparation 3-3 Adjusting the side guides and...
... in the host computer 2-2 Installing the Kodak Driver software 2-2 Installing the FireWire cable 2-2 Attaching the power cord 2-3 Powering up the host computer 2-3 Scanner components 2-3 3 Using the Scanner 3-1 Turning the scanner on and off 3-1 Starting and stopping scanning 3-1 Manually pausing and resuming the scanner 3-2 Automatically pausing and resuming the scanner 3-2 Manually ending scanning 3-2 Document preparation 3-3 Adjusting the side guides and...

User Guide
Page 3
Exit deflector 3-7 Adjusting the optional short document tray 3-8 Feeding documents using multi-feed detection 3-9 Automatic feeding 3-9 Continuous feeding 3-10 Manual feeding 3-10 Feeding documents that require special handling 3-11 Calibrating the scanner 3-11 Image calibration 3-12 Ultrasonics calibration 3-... Troubleshooting 6-1 Indicator lights 6-1 Accessing the Operator Log 6-3 i600 Series Scanners Message listing 6-6 i600 Series Scanners Numerical Message listing 6-11 i700 Series Scanners Message listing 6-12 i700 Series Scanenrs Numerial Message listing 6-18 Problem ...
Exit deflector 3-7 Adjusting the optional short document tray 3-8 Feeding documents using multi-feed detection 3-9 Automatic feeding 3-9 Continuous feeding 3-10 Manual feeding 3-10 Feeding documents that require special handling 3-11 Calibrating the scanner 3-11 Image calibration 3-12 Ultrasonics calibration 3-... Troubleshooting 6-1 Indicator lights 6-1 Accessing the Operator Log 6-3 i600 Series Scanners Message listing 6-6 i600 Series Scanners Numerical Message listing 6-11 i700 Series Scanners Message listing 6-12 i700 Series Scanenrs Numerial Message listing 6-18 Problem ...
User Guide
Page 6
.... • For i600/i700 Series Scanners minimum paper length is 2.5 inches (63.5 mm) • Maximum paper length for Kodak i700 Series Scanners. • Multi-feed detection by multiple ultrasonic sensors as well as by length detection. • Automatic and manual feeding. • JPEG compression allows ... drivers are included on a CD that is 34 inches (863.6 mm) and i700 Series Scanners 40 inches (1016 mm) • Color or grayscale at the same speed as "sleep" mode). • Document printing capabilities. • Electronic red, green and blue color dropout. • Output resolutions ...
.... • For i600/i700 Series Scanners minimum paper length is 2.5 inches (63.5 mm) • Maximum paper length for Kodak i700 Series Scanners. • Multi-feed detection by multiple ultrasonic sensors as well as by length detection. • Automatic and manual feeding. • JPEG compression allows ... drivers are included on a CD that is 34 inches (863.6 mm) and i700 Series Scanners 40 inches (1016 mm) • Color or grayscale at the same speed as "sleep" mode). • Document printing capabilities. • Electronic red, green and blue color dropout. • Output resolutions ...

User Guide
Page 9
...material may be required to correct the interference at his own expense. Do not attempt to repair. • The Kodak i600/i700 Series Scanners contain lead in a domestic environment, radio disturbance may cause harmful interference to radio communications. Disposal of this equipment in ... packaging is likely to cause harmful interference in a bundle. • Remove all other loose objects from the factory with the instruction manual, may arise. These include, but are designed to provide reasonable protection against harmful interference when the equipment is a Class A product ...
...material may be required to correct the interference at his own expense. Do not attempt to repair. • The Kodak i600/i700 Series Scanners contain lead in a domestic environment, radio disturbance may cause harmful interference to radio communications. Disposal of this equipment in ... packaging is likely to cause harmful interference in a bundle. • Remove all other loose objects from the factory with the instruction manual, may arise. These include, but are designed to provide reasonable protection against harmful interference when the equipment is a Class A product ...

User Guide
Page 13
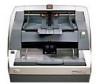
... lever - The side guides can be adjusted. 6 POD release latch - Attaching the power cord The Kodak i600/i700 Series Scanner is idle. Turn on to manually adjust the space between the feed module and separation roller for documents that require special handling. 5 Output tray and end stop length can also be left-, center- slide...
... lever - The side guides can be adjusted. 6 POD release latch - Attaching the power cord The Kodak i600/i700 Series Scanner is idle. Turn on to manually adjust the space between the feed module and separation roller for documents that require special handling. 5 Output tray and end stop length can also be left-, center- slide...

User Guide
Page 17
... provides the following operational procedures: • Turning on/off the scanner • Starting, stopping, pausing and resuming the scanner • Document preparation • Adjusting the side guides and output tray • Scanning documents • Feeding long documents • Automatic, continuous and manual feeding • Calibration Turning the scanner on and off • Press the button on the...
... provides the following operational procedures: • Turning on/off the scanner • Starting, stopping, pausing and resuming the scanner • Document preparation • Adjusting the side guides and output tray • Scanning documents • Feeding long documents • Automatic, continuous and manual feeding • Calibration Turning the scanner on and off • Press the button on the...

User Guide
Page 18
...button Start/Resume button Automatically pausing and resuming the scanner Manually ending scanning During scanning the scanner monitors its own internal image buffer memory. After feeding the last document to be scanned, you can retrieve them, the scanner will be sure your host application. An end ... the job from the host application. • Press the Start/Resume button on the scanner once to pause scanning. Manually pausing and resuming the scanner While scanning documents: • Press the Stop/Pause button on the scanner to restart scanning after it has been paused.
...button Start/Resume button Automatically pausing and resuming the scanner Manually ending scanning During scanning the scanner monitors its own internal image buffer memory. After feeding the last document to be scanned, you can retrieve them, the scanner will be sure your host application. An end ... the job from the host application. • Press the Start/Resume button on the scanner once to pause scanning. Manually pausing and resuming the scanner While scanning documents: • Press the Stop/Pause button on the scanner to restart scanning after it has been paused.

User Guide
Page 19
... multi-feed detection is achieved when scanning documents within the recommended document specifications listed below. Scanning documents outside of these specifications may damage the scanner and documents. The Kodak Feeder Kit for Ultra Lightweight Paper can transport every possible type of the sleeve. Documents as small as 5 cm (2 in .). Kodak scanners have been tested with the folded edge of...
... multi-feed detection is achieved when scanning documents within the recommended document specifications listed below. Scanning documents outside of these specifications may damage the scanner and documents. The Kodak Feeder Kit for Ultra Lightweight Paper can transport every possible type of the sleeve. Documents as small as 5 cm (2 in .). Kodak scanners have been tested with the folded edge of...

User Guide
Page 26
...continuous feeding, the elevator tray is covered. 2. NOTE: Depending on how your scanner is configured, the transport will remain in this position to allow more documents to be used when you want to feed in the elevator tray so that ...documents to a position where approximately 25 documents can be loaded to the bottom of documents (less than 25). To continuously feed documents, follow Steps 1 through 5 above. Press Start/Resume. 3-10 A-61500 May 2010 As the documents are being scanned, you want to scan small batches of the stack. Manual feeding To manually feed documents...
...continuous feeding, the elevator tray is covered. 2. NOTE: Depending on how your scanner is configured, the transport will remain in this position to allow more documents to be used when you want to feed in the elevator tray so that ...documents to a position where approximately 25 documents can be loaded to the bottom of documents (less than 25). To continuously feed documents, follow Steps 1 through 5 above. Press Start/Resume. 3-10 A-61500 May 2010 As the documents are being scanned, you want to scan small batches of the stack. Manual feeding To manually feed documents...

User Guide
Page 27
... you are badly torn. Press and hold the gap release lever - Push the document into the elevator tray. Using the scanner in doubt about whether a damaged document can be transported through the scanner, use the gap release lever and manually feed the document. IMPORTANT: If the White Background Accessory is not needed or recommended. i.e. If you...
... you are badly torn. Press and hold the gap release lever - Push the document into the elevator tray. Using the scanner in doubt about whether a damaged document can be transported through the scanner, use the gap release lever and manually feed the document. IMPORTANT: If the White Background Accessory is not needed or recommended. i.e. If you...

User Guide
Page 33
... HP-C6602B Front (pre-scan) 0.89 cm (0.35 in.) User-specified messages via capture software application Up to a nine-digit sequential document number, date, four-digit time Any phonetic language (for example: Dutch, English, French, German, Italian, Portuguese, Spanish, Japanese (half-...Print locations (vertical) Print orientation Font size Ink cartridge Print side Minimum printing distance from document lead edge Static fields available Dynamic fields available Languages supported Description 1 40 8 front manually set, Set by capture software application 0, 90, 180 or 270 degrees 2 selectable,...
... HP-C6602B Front (pre-scan) 0.89 cm (0.35 in.) User-specified messages via capture software application Up to a nine-digit sequential document number, date, four-digit time Any phonetic language (for example: Dutch, English, French, German, Italian, Portuguese, Spanish, Japanese (half-...Print locations (vertical) Print orientation Font size Ink cartridge Print side Minimum printing distance from document lead edge Static fields available Dynamic fields available Languages supported Description 1 40 8 front manually set, Set by capture software application 0, 90, 180 or 270 degrees 2 selectable,...
User Guide
Page 40
...recommended Kodak cleaning procedures. After cleaning, inspect the tires for parts that are worn or damaged. Following this procedure as specified in this manual. The following is a preventative maintenance procedure that the tires are customer-replaceable IMPORTANT: Scanner ...components marked with a green tab indicate operator-accessible parts. Tire debris does not always mean that is recommended to ensure the best possible image quality. Some document...
...recommended Kodak cleaning procedures. After cleaning, inspect the tires for parts that are worn or damaged. Following this procedure as specified in this manual. The following is a preventative maintenance procedure that the tires are customer-replaceable IMPORTANT: Scanner ...components marked with a green tab indicate operator-accessible parts. Tire debris does not always mean that is recommended to ensure the best possible image quality. Some document...
User Guide
Page 44
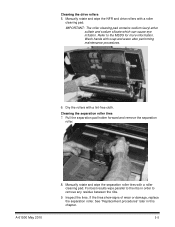
Manually rotate and wipe the separation roller tires with a roller cleaning pad. See "Replacement procedures" later in order to remove any residue between the ribs. 9. Cleaning ... more information. If the tires show signs of wear or damage, replace the separation roller. Refer to the ribs in this chapter. 5-5 Inspect the tires. Manually rotate and wipe the NFR and drive rollers with a roller cleaning pad. Wash hands with a lint-free cloth. Pull the separation pad holder forward and...
Manually rotate and wipe the separation roller tires with a roller cleaning pad. See "Replacement procedures" later in order to remove any residue between the ribs. 9. Cleaning ... more information. If the tires show signs of wear or damage, replace the separation roller. Refer to the ribs in this chapter. 5-5 Inspect the tires. Manually rotate and wipe the NFR and drive rollers with a roller cleaning pad. Wash hands with a lint-free cloth. Pull the separation pad holder forward and...

User Guide
Page 45
Lift up the printer access cover. 12. See "Replacement procedures" later in order to release and remove the feed module. 13. Cleaning the feed module tires 11. Manually rotate and wipe the feed module tires with a roller cleaning pad. Inspect the tires. For best results wipe parallel to the ribs in this chapter. 5-6 A-61500 May 2010 10. Push the release lever down (located underneath the printer access cover) to remove any residue between the ribs. 14. If the tires show signs of wear or damage, replace the feed module tires. Reinstall the separation roller.
Lift up the printer access cover. 12. See "Replacement procedures" later in order to release and remove the feed module. 13. Cleaning the feed module tires 11. Manually rotate and wipe the feed module tires with a roller cleaning pad. Inspect the tires. For best results wipe parallel to the ribs in this chapter. 5-6 A-61500 May 2010 10. Push the release lever down (located underneath the printer access cover) to remove any residue between the ribs. 14. If the tires show signs of wear or damage, replace the feed module tires. Reinstall the separation roller.

