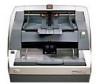

User Guide
Page 11
... scanning. For more information about the scanner specifications, refer to run Kodak i600/i700 Series Scanners. If the scanner is very important that helps maintain your reseller of Kodak Document Imaging products or visit us provide you... with a Pentium IV 2 GHz processor • PCI slot • 512 MB RAM • Monitor and mouse • Supported operating systems: - IMPORTANT: Only use the scanner indoors in a dry location. For i700 Series Scanners only: Microsoft Windows 7 (64-bit) Registering your scanner...
... scanning. For more information about the scanner specifications, refer to run Kodak i600/i700 Series Scanners. If the scanner is very important that helps maintain your reseller of Kodak Document Imaging products or visit us provide you... with a Pentium IV 2 GHz processor • PCI slot • 512 MB RAM • Monitor and mouse • Supported operating systems: - IMPORTANT: Only use the scanner indoors in a dry location. For i700 Series Scanners only: Microsoft Windows 7 (64-bit) Registering your scanner...

User Guide
Page 28
... calibration targets can be displayed. 3-12 A-61500 May 2010 Open the pod and clean the imaging guides. The main Kodak Scanner window will be ordered. Place the calibration target in the elevator tray and output tray. 4. Image calibration Use the calibration target... provided with your system may be different. 1. Select Kodak Scanner: i600 or Kodak Scanner: i700. See Chapter 5, "Supplies and accessories" for 90 seconds. 3. The screens displayed on , allow the lamps to use...
... calibration targets can be displayed. 3-12 A-61500 May 2010 Open the pod and clean the imaging guides. The main Kodak Scanner window will be ordered. Place the calibration target in the elevator tray and output tray. 4. Image calibration Use the calibration target... provided with your system may be different. 1. Select Kodak Scanner: i600 or Kodak Scanner: i700. See Chapter 5, "Supplies and accessories" for 90 seconds. 3. The screens displayed on , allow the lamps to use...

User Guide
Page 29
7. A-61500 May 2010 3-13 Click Device. The following screen will be displayed. 9. Click Settings. Click the Setup icon to access the main Kodak Scanner window. 8.
7. A-61500 May 2010 3-13 Click Device. The following screen will be displayed. 9. Click Settings. Click the Setup icon to access the main Kodak Scanner window. 8.

User Guide
Page 59
Select Start>Programs>Kodak>Document Imaging>Scan Validation Tool. 2. From the Driver Types box, select TWAIN. 3. Open the Scan Validation Tool. 4. Click the Setup icon to access the main Kodak Scanner window.. The main Kodak Scanner window will be displayed.. 5. A-61500 May 2010 6-3 Select Kodak Scanner: i600 or Kodak Scanner: i700. Accessing the Operator Log The Operator Log is accessed through the Scan Validation Tool. 1.
Select Start>Programs>Kodak>Document Imaging>Scan Validation Tool. 2. From the Driver Types box, select TWAIN. 3. Open the Scan Validation Tool. 4. Click the Setup icon to access the main Kodak Scanner window.. The main Kodak Scanner window will be displayed.. 5. A-61500 May 2010 6-3 Select Kodak Scanner: i600 or Kodak Scanner: i700. Accessing the Operator Log The Operator Log is accessed through the Scan Validation Tool. 1.

User Guide
Page 63
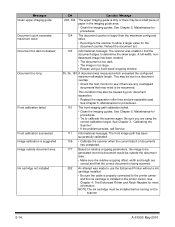
...8226; Calibrate the scanner when the current batch of documents has completed. 177 Based on the scanner. Messages Clean upper imaging guide Document count exceeded maximum value Document too dark to deskew Document too long Front ...calibration failed Front calibration succeeded Image calibration is suggested Image outside the document area. • Make sure the relative cropping offset, width and length are using a fixed-sized cropping window...
...8226; Calibrate the scanner when the current batch of documents has completed. 177 Based on the scanner. Messages Clean upper imaging guide Document count exceeded maximum value Document too dark to deskew Document too long Front ...calibration failed Front calibration succeeded Image calibration is suggested Image outside the document area. • Make sure the relative cropping offset, width and length are using a fixed-sized cropping window...
User Guide
Page 70
... the skew angle. The scanner was unable to find the document edges to deskew Document too long Front calibration failed Front calibration succeeded Image calibration is suggested Image outside the document area. • Make sure the relative cropping offset, width and length are using a fixed-sized cropping window. 35, 36, 183 A document was made to use...
... the skew angle. The scanner was unable to find the document edges to deskew Document too long Front calibration failed Front calibration succeeded Image calibration is suggested Image outside the document area. • Make sure the relative cropping offset, width and length are using a fixed-sized cropping window. 35, 36, 183 A document was made to use...


