User Guide
Page 2
... in the host computer 2-2 Installing the Kodak Driver software 2-2 Installing the FireWire cable 2-2 Attaching the power cord 2-3 Powering up the host computer 2-3 Scanner components 2-3 3 Using the Scanner 3-1 Turning the scanner on and off 3-1 Starting and stopping scanning 3-1 Manually pausing and resuming the scanner 3-2 Automatically pausing and resuming the scanner 3-2 Manually ending scanning 3-2 Document preparation 3-3 Adjusting the side guides and...
... in the host computer 2-2 Installing the Kodak Driver software 2-2 Installing the FireWire cable 2-2 Attaching the power cord 2-3 Powering up the host computer 2-3 Scanner components 2-3 3 Using the Scanner 3-1 Turning the scanner on and off 3-1 Starting and stopping scanning 3-1 Manually pausing and resuming the scanner 3-2 Automatically pausing and resuming the scanner 3-2 Manually ending scanning 3-2 Document preparation 3-3 Adjusting the side guides and...

User Guide
Page 3
Exit deflector 3-7 Adjusting the optional short document tray 3-8 Feeding documents using multi-feed detection 3-9 Automatic feeding 3-9 Continuous feeding 3-10 Manual feeding 3-10 Feeding documents that require special handling 3-11 Calibrating the scanner 3-11 Image calibration 3-12 Ultrasonics calibration 3-... Troubleshooting 6-1 Indicator lights 6-1 Accessing the Operator Log 6-3 i600 Series Scanners Message listing 6-6 i600 Series Scanners Numerical Message listing 6-11 i700 Series Scanners Message listing 6-12 i700 Series Scanenrs Numerial Message listing 6-18 Problem ...
Exit deflector 3-7 Adjusting the optional short document tray 3-8 Feeding documents using multi-feed detection 3-9 Automatic feeding 3-9 Continuous feeding 3-10 Manual feeding 3-10 Feeding documents that require special handling 3-11 Calibrating the scanner 3-11 Image calibration 3-12 Ultrasonics calibration 3-... Troubleshooting 6-1 Indicator lights 6-1 Accessing the Operator Log 6-3 i600 Series Scanners Message listing 6-6 i600 Series Scanners Numerical Message listing 6-11 i700 Series Scanners Message listing 6-12 i700 Series Scanenrs Numerial Message listing 6-18 Problem ...

User Guide
Page 6
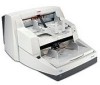
...scanner. • International language support. • Ergonomic design. • 500-sheet elevator tray. • Energy Star compliant (also known as "sleep" mode). • Document printing capabilities. • Electronic red, green and blue color dropout. • Output resolutions include: - Kodak... White Background Accessory - if you are scanning translucent documents... dpi (i700 Series Scanners only). * Not applicable to the Kodak i610 Scanner. Grayscale: 100, ...
...scanner. • International language support. • Ergonomic design. • 500-sheet elevator tray. • Energy Star compliant (also known as "sleep" mode). • Document printing capabilities. • Electronic red, green and blue color dropout. • Output resolutions include: - Kodak... White Background Accessory - if you are scanning translucent documents... dpi (i700 Series Scanners only). * Not applicable to the Kodak i610 Scanner. Grayscale: 100, ...
User Guide
Page 12
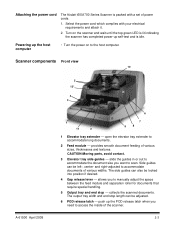
Turn on to manually adjust the space between the feed module and separation roller for documents that require special handling. 5 Output tray and end stop length can be adjusted. 6 POD release latch - push up self-test and is idle. Scanner components Front view 10 A-61500 April 2009 5 12* 4 3 6 1...latch when you need to scan. Attaching the power cord The Kodak i600/i700 Series Scanner is packed with your electrical requirements and attach it. 2. open the elevator tray extender to accommodate documents of the scanner. 2-3 CAUTION:Moving parts, avoid contact. 3 Elevator tray ...
Turn on to manually adjust the space between the feed module and separation roller for documents that require special handling. 5 Output tray and end stop length can be adjusted. 6 POD release latch - push up self-test and is idle. Scanner components Front view 10 A-61500 April 2009 5 12* 4 3 6 1...latch when you need to scan. Attaching the power cord The Kodak i600/i700 Series Scanner is packed with your electrical requirements and attach it. 2. open the elevator tray extender to accommodate documents of the scanner. 2-3 CAUTION:Moving parts, avoid contact. 3 Elevator tray ...
User Guide
Page 16
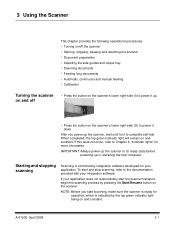
... provides the following operational procedures: • Turning on/off the scanner • Starting, stopping, pausing and resuming the scanner • Document preparation • Adjusting the side guides and output tray • Scanning documents • Feeding long documents • Automatic, continuous and manual feeding • Calibration Turning the scanner on and off • Press the button on the...
... provides the following operational procedures: • Turning on/off the scanner • Starting, stopping, pausing and resuming the scanner • Document preparation • Adjusting the side guides and output tray • Scanning documents • Feeding long documents • Automatic, continuous and manual feeding • Calibration Turning the scanner on and off • Press the button on the...

User Guide
Page 17
...read existing images. An end of Job. Stop/Pause button Start/Resume button Automatically pausing and resuming the scanner Manually ending scanning During scanning the scanner monitors its own internal image buffer memory. To avoid this situation be sure your host application. NOTE: ...the host application. 3-2 A-61500 April 2009 After feeding the last document to be sent to your host computer meets the minimum system requirements as referred to pause scanning. Manually pausing and resuming the scanner While scanning documents: • Press the Stop/Pause button on the...
...read existing images. An end of Job. Stop/Pause button Start/Resume button Automatically pausing and resuming the scanner Manually ending scanning During scanning the scanner monitors its own internal image buffer memory. To avoid this situation be sure your host application. NOTE: ...the host application. 3-2 A-61500 April 2009 After feeding the last document to be sent to your host computer meets the minimum system requirements as referred to pause scanning. Manually pausing and resuming the scanner While scanning documents: • Press the Stop/Pause button on the...

User Guide
Page 18
... (7 to 20 lbs). Kodak scanners have been tested with a range of documents that represent the broad spectrum of document types found in documents may lead to undesirable results in .) (i.e. A-61500 April 2009 3-3 NOTE: When scanning documents in this allows the feeder to introduce documents into the scanner must be transported successfully through the scanner. The Kodak Feeder Kit for Ultra...
... (7 to 20 lbs). Kodak scanners have been tested with a range of documents that represent the broad spectrum of document types found in documents may lead to undesirable results in .) (i.e. A-61500 April 2009 3-3 NOTE: When scanning documents in this allows the feeder to introduce documents into the scanner must be transported successfully through the scanner. The Kodak Feeder Kit for Ultra...
User Guide
Page 25
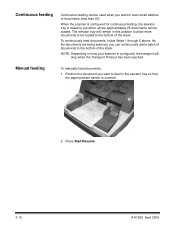
... to the bottom of the stack. Manual feeding To manually feed documents: 1. As the documents are being scanned, you can continuously add a batch of documents to scan small batches of documents (less than 25). Press Start/Resume. 3-10 A-61500 April 2009 Continuous feeding Continuous feeding can be loaded. When the scanner is configured for continuous feeding, the...
... to the bottom of the stack. Manual feeding To manually feed documents: 1. As the documents are being scanned, you can continuously add a batch of documents to scan small batches of documents (less than 25). Press Start/Resume. 3-10 A-61500 April 2009 Continuous feeding Continuous feeding can be loaded. When the scanner is configured for continuous feeding, the...

User Guide
Page 26
... Accessory is installed, it must be replaced with the black background strip, and the scanner must be transported through the scanner, use the gap release lever and manually feed the document. Press and hold the gap release lever - i.e. If you to manually adjust the space between the feed module and separation roller for best performance.
... Accessory is installed, it must be replaced with the black background strip, and the scanner must be transported through the scanner, use the gap release lever and manually feed the document. Press and hold the gap release lever - i.e. If you to manually adjust the space between the feed module and separation roller for best performance.
User Guide
Page 39
Some document types generate more paper dust and debris and may ...cleaning, inspect the tires for parts that the tires are customer-replaceable IMPORTANT: Scanner components marked with a green tab indicate operator-accessible parts. Following this manual. A-61500 April 2009 5-1 Tire debris does not always mean that are .../tires to prevent costly interruptions during production scanning. NOTES: • Follow the recommended Kodak cleaning procedures. Cleaning your scanner and preventative maintenance on the feed module and separation roller is required to ensure the best possible...
Some document types generate more paper dust and debris and may ...cleaning, inspect the tires for parts that the tires are customer-replaceable IMPORTANT: Scanner components marked with a green tab indicate operator-accessible parts. Following this manual. A-61500 April 2009 5-1 Tire debris does not always mean that are .../tires to prevent costly interruptions during production scanning. NOTES: • Follow the recommended Kodak cleaning procedures. Cleaning your scanner and preventative maintenance on the feed module and separation roller is required to ensure the best possible...


