
User's Guide
Page 1
... to the follow-ing two conditions: (1) this device must accept any interference received, including interference that interference will not occur. Kodak KE115 Zoom 35 mm Camera Consumer Imaging EASTMAN KODAK COMPANY Rochester, NY 14650 © Eastman Kodak Company, 2002 Pt. These limits provide reasonable protection against interference in accordance with part 15 of the Canadian Interference-Causing Equipment...
... to the follow-ing two conditions: (1) this device must accept any interference received, including interference that interference will not occur. Kodak KE115 Zoom 35 mm Camera Consumer Imaging EASTMAN KODAK COMPANY Rochester, NY 14650 © Eastman Kodak Company, 2002 Pt. These limits provide reasonable protection against interference in accordance with part 15 of the Canadian Interference-Causing Equipment...

User's Guide
Page 3
...465-6325, ext. 36100; Kodak (Canada only) from 9:00 a.m. to 7:00 p.m. (Eastern time) Monday through Friday at 1-800-242-2424. When you call, please have your sales receipt as proof of the date of purchase. 1 Visit our Web sites at http://www.kodak.com (for US) or ...http://www.kodak.ca (for the Toronto area, call : Kodak (USA only) from 8:00 a.m. For warranty purposes, please keep your camera available. for Canada) or call 416-766-8233, ext. 36100. ENGLISH ENGLISH Kodak KE115 Zoom 35 mm Camera NEED HELP WITH YOUR...
...465-6325, ext. 36100; Kodak (Canada only) from 9:00 a.m. to 7:00 p.m. (Eastern time) Monday through Friday at 1-800-242-2424. When you call, please have your sales receipt as proof of the date of purchase. 1 Visit our Web sites at http://www.kodak.com (for US) or ...http://www.kodak.ca (for the Toronto area, call : Kodak (USA only) from 8:00 a.m. For warranty purposes, please keep your camera available. for Canada) or call 416-766-8233, ext. 36100. ENGLISH ENGLISH Kodak KE115 Zoom 35 mm Camera NEED HELP WITH YOUR...
User's Guide
Page 4
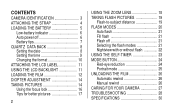
CONTENTS CAMERA IDENTIFICATION 3 ATTACHING THE STRAP 4 LOADING THE BATTERY 5 Low-battery indicator 6 Auto power off 6 Battery tips 7 QUARTZ DATA BACK 8 Setting the date ...LOADING THE FILM 12 DIOPTER ADJUSTMENT 14 TAKING PICTURES 14 Using the focus lock 16 Tips for better pictures 17 2 USING THE ZOOM LENS 18 TAKING FLASH PICTURES 19 Flash-to-subject distance 19 FLASH MODES 20 Auto flash 21 Fill flash 21 Flash off ...-eye reduction 24 Portrait mode 25 UNLOADING THE FILM 26 Automatic rewind 26 Manual rewind 26 CARING FOR YOUR CAMERA 27 TROUBLESHOOTING 28 SPECIFICATIONS 30
CONTENTS CAMERA IDENTIFICATION 3 ATTACHING THE STRAP 4 LOADING THE BATTERY 5 Low-battery indicator 6 Auto power off 6 Battery tips 7 QUARTZ DATA BACK 8 Setting the date ...LOADING THE FILM 12 DIOPTER ADJUSTMENT 14 TAKING PICTURES 14 Using the focus lock 16 Tips for better pictures 17 2 USING THE ZOOM LENS 18 TAKING FLASH PICTURES 19 Flash-to-subject distance 19 FLASH MODES 20 Auto flash 21 Fill flash 21 Flash off ...-eye reduction 24 Portrait mode 25 UNLOADING THE FILM 26 Automatic rewind 26 Manual rewind 26 CARING FOR YOUR CAMERA 27 TROUBLESHOOTING 28 SPECIFICATIONS 30

User's Guide
Page 5
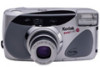
CAMERA IDENTIFICATION Unfold the front and back flaps of manual to view camera diagrams 1 Shutter button 2 Auto-focus windows 3 Light sensor 4 Flash 5 Self-timer/ red-eye-reduction bulb 6 Viewfinder 7 Lens/lens cover 8 Strap post 9 Film-door latch 10 Diopter dial 11 Viewfinder eyepiece 12 Flash-ready/camera-warning light 13 Zoom dial 14 Film-door-lock indicator 15 DATE 16 REWIND 17 LCD panel 18 TIMER 19 MODE 20 Tripod socket 21 EXPOSURE 22 LCD backlight 23 ON/OFF 24 Battery door 25 Film-guide rails 26 DX/DXN code sensors 27 Film chamber 28 Film door 29 Film window 3
CAMERA IDENTIFICATION Unfold the front and back flaps of manual to view camera diagrams 1 Shutter button 2 Auto-focus windows 3 Light sensor 4 Flash 5 Self-timer/ red-eye-reduction bulb 6 Viewfinder 7 Lens/lens cover 8 Strap post 9 Film-door latch 10 Diopter dial 11 Viewfinder eyepiece 12 Flash-ready/camera-warning light 13 Zoom dial 14 Film-door-lock indicator 15 DATE 16 REWIND 17 LCD panel 18 TIMER 19 MODE 20 Tripod socket 21 EXPOSURE 22 LCD backlight 23 ON/OFF 24 Battery door 25 Film-guide rails 26 DX/DXN code sensors 27 Film chamber 28 Film door 29 Film window 3
User's Guide
Page 11
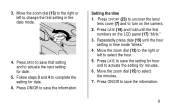
... mode "blinks." 4. Setting the time 1. Press ON/Off to complete the setting for date. 5. Follow steps 3 and 4 to save the information. Move the zoom dial (15) to turn on the LCD panel (17) "blink." 3. Press DATE to save that setting and to select the hour. 5. Repeatedly press date (...15) until the first numbers on the camera. 2. Press DATE (15) and hold until the hour setting in the date mode. 4. 3. Move the zoom dial (13) to the right or left to actuate the next setting for date. 6.
... mode "blinks." 4. Setting the time 1. Press ON/Off to complete the setting for date. 5. Follow steps 3 and 4 to save the information. Move the zoom dial (15) to turn on the LCD panel (17) "blink." 3. Press DATE to save that setting and to select the hour. 5. Repeatedly press date (...15) until the first numbers on the camera. 2. Press DATE (15) and hold until the hour setting in the date mode. 4. 3. Move the zoom dial (13) to the right or left to actuate the next setting for date. 6.

User's Guide
Page 20
USING THE ZOOM LENS This camera has a motorized zoom lens that lets you turn on the camera, the lens is initially set to the wide-angle position. 1. Press ON/OFF (23) to uncover the lens/lens cover (7) and to take the picture. • The lens barrel fully retracts and the camera goes into a ...sleep mode after 4 minutes. Look through the viewfinder eyepiece (11) to zoom away from the subject in the telephoto mode or to to see your subject. 3. It also has a ...
USING THE ZOOM LENS This camera has a motorized zoom lens that lets you turn on the camera, the lens is initially set to the wide-angle position. 1. Press ON/OFF (23) to uncover the lens/lens cover (7) and to take the picture. • The lens barrel fully retracts and the camera goes into a ...sleep mode after 4 minutes. Look through the viewfinder eyepiece (11) to zoom away from the subject in the telephoto mode or to to see your subject. 3. It also has a ...

User's Guide
Page 27
In this mode, the camera automatically zooms to take a picture. • All flash options are available in the portrait mode. • The portrait mode with or without red-eye reduction. 1. close -framing guides of people. Hold the camera steady and gently press the shutter button (1) ...halfway down to provide suitable framing for suitable framing and completely down until the portrait symbol (36) with or without red- Repeatedly press MODE (19) until the zoom lens adjusts for portraits. eye...
In this mode, the camera automatically zooms to take a picture. • All flash options are available in the portrait mode. • The portrait mode with or without red-eye reduction. 1. close -framing guides of people. Hold the camera steady and gently press the shutter button (1) ...halfway down to provide suitable framing for suitable framing and completely down until the portrait symbol (36) with or without red- Repeatedly press MODE (19) until the zoom lens adjusts for portraits. eye...

User's Guide
Page 31
... cover closed Battery weak, dead, missing, or improperly loaded Film is not completely rewound into the cartridge LCD panel is blank Camera-warning light "blinks" red Camera buttons and zoom will not operate Battery weak, dead, missing, or improperly loaded Slow shutter speed in low-light scenes No film in... camera Solution Press ON/OFF to open the lens/lens cover Replace or reload the battery Complete taking pictures or press the ...
... cover closed Battery weak, dead, missing, or improperly loaded Film is not completely rewound into the cartridge LCD panel is blank Camera-warning light "blinks" red Camera buttons and zoom will not operate Battery weak, dead, missing, or improperly loaded Slow shutter speed in low-light scenes No film in... camera Solution Press ON/OFF to open the lens/lens cover Replace or reload the battery Complete taking pictures or press the ...
