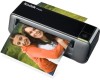
User Guide
Page 2
... VISTA Users ...11 For WINDOWS XP Users ...11 For WINDOWS 7 Users...12 For MAC Users ...12 Scanned Picture Naming Convention 12 Safely Disconnect the Scanner from PC 12 Scan PC Software for KODAK Personal Photo Scanners 12 Install Scan PC Software ...13 Using the Scan PC Software ...13 Uninstall the Scan PC Software ...13...
... VISTA Users ...11 For WINDOWS XP Users ...11 For WINDOWS 7 Users...12 For MAC Users ...12 Scanned Picture Naming Convention 12 Safely Disconnect the Scanner from PC 12 Scan PC Software for KODAK Personal Photo Scanners 12 Install Scan PC Software ...13 Using the Scan PC Software ...13 Uninstall the Scan PC Software ...13...
User Guide
Page 3
... Photo Scanner AC Power Adapter USB Cable (varies by region) MICROSD Card and Adapter 35mm Negative Adapter Calibration Card Roller Cleaning Sheet and Sensor Cleaning Swab Plastic Sheath Scan PC Software (on MICROSD Card) KODAK EASYSHARE Software (on the cable of the power adapter. Do not place... this device may lead to malfunction. Do not insert any other than compatible memory cards into these basic safety precautions when using the KODAK Personal Photo Scanner. Do not use this device to fire or explosion. Do not cut, bend, modify, place heavy objects, or step on MICROSD...
... Photo Scanner AC Power Adapter USB Cable (varies by region) MICROSD Card and Adapter 35mm Negative Adapter Calibration Card Roller Cleaning Sheet and Sensor Cleaning Swab Plastic Sheath Scan PC Software (on MICROSD Card) KODAK EASYSHARE Software (on the cable of the power adapter. Do not place... this device may lead to malfunction. Do not insert any other than compatible memory cards into these basic safety precautions when using the KODAK Personal Photo Scanner. Do not use this device to fire or explosion. Do not cut, bend, modify, place heavy objects, or step on MICROSD...

User Guide
Page 4
... to "Indicator Lights" on page 5.) Indicates the operating status of the original for 300dpi mode. Indicates the correct position and orientation of the scanner and memory card. (Refer to "Indicator Lights" on the memory card. For connecting to a computer via a USB cable and our Scan ...61472; Adapter Grooves Orientation guide Function/ Description Press once to turn off. No computer is ready, feed your printed photo or negative film into the scanner and your pictures will be stored on page 5.) Slide the guide to adjust for 2 seconds to turn on your memory card....
... to "Indicator Lights" on page 5.) Indicates the operating status of the original for 300dpi mode. Indicates the correct position and orientation of the scanner and memory card. (Refer to "Indicator Lights" on the memory card. For connecting to a computer via a USB cable and our Scan ...61472; Adapter Grooves Orientation guide Function/ Description Press once to turn off. No computer is ready, feed your printed photo or negative film into the scanner and your pictures will be stored on page 5.) Slide the guide to adjust for 2 seconds to turn on your memory card....

User Guide
Page 5
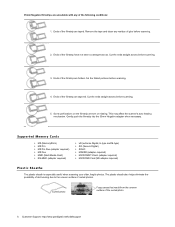
...; Status /Card 600dpi - Unsuitable Do not use in progress. Press the Power button. Otherwise the scanner may malfunction or cause the original to free up space, unlock the card if it is in the slot. Originals thicker than 1.0mm &#...Lights Listed below 1MB), more than 55mm Originals with lots of originals (without using a plastic sheath): 3.5"x5" and 4"x6" photos (max size 4.1"x12") Business cards (max 1.0mm thick) 35mm negatives (1-6 frames with dark colors surrounding the edges ...
...; Status /Card 600dpi - Unsuitable Do not use in progress. Press the Power button. Otherwise the scanner may malfunction or cause the original to free up space, unlock the card if it is in the slot. Originals thicker than 1.0mm &#...Lights Listed below 1MB), more than 55mm Originals with lots of originals (without using a plastic sheath): 3.5"x5" and 4"x6" photos (max size 4.1"x12") Business cards (max 1.0mm thick) 35mm negatives (1-6 frames with dark colors surrounding the edges ...
User Guide
Page 6
...scanner's auto feeding mechanism. The plastic sheath also helps eliminate the possibility of de-focusing due to the uneven surface of the filmstrip are folded. Remove the tape and clean any of the following conditions: 1. Ends of curled photos. Cut the folded portions before scanning. 2. Curled photo...MICROSD Card (SD adapter required) Plastic Sheaths The plastic sheath is especially useful when scanning your older, fragile photos. Ends of the curled photo 6 Customer Support: http://www.pandigital.net/kodaksupport Cut the ends straight across . Ends of the filmstrip have...
...scanner's auto feeding mechanism. The plastic sheath also helps eliminate the possibility of de-focusing due to the uneven surface of the filmstrip are folded. Remove the tape and clean any of the following conditions: 1. Ends of curled photos. Cut the folded portions before scanning. 2. Curled photo...MICROSD Card (SD adapter required) Plastic Sheaths The plastic sheath is especially useful when scanning your older, fragile photos. Ends of the curled photo 6 Customer Support: http://www.pandigital.net/kodaksupport Cut the ends straight across . Ends of the filmstrip have...

User Guide
Page 7
..., refer to the power connector on the Scanner 1. Operating the Scanner Preparation and Initial Setup 1. This is unlocked (writable) The scanner only accepts memory cards in color tones and brightness. Insert the KODAK MICROSD Mobile Card into the SD adapter (...included) or an unlocked (writable) memory card into a power outlet. The type of your region. 4. Insert the plastic sheath into the plastic sheath as shown. 2. Insert the photo...
..., refer to the power connector on the Scanner 1. Operating the Scanner Preparation and Initial Setup 1. This is unlocked (writable) The scanner only accepts memory cards in color tones and brightness. Insert the KODAK MICROSD Mobile Card into the SD adapter (...included) or an unlocked (writable) memory card into a power outlet. The type of your region. 4. Insert the plastic sheath into the plastic sheath as shown. 2. Insert the photo...

User Guide
Page 8
...orientation, place one edge of the filmstrip are in the same orientation as the picture. CAUTION: Do not scan glossy photos in certain conditions are blinking. This scanner produces JPEG (.jpg) file formats. When scanning is blinking; If you can detect the orientation of the feed slot....feed slot when the power indicator is completed, the Power and Status/Card indicator lights blink while the scanner stores the photo on the edge of the photo on steady, indicating that the photo aligns against the left idle for 15 minutes. (If it 's left side of a filmstrip when ...
...orientation, place one edge of the filmstrip are in the same orientation as the picture. CAUTION: Do not scan glossy photos in certain conditions are blinking. This scanner produces JPEG (.jpg) file formats. When scanning is blinking; If you can detect the orientation of the feed slot....feed slot when the power indicator is completed, the Power and Status/Card indicator lights blink while the scanner stores the photo on the edge of the photo on steady, indicating that the photo aligns against the left idle for 15 minutes. (If it 's left side of a filmstrip when ...

User Guide
Page 9
... mirror or upside down . Slide the paper guide lever all the way into the feed slot, being careful not to the direction of photo scanning. Wait until indicator lights are right-side up. Insert the filmstrip into position after the calibration has completed. therefore the scanning speed ... remaining upside-down ). 5. Hold up to the right side of any original. 2. To prevent poor image quality, reserve adequate space behind the scanner for the filmstrip to re-calibrate. 4. The filmstrip will not rotate the image. The following orientations would not be rotated, resulting in the same...
... mirror or upside down . Slide the paper guide lever all the way into the feed slot, being careful not to the direction of photo scanning. Wait until indicator lights are right-side up. Insert the filmstrip into position after the calibration has completed. therefore the scanning speed ... remaining upside-down ). 5. Hold up to the right side of any original. 2. To prevent poor image quality, reserve adequate space behind the scanner for the filmstrip to re-calibrate. 4. The filmstrip will not rotate the image. The following orientations would not be rotated, resulting in the same...

User Guide
Page 10
... When scanning darker originals (for one is completed, the Power and Status/Card indicator lights blink while the scanner stores the photo on the scanner. 10 Customer Support: http://www.pandigital.net/kodaksupport PC System Requirements Operating system: WINDOWS XP, VISTA, WINDOWS 7 or...filmstrip only when the previous one second. To power down the scanner, press and hold the power button for example, a photo of an original during the scan process (see following illustration). Automatic Image Cropping The scanner has a built-in a different direction (orientation) and try ...
... When scanning darker originals (for one is completed, the Power and Status/Card indicator lights blink while the scanner stores the photo on the scanner. 10 Customer Support: http://www.pandigital.net/kodaksupport PC System Requirements Operating system: WINDOWS XP, VISTA, WINDOWS 7 or...filmstrip only when the previous one second. To power down the scanner, press and hold the power button for example, a photo of an original during the scan process (see following illustration). Automatic Image Cropping The scanner has a built-in a different direction (orientation) and try ...

User Guide
Page 11
...to your PC. 6. Select the "Always do this for pictures checkbox. 2. For WINDOWS XP Users When the PC recognizes the scanner with WINDOWS EXPLORER or VISTA Photo Import Wizard. 4. Select Open folder to view or edit the files on your memory card. The scanned picture files will appear....card, and then you are using WINDOWS EXPLORER. 2. Check the Always do the selected action" checkbox, and then click OK. 3. 2. Insert the KODAK MICROSD Mobile Card into the SD adapter (included) or an unlocked (writable) memory card into an electrical outlet. The type of the ...
...to your PC. 6. Select the "Always do this for pictures checkbox. 2. For WINDOWS XP Users When the PC recognizes the scanner with WINDOWS EXPLORER or VISTA Photo Import Wizard. 4. Select Open folder to view or edit the files on your memory card. The scanned picture files will appear....card, and then you are using WINDOWS EXPLORER. 2. Check the Always do the selected action" checkbox, and then click OK. 3. 2. Insert the KODAK MICROSD Mobile Card into the SD adapter (included) or an unlocked (writable) memory card into an electrical outlet. The type of the ...

User Guide
Page 12
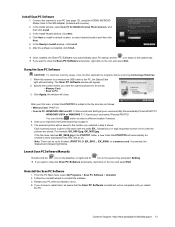
... exceeded, the Status/Card indicator light blinks. Hardware Removal Icon 2. Scan PC Software for KODAK Personal Photo Scanners With the Scan PC Software for KODAK Personal Photo Scanners (Scan PC Software), you can be up to open a Finder window. 1. double-click it to 9 folders (PHOTO1..9, EK_0001... ...If the file name reaches EK_9999.jpg in the PHOTO1 folder. You can easily scan photos and save the scanned pictures...
... exceeded, the Status/Card indicator light blinks. Hardware Removal Icon 2. Scan PC Software for KODAK Personal Photo Scanners With the Scan PC Software for KODAK Personal Photo Scanners (Scan PC Software), you can be up to open a Finder window. 1. double-click it to 9 folders (PHOTO1..9, EK_0001... ...If the file name reaches EK_9999.jpg in the PHOTO1 folder. You can easily scan photos and save the scanned pictures...
User Guide
Page 13
In the Install window, select Scan PC for KODAK Personal Photo Scanners, and then click Install. 3. After the software is added to the file structure as instructed beginning on page 8. 5. the window will appear. 2. digit sequential number ... Scan PC Software window will close the Scan PC Software temporarily, right-click on a memory card. EK_9999) on the icon and select Exit. Connect the scanner to uninstall the software. 3. In the Ready to restart later, be aware that the Scan PC Software uninstall will automatically be completed until you want...
In the Install window, select Scan PC for KODAK Personal Photo Scanners, and then click Install. 3. After the software is added to the file structure as instructed beginning on page 8. 5. the window will appear. 2. digit sequential number ... Scan PC Software window will close the Scan PC Software temporarily, right-click on a memory card. EK_9999) on the icon and select Exit. Connect the scanner to uninstall the software. 3. In the Ready to restart later, be aware that the Scan PC Software uninstall will automatically be completed until you want...
User Guide
Page 14
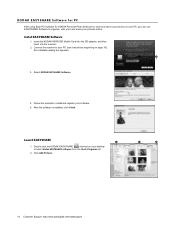
... http://www.pandigital.net/kodaksupport Connect the scanner to install and register your software. 5. KODAK EASYSHARE Software for PC After using Scan PC Software for KODAK Personal Photo Scanners to scan and store your pictures on your desktop or select Kodak EASYSHARE software from the Start>Programs list.... 2. Double-click the KODAK EASYSHARE shortcut on your PC, you can use ...
... http://www.pandigital.net/kodaksupport Connect the scanner to install and register your software. 5. KODAK EASYSHARE Software for PC After using Scan PC Software for KODAK Personal Photo Scanners to scan and store your pictures on your desktop or select Kodak EASYSHARE software from the Start>Programs list.... 2. Double-click the KODAK EASYSHARE shortcut on your PC, you can use ...

User Guide
Page 15
... to blow off the dust on the surface of the scanner. Scanner Maintenance Cleaning the Scanner In order to clean the scanner. With scanner powered off any part of the scanner. 3. 3. Select Kodak EASYSHARE Software, and then click Uninstall. 4. Connect the power... supply to an Album. 5. Select the desired pictures to add to the scanner. 3. Follow the prompts to wipe off , press and hold the Power button for complete instructions on the scanned picture photos...
... to blow off the dust on the surface of the scanner. Scanner Maintenance Cleaning the Scanner In order to clean the scanner. With scanner powered off any part of the scanner. 3. 3. Select Kodak EASYSHARE Software, and then click Uninstall. 4. Connect the power... supply to an Album. 5. Select the desired pictures to add to the scanner. 3. Follow the prompts to wipe off , press and hold the Power button for complete instructions on the scanned picture photos...
User Guide
Page 17
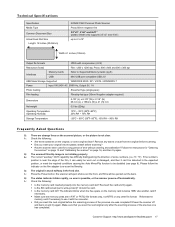
...original, or is the original clean? Technical Specifications Specification Media Type Common Document Size Actual Feed Slot Size Length: 12 inches (304.8mm) KODAK P460 Personal Photo Scanner Photo/35mm negative film 3.5"x5", 4"x6" and 4x11" (plastic sheath only supports 3.5"x5" and 4"x6") up to 4.1x12" Width 4.1 ...any stains or dust from the original before scanning. Did you insert your original into the memory card slot? the scanner will eject photos out the front, and films will be disabled (see page 8). Make sure that you insert the next original before scanning?...
...original, or is the original clean? Technical Specifications Specification Media Type Common Document Size Actual Feed Slot Size Length: 12 inches (304.8mm) KODAK P460 Personal Photo Scanner Photo/35mm negative film 3.5"x5", 4"x6" and 4x11" (plastic sheath only supports 3.5"x5" and 4"x6") up to 4.1x12" Width 4.1 ...any stains or dust from the original before scanning. Did you insert your original into the memory card slot? the scanner will eject photos out the front, and films will be disabled (see page 8). Make sure that you insert the next original before scanning?...


