User Guide
Page 6
......2-9 LCDs ...2-10 Top Status LCD...2-10 Image LCD ...2-10 Turning On the Image LCD ...2-11 Turning Off the Image LCD...2-11 Digital Status LCD...2-12 Using the Menus ...2-13 Navigating Through the Menus ...2-14 Using the Digital Status Button and Digital Status LCD to Highlight Menu Options 2-15...the Lens...2-17 Removing the Lens ...2-18 Imager ...2-18 Viewfinder Diopter ...2-19 LCD Illuminator...2-19 Depth of Field Preview Button...2-20 Imager Plane Indicator...2-20 Hot Shoe...2-21 PC Sync Terminal...2-21 Remote Release Accessory Port ...2-21 Camera Straps ...2-22 Attaching the Neck Strap ...
......2-9 LCDs ...2-10 Top Status LCD...2-10 Image LCD ...2-10 Turning On the Image LCD ...2-11 Turning Off the Image LCD...2-11 Digital Status LCD...2-12 Using the Menus ...2-13 Navigating Through the Menus ...2-14 Using the Digital Status Button and Digital Status LCD to Highlight Menu Options 2-15...the Lens...2-17 Removing the Lens ...2-18 Imager ...2-18 Viewfinder Diopter ...2-19 LCD Illuminator...2-19 Depth of Field Preview Button...2-20 Imager Plane Indicator...2-20 Hot Shoe...2-21 PC Sync Terminal...2-21 Remote Release Accessory Port ...2-21 Camera Straps ...2-22 Attaching the Neck Strap ...

User Guide
Page 8
... Job Tracker File From a Card 5-10 Loading a Job Tracker File from Camera Memory 5-11 Selecting a Language...5-11 Resetting Defaults ...5-12 Time and Date ...5-12 Setting the User Mode...5-13 Using the Vertical Release...5-14 Intervalometer ...5-15 Changing Intervalometer Settings ...5-16 Lens Optimization ......5-17 Long Exposure...5-18 Two-Button Reset ...5-19 ISO ...5-20 Setting ISO using the Image LCD...5-20 Setting ISO using Camera Controls ...5-21 Drive...
... Job Tracker File From a Card 5-10 Loading a Job Tracker File from Camera Memory 5-11 Selecting a Language...5-11 Resetting Defaults ...5-12 Time and Date ...5-12 Setting the User Mode...5-13 Using the Vertical Release...5-14 Intervalometer ...5-15 Changing Intervalometer Settings ...5-16 Lens Optimization ......5-17 Long Exposure...5-18 Two-Button Reset ...5-19 ISO ...5-20 Setting ISO using the Image LCD...5-20 Setting ISO using Camera Controls ...5-21 Drive...
User Guide
Page 9
... Setting JPEG Resolution...6-13 Setting JPEG Quality ...6-14 Correcting Digital Exposure ...6-15 Exposure Bias...6-15 Look ...6-16 Noise Reduction...6-16 Sharpening Level...6-17 7 Controlling Exposure White Balance ...7-1 Preset White Balance ...7-2 Click Balance...7-3 Using the Current Image for Click Balance 7-3 Displaying the Saved Settings Menu ...7-4 Using a Saved Setting ...7-5 Saving a Setting on the Camera...7-6 Loading Settings...
... Setting JPEG Resolution...6-13 Setting JPEG Quality ...6-14 Correcting Digital Exposure ...6-15 Exposure Bias...6-15 Look ...6-16 Noise Reduction...6-16 Sharpening Level...6-17 7 Controlling Exposure White Balance ...7-1 Preset White Balance ...7-2 Click Balance...7-3 Using the Current Image for Click Balance 7-3 Displaying the Saved Settings Menu ...7-4 Using a Saved Setting ...7-5 Saving a Setting on the Camera...7-6 Loading Settings...
User Guide
Page 10
... ...8-10 Depth of Field ...8-10 Focus Tracking ...8-10 9 Capture Workflow Capture Workflow When the Camera Is Not Connected to a Computer 9-1 Device and Media Preparation ...9-2 Capturing and Evaluating Test Images ...9-3 Capturing Images ...9-3 Occasional Verification ...9-4 Transferring Images...9-4 Editing Images ...9-4 KODAK PROFESSIONAL DCS Photo Desk 9-5 KODAK PROFESSIONAL Extended Range Imaging File Format Module 9-5 Capture Workflow When the Camera Is Connected to a Computer 9-5 6 April 29, 2004
... ...8-10 Depth of Field ...8-10 Focus Tracking ...8-10 9 Capture Workflow Capture Workflow When the Camera Is Not Connected to a Computer 9-1 Device and Media Preparation ...9-2 Capturing and Evaluating Test Images ...9-3 Capturing Images ...9-3 Occasional Verification ...9-4 Transferring Images...9-4 Editing Images ...9-4 KODAK PROFESSIONAL DCS Photo Desk 9-5 KODAK PROFESSIONAL Extended Range Imaging File Format Module 9-5 Capture Workflow When the Camera Is Connected to a Computer 9-5 6 April 29, 2004

User Guide
Page 11
... 10-11 Flash Exposure Compensation...10-12 Using Optional Speedlights ...10-13 Notes for Using an Optional Speedlight 10-15 11 Working with Images on the Camera Reviewing Images...11-1 Selecting an Image Mode ...11-1 Changing the Duration of the Image Mode Menu Display 11-2 Single-Image Mode ...11-2 Histogram Mode ...11-2 Interpreting a Histogram...11-3 Zoom Mode...
... 10-11 Flash Exposure Compensation...10-12 Using Optional Speedlights ...10-13 Notes for Using an Optional Speedlight 10-15 11 Working with Images on the Camera Reviewing Images...11-1 Selecting an Image Mode ...11-1 Changing the Duration of the Image Mode Menu Display 11-2 Single-Image Mode ...11-2 Histogram Mode ...11-2 Interpreting a Histogram...11-3 Zoom Mode...

User Guide
Page 12
... Advantages to an IEEE 1394 Connection ...13-1 Advantages to a Card Reader...13-1 Connecting Your Camera to the Computer ...13-2 Quitting-Disconnecting from the Computer 13-4 Using the Card Reader ...13-4 14 Camera Care Handling ...14-1 Cleaning ...14-2 The Imager...14-3 Determining if the Imager is Dirty ...14-3 Examining a Test Image...14-3 Inspecting and Cleaning the Imager 14-4 ...14-4 Storing ...14-5 Top...
... Advantages to an IEEE 1394 Connection ...13-1 Advantages to a Card Reader...13-1 Connecting Your Camera to the Computer ...13-2 Quitting-Disconnecting from the Computer 13-4 Using the Card Reader ...13-4 14 Camera Care Handling ...14-1 Cleaning ...14-2 The Imager...14-3 Determining if the Imager is Dirty ...14-3 Examining a Test Image...14-3 Inspecting and Cleaning the Imager 14-4 ...14-4 Storing ...14-5 Top...
User Guide
Page 15
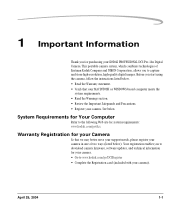
... Registration for purchasing your camera). Your registration enables you to www.kodak.com/go /dcs. System Requirements for Your Computer Refer to the following Web site for your camera. • Go to download camera firmware, software updates, and technical information for system requirements: www.kodak.com/go /DCSRegister • Complete the Registration card (included with your KODAK PROFESSIONAL DCS Pro 14n Digital Camera.
... Registration for purchasing your camera). Your registration enables you to www.kodak.com/go /dcs. System Requirements for Your Computer Refer to the following Web site for your camera. • Go to download camera firmware, software updates, and technical information for system requirements: www.kodak.com/go /DCSRegister • Complete the Registration card (included with your KODAK PROFESSIONAL DCS Pro 14n Digital Camera.

User Guide
Page 16
Do not plug other than for the KODAK PROFESSIONAL DCS Pro 14n Digital Camera. • Use the Image LCD to verify that data is for any purpose other adapters into the camera. • The KODAK PROFESSIONAL DCS Pro DC Power Module is being read from the camera while the memory card icon on the Digital Status LCD or the Card Busy LED inside the Media door are...
Do not plug other than for the KODAK PROFESSIONAL DCS Pro 14n Digital Camera. • Use the Image LCD to verify that data is for any purpose other adapters into the camera. • The KODAK PROFESSIONAL DCS Pro DC Power Module is being read from the camera while the memory card icon on the Digital Status LCD or the Card Busy LED inside the Media door are...

User Guide
Page 17
... controls that are covered by the operating instructions. Treat the imager as you operate the camera in the U.S.A., the Electronics Industry Alliance: http:/www.eiae.org. Water and Moisture-Do not use the KODAK PROFESSIONAL DCS Pro Charger/AC Adapter near water-for example, near salt spray,... the camera in dripping or splashing water or near a sink or in water or other liquids. Never spill liquid of any kind on the camera. Dust-If you would your camera. April 29, 2004 1-3 Follow Instructions-Follow all operating and usage instructions. Disposal-This digital camera contains ...
... controls that are covered by the operating instructions. Treat the imager as you operate the camera in the U.S.A., the Electronics Industry Alliance: http:/www.eiae.org. Water and Moisture-Do not use the KODAK PROFESSIONAL DCS Pro Charger/AC Adapter near water-for example, near salt spray,... the camera in dripping or splashing water or near a sink or in water or other liquids. Never spill liquid of any kind on the camera. Dust-If you would your camera. April 29, 2004 1-3 Follow Instructions-Follow all operating and usage instructions. Disposal-This digital camera contains ...

User Guide
Page 22
... Exposure Mode dial Flash Sync Mode button Auto Exposure Bracketing button Image LCD Menu button Nav+ button HotKey button Digital Status button Digital Status LCD Camera Top Flash Lock Release button Drive Mode selector lock release Camera Strap eyelet Exposure Mode dial Drive Mode selector Hot shoe 2-2 Viewfinder eyepiece Diopter Adjustment lever AE-L/...switch lock Delete button Tag/Record button Media door Power switch Shutter Release button Flash Exposure Compensation button Exposure Compensation button LCD Illuminator Camera Strap eyelet Top Status LCD Imager Plane indicator April 29, 2004
... Exposure Mode dial Flash Sync Mode button Auto Exposure Bracketing button Image LCD Menu button Nav+ button HotKey button Digital Status button Digital Status LCD Camera Top Flash Lock Release button Drive Mode selector lock release Camera Strap eyelet Exposure Mode dial Drive Mode selector Hot shoe 2-2 Viewfinder eyepiece Diopter Adjustment lever AE-L/...switch lock Delete button Tag/Record button Media door Power switch Shutter Release button Flash Exposure Compensation button Exposure Compensation button LCD Illuminator Camera Strap eyelet Top Status LCD Imager Plane indicator April 29, 2004
User Guide
Page 26
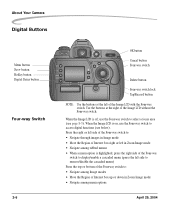
When the Image LCD is on, use the Four-way switch to select a focus area (see below). About Your Camera Digital Buttons Menu button Nav+ button HotKey button Digital Status button Four-way Switch 2-6 OK button Cancel button Four-way switch Delete button Four-way switch lock Tag/Record button... NOTE: Use the buttons at the right of Interest box right or left in Zoom Image mode •...
When the Image LCD is on, use the Four-way switch to select a focus area (see below). About Your Camera Digital Buttons Menu button Nav+ button HotKey button Digital Status button Four-way Switch 2-6 OK button Cancel button Four-way switch Delete button Four-way switch lock Tag/Record button... NOTE: Use the buttons at the right of Interest box right or left in Zoom Image mode •...

User Guide
Page 27
...• If the Image LCD is displayed April 29, 2004 2-7 There may be occasions where you want it to the left to lock the switch. Rotate it locked to prevent changing certain settings. • Rotate the Four-way switch lock lever to the right to unlock. About Your Camera Locking and Unlocking... the Four-way Switch The Four-way switch does not work if the Four-way switch lock is on in Image mode (see page 11-1) • Implements a highlighted menu option • Enables the ...
...• If the Image LCD is displayed April 29, 2004 2-7 There may be occasions where you want it to the left to lock the switch. Rotate it locked to prevent changing certain settings. • Rotate the Four-way switch lock lever to the right to unlock. About Your Camera Locking and Unlocking... the Four-way Switch The Four-way switch does not work if the Four-way switch lock is on in Image mode (see page 11-1) • Implements a highlighted menu option • Enables the ...
User Guide
Page 28
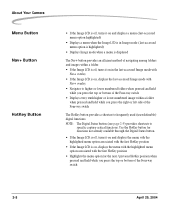
... button (see page 2-9) provides shortcuts to frequently used (user-definable) digital functions. About Your Camera Menu Button Nav+ Button HotKey Button • If the Image LCD is off, turns it on , displays the last-accessed Image mode with the first HotKey position • Highlights the menu option for functions not already available through the...
... button (see page 2-9) provides shortcuts to frequently used (user-definable) digital functions. About Your Camera Menu Button Nav+ Button HotKey Button • If the Image LCD is off, turns it on , displays the last-accessed Image mode with the first HotKey position • Highlights the menu option for functions not already available through the...
User Guide
Page 29
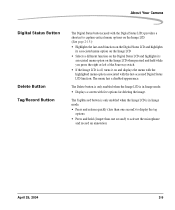
...turns it on the Image LCD when pressed and held while you press the right or left of the Four-way switch • If the Image LCD is in Image mode. • Displays a screen with the last-accessed Digital Status LCD function. About Your Camera Digital Status Button Delete Button... Tag/Record Button The Digital Status button (used with the Digital Status LCD) provides a shortcut to activate the...
...turns it on the Image LCD when pressed and held while you press the right or left of the Four-way switch • If the Image LCD is in Image mode. • Displays a screen with the last-accessed Digital Status LCD function. About Your Camera Digital Status Button Delete Button... Tag/Record Button The Digital Status button (used with the Digital Status LCD) provides a shortcut to activate the...

User Guide
Page 30
... few pixels in the LCD that are able to fully utilize all the camera features and performance in this instance. • Use tabbed menus to access digital functions NOTE: The Image LCD screen shown here appears when the camera is in number, do not affect the evaluation of a scene, the exposure... or color of the image, or the control of the information appears. 2-10 April 29,...
... few pixels in the LCD that are able to fully utilize all the camera features and performance in this instance. • Use tabbed menus to access digital functions NOTE: The Image LCD screen shown here appears when the camera is in number, do not affect the evaluation of a scene, the exposure... or color of the image, or the control of the information appears. 2-10 April 29,...
User Guide
Page 31
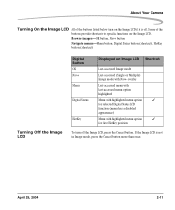
... Camera Turning On the Image LCD All of the buttons provide shortcuts to specific functions on the Image LCD if it is not in Image mode, press the Cancel button more than once. Some of the buttons listed below turn off . If the Image LCD is off the Image ...LCD, press the Cancel button. Browse images-OK button, Nav+ button Navigate menus-Menu button, Digital Status button (shortcut), HotKey button (shortcut) Turning Off the Image LCD Digital Button OK Nav+ Menu Digital Status HotKey Displayed on Image LCD Shortcut Last-accessed Image mode Last-...
... Camera Turning On the Image LCD All of the buttons provide shortcuts to specific functions on the Image LCD if it is not in Image mode, press the Cancel button more than once. Some of the buttons listed below turn off . If the Image LCD is off the Image ...LCD, press the Cancel button. Browse images-OK button, Nav+ button Navigate menus-Menu button, Digital Status button (shortcut), HotKey button (shortcut) Turning Off the Image LCD Digital Button OK Nav+ Menu Digital Status HotKey Displayed on Image LCD Shortcut Last-accessed Image mode Last-...

User Guide
Page 32
... aspect ratio White balance ISO Estimated images remaining on the Image LCD (see page 4-7) only some of highlighted menu options Brief procedural instructions Capture-related status information: When the Image LCD is in Image mode, the Digital Status LCD displays information about the selected image. About Your Camera Digital Status LCD The Digital Status LCD provides the following information...
... aspect ratio White balance ISO Estimated images remaining on the Image LCD (see page 4-7) only some of highlighted menu options Brief procedural instructions Capture-related status information: When the Image LCD is in Image mode, the Digital Status LCD displays information about the selected image. About Your Camera Digital Status LCD The Digital Status LCD provides the following information...

User Guide
Page 33
... digital functions using the Digital Status button and the Digital Status LCD (see page 2-15). • Shortcut to access the digital functions. • Navigate through the tabbed menus on that tab. The tabbed menus are five tabs. Capture Review Image Tools Custom Settings April 29, 2004 2-13 Using the Menus About Your Camera Your camera provides a variety of digital...
... digital functions using the Digital Status button and the Digital Status LCD (see page 2-15). • Shortcut to access the digital functions. • Navigate through the tabbed menus on that tab. The tabbed menus are five tabs. Capture Review Image Tools Custom Settings April 29, 2004 2-13 Using the Menus About Your Camera Your camera provides a variety of digital...
User Guide
Page 35
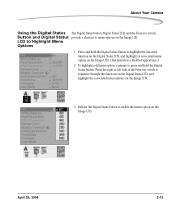
... its associated menu option on the Image LCD. About Your Camera Using the Digital Status The Digital Status button, Digital Status LCD, and the Four-way switch Button and Digital Status provide a shortcut to menu options on the Image LCD. 3. Release the Digital Status button to enable the menu option on the Image LCD. (The menu has a disabled appearance...
... its associated menu option on the Image LCD. About Your Camera Using the Digital Status The Digital Status button, Digital Status LCD, and the Four-way switch Button and Digital Status provide a shortcut to menu options on the Image LCD. 3. Release the Digital Status button to enable the menu option on the Image LCD. (The menu has a disabled appearance...
User Guide
Page 38
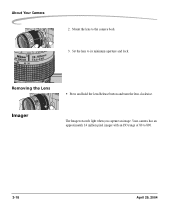
Removing the Lens • Press and hold the Lens Release button and turn the lens clockwise. 22 22 35 28 28 50 m ft 70 85 105 Imager The Imager records light when you capture an image. Your camera has an approximately 14 million pixel imager with an ISO range of 80 to its minimum aperture and lock. About Your Camera 2. Set the lens to 800. 2-18 April 29, 2004 Mount the lens to the camera body. 3.
Removing the Lens • Press and hold the Lens Release button and turn the lens clockwise. 22 22 35 28 28 50 m ft 70 85 105 Imager The Imager records light when you capture an image. Your camera has an approximately 14 million pixel imager with an ISO range of 80 to its minimum aperture and lock. About Your Camera 2. Set the lens to 800. 2-18 April 29, 2004 Mount the lens to the camera body. 3.


