
User Guide
Page 5
......1-2 Safety Warnings...1-2 Operational Warnings ...1-2 Important Safeguards and Precautions ...1-3 Electromagnetic Emissions...1-6 VCCI ...1-6 2 About Your Camera Nomenclature...2-1 Camera Front...2-1 Camera Back ...2-2 Camera Top ...2-2 Camera Bottom...2-3 Left Side...2-3 Open Media Door ...2-4 Turning the Camera On and Off...2-4 Viewfinder...2-5 Digital Buttons...2-6 Four-way Switch...2-6 Locking and Unlocking the Four-way Switch 2-7 OK Button ...2-7 Cancel Button ...2-7 Menu Button...2-8 Nav+ Button ...2-8 HotKey Button...
......1-2 Safety Warnings...1-2 Operational Warnings ...1-2 Important Safeguards and Precautions ...1-3 Electromagnetic Emissions...1-6 VCCI ...1-6 2 About Your Camera Nomenclature...2-1 Camera Front...2-1 Camera Back ...2-2 Camera Top ...2-2 Camera Bottom...2-3 Left Side...2-3 Open Media Door ...2-4 Turning the Camera On and Off...2-4 Viewfinder...2-5 Digital Buttons...2-6 Four-way Switch...2-6 Locking and Unlocking the Four-way Switch 2-7 OK Button ...2-7 Cancel Button ...2-7 Menu Button...2-8 Nav+ Button ...2-8 HotKey Button...
User Guide
Page 6
...Turning On the Image LCD ...2-11 Turning Off the Image LCD...2-11 Digital Status LCD...2-12 Using the Menus ...2-13 Navigating Through the Menus ...2-14 Using the Digital Status Button and Digital Status LCD to Highlight Menu Options 2-15 Using the HotKey Button to......2-21 PC Sync Terminal...2-21 Remote Release Accessory Port ...2-21 Camera Straps ...2-22 Attaching the Neck Strap ...2-22 Attaching the Hand Strap...2-22 3 Powering Your Camera Powering Your Camera using the Power Module 3-2 Powering Your Camera using a Battery ...3-2 Charging Batteries...3-2 Inserting/Removing Batteries ...3-3 ...
...Turning On the Image LCD ...2-11 Turning Off the Image LCD...2-11 Digital Status LCD...2-12 Using the Menus ...2-13 Navigating Through the Menus ...2-14 Using the Digital Status Button and Digital Status LCD to Highlight Menu Options 2-15 Using the HotKey Button to......2-21 PC Sync Terminal...2-21 Remote Release Accessory Port ...2-21 Camera Straps ...2-22 Attaching the Neck Strap ...2-22 Attaching the Hand Strap...2-22 3 Powering Your Camera Powering Your Camera using the Power Module 3-2 Powering Your Camera using a Battery ...3-2 Charging Batteries...3-2 Inserting/Removing Batteries ...3-3 ...
User Guide
Page 7
...Camera Operations ...4-1 Inserting/Removing Batteries ...4-1 Mounting the Lens ...4-2 Inserting a Memory Card ...4-3 Setting Focus...4-3 Setting the Metering System and Exposure Mode 4-4 Composing, Focusing, and Capturing ...4-5 Using the Built-in Speedlight ...4-6 Basic Mode ...4-7 Setting Basic Mode...4-8 Accessing Functions Using the Basic Menu 4-8 Digital Status LCD...4-9 Using the Digital... Status LCD to Highlight Menu Options 4-9 Setting ISO ...4-10 White Balance...4-11 Setting Raw Resolution...4-12 Setting JPEG Resolution...4-13 Formatting...
...Camera Operations ...4-1 Inserting/Removing Batteries ...4-1 Mounting the Lens ...4-2 Inserting a Memory Card ...4-3 Setting Focus...4-3 Setting the Metering System and Exposure Mode 4-4 Composing, Focusing, and Capturing ...4-5 Using the Built-in Speedlight ...4-6 Basic Mode ...4-7 Setting Basic Mode...4-8 Accessing Functions Using the Basic Menu 4-8 Digital Status LCD...4-9 Using the Digital... Status LCD to Highlight Menu Options 4-9 Setting ISO ...4-10 White Balance...4-11 Setting Raw Resolution...4-12 Setting JPEG Resolution...4-13 Formatting...
User Guide
Page 9
... the Crop Aspect Ratio ...6-11 Setting Raw Resolution...6-12 Setting JPEG Resolution...6-13 Setting JPEG Quality ...6-14 Correcting Digital Exposure ...6-15 Exposure Bias...6-15 Look ...6-16 Noise Reduction...6-16 Sharpening Level...Camera...7-6 Loading Settings from a Card...7-7 Deleting Settings...7-7 Exposure...7-8 Exposure Metering Systems...7-8 Choosing a Metering System...7-8 Matrix Metering/3D Matrix Metering 7-8 Center-Weighted Metering...7-9 Spot Metering...7-9 Capturing Images in Each Exposure Mode 7-10 Programmed Auto Exposure Mode 7-11 Shutter-Priority Auto Exposure Mode 7-13...
... the Crop Aspect Ratio ...6-11 Setting Raw Resolution...6-12 Setting JPEG Resolution...6-13 Setting JPEG Quality ...6-14 Correcting Digital Exposure ...6-15 Exposure Bias...6-15 Look ...6-16 Noise Reduction...6-16 Sharpening Level...Camera...7-6 Loading Settings from a Card...7-7 Deleting Settings...7-7 Exposure...7-8 Exposure Metering Systems...7-8 Choosing a Metering System...7-8 Matrix Metering/3D Matrix Metering 7-8 Center-Weighted Metering...7-9 Spot Metering...7-9 Capturing Images in Each Exposure Mode 7-10 Programmed Auto Exposure Mode 7-11 Shutter-Priority Auto Exposure Mode 7-13...

User Guide
Page 13
... B: Lens Compatibility Compatible Lenses and Lens Accessories...B-2 Incompatible Lenses and Lens Accessories...B-3 Appendix C: Troubleshooting Problems Indicated in the Top Status LCD ...C-1 Other Problems...C-3 Appendix D: Warranty KODAK PROFESSI0NAL DCS Pro 14n Digital Camera D-1 Warranty Repair Coverage ...D-1 Limitations ...D-2 Outside the United States ...D-3 Warranty is Not Transferable ...D-3 How to Obtain Service ...D-4 Product Support Options...D-5 Glossary April 29, 2004 9
... B: Lens Compatibility Compatible Lenses and Lens Accessories...B-2 Incompatible Lenses and Lens Accessories...B-3 Appendix C: Troubleshooting Problems Indicated in the Top Status LCD ...C-1 Other Problems...C-3 Appendix D: Warranty KODAK PROFESSI0NAL DCS Pro 14n Digital Camera D-1 Warranty Repair Coverage ...D-1 Limitations ...D-2 Outside the United States ...D-3 Warranty is Not Transferable ...D-3 How to Obtain Service ...D-4 Product Support Options...D-5 Glossary April 29, 2004 9
User Guide
Page 15
See below ). Warranty Registration for purchasing your KODAK PROFESSIONAL DCS Pro 14n Digital Camera. Your registration enables you to download camera firmware, software updates, and technical information for system requirements: www.kodak.com/go /DCSRegister • Complete the Registration card (included with your camera). Before you start using the camera, follow the instructions listed below. • Read the Warranty statement. • Verify...
See below ). Warranty Registration for purchasing your KODAK PROFESSIONAL DCS Pro 14n Digital Camera. Your registration enables you to download camera firmware, software updates, and technical information for system requirements: www.kodak.com/go /DCSRegister • Complete the Registration card (included with your camera). Before you start using the camera, follow the instructions listed below. • Read the Warranty statement. • Verify...

User Guide
Page 16
... Warnings Safety Warnings Operational Warnings • To prevent fire or shock hazard, use only the recommended accessories and attachments. • Do not use the supplied KODAK PROFESSIONAL DCS Pro DC Power Module for any purpose other than for the KODAK PROFESSIONAL DCS Pro 14n Digital Camera. • Use the Image LCD to the computer.
... Warnings Safety Warnings Operational Warnings • To prevent fire or shock hazard, use only the recommended accessories and attachments. • Do not use the supplied KODAK PROFESSIONAL DCS Pro DC Power Module for any purpose other than for the KODAK PROFESSIONAL DCS Pro 14n Digital Camera. • Use the Image LCD to the computer.

User Guide
Page 17
... out parts and cause a fire or electric shock. Water and Moisture-Do not use the KODAK PROFESSIONAL DCS Pro Charger/AC Adapter near a sink or in water or other liquids. Disposal-This digital camera contains lead. Do not place your camera. Retain Instructions and Packaging-Retain the safety and operating instructions for example, near water-for future...
... out parts and cause a fire or electric shock. Water and Moisture-Do not use the KODAK PROFESSIONAL DCS Pro Charger/AC Adapter near a sink or in water or other liquids. Disposal-This digital camera contains lead. Do not place your camera. Retain Instructions and Packaging-Retain the safety and operating instructions for example, near water-for future...

User Guide
Page 20
...Control Council for help. These limits are designed to radio communications. VCCI This is used in accordance with the limits for a Class B digital device, pursuant to the instruction manual. 1-6 April 29, 2004 This equipment generates, uses and can be determined by turning the equipment off... 15 of the following measures: • Reorient or relocate the receiving antenna. • Increase the separation between your camera and receiver. • Connect your camera into an outlet on , the user is connected. • Consult the dealer or an experienced radio/TV technician for...
...Control Council for help. These limits are designed to radio communications. VCCI This is used in accordance with the limits for a Class B digital device, pursuant to the instruction manual. 1-6 April 29, 2004 This equipment generates, uses and can be determined by turning the equipment off... 15 of the following measures: • Reorient or relocate the receiving antenna. • Increase the separation between your camera and receiver. • Connect your camera into an outlet on , the user is connected. • Consult the dealer or an experienced radio/TV technician for...

User Guide
Page 22
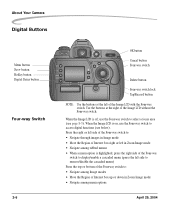
... Mode dial Flash Sync Mode button Auto Exposure Bracketing button Image LCD Menu button Nav+ button HotKey button Digital Status button Digital Status LCD Camera Top Flash Lock Release button Drive Mode selector lock release Camera Strap eyelet Exposure Mode dial Drive Mode selector Hot shoe 2-2 Viewfinder eyepiece Diopter Adjustment lever AE-L/AF-L...-way switch lock Delete button Tag/Record button Media door Power switch Shutter Release button Flash Exposure Compensation button Exposure Compensation button LCD Illuminator Camera Strap eyelet Top Status LCD Imager Plane indicator April 29, 2004
... Mode dial Flash Sync Mode button Auto Exposure Bracketing button Image LCD Menu button Nav+ button HotKey button Digital Status button Digital Status LCD Camera Top Flash Lock Release button Drive Mode selector lock release Camera Strap eyelet Exposure Mode dial Drive Mode selector Hot shoe 2-2 Viewfinder eyepiece Diopter Adjustment lever AE-L/AF-L...-way switch lock Delete button Tag/Record button Media door Power switch Shutter Release button Flash Exposure Compensation button Exposure Compensation button LCD Illuminator Camera Strap eyelet Top Status LCD Imager Plane indicator April 29, 2004
User Guide
Page 26
... 29, 2004 When the Image LCD is highlighted, press the right side of the Four-way switch to access digital functions (see page 8-3). About Your Camera Digital Buttons Menu button Nav+ button HotKey button Digital Status button Four-way Switch 2-6 OK button Cancel button Four-way switch Delete button Four-way switch lock Tag...
... 29, 2004 When the Image LCD is highlighted, press the right side of the Four-way switch to access digital functions (see page 8-3). About Your Camera Digital Buttons Menu button Nav+ button HotKey button Digital Status button Four-way Switch 2-6 OK button Cancel button Four-way switch Delete button Four-way switch lock Tag...
User Guide
Page 28
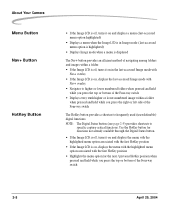
Use the HotKey button for functions not already available through the Digital Status button. • If the Image LCD is off , turns it on in Image mode (... and held while you press the right or left side of the Four-way switch 2-8 April 29, 2004 About Your Camera Menu Button Nav+ Button HotKey Button • If the Image LCD is off, turns it on and displays the menu... the Four-way switch The HotKey button provides a shortcut to frequently used (user-definable) digital functions. NOTE: The Digital Status button (see page 2-9) provides shortcuts to specific capture-critical functions.
Use the HotKey button for functions not already available through the Digital Status button. • If the Image LCD is off , turns it on in Image mode (... and held while you press the right or left side of the Four-way switch 2-8 April 29, 2004 About Your Camera Menu Button Nav+ Button HotKey Button • If the Image LCD is off, turns it on and displays the menu... the Four-way switch The HotKey button provides a shortcut to frequently used (user-definable) digital functions. NOTE: The Digital Status button (see page 2-9) provides shortcuts to specific capture-critical functions.
User Guide
Page 29
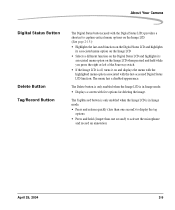
...(See page 2-15.) • Highlights the last-used function on the Digital Status LCD and highlights its associated menu option on the Image LCD • Selects a different function on the Digital Status LCD and highlights its associated menu option on the Image LCD when pressed... displays the menu with the highlighted menu option associated with the last-accessed Digital Status LCD function. About Your Camera Digital Status Button Delete Button Tag/Record Button The Digital Status button (used with the Digital Status LCD) provides a shortcut to activate the microphone and record an annotation...
...(See page 2-15.) • Highlights the last-used function on the Digital Status LCD and highlights its associated menu option on the Image LCD • Selects a different function on the Digital Status LCD and highlights its associated menu option on the Image LCD when pressed... displays the menu with the highlighted menu option associated with the last-accessed Digital Status LCD function. About Your Camera Digital Status Button Delete Button Tag/Record Button The Digital Status button (used with the Digital Status LCD) provides a shortcut to activate the microphone and record an annotation...

User Guide
Page 30
... image. In Basic mode (see page 4-7) only some of the camera. These pixels, few pixels in the LCD that are able to fully utilize all the camera features and performance in this instance. • Use tabbed menus to access digital functions NOTE: The Image LCD screen shown here appears when the... camera is in number, do not affect the evaluation of a scene, the exposure...
... image. In Basic mode (see page 4-7) only some of the camera. These pixels, few pixels in the LCD that are able to fully utilize all the camera features and performance in this instance. • Use tabbed menus to access digital functions NOTE: The Image LCD screen shown here appears when the... camera is in number, do not affect the evaluation of a scene, the exposure...
User Guide
Page 31
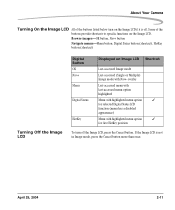
...Camera Turning On the Image LCD All of the buttons provide shortcuts to specific functions on the Image LCD if it is not in Image mode, press the Cancel button more than once. Some of the buttons listed below turn off . Browse images-OK button, Nav+ button Navigate menus-Menu button, Digital...Image mode with Nav+ overlay Last-accessed menu with last-accessed menu option highlighted Menu with highlighted menu option ✓ for selected Digital Status LCD function (menu has a disabled appearance) Menu with highlighted menu option ✓ for first HotKey position To turn on ...
...Camera Turning On the Image LCD All of the buttons provide shortcuts to specific functions on the Image LCD if it is not in Image mode, press the Cancel button more than once. Some of the buttons listed below turn off . Browse images-OK button, Nav+ button Navigate menus-Menu button, Digital...Image mode with Nav+ overlay Last-accessed menu with last-accessed menu option highlighted Menu with highlighted menu option ✓ for selected Digital Status LCD function (menu has a disabled appearance) Menu with highlighted menu option ✓ for first HotKey position To turn on ...

User Guide
Page 32
... Image LCD is turned off, or when you perform operations, appropriate messages appear. 2-12 April 29, 2004 About Your Camera Digital Status LCD The Digital Status LCD provides the following information: Status information Capture-related information - In Basic mode (see page 2-15). interactive shortcuts...related status information: When the Image LCD is in Image mode, the Digital Status LCD displays information about the selected image. NOTE: The Digital Status LCD shown here appears when the camera is in Advanced mode. White balance Current folder Current image Raw resolution...
... Image LCD is turned off, or when you perform operations, appropriate messages appear. 2-12 April 29, 2004 About Your Camera Digital Status LCD The Digital Status LCD provides the following information: Status information Capture-related information - In Basic mode (see page 2-15). interactive shortcuts...related status information: When the Image LCD is in Image mode, the Digital Status LCD displays information about the selected image. NOTE: The Digital Status LCD shown here appears when the camera is in Advanced mode. White balance Current folder Current image Raw resolution...

User Guide
Page 33
.... • Navigate through the tabbed menus on that tab. Capture Review Image Tools Custom Settings April 29, 2004 2-13 Using the Menus About Your Camera Your camera provides a variety of digital functions available on the Image LCD. The tabbed menus are five tabs. You can access these functions through the tabbed menus to access...
.... • Navigate through the tabbed menus on that tab. Capture Review Image Tools Custom Settings April 29, 2004 2-13 Using the Menus About Your Camera Your camera provides a variety of digital functions available on the Image LCD. The tabbed menus are five tabs. You can access these functions through the tabbed menus to access...
User Guide
Page 35
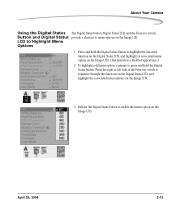
...April 29, 2004 2-15 Release the Digital Status button to press and hold the Digital Status button to menu options on the Image LCD. Press and hold the Digital Status button. About Your Camera Using the Digital Status The Digital Status button, Digital Status LCD, and the Four-way ...switch Button and Digital Status provide a shortcut to highlight the last-used function on the Digital Status LCD, and highlight its associated...
...April 29, 2004 2-15 Release the Digital Status button to press and hold the Digital Status button to menu options on the Image LCD. Press and hold the Digital Status button. About Your Camera Using the Digital Status The Digital Status button, Digital Status LCD, and the Four-way ...switch Button and Digital Status provide a shortcut to highlight the last-used function on the Digital Status LCD, and highlight its associated...

User Guide
Page 36
... Four-way switch to enable the menu option. 2-16 April 29, 2004 You can change the HotKey settings if you like (see page 5-8). About Your Camera Using the HotKey Button to Highlight Menu Options The HotKey button provides a shortcut to highlight the menu option associated with the next or previous HotKey...
... Four-way switch to enable the menu option. 2-16 April 29, 2004 You can change the HotKey settings if you like (see page 5-8). About Your Camera Using the HotKey Button to Highlight Menu Options The HotKey button provides a shortcut to highlight the menu option associated with the next or previous HotKey...

User Guide
Page 39
... range of the viewfinder diopter is -1.8 to +0.8). 1. April 29, 2004 2-19 The illuminator remains on and the Top and Digital Status LCDs are illuminated. Slide the Diopter Adjustment lever while looking through the viewfinder by adjusting the viewfinder diopter within a continuous range... (-1.8 to +0.8 DP. About Your Camera Viewfinder Diopter You can illuminate the Top and Digital Status LCDs for nearsightedness or farsightedness and see more clearly through the viewfinder until you lightly or...
... range of the viewfinder diopter is -1.8 to +0.8). 1. April 29, 2004 2-19 The illuminator remains on and the Top and Digital Status LCDs are illuminated. Slide the Diopter Adjustment lever while looking through the viewfinder by adjusting the viewfinder diopter within a continuous range... (-1.8 to +0.8 DP. About Your Camera Viewfinder Diopter You can illuminate the Top and Digital Status LCDs for nearsightedness or farsightedness and see more clearly through the viewfinder until you lightly or...


