User Guide
Page 6
...Image LCD ...2-11 Turning Off the Image LCD...2-11 Digital Status LCD...2-12 Using the Menus ...2-13 Navigating Through the Menus ...2-14 Using the Digital Status Button and Digital Status LCD to Highlight Menu Options 2-15 Using ... ...2-21 Camera Straps ...2-22 Attaching the Neck Strap ...2-22 Attaching the Hand Strap...2-22 3 Powering Your Camera Powering Your Camera using the Power Module 3-2 Powering Your Camera using a Battery ...3-2 Charging Batteries...3-2 Inserting/Removing Batteries ...3-3 Checking Battery Status ...3-4 Conserving Batteries...3-5 Situations Using Extra Battery Power ...
...Image LCD ...2-11 Turning Off the Image LCD...2-11 Digital Status LCD...2-12 Using the Menus ...2-13 Navigating Through the Menus ...2-14 Using the Digital Status Button and Digital Status LCD to Highlight Menu Options 2-15 Using ... ...2-21 Camera Straps ...2-22 Attaching the Neck Strap ...2-22 Attaching the Hand Strap...2-22 3 Powering Your Camera Powering Your Camera using the Power Module 3-2 Powering Your Camera using a Battery ...3-2 Charging Batteries...3-2 Inserting/Removing Batteries ...3-3 Checking Battery Status ...3-4 Conserving Batteries...3-5 Situations Using Extra Battery Power ...
User Guide
Page 7
......3-6 Disposing of Batteries ...3-6 4 The Basics Basic Camera Operations ...4-1 Inserting/Removing Batteries ...4-1 Mounting the Lens ...4-2 Inserting a Memory Card ...4-3 Setting Focus...4-3 Setting the Metering System and Exposure Mode 4-4 Composing, Focusing, and Capturing ...4-5 Using the Built-in Speedlight ...4-6 Basic Mode ...4-7 Setting Basic Mode...4-8 Accessing Functions Using the Basic Menu 4-8 Digital Status LCD...4-9 Using the Digital Status LCD to...
......3-6 Disposing of Batteries ...3-6 4 The Basics Basic Camera Operations ...4-1 Inserting/Removing Batteries ...4-1 Mounting the Lens ...4-2 Inserting a Memory Card ...4-3 Setting Focus...4-3 Setting the Metering System and Exposure Mode 4-4 Composing, Focusing, and Capturing ...4-5 Using the Built-in Speedlight ...4-6 Basic Mode ...4-7 Setting Basic Mode...4-8 Accessing Functions Using the Basic Menu 4-8 Digital Status LCD...4-9 Using the Digital Status LCD to...

User Guide
Page 16
.... If dropped, the card may lose data if you connect the IEEE 1394 cable to verify that data is for the KODAK PROFESSIONAL DCS Pro 14n Digital Camera. • Use the Image LCD to the computer. Important Information Warnings Safety Warnings Operational Warnings • To prevent fire or...damaged, resulting in the loss of all data on the card. • Do not remove a memory card, the KODAK PROFESSIONAL DCS Pro Battery, or the KODAK PROFESSIONAL DCS Pro DC Power Module from Kodak as they are blinking. The blinking indicates that a picture was captured correctly during your...
.... If dropped, the card may lose data if you connect the IEEE 1394 cable to verify that data is for the KODAK PROFESSIONAL DCS Pro 14n Digital Camera. • Use the Image LCD to the computer. Important Information Warnings Safety Warnings Operational Warnings • To prevent fire or...damaged, resulting in the loss of all data on the card. • Do not remove a memory card, the KODAK PROFESSIONAL DCS Pro Battery, or the KODAK PROFESSIONAL DCS Pro DC Power Module from Kodak as they are blinking. The blinking indicates that a picture was captured correctly during your...
User Guide
Page 18
... the point where they leave your memory cards.) Temperature-Do not expose the camera and batteries to excessive heat such as specified, and that you will leave your camera yourself. Humidity, Condensation-We recommend operating your camera within the range of time, unplug the KODAK PROFESSIONAL DCS Pro Charger / AC Adapter from the power outlet and disconnect the...
... the point where they leave your memory cards.) Temperature-Do not expose the camera and batteries to excessive heat such as specified, and that you will leave your camera yourself. Humidity, Condensation-We recommend operating your camera within the range of time, unplug the KODAK PROFESSIONAL DCS Pro Charger / AC Adapter from the power outlet and disconnect the...

User Guide
Page 30
... Exposure Compensation Flexible Program Bracketing bar graphs Aperture Custom Setting Battery power Flash Sync Mode Image LCD Focus area Auto Exposure bracketing Using the Image LCD you can: • Conveniently evaluate and review images in the camera NOTE: Occasionally there are a few in Advanced mode. These...pixels in the LCD that are able to fully utilize all the camera features and performance in this instance. • Use tabbed menus to access digital functions NOTE: The Image LCD screen shown here appears when the camera is in number, do not affect the evaluation of a scene,...
... Exposure Compensation Flexible Program Bracketing bar graphs Aperture Custom Setting Battery power Flash Sync Mode Image LCD Focus area Auto Exposure bracketing Using the Image LCD you can: • Conveniently evaluate and review images in the camera NOTE: Occasionally there are a few in Advanced mode. These...pixels in the LCD that are able to fully utilize all the camera features and performance in this instance. • Use tabbed menus to access digital functions NOTE: The Image LCD screen shown here appears when the camera is in number, do not affect the evaluation of a scene,...

User Guide
Page 39
About Your Camera Viewfinder Diopter You can illuminate the Top and Digital Status LCDs for nearsightedness or farsightedness and see page 5-1). Slide the Diopter Adjustment lever while looking through the viewfinder by adjusting the viewfinder diopter within...; Press . LCD Illuminator 2. Remove the rubber eyecup. The Exposure meter turns on until you lightly or fully press the Shutter Release button or the Battery Save time elapses (see more clearly through the viewfinder until the focus brackets or other viewfinder displays appear sharp. WARNING: Be careful not to +3 DP...
About Your Camera Viewfinder Diopter You can illuminate the Top and Digital Status LCDs for nearsightedness or farsightedness and see page 5-1). Slide the Diopter Adjustment lever while looking through the viewfinder by adjusting the viewfinder diopter within...; Press . LCD Illuminator 2. Remove the rubber eyecup. The Exposure meter turns on until you lightly or fully press the Shutter Release button or the Battery Save time elapses (see more clearly through the viewfinder until the focus brackets or other viewfinder displays appear sharp. WARNING: Be careful not to +3 DP...
User Guide
Page 43
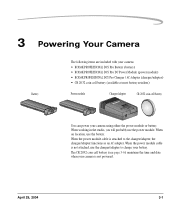
... 3-6) maintains the time and date when your camera using either the power module or battery. 3 Powering Your Camera The following items are included with your camera: • KODAK PROFESSIONAL DCS Pro Battery (battery) • KODAK PROFESSIONAL DCS Pro DC Power Module (power module) • KODAK PROFESSIONAL DCS Pro Charger / AC Adapter (charger/adapter) • CR 2032 coin cell battery (available at most battery retailers) Battery Power module Charger/adapter CR 2032 coin...
... 3-6) maintains the time and date when your camera using either the power module or battery. 3 Powering Your Camera The following items are included with your camera: • KODAK PROFESSIONAL DCS Pro Battery (battery) • KODAK PROFESSIONAL DCS Pro DC Power Module (power module) • KODAK PROFESSIONAL DCS Pro Charger / AC Adapter (charger/adapter) • CR 2032 coin cell battery (available at most battery retailers) Battery Power module Charger/adapter CR 2032 coin...

User Guide
Page 44
Plug the charger/adapter into the port on the camera and turn the latch latch clockwise. 2. Powering Your Camera Powering Your Camera using a Battery Charging Batteries Power LED 1. Remove the power module cable from the charger/adapter if it is powered. Insert the... power module cable into the power module and into an electrical outlet. Powering Your Camera using the Power Module 1....
Plug the charger/adapter into the port on the camera and turn the latch latch clockwise. 2. Powering Your Camera Powering Your Camera using a Battery Charging Batteries Power LED 1. Remove the power module cable from the charger/adapter if it is powered. Insert the... power module cable into the power module and into an electrical outlet. Powering Your Camera using the Power Module 1....

User Guide
Page 45
... the charger again until the green light indicates that charging is complete (the green light stays on the charger/adapter. Powering Your Camera Charging LED Inserting/Removing Batteries 3. The appearance of the charging operation: Color Action Charging Status green one blink 0 - 50% complete green two blinks 50 - 70% complete green three blinks...
... the charger again until the green light indicates that charging is complete (the green light stays on the charger/adapter. Powering Your Camera Charging LED Inserting/Removing Batteries 3. The appearance of the charging operation: Color Action Charging Status green one blink 0 - 50% complete green two blinks 50 - 70% complete green three blinks...

User Guide
Page 46
Powering Your Camera Checking Battery Status You can determine the charge status of an inserted battery by viewing the Battery icon on the Top Status LCD. When the icon blinks, you need to replace the battery. The shutter locks when the icon blinks. Full Low Insufficient 3-4 April 29, 2004
Powering Your Camera Checking Battery Status You can determine the charge status of an inserted battery by viewing the Battery icon on the Top Status LCD. When the icon blinks, you need to replace the battery. The shutter locks when the icon blinks. Full Low Insufficient 3-4 April 29, 2004

User Guide
Page 47
Powering Your Camera Conserving Batteries Situations Using Extra Battery Power Your camera has a battery save time for a specified period of the Image LCD • Cold temperatures • Frequently turning the camera on and off time (see page 5-2) to http://www.kodak.com/go/DCSPro14n, then click the "Batteries" white paper...., 2004 3-5 For more information on -camera pop-up flash • Frequent use of time. NOTE: You can change the battery save feature that does the following: • Turns off the Image LCD if you don't touch any digital buttons for a specified period of time...
Powering Your Camera Conserving Batteries Situations Using Extra Battery Power Your camera has a battery save time for a specified period of the Image LCD • Cold temperatures • Frequently turning the camera on and off time (see page 5-2) to http://www.kodak.com/go/DCSPro14n, then click the "Batteries" white paper...., 2004 3-5 For more information on -camera pop-up flash • Frequent use of time. NOTE: You can change the battery save feature that does the following: • Turns off the Image LCD if you don't touch any digital buttons for a specified period of time...

User Guide
Page 48
...date will not be regulated due to two years. Slide the coin cell into the carrier slot on the same side. Disposing of Batteries This digital camera contains small amounts of one to environmental considerations. Disposal of lead may be maintained. 2. Improper insertion will not damage your local authorities...its carrier so that the + sign on the cell and the carrier are on the camera. This battery has an average life span of lead in the circuit board. Purchase replacement batteries from your camera. While you can force the cell in the other orientation, it is not powered....
...date will not be regulated due to two years. Slide the coin cell into the carrier slot on the same side. Disposing of Batteries This digital camera contains small amounts of one to environmental considerations. Disposal of lead may be maintained. 2. Improper insertion will not damage your local authorities...its carrier so that the + sign on the cell and the carrier are on the camera. This battery has an average life span of lead in the circuit board. Purchase replacement batteries from your camera. While you can force the cell in the other orientation, it is not powered....

User Guide
Page 49
... latch clockwise. Inserting/Removing Batteries 1. To insert, slide a charged battery (see page 3-2) in other areas of functionality. Use this chapter to familiarize yourself with your camera's non-digital functions. latch April 29, 2004 4-1 4 The Basics This chapter helps you quickly start using its full range of the manual.) As you can begin using your KODAK PROFESSIONAL DCS Pro 14n Digital Camera.
... latch clockwise. Inserting/Removing Batteries 1. To insert, slide a charged battery (see page 3-2) in other areas of functionality. Use this chapter to familiarize yourself with your camera's non-digital functions. latch April 29, 2004 4-1 4 The Basics This chapter helps you quickly start using its full range of the manual.) As you can begin using your KODAK PROFESSIONAL DCS Pro 14n Digital Camera.

User Guide
Page 50
Mounting the Lens 1. Turn off the camera. 2. Mount the lens to the camera body. 4-2 April 29, 2004 The Basics • To remove, lift the latch, turn the latch counterclockwise, and slide the battery out.
Mounting the Lens 1. Turn off the camera. 2. Mount the lens to the camera body. 4-2 April 29, 2004 The Basics • To remove, lift the latch, turn the latch counterclockwise, and slide the battery out.

User Guide
Page 67
A CR 2032 coin cell battery maintains the time and date for year, month, and day. 4. Choose Time/Date from the Basic menu. 2. Press the right or left side of the Four-way switch to select hours, minutes, or seconds. Shortcut: • You can also access this battery loses its charge, you ...must replace the battery (see page 4-20). Follow the steps on page 4-8 to two years. The Basics Setting the Time/Date Setting User Mode A ...
A CR 2032 coin cell battery maintains the time and date for year, month, and day. 4. Choose Time/Date from the Basic menu. 2. Press the right or left side of the Four-way switch to select hours, minutes, or seconds. Shortcut: • You can also access this battery loses its charge, you ...must replace the battery (see page 4-20). Follow the steps on page 4-8 to two years. The Basics Setting the Time/Date Setting User Mode A ...
User Guide
Page 69
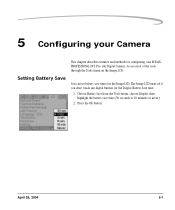
5 Configuring your KODAK PROFESSIONAL DCS Pro 14n Digital Camera. The Image LCD turns off if you don't touch any digital buttons for configuring your Camera This chapter describes features and methods for the Display Battery Save time. 1. Access most of the tools through the Tools menu on the Image LCD. April 29, 2004 5-1 Setting Battery Save You can set battery save time (30 seconds to 10 minutes or never). 2. Choose Battery Save from the Tools menu, choose Display, then highlight the battery save times for the Image LCD. Press the OK button.
5 Configuring your KODAK PROFESSIONAL DCS Pro 14n Digital Camera. The Image LCD turns off if you don't touch any digital buttons for configuring your Camera This chapter describes features and methods for the Display Battery Save time. 1. Access most of the tools through the Tools menu on the Image LCD. April 29, 2004 5-1 Setting Battery Save You can set battery save time (30 seconds to 10 minutes or never). 2. Choose Battery Save from the Tools menu, choose Display, then highlight the battery save times for the Image LCD. Press the OK button.

User Guide
Page 80
Configuring your camera, a CR 2032 Coin Cell battery (see page 3-6) maintains the time and date for one to two years. Press the OK button to select hours, minutes, or seconds. Choose Time/Date from the Tools menu, then highlight Digital Settings, Camera Settings, or Both. 2. Press the top or bottom ...of the Four-way switch to accept the change the value. 3. If this battery loses its charge, you chose Date, press the right or left side ...
Configuring your camera, a CR 2032 Coin Cell battery (see page 3-6) maintains the time and date for one to two years. Press the OK button to select hours, minutes, or seconds. Choose Time/Date from the Tools menu, then highlight Digital Settings, Camera Settings, or Both. 2. Press the top or bottom ...of the Four-way switch to accept the change the value. 3. If this battery loses its charge, you chose Date, press the right or left side ...
User Guide
Page 146
...see page 3-3). • Set the time and date, if needed . 9-2 April 29, 2004 Insert a battery (see page 5-20) based on the camera you will be using the software. • Set up White Balance on the camera, select an image with a MACBETH color chart, a gray card or a neutral area in the image, ... dozen), you have used and check the Back Status LCD to be sure there is adequate space available. To set up White Balance in the KODAK PROFESSIONAL DCS Photo Desk software, capture an image of a MACBETH color chart, a gray or white card, then adjust later using so that the full capacity...
...see page 3-3). • Set the time and date, if needed . 9-2 April 29, 2004 Insert a battery (see page 5-20) based on the camera you will be using the software. • Set up White Balance on the camera, select an image with a MACBETH color chart, a gray card or a neutral area in the image, ... dozen), you have used and check the Back Status LCD to be sure there is adequate space available. To set up White Balance in the KODAK PROFESSIONAL DCS Photo Desk software, capture an image of a MACBETH color chart, a gray or white card, then adjust later using so that the full capacity...
User Guide
Page 150
... computer. Capture Workflow Connecting to a Computer Connect the DCS Pro 14n to studio needs or procedures. Occasional Verification Captured images ... hold images as they are running DCS Photo Desk. Name folders according to your "digital negative.") Refer to DCS Camera Manager Help for example, weekly. ...Camera tools (see page 9-3). Refer to capture images when your camera. Start this software and use a battery, but the AC adapter provides an unlimited source of power.) Starting the Capture Software KODAK PROFESSIONAL DCS Camera Manager is included with your camera...
... computer. Capture Workflow Connecting to a Computer Connect the DCS Pro 14n to studio needs or procedures. Occasional Verification Captured images ... hold images as they are running DCS Photo Desk. Name folders according to your "digital negative.") Refer to DCS Camera Manager Help for example, weekly. ...Camera tools (see page 9-3). Refer to capture images when your camera. Start this software and use a battery, but the AC adapter provides an unlimited source of power.) Starting the Capture Software KODAK PROFESSIONAL DCS Camera Manager is included with your camera...

User Guide
Page 184
...the camera. Connect the 4-pin end of data if the battery should lose its charge. 2. Connecting to Your Computer Connecting Your Camera to the Computer CAUTION: Do not use an IEEE 1394 connector and adapter card. 1. Doing so can damage your camera. 13-2 ... ports. 4. Connect your camera to the IEEE 1394 port on your camera. Connect the KODAK PROFESSIONAL DCS Pro 14n Charger / AC Adapter or charge and insert the KODAK PROFESSIONAL DCS Pro 14n Battery. Install the KODAK PROFESSIONAL DCS Host Software for Macintosh or Windows-based computers if you use a battery, it is correct when ...
...the camera. Connect the 4-pin end of data if the battery should lose its charge. 2. Connecting to Your Computer Connecting Your Camera to the Computer CAUTION: Do not use an IEEE 1394 connector and adapter card. 1. Doing so can damage your camera. 13-2 ... ports. 4. Connect your camera to the IEEE 1394 port on your camera. Connect the KODAK PROFESSIONAL DCS Pro 14n Charger / AC Adapter or charge and insert the KODAK PROFESSIONAL DCS Pro 14n Battery. Install the KODAK PROFESSIONAL DCS Host Software for Macintosh or Windows-based computers if you use a battery, it is correct when ...


