User Guide
Page 7
... Basic Menu 4-8 Digital Status LCD...4-9 Using the Digital Status LCD to Highlight Menu Options 4-9 Setting ISO ...4-10 White Balance...4-11 Setting Raw Resolution...4-12 Setting JPEG Resolution...4-13 Formatting a Card ...4-14 Changing the Display Contrast...4-15 Turning the Overexposure Indicator On and Off 4-16 Firmware ...4-17 Checking the Firmware Version...4-17 Updating Firmware...4-18 Setting the...
... Basic Menu 4-8 Digital Status LCD...4-9 Using the Digital Status LCD to Highlight Menu Options 4-9 Setting ISO ...4-10 White Balance...4-11 Setting Raw Resolution...4-12 Setting JPEG Resolution...4-13 Formatting a Card ...4-14 Changing the Display Contrast...4-15 Turning the Overexposure Indicator On and Off 4-16 Firmware ...4-17 Checking the Firmware Version...4-17 Updating Firmware...4-18 Setting the...

User Guide
Page 8
... Firmware to your Computer 5-6 Updating Firmware on your Camera...5-6 Firmware Features ...5-7 Folder and File Naming...5-7 Setting HotKeys ...5-8 Using Job Tracker...5-9 Saving a Job Tracker File to a Card...5-9 Loading a Job Tracker File From a Card 5-10 Loading a Job Tracker File from Camera Memory 5-11 Selecting a Language...5-11 Resetting Defaults ...5-12 Time and Date ...5-12 Setting the User Mode...5-13...
... Firmware to your Computer 5-6 Updating Firmware on your Camera...5-6 Firmware Features ...5-7 Folder and File Naming...5-7 Setting HotKeys ...5-8 Using Job Tracker...5-9 Saving a Job Tracker File to a Card...5-9 Loading a Job Tracker File From a Card 5-10 Loading a Job Tracker File from Camera Memory 5-11 Selecting a Language...5-11 Resetting Defaults ...5-12 Time and Date ...5-12 Setting the User Mode...5-13...
User Guide
Page 15
... download camera firmware, software updates, and technical information for your Camera So that your MACINTOSH or WINDOWS-based computer meets the system requirements. • Read the Warnings section. • Review the Important Safeguards and Precautions. • Register your camera). System Requirements for Your Computer Refer to the following Web site for purchasing your KODAK PROFESSIONAL DCS Pro 14n Digital Camera. April...
... download camera firmware, software updates, and technical information for your Camera So that your MACINTOSH or WINDOWS-based computer meets the system requirements. • Read the Warnings section. • Review the Important Safeguards and Precautions. • Register your camera). System Requirements for Your Computer Refer to the following Web site for purchasing your KODAK PROFESSIONAL DCS Pro 14n Digital Camera. April...

User Guide
Page 55
... Indicator • Time/Date • Firmware • User Mode April 29, 2004 4-7 All other digital functions are saved in the JPEG format. In Advanced mode, however, you become familiar with your camera, change settings on some digital functions. Basic Mode The Basics Your camera has two modes for accessing digital functions: Basic and Advanced modes. When...
... Indicator • Time/Date • Firmware • User Mode April 29, 2004 4-7 All other digital functions are saved in the JPEG format. In Advanced mode, however, you become familiar with your camera, change settings on some digital functions. Basic Mode The Basics Your camera has two modes for accessing digital functions: Basic and Advanced modes. When...

User Guide
Page 65
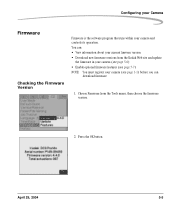
NOTE: You must register your current firmware version. 1. You can view information about your camera (see page 5-5) and update the firmware in your camera and controls its operation. The Basics Firmware Checking the Firmware Version Firmware is the software program that runs within your camera. If a new firmware version becomes available, you can download it from the Basic menu, then highlight the firmware version. 2. Press the OK button. Choose Firmware from the Kodak Web site (see page 1-1) before you can download firmware. April 29, 2004 4-17
NOTE: You must register your current firmware version. 1. You can view information about your camera (see page 5-5) and update the firmware in your camera and controls its operation. The Basics Firmware Checking the Firmware Version Firmware is the software program that runs within your camera. If a new firmware version becomes available, you can download it from the Basic menu, then highlight the firmware version. 2. Press the OK button. Choose Firmware from the Kodak Web site (see page 1-1) before you can download firmware. April 29, 2004 4-17
User Guide
Page 66
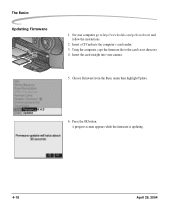
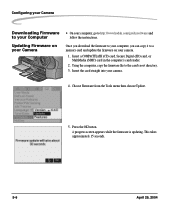
The Basics Updating Firmware 1. Insert a CF Card into your computer, go to the card's root directory. 4. Using the computer, copy the firmware file to http://www.kodak.com/go/dcssoftware and follow the instructions. 2. Choose Firmware from the Basic menu then highlight Update. 6. A progress screen appears while the firmware is updating. 4-18 April 29, 2004 Insert the card straight into the computer's card reader. 3. Press the OK button. On your camera. 5.
The Basics Updating Firmware 1. Insert a CF Card into your computer, go to the card's root directory. 4. Using the computer, copy the firmware file to http://www.kodak.com/go/dcssoftware and follow the instructions. 2. Choose Firmware from the Basic menu then highlight Update. 6. A progress screen appears while the firmware is updating. 4-18 April 29, 2004 Insert the card straight into the computer's card reader. 3. Press the OK button. On your camera. 5.
User Guide
Page 73
.... April 29, 2004 5-5 Configuring your Camera Firmware Checking the Firmware Version Firmware is the software program that runs within your current fimware version • Download new firmware versions from the Tools menu, then choose the firmware version. 2. Choose Firmware from the Kodak Web site and update the firmware in your camera (see page 5-6) • Enable optional firmware features (see page 5-7) NOTE...
.... April 29, 2004 5-5 Configuring your Camera Firmware Checking the Firmware Version Firmware is the software program that runs within your current fimware version • Download new firmware versions from the Tools menu, then choose the firmware version. 2. Choose Firmware from the Kodak Web site and update the firmware in your camera (see page 5-6) • Enable optional firmware features (see page 5-7) NOTE...
User Guide
Page 74
Using the computer, copy the firmware file to http://www.kodak.com/go to the card's root directory. 3. Choose Firmware from the Tools menu then choose Update. 5. Configuring your Camera Downloading Firmware to your Computer Updating Firmware on your camera. 4. Insert a COMPACTFLASH (CF) card, Secure Digital (SD) card, or MultiMedia (MMC) card in the computer's card reader. 2. This takes...
Using the computer, copy the firmware file to http://www.kodak.com/go to the card's root directory. 3. Choose Firmware from the Tools menu then choose Update. 5. Configuring your Camera Downloading Firmware to your Computer Updating Firmware on your camera. 4. Insert a COMPACTFLASH (CF) card, Secure Digital (SD) card, or MultiMedia (MMC) card in the computer's card reader. 2. This takes...

User Guide
Page 75
... Naming You can choose how to 0 when a new card is inserted. Configuring your Camera Firmware Features A few specialized features are built into the firmware and are to enable the feature on your camera you must first purchase a kit containing instructions and a certificate number (one kit for ...the specified folder limit has been reached, no more images will be enabled). Manual Restart-Names are reset to 0 on your camera. To enable a firmware feature on the current card or cards when you chose Folder Limit, choose 100 or 10000. 3. The included instructions describe how...
... Naming You can choose how to 0 when a new card is inserted. Configuring your Camera Firmware Features A few specialized features are built into the firmware and are to enable the feature on your camera you must first purchase a kit containing instructions and a certificate number (one kit for ...the specified folder limit has been reached, no more images will be enabled). Manual Restart-Names are reset to 0 on your camera. To enable a firmware feature on the current card or cards when you chose Folder Limit, choose 100 or 10000. 3. The included instructions describe how...

User Guide
Page 85
... Type3 (and is not necessary to http://www.kodak.com/go/DCSPro14n. April 29, 2004 5-17 Press the OK button. Your camera has a feature that automatically selects optimized lens settings for lenses recognized by the firmware: 1. If your lens appears in their responses... lenses and some wide-angle lenses (Type 3) For lenses not automatically recognized by the firmware. For a list of lenses. Choose Lens Optimization from the Tools menu. 2. Choose Auto, Type 1, Type 2, or Type 3. Configuring your Camera Lens Optimization Digital cameras can use the Lens Optimization feature.
... Type3 (and is not necessary to http://www.kodak.com/go/DCSPro14n. April 29, 2004 5-17 Press the OK button. Your camera has a feature that automatically selects optimized lens settings for lenses recognized by the firmware: 1. If your lens appears in their responses... lenses and some wide-angle lenses (Type 3) For lenses not automatically recognized by the firmware. For a list of lenses. Choose Lens Optimization from the Tools menu. 2. Choose Auto, Type 1, Type 2, or Type 3. Configuring your Camera Lens Optimization Digital cameras can use the Lens Optimization feature.
User Guide
Page 223
... for digital SLR, 10-2 A af area mode, 8-2 choosing, 8-2 af-assist illuminator, 8-6 aperture-priority auto exposure mode, 7-14 auto exposure bracketing, 7-20 cancelling, 7-22 auto exposure lock, 7-17 auto review, 11-9 autofocus, 8-1 situations where autofocus may not work as expected, 8-8 B basic camera operations, 4-1 basic menu, using, 4-8 basic mode, 4-7 changing display contrast, 4-15 checking the firmware...
... for digital SLR, 10-2 A af area mode, 8-2 choosing, 8-2 af-assist illuminator, 8-6 aperture-priority auto exposure mode, 7-14 auto exposure bracketing, 7-20 cancelling, 7-22 auto exposure lock, 7-17 auto review, 11-9 autofocus, 8-1 situations where autofocus may not work as expected, 8-8 B basic camera operations, 4-1 basic menu, using, 4-8 basic mode, 4-7 changing display contrast, 4-15 checking the firmware...
User Guide
Page 224
... camera, 5-1 connecting camera to computer, 13-1 continuous drive mode, 5-22 CR 2032 coin cell, 3-6 crop aspect ratio, 6-11 custom settings, 5-2 custom settings table, 5-2 D DCS Pro 14n back, 2-2 bottom, 2-3 front, 2-1 media door, 2-4 side, 2-3 top, 2-2 turning on and off, 2-4 defaults, resetting, 5-12 delete button, 2-9 deleting images, 11-11 depth of field, 8-10 depth of field preview button, 2-20 digital...
... camera, 5-1 connecting camera to computer, 13-1 continuous drive mode, 5-22 CR 2032 coin cell, 3-6 crop aspect ratio, 6-11 custom settings, 5-2 custom settings table, 5-2 D DCS Pro 14n back, 2-2 bottom, 2-3 front, 2-1 media door, 2-4 side, 2-3 top, 2-2 turning on and off, 2-4 defaults, resetting, 5-12 delete button, 2-9 deleting images, 11-11 depth of field, 8-10 depth of field preview button, 2-20 digital...


