
User Manual
Page 5
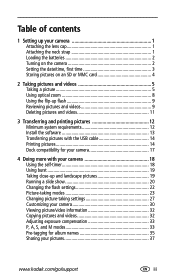
... the lens cap 1 Attaching the neck strap 1 Loading the batteries 2 Turning on the camera 2 Setting the date/time, first time 3 Storing pictures on an SD or ... pictures with the USB cable 14 Printing pictures 14 Dock compatibility for your camera 17 4 Doing more with your camera 18 Using the self-timer 18 Using burst 19 Taking close-up and ... show 20 Changing the flash settings 22 Picture-taking modes 23 Changing picture-taking settings 27 Customizing your camera 30 Viewing picture/video information 32 Copying pictures and videos 32 Adjusting exposure compensation 33 P, A, S,...
... the lens cap 1 Attaching the neck strap 1 Loading the batteries 2 Turning on the camera 2 Setting the date/time, first time 3 Storing pictures on an SD or ... pictures with the USB cable 14 Printing pictures 14 Dock compatibility for your camera 17 4 Doing more with your camera 18 Using the self-timer 18 Using burst 19 Taking close-up and ... show 20 Changing the flash settings 22 Picture-taking modes 23 Changing picture-taking settings 27 Customizing your camera 30 Viewing picture/video information 32 Copying pictures and videos 32 Adjusting exposure compensation 33 P, A, S,...
User Manual
Page 8
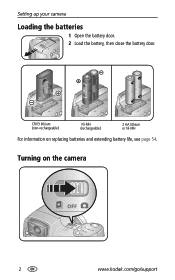
Setting up your camera Loading the batteries 1 Open the battery door. 2 Load the battery, then close the battery door. Turning on replacing batteries and extending battery life, see page 54. CRV3 lithium (non-rechargeable) Ni-MH (rechargeable) 2 AA lithium or Ni-MH For information on the camera 2 www.kodak.com/go/support
Setting up your camera Loading the batteries 1 Open the battery door. 2 Load the battery, then close the battery door. Turning on replacing batteries and extending battery life, see page 54. CRV3 lithium (non-rechargeable) Ni-MH (rechargeable) 2 AA lithium or Ni-MH For information on the camera 2 www.kodak.com/go/support

User Manual
Page 11
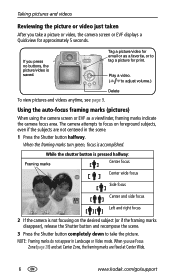
To stop recording, press and release the Shutter button again. When AF/AE Indicator turns green, press Shutter button completely down. 2 Taking a video 1 2 3 Choose LCD or EFV (electronic viewfinder) AF/AE Indicator: Green-successful Red-failed Failed focus Failed exposure 3 Press the Shutter button completely down and release. www.kodak.com/go/support 5 2 Taking pictures and videos Taking a picture 1 Press Shutter button 4 halfway to focus and set exposure.
To stop recording, press and release the Shutter button again. When AF/AE Indicator turns green, press Shutter button completely down. 2 Taking a video 1 2 3 Choose LCD or EFV (electronic viewfinder) AF/AE Indicator: Green-successful Red-failed Failed focus Failed exposure 3 Press the Shutter button completely down and release. www.kodak.com/go/support 5 2 Taking pictures and videos Taking a picture 1 Press Shutter button 4 halfway to focus and set exposure.
User Manual
Page 12
...focus Center wide focus Side focus Center and side focus Left and right focus 2 If the camera is not focusing on foreground subjects, even if the subjects are fixed at Center Wide. 6 www.kodak.com/go/support Tag a picture/video for email or as a viewfinder, framing marks indicate ...the camera focus area. When the framing marks turn green, focus is saved. When you press no buttons, the picture/video is...
...focus Center wide focus Side focus Center and side focus Left and right focus 2 If the camera is not focusing on foreground subjects, even if the subjects are fixed at Center Wide. 6 www.kodak.com/go/support Tag a picture/video for email or as a viewfinder, framing marks indicate ...the camera focus area. When the framing marks turn green, focus is saved. When you press no buttons, the picture/video is...

User Manual
Page 13
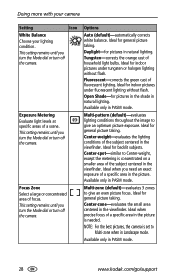
.../ Close-up Date stamp Album name Flash Zoom: digital telephoto wide PASM Setting Aperture Shutter speed Picture size Pictures/time remaining Storage location AF mode Focus zone Exposure metering White balance ISO Low battery Camera mode Exposure compensation Capture modes-shutter pressed halfway Open ... Slow shutter speed warning Auto Focus/ Auto Exposure (AF/AE indicator) ISO Aperture Shutter speed Exposure compensation www.kodak.com/go/support 7 Taking pictures and videos Checking camera and picture status To turn on/off the camera and picture icons, press the Status button.
.../ Close-up Date stamp Album name Flash Zoom: digital telephoto wide PASM Setting Aperture Shutter speed Picture size Pictures/time remaining Storage location AF mode Focus zone Exposure metering White balance ISO Low battery Camera mode Exposure compensation Capture modes-shutter pressed halfway Open ... Slow shutter speed warning Auto Focus/ Auto Exposure (AF/AE indicator) ISO Aperture Shutter speed Exposure compensation www.kodak.com/go/support 7 Taking pictures and videos Checking camera and picture status To turn on/off the camera and picture icons, press the Status button.
User Manual
Page 14
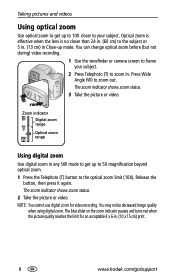
... (but not during) video recording. 1 Use the viewfinder or camera screen to frame your subject. The zoom indicator shows zoom status. 3 Take the picture or video. The blue slider on the zoom indicator pauses and turns red when the picture quality reaches the limit for video recording. ... Angle (W) to your subject. 2 Press Telephoto (T) to the optical zoom limit (10X). NOTE: You cannot use digital zoom for an acceptable 4 x 6-in. (10 x 15 cm) print. 8 www.kodak.com/go/support The zoom indicator shows zoom status. 2 Take the picture or video. Taking pictures and videos Using optical...
... (but not during) video recording. 1 Use the viewfinder or camera screen to frame your subject. The zoom indicator shows zoom status. 3 Take the picture or video. The blue slider on the zoom indicator pauses and turns red when the picture quality reaches the limit for video recording. ... Angle (W) to your subject. 2 Press Telephoto (T) to the optical zoom limit (10X). NOTE: You cannot use digital zoom for an acceptable 4 x 6-in. (10 x 15 cm) print. 8 www.kodak.com/go/support The zoom indicator shows zoom status. 2 Take the picture or video. Taking pictures and videos Using optical...
User Manual
Page 15
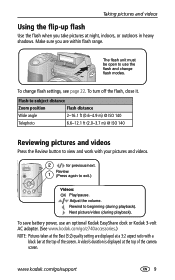
..., see page 22. A video's duration is displayed at the top of the screen. To turn off the flash, close it. Next picture/video (during playback). Review. 1 (Press again to...must be open to view and work with a black bar at the top of the camera screen. Adjust the volume. Taking pictures and videos Using the flip-up flash Use the... 140 Reviewing pictures and videos Press the Review button to use an optional Kodak EasyShare dock or Kodak 3-volt AC adapter. (See www.kodak.com/go /support 9 www.kodak.com/go /z740accessories.) NOTE: Pictures taken at the Best (3:2) quality setting...
..., see page 22. A video's duration is displayed at the top of the screen. To turn off the flash, close it. Next picture/video (during playback). Review. 1 (Press again to...must be open to view and work with a black bar at the top of the camera screen. Adjust the volume. Taking pictures and videos Using the flip-up flash Use the... 140 Reviewing pictures and videos Press the Review button to use an optional Kodak EasyShare dock or Kodak 3-volt AC adapter. (See www.kodak.com/go /support 9 www.kodak.com/go /z740accessories.) NOTE: Pictures taken at the Best (3:2) quality setting...
User Manual
Page 19
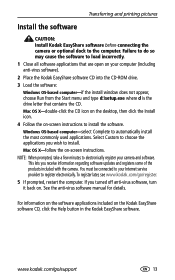
... Start menu and type d:\setup.exe where d is the drive letter that are open on -screen instructions. If you turned off anti-virus software, turn it back on -screen instructions to load incorrectly. 1 Close all software applications that contains the CD. See the anti-virus... computer-select Complete to the computer. Mac OS X-follow the on your camera and software. For information on the software applications included on the Kodak EasyShare software CD, click the Help button in the Kodak EasyShare software. www.kodak.com/go /register. 5 If prompted, restart the computer. To register ...
... Start menu and type d:\setup.exe where d is the drive letter that are open on -screen instructions. If you turned off anti-virus software, turn it back on -screen instructions to load incorrectly. 1 Close all software applications that contains the CD. See the anti-virus... computer-select Complete to the computer. Mac OS X-follow the on your camera and software. For information on the software applications included on the Kodak EasyShare software CD, click the Help button in the Kodak EasyShare software. www.kodak.com/go /register. 5 If prompted, restart the computer. To register ...
User Manual
Page 20
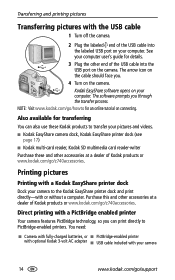
... the other end of the USB cable into the USB port on the camera. Also available for an online tutorial on the camera. Printing pictures Printing with your camera to PictBridge-enabled printers. The software prompts you . 4 Turn on connecting. Kodak EasyShare software opens on the cable should face you through the transfer process. You need...
... the other end of the USB cable into the USB port on the camera. Also available for an online tutorial on the camera. Printing pictures Printing with your camera to PictBridge-enabled printers. The software prompts you . 4 Turn on connecting. Kodak EasyShare software opens on the cable should face you through the transfer process. You need...

User Manual
Page 21
... turns off, press any button to redisplay it into the camera and into an electrical outlet. www.kodak.com/go /z740accessories to order cables.) Printing from a PictBridge-enabled printer 1 Turn on the camera. IMPORTANT: Do not use the AC adapter included with the Kodak EasyShare camera ...dock or printer dock to power your computer, see page 12. If the printer is capable, print pictures that you have a Kodak 3-volt AC adapter (optional accessory...
... turns off, press any button to redisplay it into the camera and into an electrical outlet. www.kodak.com/go /z740accessories to order cables.) Printing from a PictBridge-enabled printer 1 Turn on the camera. IMPORTANT: Do not use the AC adapter included with the Kodak EasyShare camera ...dock or printer dock to power your computer, see page 12. If the printer is capable, print pictures that you have a Kodak 3-volt AC adapter (optional accessory...

User Manual
Page 24
...Self-timer setting remains active.) Use the same procedure to take a video, but: ■ Turn the Mode dial to get into the scene) . To cancel the Self-timer before the picture ...in 2 or 10 seconds. NOTE: The video stops when no storage space remains. 18 www.kodak.com/go/support Once for a steady, auto-shutter release on a tripod or flat surface. 2 In... any still mode, press : . Once more with your camera Using the self-timer 1 Place camera on a tripod) 3 Compose the scene. 4 Press the Shutter button halfway, then completely down . 4...
...Self-timer setting remains active.) Use the same procedure to take a video, but: ■ Turn the Mode dial to get into the scene) . To cancel the Self-timer before the picture ...in 2 or 10 seconds. NOTE: The video stops when no storage space remains. 18 www.kodak.com/go/support Once for a steady, auto-shutter release on a tripod or flat surface. 2 In... any still mode, press : . Once more with your camera Using the self-timer 1 Place camera on a tripod) 3 Compose the scene. 4 Press the Shutter button halfway, then completely down . 4...
User Manual
Page 27
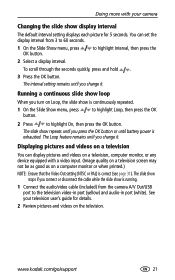
...seconds quickly, press and hold . 3 Press the OK button. See your camera Changing the slide show display interval The default interval setting displays each picture for details. 2 Review pictures and videos on the television. www.kodak.com/go/support 21 Doing more with a video input. (Image quality ...your television user's guide for 5 seconds. The Loop feature remains until you connect or disconnect the cable while the slide show repeats until you turn on a computer monitor or when printed.) NOTE: Ensure that the Video Out setting (NTSC or PAL) is running. 1 Connect the audio/...
...seconds quickly, press and hold . 3 Press the OK button. See your camera Changing the slide show display interval The default interval setting displays each picture for details. 2 Review pictures and videos on the television. www.kodak.com/go/support 21 Doing more with a video input. (Image quality ...your television user's guide for 5 seconds. The Loop feature remains until you connect or disconnect the cable while the slide show repeats until you turn on a computer monitor or when printed.) NOTE: Ensure that the Video Out setting (NTSC or PAL) is running. 1 Connect the audio/...

User Manual
Page 30
...Macro Focus, CenterWeight Metering, Center-Zone Focus, ISO 100 24 www.kodak.com/go/support Doing more with your camera Scene modes 1 Turn the Mode dial to Scene . 2 Press to choose a Scene mode. NOTE: If the Help text turns off, press the OK button. 3 Press the OK button to ... shadow or "backlit" (when light is behind the subject). Metering, Multi-Zone Focus, ISO 140 Party People indoors. Minimizes red eye. Place the camera on a flat, steady surface or use a tripod. f/5.6, 2 second exposure, Infinity Focus, Center-Weight Metering, Daylight White Balance, ISO 100 Snow ...
...Macro Focus, CenterWeight Metering, Center-Zone Focus, ISO 100 24 www.kodak.com/go/support Doing more with your camera Scene modes 1 Turn the Mode dial to Scene . 2 Press to choose a Scene mode. NOTE: If the Help text turns off, press the OK button. 3 Press the OK button to ... shadow or "backlit" (when light is behind the subject). Metering, Multi-Zone Focus, ISO 140 Party People indoors. Minimizes red eye. Place the camera on a flat, steady surface or use a tripod. f/5.6, 2 second exposure, Infinity Focus, Center-Weight Metering, Daylight White Balance, ISO 100 Snow ...
User Manual
Page 34
...lighting conditions throughout the image to give an optimum picture exposure. Ideal for general picture taking. Ideal when you turn the Mode dial or turn off the camera. Available only in the viewfinder. Tungsten-corrects the orange cast of the subject centered in the picture. Ideal... setting remains until you turn the Mode dial or turn off the camera. Daylight-for indoor pictures under fluorescent lighting without flash. Ideal when precise focus of a scene. Ideal for pictures in natural lighting. Available only in PASM mode. 28 www.kodak.com/go/support Exposure ...
...lighting conditions throughout the image to give an optimum picture exposure. Ideal for general picture taking. Ideal when you turn the Mode dial or turn off the camera. Available only in the viewfinder. Tungsten-corrects the orange cast of the subject centered in the picture. Ideal... setting remains until you turn the Mode dial or turn off the camera. Daylight-for indoor pictures under fluorescent lighting without flash. Ideal when precise focus of a scene. Ideal for pictures in natural lighting. Available only in PASM mode. 28 www.kodak.com/go/support Exposure ...
User Manual
Page 35
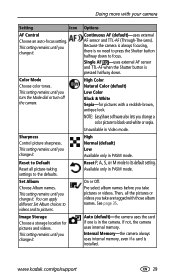
... the defaults. Then, all picture-taking settings to its default setting. www.kodak.com/go/support 29 You can apply different Set Album choices to videos and to black-and-white or sepia. Available only in the camera. Pre-select album names before you change it . If not, the...are tagged with those album names. NOTE: EasyShare software also lets you change it . This setting remains until you turn the Mode dial or turn off the camera. On or Off. Image Storage Choose a storage location for pictures with your camera Setting Icon AF Control Choose an auto-focus ...
... the defaults. Then, all picture-taking settings to its default setting. www.kodak.com/go/support 29 You can apply different Set Album choices to videos and to black-and-white or sepia. Available only in the camera. Pre-select album names before you change it . If not, the...are tagged with those album names. NOTE: EasyShare software also lets you change it . This setting remains until you turn the Mode dial or turn off the camera. On or Off. Image Storage Choose a storage location for pictures with your camera Setting Icon AF Control Choose an auto-focus ...
User Manual
Page 36
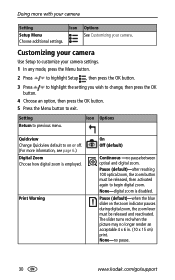
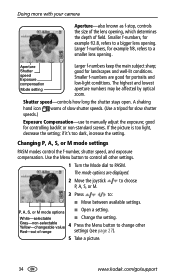
...-no longer render an acceptable 4 x 6 in. (10 x 15 cm) print. The slider turns red when the picture may no pause between optical and digital zoom. Doing more information, see page 6.) Digital Zoom Choose how digital zoom is disabled. Setting Return to on the zoom indicator pauses during... digital zoom, the zoom lever must be released and reactivated. Pause (default)-after reaching 10X optical zoom, the zoom button must be released, then activated again to exit. None-no pause. 30 www.kodak.com/go/support Customizing your camera Use Setup to customize your camera ...
...-no longer render an acceptable 4 x 6 in. (10 x 15 cm) print. The slider turns red when the picture may no pause between optical and digital zoom. Doing more information, see page 6.) Digital Zoom Choose how digital zoom is disabled. Setting Return to on the zoom indicator pauses during... digital zoom, the zoom lever must be released and reactivated. Pause (default)-after reaching 10X optical zoom, the zoom button must be released, then activated again to exit. None-no pause. 30 www.kodak.com/go/support Customizing your camera Use Setup to customize your camera ...

User Manual
Page 37
... a television or other external device. Video Date Display Display Date/Time at the start of inactivity time until camera turns off .) On (default)- choose from date formats. On (default) Off Choose a date option, or turn off the feature. (Default is off . Video Out Choose the regional setting that they are displayed with your... Shutter only (default) Default Classical Jazz Sci-fi Off Low (default) Medium High 10 minutes (default) 5 minutes 3 minutes 1 minutes On (default) Off See page 3. www.kodak.com/go/support 31
... a television or other external device. Video Date Display Display Date/Time at the start of inactivity time until camera turns off .) On (default)- choose from date formats. On (default) Off Choose a date option, or turn off the feature. (Default is off . Video Out Choose the regional setting that they are displayed with your... Shutter only (default) Default Classical Jazz Sci-fi Off Low (default) Medium High 10 minutes (default) 5 minutes 3 minutes 1 minutes On (default) Off See page 3. www.kodak.com/go/support 31

User Manual
Page 39
...information appears on the camera screen or EVF. 2 To make pictures lighter or darker. 1 In any capture mode, move the joystick . For example, if you change the Color Mode to highlight an option: PICTURE or VIDEO-copies the current picture or video. www.kodak.com/go/support 33.... 2 Press to highlight Copy , then press the OK button. 3 Press to Sepia while in P, A, S, or M mode, you change it or turn off the camera. To apply protection to make pictures lighter, move the joystick . Protection settings are copied, not moved. P, A, S, and M modes Settings you still retain...
...information appears on the camera screen or EVF. 2 To make pictures lighter or darker. 1 In any capture mode, move the joystick . For example, if you change the Color Mode to highlight an option: PICTURE or VIDEO-copies the current picture or video. www.kodak.com/go/support 33.... 2 Press to highlight Copy , then press the OK button. 3 Press to Sepia while in P, A, S, or M mode, you change it or turn off the camera. To apply protection to make pictures lighter, move the joystick . Protection settings are copied, not moved. P, A, S, and M modes Settings you still retain...
User Manual
Page 40
...A shaking hand icon warns of range settings (see page 27). 5 Take a picture. 34 www.kodak.com/go/support Changing P, A, S, or M mode settings PASM modes control the f-number, shutter speed...Grey-non-selectable Yellow-changeable value 4 Press the Menu button to change other settings. 1 Turn the Mode dial to : ■ Move between available settings. The highest and lowest aperture... setting. P, A, S, or M mode options ■ Open a setting. Doing more with your camera Aperture-also known as f-stop, controls the size of the lens opening . Shutter speed-controls how ...
...A shaking hand icon warns of range settings (see page 27). 5 Take a picture. 34 www.kodak.com/go/support Changing P, A, S, or M mode settings PASM modes control the f-number, shutter speed...Grey-non-selectable Yellow-changeable value 4 Press the Menu button to change other settings. 1 Turn the Mode dial to : ■ Move between available settings. The highest and lowest aperture... setting. P, A, S, or M mode options ■ Open a setting. Doing more with your camera Aperture-also known as f-stop, controls the size of the lens opening . Shutter speed-controls how ...
User Manual
Page 41
... noted with those album names. See Kodak EasyShare software Help for album names Use the Set Album (Still or Video) feature to exit the menu. To remove all the pictures or videos you turn on the camera screen, your computer When you connect the camera to highlight an album name, then ...press the OK button. First-on your computer Use Kodak EasyShare software (V 3.0 or higher, see page 12) to create album names on...
... noted with those album names. See Kodak EasyShare software Help for album names Use the Set Album (Still or Video) feature to exit the menu. To remove all the pictures or videos you turn on the camera screen, your computer When you connect the camera to highlight an album name, then ...press the OK button. First-on your computer Use Kodak EasyShare software (V 3.0 or higher, see page 12) to create album names on...


