Specification (English)
Page 2
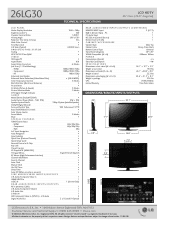
...8226; Parental Control w/V-Chip • Key Lock • Closed Caption • LG SimpLink™ (HDMI CEC) • Trilingual Menus English/French/Spanish EZ Menus... Channel Add/Delete • Favorite Channel • Auto Clock • Manual Clock • On/Off Timer • Sleep Timer • Auto ...) HDMI™/HDCP Input 2 (V.1.3) RGB In (D-Sub 15pin) - 26LG30 TECHNICAL SPECIFICATIONS LCD HDTV 26" Class (26.0" diagonal) LCD PANEL Native Display Resolution 1366 x 768p Brightness (cd/m2) 500 Dynamic...
...8226; Parental Control w/V-Chip • Key Lock • Closed Caption • LG SimpLink™ (HDMI CEC) • Trilingual Menus English/French/Spanish EZ Menus... Channel Add/Delete • Favorite Channel • Auto Clock • Manual Clock • On/Off Timer • Sleep Timer • Auto ...) HDMI™/HDCP Input 2 (V.1.3) RGB In (D-Sub 15pin) - 26LG30 TECHNICAL SPECIFICATIONS LCD HDTV 26" Class (26.0" diagonal) LCD PANEL Native Display Resolution 1366 x 768p Brightness (cd/m2) 500 Dynamic...

Owner's Manual (English)
Page 1
LCD TV OWNER'S MANUAL 19LG30 19LG31 22LG30 22LG31 22LG30DC 26LG30 26LG30DC Please read this manual carefully before operating your set of this product meets the ENERGY STAR guidelines for future reference. has determined that this manual. A.,Inc. ENERGY STAR is a set and retain it for energy efficiency. S. As an ENERGY STAR Partner LGE U. P/NO : SAC30708022 (0805-REV05...
LCD TV OWNER'S MANUAL 19LG30 19LG31 22LG30 22LG31 22LG30DC 26LG30 26LG30DC Please read this manual carefully before operating your set of this product meets the ENERGY STAR guidelines for future reference. has determined that this manual. A.,Inc. ENERGY STAR is a set and retain it for energy efficiency. S. As an ENERGY STAR Partner LGE U. P/NO : SAC30708022 (0805-REV05...

Owner's Manual (English)
Page 4
...the Power Cord: It is recommend that is the disconnecting device. Do not use of these conditions could result in . Do not touch the TV with the power cord plugged in fire or electric shock. Pay particular attention to dripping or splashing and do not place objects filled with a three... away from physical or mechanical abuse, such as this could result in a door, or walked upon a dedicated circuit; Do not install this owner's manual to a three-prong grounded AC outlet). Any of the appliance, and have a qualified electrician install a separate circuit breaker...
...the Power Cord: It is recommend that is the disconnecting device. Do not use of these conditions could result in . Do not touch the TV with the power cord plugged in fire or electric shock. Pay particular attention to dripping or splashing and do not place objects filled with a three... away from physical or mechanical abuse, such as this could result in a door, or walked upon a dedicated circuit; Do not install this owner's manual to a three-prong grounded AC outlet). Any of the appliance, and have a qualified electrician install a separate circuit breaker...

Owner's Manual (English)
Page 6
...Digital Broadcasting System Captions 71 - Add / Delete Channel (Manual Tuning 46 - Channel Editing 47 Input List 48 Input Label 49 PICTURE CONTROL Picture Size (Aspect Ratio) Control 50 Preset Picture Settings - User Mode 63 Balance 64 TV Speakers On/Off Setup 65 Audio Reset 66 Stereo/SAP...EQUIPMENT SETUP HD Receiver Setup 18 DVD Setup 23 VCR Setup 26 Headphone Setup 29 Other A/V Source Setup 29 Audio out Connection 30 PC Setup 31 WATCHING TV / CHANNEL CONTROL Remote Control Functions 38 Turning On TV 40 Channel Selection 40 Volume Adjustment 40 Quick Menu 41 ...
...Digital Broadcasting System Captions 71 - Add / Delete Channel (Manual Tuning 46 - Channel Editing 47 Input List 48 Input Label 49 PICTURE CONTROL Picture Size (Aspect Ratio) Control 50 Preset Picture Settings - User Mode 63 Balance 64 TV Speakers On/Off Setup 65 Audio Reset 66 Stereo/SAP...EQUIPMENT SETUP HD Receiver Setup 18 DVD Setup 23 VCR Setup 26 Headphone Setup 29 Other A/V Source Setup 29 Audio out Connection 30 PC Setup 31 WATCHING TV / CHANNEL CONTROL Remote Control Functions 38 Turning On TV 40 Channel Selection 40 Volume Adjustment 40 Quick Menu 41 ...

Owner's Manual (English)
Page 7
Auto Clock Setup 73 Manual Clock Setup 74 Auto On/Off Time Setting 75 Sleep Timer Setting 76 Auto Shut-off Setting 77 PARENTAL CONTROL / RATINGS Set Password & Lock System 78 Channel Blocking 81 Movie & TV Rating 82 Downloadable Rating 87 External Input Blocking 88 Key Lock 89 APPENDIX Troubleshooting 90 Maintenance 92 Product Specifications 93 External Control Through RS-232C 94 Open Source License 100 5 TIME SETTING Clock Setting -
Auto Clock Setup 73 Manual Clock Setup 74 Auto On/Off Time Setting 75 Sleep Timer Setting 76 Auto Shut-off Setting 77 PARENTAL CONTROL / RATINGS Set Password & Lock System 78 Channel Blocking 81 Movie & TV Rating 82 Downloadable Rating 87 External Input Blocking 88 Key Lock 89 APPENDIX Troubleshooting 90 Maintenance 92 Product Specifications 93 External Control Through RS-232C 94 Open Source License 100 5 TIME SETTING Clock Setting -

Owner's Manual (English)
Page 9
CD Manual PICTURE TV SOUND POWER 1 4 2 SAP INPUT RATIO 7 5 3 - 8 6 0 9 VOL FAV FLASHBK Q.MENU ...use shielded signal interface cables with the polishing cloth. * Do not wipe roughly when removing stain. Owner's Manual Only 19/22LG3** Copyright© 2007 LGE, All Rights Reserved. The accessories included may cause scratch or discoloration.... Please be Polishing Cloth (This feature is missing, please contact the dealer where you purchased the TV. for stand fixing (Refer to P.12) (Refer to P.16) Protection Cover * Wipe spots on the exterior...
CD Manual PICTURE TV SOUND POWER 1 4 2 SAP INPUT RATIO 7 5 3 - 8 6 0 9 VOL FAV FLASHBK Q.MENU ...use shielded signal interface cables with the polishing cloth. * Do not wipe roughly when removing stain. Owner's Manual Only 19/22LG3** Copyright© 2007 LGE, All Rights Reserved. The accessories included may cause scratch or discoloration.... Please be Polishing Cloth (This feature is missing, please contact the dealer where you purchased the TV. for stand fixing (Refer to P.12) (Refer to P.16) Protection Cover * Wipe spots on the exterior...

Owner's Manual (English)
Page 17
...B CAUTION G Ensure adequate ventilation by a qualified professional installer. G When purchasing our wall mount kit, a detailed installation manual and all four sides from your nearest dealer. G LG is not liable for these kinds of 4 inches on all parts necessary for wall mount kits are provided. It may ...result in severe personal injury. If installed on . LG is not liable for TV damage or personal injury when a non-VESA or non specified wall mount is turned on a ceiling or slanted wall, it may...
...B CAUTION G Ensure adequate ventilation by a qualified professional installer. G When purchasing our wall mount kit, a detailed installation manual and all four sides from your nearest dealer. G LG is not liable for these kinds of 4 inches on all parts necessary for wall mount kits are provided. It may ...result in severe personal injury. If installed on . LG is not liable for TV damage or personal injury when a non-VESA or non specified wall mount is turned on a ceiling or slanted wall, it may...

Owner's Manual (English)
Page 20
... use I Turn on the remote control. Component Connection 19/22LG3** 1. operation) I Select the Component input source on the TV using the INPUT button on the digital set-top box. (Refer to the owner's manual for the digital set-top box. How to connect Y PB PR L R 1 Connect the video outputs (Y, PB, PR) of... the digital set-top box to the COMPONENT IN AUDIO jacks on the TV. Match the jack colors (Y = green, PB = blue, and ...
... use I Turn on the remote control. Component Connection 19/22LG3** 1. operation) I Select the Component input source on the TV using the INPUT button on the digital set-top box. (Refer to the owner's manual for the digital set-top box. How to connect Y PB PR L R 1 Connect the video outputs (Y, PB, PR) of... the digital set-top box to the COMPONENT IN AUDIO jacks on the TV. Match the jack colors (Y = green, PB = blue, and ...

Owner's Manual (English)
Page 21
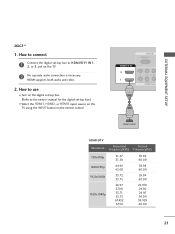
... 1920x1080i 1920x1080p 15.73 15.73 31.47 31.50 44.96 45.00 33.72 33.75 26.97 27.00 33.71 33.75 67.432 67.50 59.94 60.00 59.94 60....to the COMPONENT IN AUDIO 1 jacks on the remote control. I Select the Component 1 input source on the TV using the INPUT button on the TV. 1 2 RGB IN RGB(PC) AUDIO REMOTE (RGB/DVI) CONTROL IN 2. I Turn on the digital... set-top box. (Refer to the owner's manual for the digital set -top box to the COMPONENT IN VIDEO 1 jacks on the TV. How to connect Y PB PR L R 1 Connect the video outputs (Y, PB, PR)...
... 1920x1080i 1920x1080p 15.73 15.73 31.47 31.50 44.96 45.00 33.72 33.75 26.97 27.00 33.71 33.75 67.432 67.50 59.94 60.00 59.94 60....to the COMPONENT IN AUDIO 1 jacks on the remote control. I Select the Component 1 input source on the TV using the INPUT button on the TV. 1 2 RGB IN RGB(PC) AUDIO REMOTE (RGB/DVI) CONTROL IN 2. I Turn on the digital... set-top box. (Refer to the owner's manual for the digital set -top box to the COMPONENT IN VIDEO 1 jacks on the TV. How to connect Y PB PR L R 1 Connect the video outputs (Y, PB, PR)...
Owner's Manual (English)
Page 22
... 60.00 20 How to use I Select the HDMI input source on the TV using the INPUT button on the TV. 2 No separate audio connection is necessary. How to connect 1 Connect the digital set-top box to the owner's manual for the digital set-top box.) I Turn on the digital set-top box...
... 60.00 20 How to use I Select the HDMI input source on the TV using the INPUT button on the TV. 2 No separate audio connection is necessary. How to connect 1 Connect the digital set-top box to the owner's manual for the digital set-top box.) I Turn on the digital set-top box...
Owner's Manual (English)
Page 23
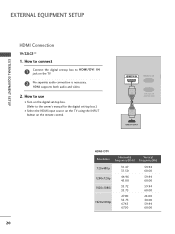
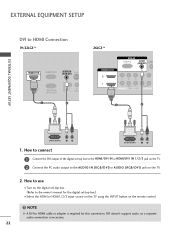
...KHz) Frequency(Hz) 720x480p 1280x720p 1920x1080i 1920x1080p 31.47 31.50 44.96 45.00 33.72 33.75 26.97 27.00 33.71 33.75 67.432 67.50 59.94 60.00 59.94 60.00 ...60.00 21 HDMI supports both audio and video. 2. How to connect 1 Connect the digital set-top box to the owner's manual for the digital set -top box. (Refer to HDMI/DVI IN1, 2, or 3 jack on the remote control. How to...on the digital set -top box.) I Select the HDMI1, HDMI2, or HDMI3 input source on the TV using the INPUT button on the TV. 2 No separate audio connection is necessary. EXTERNAL EQUIPMENT SETUP 26LG3** 1.
...KHz) Frequency(Hz) 720x480p 1280x720p 1920x1080i 1920x1080p 31.47 31.50 44.96 45.00 33.72 33.75 26.97 27.00 33.71 33.75 67.432 67.50 59.94 60.00 59.94 60.00 ...60.00 21 HDMI supports both audio and video. 2. How to connect 1 Connect the digital set-top box to the owner's manual for the digital set -top box. (Refer to HDMI/DVI IN1, 2, or 3 jack on the remote control. How to...on the digital set -top box.) I Select the HDMI1, HDMI2, or HDMI3 input source on the TV using the INPUT button on the TV. 2 No separate audio connection is necessary. EXTERNAL EQUIPMENT SETUP 26LG3** 1.
Owner's Manual (English)
Page 24
... the PC audio output to use I Select the HDMI or HDMI1/2/3 input source on the TV using the INPUT button on the TV. 2. EXTERNAL EQUIPMENT SETUP EXTERNAL EQUIPMENT SETUP DVI to the owner's manual for this connection. How to connect DVI-DTV OUTPUT L R 1 Connect the DVI output of the digital set -top box...
... the PC audio output to use I Select the HDMI or HDMI1/2/3 input source on the TV using the INPUT button on the TV. 2. EXTERNAL EQUIPMENT SETUP EXTERNAL EQUIPMENT SETUP DVI to the owner's manual for this connection. How to connect DVI-DTV OUTPUT L R 1 Connect the DVI output of the digital set -top box...

Owner's Manual (English)
Page 25
... remote control. Component Input ports To get better picture quality, connect a DVD player to the DVD player's manual for operating instructions. Component ports on the TV Y PB PR Y PB PR Video output ports Y B-Y R-Y on the TV. 2. How to the COMPONENT IN AUDIO or COMPONENT IN AUDIO1 jacks on DVD player Y Cb Cr Y Pb... shown below. How to connect 1 Connect the video outputs (Y, PB, PR) of the DVD to use I Select the Component or Component 1 input source on the TV using the INPUT button on the...
... remote control. Component Input ports To get better picture quality, connect a DVD player to the DVD player's manual for operating instructions. Component ports on the TV Y PB PR Y PB PR Video output ports Y B-Y R-Y on the TV. 2. How to the COMPONENT IN AUDIO or COMPONENT IN AUDIO1 jacks on DVD player Y Cb Cr Y Pb... shown below. How to connect 1 Connect the video outputs (Y, PB, PR) of the DVD to use I Select the Component or Component 1 input source on the TV using the INPUT button on the...

Owner's Manual (English)
Page 26
How to the DVD player's manual for operating instructions. 24 I Turn on the DVD player, insert a DVD. I Refer to use I Select the A V or A V 1 input source on the TV using the INPUT button on the TV. 2. How to connect 1 Connect the S-VIDEO output of the DVD to the S -VIDEO input on the TV. 2 Connect the audio...
How to the DVD player's manual for operating instructions. 24 I Turn on the DVD player, insert a DVD. I Refer to use I Select the A V or A V 1 input source on the TV using the INPUT button on the TV. 2. How to connect 1 Connect the S-VIDEO output of the DVD to the S -VIDEO input on the TV. 2 Connect the audio...

Owner's Manual (English)
Page 27
I Select the HDMI or HDMI1/2/3 input source on the TV using the INPUT button on the TV. 2 No separated audio connection is necessary. HDMI supports both audio and video. 2. How to connect 1 Connect the HDMI output of the DVD to the DVD player's manual for operating instructions. 25 How to use I Refer to the...
I Select the HDMI or HDMI1/2/3 input source on the TV using the INPUT button on the TV. 2 No separated audio connection is necessary. HDMI supports both audio and video. 2. How to connect 1 Connect the HDMI output of the DVD to the DVD player's manual for operating instructions. 25 How to use I Refer to the...
Owner's Manual (English)
Page 28
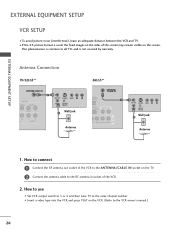
... R ANT OUT S-VIDEO VIDEO L R ANT IN OUTPUT SWITCH Wall Jack 2 Antenna 1. This phenomenon is common to all TVs and is used; I Set VCR output switch to 3 or 4 and then tune TV to the VCR owner's manual.) 26 the fixed images on the sides of the VCR. 2. How to use I Insert a video tape into the... is not covered by warranty. How to connect 1 Connect the RF antenna out socket of the VCR to the ANTENNA/CABLE IN socket on the TV. 2 Connect the antenna cable to the RF antenna in socket of the screen may remain visible on the VCR. (Refer to the same channel number...
... R ANT OUT S-VIDEO VIDEO L R ANT IN OUTPUT SWITCH Wall Jack 2 Antenna 1. This phenomenon is common to all TVs and is used; I Set VCR output switch to 3 or 4 and then tune TV to the VCR owner's manual.) 26 the fixed images on the sides of the VCR. 2. How to use I Insert a video tape into the... is not covered by warranty. How to connect 1 Connect the RF antenna out socket of the VCR to the ANTENNA/CABLE IN socket on the TV. 2 Connect the antenna cable to the RF antenna in socket of the screen may remain visible on the VCR. (Refer to the same channel number...

Owner's Manual (English)
Page 29
... the jack colors (Video = yellow, Audio Left = white, and Audio Right = red) 2. How to use I Select the A V or A V 1 input source on the TV using the INPUT button on the TV. ! NOTE G If you have a mono VCR, connect the audio cable from the VCR to connect 1 Connect the AUDIO/VIDEO jacks between... AUDIO OUT OPTICAL ANTENNA/ CABLE IN RS-232C IN AUDIO OUT (CONTROL & SERVICE) R AUDIO S-VIDEO VIDEO L(MONO) AUDIO R 1. I If connected to the VCR owner's manual.) I Insert a video tape into the VCR and press PLAY on the VCR. (Refer to AV IN2, select AV2 input source on the remote control.
... the jack colors (Video = yellow, Audio Left = white, and Audio Right = red) 2. How to use I Select the A V or A V 1 input source on the TV using the INPUT button on the TV. ! NOTE G If you have a mono VCR, connect the audio cable from the VCR to connect 1 Connect the AUDIO/VIDEO jacks between... AUDIO OUT OPTICAL ANTENNA/ CABLE IN RS-232C IN AUDIO OUT (CONTROL & SERVICE) R AUDIO S-VIDEO VIDEO L(MONO) AUDIO R 1. I If connected to the VCR owner's manual.) I Insert a video tape into the VCR and press PLAY on the VCR. (Refer to AV IN2, select AV2 input source on the remote control.

Owner's Manual (English)
Page 30
... will work. 28 How to connect 1 Connect the S-VIDEO output of the VCR to the S -VIDEO input on the TV. 2 Connect the audio outputs of the VCR to the VCR owner's manual.) I Insert a video tape into the VCR and press PLAY on the VCR. (Refer to the AUDIO input jacks on the...
... will work. 28 How to connect 1 Connect the S-VIDEO output of the VCR to the S -VIDEO input on the TV. 2 Connect the audio outputs of the VCR to the VCR owner's manual.) I Insert a video tape into the VCR and press PLAY on the VCR. (Refer to the AUDIO input jacks on the...

Owner's Manual (English)
Page 32
...S-VIDEO VIDEO L(MONO) AUDIO R 1 Digital L R AUDIO 1. See the external audio equipment instruction manual for operation. ! How to connect 1 Connect one end of the optical or coaxial cable to the TV's OPTICAL port of DIGITAL AUDIO OUT. 2 Connect the other end of the optical cable to external audio... audio equipments, such as amplifiers or speakers, you can turn the TV speakers off in the menu. (G p.65) CAUTION G Do not look into the optical output port. See the external audio equipment instruction manual for operation. NOTE G When connecting with ACP(Audio Copy Protection)...
...S-VIDEO VIDEO L(MONO) AUDIO R 1 Digital L R AUDIO 1. See the external audio equipment instruction manual for operation. ! How to connect 1 Connect one end of the optical or coaxial cable to the TV's OPTICAL port of DIGITAL AUDIO OUT. 2 Connect the other end of the optical cable to external audio... audio equipments, such as amplifiers or speakers, you can turn the TV speakers off in the menu. (G p.65) CAUTION G Do not look into the optical output port. See the external audio equipment instruction manual for operation. NOTE G When connecting with ACP(Audio Copy Protection)...

Owner's Manual (English)
Page 37
... To Set Yes No 1 MENU 2 ENTER 3 ENTER Select PICTURE. Select Screen (RGB-PC). After adjustment, if the image is still not correct, try using the manual settings or a different resolution or refresh rate on the PC. PICTURE Move Enter E • Contrast 50 • Brightness 50 • Sharpness 50 • Color 50...
... To Set Yes No 1 MENU 2 ENTER 3 ENTER Select PICTURE. Select Screen (RGB-PC). After adjustment, if the image is still not correct, try using the manual settings or a different resolution or refresh rate on the PC. PICTURE Move Enter E • Contrast 50 • Brightness 50 • Sharpness 50 • Color 50...


