
Owners Manual
Page 2
... and Button Description-------- 6 How to Use the Joystick Button Input Connector --Moving and Lifting the Monitor 8 --Setting up the Monitor set 9 Assembling the Stand Mounting on a table Mounting on a wall USING THE MONITOR SET------- 14 --Connecting to a PC 14 D-SUB connection HDMI connection --Connecting to AV Devices 15 HDMI connection --Connecting Peripherals...
... and Button Description-------- 6 How to Use the Joystick Button Input Connector --Moving and Lifting the Monitor 8 --Setting up the Monitor set 9 Assembling the Stand Mounting on a table Mounting on a wall USING THE MONITOR SET------- 14 --Connecting to a PC 14 D-SUB connection HDMI connection --Connecting to AV Devices 15 HDMI connection --Connecting Peripherals...

Owners Manual
Page 11
There is risk of the monitor to turn on the monitor. CAUTION yyUnplug the power cord prior to a wall outlet. or ENEGNLGISH 11 Mounting on a table 1 Lift and tilt the Monitor set into its upright position on the bottom of electric shock. 2 Connect the AC-DC Adapter and Power Cord to moving or installing the monitor. Leave a 100 mm (3.94 inches) (minimum) space from the wall for proper ventilation. 100 mm (3.94 inches) 100 mm (3.94 inches) 100 mm (3.94 inches) 100 mm (3.94 inches) 3 Press the joystick button on a table.
There is risk of the monitor to turn on the monitor. CAUTION yyUnplug the power cord prior to a wall outlet. or ENEGNLGISH 11 Mounting on a table 1 Lift and tilt the Monitor set into its upright position on the bottom of electric shock. 2 Connect the AC-DC Adapter and Power Cord to moving or installing the monitor. Leave a 100 mm (3.94 inches) (minimum) space from the wall for proper ventilation. 100 mm (3.94 inches) 100 mm (3.94 inches) 100 mm (3.94 inches) 100 mm (3.94 inches) 3 Press the joystick button on a table.
Owners Manual
Page 13
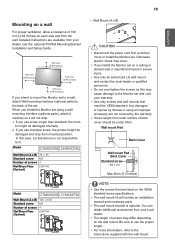
... x 75 Standard screw M4 Number of screws 4 Wall Mount Plate (Optional) LSW149 Model 27MK600M 27MK60TM Wall Mount (A x B) 100 x 100 Standard screw M4 Number of screws 4 Wall Mount Plate (Optional) LSW149 13 yyWall Mount (A x B) AB CAUTION yyDisconnect the power cord first, and then move or install the Monitor set ....) 100 mm (3.94 inches) If you install the Monitor set on the wall mount. yyDo not over tighten the screws as this case, LG Electronics is optional. Wall mount Pad Back Cover Wall mount Pad Back Cover Standard screw Max.8mm (0.3 inches) NOTE yyUse the screws that ...
... x 75 Standard screw M4 Number of screws 4 Wall Mount Plate (Optional) LSW149 Model 27MK600M 27MK60TM Wall Mount (A x B) 100 x 100 Standard screw M4 Number of screws 4 Wall Mount Plate (Optional) LSW149 13 yyWall Mount (A x B) AB CAUTION yyDisconnect the power cord first, and then move or install the Monitor set ....) 100 mm (3.94 inches) If you install the Monitor set on the wall mount. yyDo not over tighten the screws as this case, LG Electronics is optional. Wall mount Pad Back Cover Wall mount Pad Back Cover Standard screw Max.8mm (0.3 inches) NOTE yyUse the screws that ...


